Table of Contents >> Show >> Hide
- What Is the Cube Pattern Within a Rubik’s Cube?
- What You Need Before You Start
- Rubik’s Cube Notation You Need to Know
- How to Create the Cube in a Cube Pattern
- What the Finished Pattern Should Look Like
- How to Undo the Pattern
- Common Mistakes When Making a Cube Pattern
- Why the Cube in a Cube Pattern Is Great for Beginners
- Tips for Learning the Pattern Faster
- Other Rubik’s Cube Patterns to Try After This One
- Final Thoughts
- Experience: What It’s Really Like to Learn the Cube in a Cube Pattern
Some people solve a Rubik’s Cube for bragging rights. Some solve it for relaxation. And some of us do it because making a smaller-looking cube appear inside a bigger cube is the kind of harmless sorcery that keeps life interesting. If you’ve ever wanted to create that clever visual illusion, you’re looking for one of the most beloved Rubik’s Cube patterns: the cube in a cube.
This pattern does not require you to invent a new math theorem, summon a speedcuber, or become the chosen one. It does require a solved 3×3 Rubik’s Cube, a little patience, and the willingness to follow an algorithm without freelancing halfway through. In this guide, you’ll learn exactly how to create a cube pattern within a Rubik’s Cube, how the notation works, how to fix common mistakes, and why this pattern is such a crowd-pleaser for beginners and experienced cubers alike.
What Is the Cube Pattern Within a Rubik’s Cube?
When people search for a cube pattern within a Rubik’s Cube, they usually mean the classic cube in a cube design. After a specific sequence of twists, the stickers line up in a way that makes it look like there is a smaller cube sitting inside the larger one. It is not magic. It is not a secret factory setting. It is simply a legal pattern created by a carefully chosen move sequence.
That’s part of what makes it so satisfying. The standard 3×3 Rubik’s Cube already looks like a geometric object designed by someone who clearly had opinions about symmetry. This pattern pushes that even further. Instead of solving for six solid faces, you solve for a deliberate illusion. It is neat, a little flashy, and much easier to show off than explaining your taxes.
What You Need Before You Start
1. A Solved 3×3 Rubik’s Cube
This pattern should be started from a fully solved cube. If your cube is scrambled, solve it first. Pattern algorithms are built to transform a solved cube into a display design. Starting from chaos will not give you a stylish little cube. It will give you a very personal abstract art project.
2. A Basic Understanding of Cube Faces
You do not need advanced speedcubing knowledge, but you should understand that each move refers to a face of the cube: front, back, up, down, left, and right. The center pieces act as your reference points, so if the blue center is on the front, that face is still the front even as the surrounding pieces move around.
3. A Cube That Turns Smoothly
Can you make this pattern on an old cube that sounds like a drawer full of forks? Technically, yes. Will it feel graceful? Absolutely not. A smoother-turning cube makes pattern practice much more pleasant, especially when you are learning how to execute turns cleanly and keep your orientation consistent.
Rubik’s Cube Notation You Need to Know
Before you can create any Rubik’s Cube pattern, you need to read the move notation correctly. The good news is that the basics are simple:
- F = turn the front face clockwise
- B = turn the back face clockwise
- U = turn the up face clockwise
- D = turn the down face clockwise
- L = turn the left face clockwise
- R = turn the right face clockwise
Now for the symbols that make new cubers squint suspiciously:
- ‘ means turn that face counterclockwise
- 2 means turn that face 180 degrees
One important detail: clockwise and counterclockwise are judged as if you are looking directly at that face. So F means the front face turns clockwise from your point of view while facing the front. This is where many beginners go wrong. The cube is not betraying you. The notation is just very literal.
How to Create the Cube in a Cube Pattern
Here is the algorithm you need to perform from a solved 3×3 cube:
F L F U' R U F2 L2 U' L' B D' B' L2 U
That is the full move sequence. Yes, it looks like a keyboard had a dramatic moment. No, it is not as hard as it seems once you break it into smaller chunks.
Try It in Three Easy Chunks
Instead of memorizing the whole algorithm in one gulp, split it into these parts:
F L F U' R UF2 L2 U' L'B D' B' L2 U
This chunking method makes the pattern much easier to learn. It also reduces the chance that you will forget where you are and start improvising. Improvising is great in jazz, less great when your cube suddenly looks like it lost a fight.
Step-by-Step Execution Tips
First, hold the cube in a comfortable position and keep that orientation consistent while you do the algorithm. You do not need a special color facing front, but once you choose a front face, stick with it.
Second, do each move slowly and cleanly. If you are learning the pattern for the first time, speed is not your friend. Accuracy is your friend. Speed is that chaotic cousin who shows up later and knocks things over.
Third, after every few moves, pause for half a second and confirm you are still reading the notation correctly. Most failed attempts come from one of three issues: turning the wrong face, turning the right face the wrong direction, or accidentally rotating the whole cube in your hands and then continuing like nothing happened.
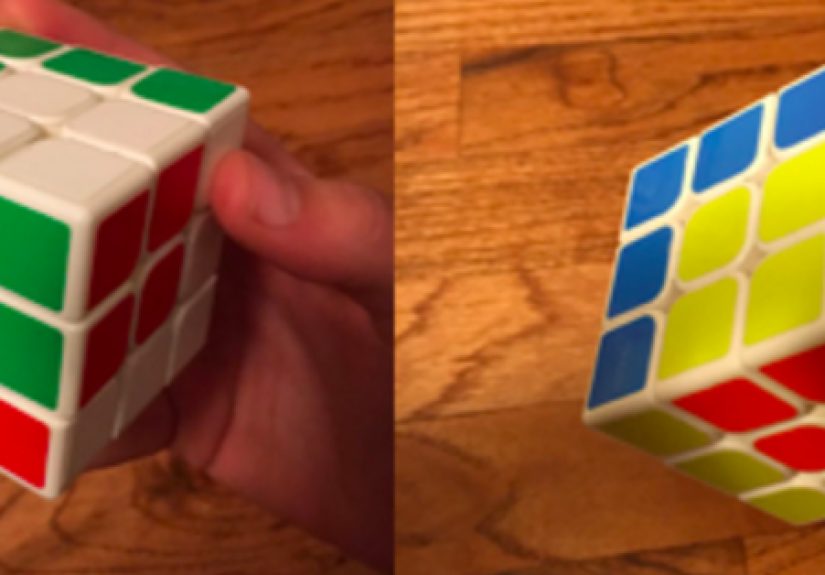
What the Finished Pattern Should Look Like
Once the algorithm is complete, the stickers should create the illusion of a smaller cube nested inside the larger cube. The exact colors will depend on your cube’s color scheme, but the visual effect should be unmistakable. You should see a central “inner cube” shape framed by contrasting colors around it.
This is why the pattern is so popular. It looks much more complicated than it actually is. If you pull this off in front of someone who only knows the cube as “that impossible thing from a junk drawer,” you will immediately seem far more powerful than you really are.
How to Undo the Pattern
One of the nicest things about legal Rubik’s Cube patterns is that they are reversible. To return your cube to solved state, you can either solve it normally or perform the inverse algorithm.
Here is the inverse for the cube in a cube pattern:
U' L2 B D B' L U L2 F2 U' R' U F' L' F'
If that looks intimidating, remember the general rule: to undo an algorithm, reverse the order of the moves and invert each one. Turns with a 2 stay the same, because a 180-degree turn is its own opposite.
Common Mistakes When Making a Cube Pattern
Turning the Wrong Direction
This is the classic beginner mistake. The apostrophe matters. U and U' are not close enough. One creates a pattern; the other creates regret.
Rotating the Whole Cube Mid-Algorithm
If you rotate the cube in your hands between moves and do not mentally reset your front, back, left, and right faces, the algorithm will no longer mean what you think it means. Keep your orientation steady.
Starting From a Scrambled Cube
This pattern is designed to begin from solved state. A scrambled cube plus a display algorithm equals a mess that may still be mathematically beautiful, but is emotionally unhelpful.
Rushing Through Double Turns
Moves like F2 and L2 should be deliberate. Many cubers accidentally do a quarter-turn instead of a half-turn, especially when learning from memory. If the pattern looks “almost right,” this is often the culprit.
Why the Cube in a Cube Pattern Is Great for Beginners
If you are new to Rubik’s Cube algorithms, this pattern is a fantastic bridge between solving and style. It teaches several useful habits at once:
- how to read notation confidently
- how to keep cube orientation consistent
- how to memorize algorithms in chunks
- how to execute turns accurately instead of randomly
It also gives you a reward that feels immediate. Learning a full solve method can be incredibly satisfying, but it also takes time. A good pattern gives you a win in one sitting. You follow a sequence, and suddenly the cube looks like it belongs in a puzzle museum or on the desk of a movie villain with excellent taste.
Tips for Learning the Pattern Faster
Say the Moves Out Loud
Reading and speaking the algorithm helps many people remember it faster. A quiet little “F, L, F, U-prime…” might feel silly, but it works.
Use Rhythm
Cube algorithms often become easier when they feel like a rhythm instead of a random string. Once your hands start to recognize the flow, the pattern becomes much less intimidating.
Practice the Same Algorithm Three Times in a Row
Do it once to learn, once to correct mistakes, and once to make it feel smooth. That third attempt is usually where the magic happens and your hands stop acting like they just met the cube five minutes ago.
Learn the Inverse Too
Knowing how to undo the pattern gives you confidence. It means you can experiment without fear. The cube is not ruined. It is just temporarily artistic.
Other Rubik’s Cube Patterns to Try After This One
Once you master the cube in a cube pattern, you can branch out into other classic designs. Popular next steps include:
- Checkerboard for a bold, high-contrast look
- Cross for a clean geometric display
- Superflip if you want a famous challenge
- Cube in a Cube in a Cube if you enjoy making your brain work overtime
The fun part is that patterns give the Rubik’s Cube a second life. It stops being only a puzzle to solve and becomes a design toy, a conversation piece, and occasionally a very nerdy flex.
Final Thoughts
Learning how to create a cube pattern within a Rubik’s Cube is one of the best ways to make the puzzle feel fresh again. The cube in a cube pattern is visually clever, beginner-friendly, and just complex enough to feel impressive without requiring an existential crisis. Start with a solved 3×3 cube, use the correct notation, take the algorithm slowly, and keep your cube orientation steady.
Once you nail it, you will understand why so many cubers love pattern-making. It turns the Rubik’s Cube from a test of problem-solving into a small piece of kinetic art. And honestly, that is part of the charm. One minute you are twisting plastic. The next minute you are admiring a tiny fake cube trapped inside a real cube like you just pulled off a geometry magic trick.
Experience: What It’s Really Like to Learn the Cube in a Cube Pattern
The experience of learning the cube in a cube pattern is surprisingly different from learning how to solve the cube from scratch. Solving often feels like work before it feels fun. Patterns, on the other hand, feel fun almost immediately. You start with a solved cube, which already removes a lot of pressure. There is no panic about whether you will ever get back to normal. You are beginning from order, not chaos, and that makes the whole process feel more playful.
For many people, the first attempt is a mix of confidence and confusion. The first few moves feel easy. Then the algorithm gets longer, and somewhere around the middle, your brain starts asking difficult questions like, “Wait, was that L or L'?” This is the exact moment when new cubers usually discover that cube notation is not hard, but it does demand attention. One tiny mistake can completely change the result. That can be frustrating for about thirty seconds, and then it becomes part of the appeal.
There is also a very specific kind of satisfaction that comes from watching the pattern develop. Unlike a full solve, where the progress can feel abstract if you do not know what you are looking for, a display pattern gives visible payoff. You can actually see the cube changing into something intentional. It feels less like repairing disorder and more like building a design. That visual feedback keeps people engaged, especially beginners who might get bored memorizing longer solve methods.
Another common experience is realizing that the quality of the cube matters more than expected. On a stiff, old cube, the pattern can feel clunky and awkward. On a smoother cube, the same moves suddenly feel elegant. That difference often surprises people. It is not that you need tournament gear to enjoy pattern-making, but a cube that turns well makes practice feel much less like arm wrestling with plastic.
There is also the social side of it. The cube in a cube pattern is a wonderful “show someone nearby” trick. Even people who have no interest in cubing tend to react well to it because the result is so easy to understand. A fully solved cube is impressive, but to non-cubers it can also look ordinary. A smaller cube illusion inside the bigger cube looks unusual right away. It gets that satisfying reaction of, “Wait, how did you do that?” which is honestly half the fun.
Over time, this pattern often becomes a gateway. A lot of cubers learn one display pattern just for fun, then immediately want another one. Then another. Before long, they are keeping short algorithms in their heads, comparing pattern difficulty, and turning the cube into a hobby rather than a one-time challenge. That is part of the charm of the Rubik’s Cube: the deeper you go, the more it rewards curiosity.
In the end, learning the cube in a cube pattern feels like a small win with a big visual payoff. It is approachable, memorable, and weirdly calming once your hands understand the rhythm. It teaches accuracy without feeling like homework, and it reminds you that the cube is not just a puzzle to conquer. Sometimes it is also a toy, a design object, and a tiny stage for geometric drama.


