Table of Contents >> Show >> Hide
- Why a DIY Photography Lightbox Works
- What You Need Before You Start
- How to Build a Cheap Photography Lightbox in 12 Steps
- Step 1: Choose a box that is bigger than your subject
- Step 2: Cut out the front opening
- Step 3: Mark and cut the side windows
- Step 4: Reinforce the frame
- Step 5: Create the seamless white background
- Step 6: Tape the sweep neatly and keep it wrinkle-free
- Step 7: Add diffusion panels over the windows
- Step 8: Place the lightbox on a stable surface
- Step 9: Position two matching lights on either side
- Step 10: Add fill with a bounce card or reflector
- Step 11: Style the subject and watch for reflections
- Step 12: Dial in your camera or phone settings and test
- Extra Tips for Better DIY Product Photography
- Common DIY Lightbox Mistakes to Avoid
- Is an Inexpensive Photography Lightbox Worth It?
- Experience: What Building a Cheap Lightbox Teaches You About Photography
- SEO Tags
If your product photos currently look like they were taken in a cave during a power outage, take heart: you do not need a fancy studio to fix them. A DIY photography lightbox can give you soft, even light, cleaner backgrounds, and far fewer weird shadows for the price of a takeout dinner and a little cardboard surgery. That is the magic of a homemade lightbox. It is simple, cheap, and surprisingly effective for small product photography, jewelry shots, crafts, collectibles, cosmetics, and all the other little things that deserve better than “blurry photo on the kitchen counter.”
This guide walks you through how to build an inexpensive photography lightbox in 12 practical steps, with tips for better lighting, better camera settings, and better results. The goal is not to make your setup look expensive. The goal is to make your photos look expensive. Big difference.
Why a DIY Photography Lightbox Works
A budget photography lightbox works because it solves three common problems at once: harsh light, distracting backgrounds, and uneven shadows. By surrounding a small object with white surfaces and diffused light, the box softens contrast and makes details easier to see. In plain English, your product stops looking like it is being interrogated under a single overhead bulb.
The white interior bounces light around the subject, the tissue or tracing-paper panels diffuse the light, and the curved background creates that clean “floating in space” look often used in e-commerce product photography. The result is a more polished image without buying a full studio kit, large softboxes, or a backdrop stand that will live in your closet until the end of time.
What You Need Before You Start
- One sturdy cardboard box
- White poster board or thick matte white paper
- Tissue paper, tracing paper, or another thin white diffuser
- Scissors or a box cutter
- Ruler and pencil
- Clear packing tape or masking tape
- Two or three matching lamps or LED lights
- A flat table or desk
- Optional: white foam board, aluminum-foil reflector, tripod, phone stand, clips
If you are buying lights instead of borrowing desk lamps, choose LEDs that stay cool and match each other in color temperature. That way your white background will stay white instead of turning into a suspicious shade of yellow soup.
How to Build a Cheap Photography Lightbox in 12 Steps
Step 1: Choose a box that is bigger than your subject
The box should be large enough to hold your subject with some breathing room around it. A cramped box makes lighting harder and reflections uglier. If you plan to photograph mugs, candles, skincare bottles, or handmade products, a medium moving box usually works well. If you only shoot jewelry or small crafts, a smaller box is fine.
A good rule is to leave several inches between the subject and every wall of the box. That extra space helps the light spread more evenly and reduces those annoying “why is one side glowing and the other side doomed?” problems.
Step 2: Cut out the front opening
Set the box so one side becomes the front. Remove most or all of that panel to create the shooting window. This is where your camera or phone will point into the lightbox. Keep the edges neat, because jagged cardboard is not a design choice.
If the box feels flimsy after the cut, do not panic. You can reinforce it with tape in the next step. Cardboard is humble, but with enough tape, it develops confidence.
Step 3: Mark and cut the side windows
On the left side, right side, and optionally the top, draw large rectangles, leaving a border of about 2 inches around the edges for strength. Cut those panels out carefully. These windows are where your light will shine through.
The bigger the windows, the softer and broader your light can become once you add diffusion. Just do not cut so much that the box collapses into modern art.
Step 4: Reinforce the frame
Use clear packing tape to strengthen the corners, edges, and any weak points. This matters more than people think. A wobbly lightbox is not just annoying; it shifts your background, changes your shadows, and makes repeat shots harder.
If you plan to use the box often, add tape to the outer edges before it starts tearing. Think of this as preventive maintenance for a cardboard employee working overtime.
Step 5: Create the seamless white background
Place a sheet of white poster board or thick matte paper inside the box so it curves gently from the back wall down to the floor. Do not fold it. Do not crease it. The curve is what creates a seamless sweep, also called an infinity background.
This is one of the most important parts of DIY product photography. A curved white background helps isolate the object and makes editing easier later. Matte material is best because glossy paper reflects light and creates bright hotspots. Your background should disappear, not audition for the lead role.
Step 6: Tape the sweep neatly and keep it wrinkle-free
Secure the top and bottom edges of the poster board with tape on the outside or hidden edges. Keep the visible area clean and smooth. If the paper buckles, your background will show waves and lines, which is less “professional studio” and more “science fair survived a storm.”
If your paper gets dirty or bent, replace it. Fortunately, poster board is cheap, and this is not the place to become emotionally attached to office supplies.
Step 7: Add diffusion panels over the windows
Tape white tissue paper, tracing paper, or thin white fabric over the cut-out windows. These panels diffuse the light before it hits your subject, turning harsh beams into soft, flattering illumination. In other words, they help your object stop looking like it is lit by a prison yard spotlight.
Make sure the diffuser covers each window completely and stays taut. Double layers can soften light more, but too many layers may dim it too much. Test one layer first, then add more only if needed.
Step 8: Place the lightbox on a stable surface
Set your lightbox on a sturdy table at a comfortable working height. You want enough room to place lights on both sides and enough space in front for your camera or phone. If you are using window light instead of lamps, place the lightbox near a bright window with indirect light.
Do not mix ten random light sources from around the room. Overhead lights, warm lamps, daylight from a window, and your microwave display all fighting at once is how white objects become beige for no good reason.
Step 9: Position two matching lights on either side
Place one light on the left and one on the right, aimed through the diffusion panels. Keep them at roughly the same distance from the box to start. If you have a third light, place it above the box or behind the subject for extra separation, but begin simple. Two lights can do a lot when they are balanced properly.
Daylight-balanced LEDs are a smart choice for a homemade lightbox because they stay cooler and make color easier to manage. If you use regular household lamps, match the bulbs so one side is not cool white while the other is “cozy restaurant at sunset.”
Step 10: Add fill with a bounce card or reflector
If one side still looks dark, place a white foam board, poster board, or homemade reflector just outside the frame to bounce light back onto the subject. You can make a cheap reflector with cardboard and aluminum foil, but even plain white board often gives a softer, more natural fill.
This small step can improve your lighting more than buying another bargain-bin lamp. Light control beats light chaos every time.
Step 11: Style the subject and watch for reflections
Put your subject in the middle of the lightbox and rotate it until the best side faces the camera. Clean it first. Seriously. Dust, fingerprints, smudges, and tiny scratches that are invisible in real life will suddenly become the star of the show in a close-up product photo.
If you are shooting reflective objects like jewelry, glass, metal, or glossy packaging, pay extra attention to bright hotspots and strange reflections. Shift the object slightly, move the lights back a little, or increase diffusion. Sometimes a half-inch adjustment saves you twenty minutes of editing and a dramatic monologue.
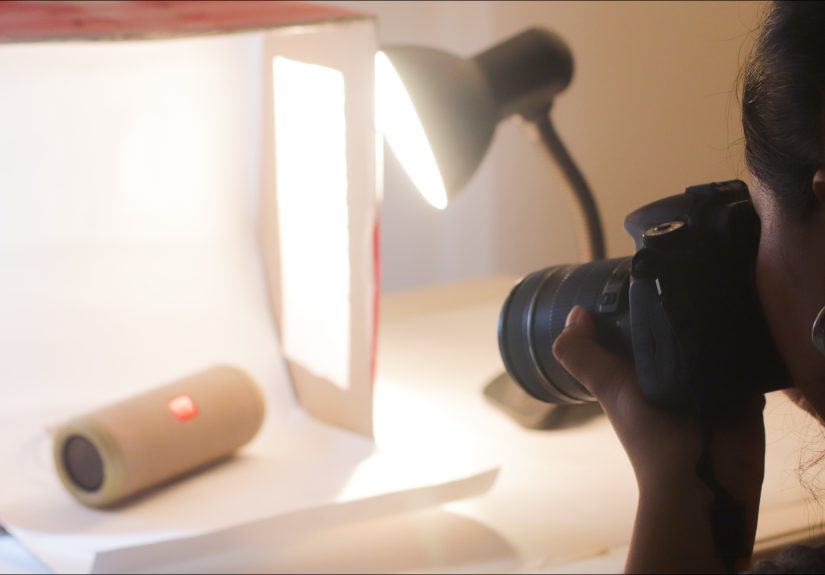
Step 12: Dial in your camera or phone settings and test
Now take a few test shots. If you are using a camera, start with a low ISO, turn off the flash, and use a tripod if possible. An aperture around f/8 is a strong starting point for many small products because it helps keep more of the object sharp. If the image is too dark, slow the shutter speed before pushing ISO too high.
Pay attention to white balance. If your whites look yellow, blue, or vaguely haunted, adjust the white balance or use a gray card for better color accuracy. Smartphone users can also improve results by tapping to focus, lowering exposure slightly if highlights look blown out, and using a stand or tripod for stability.
Extra Tips for Better DIY Product Photography
Use side light for more depth
Front lighting is easy, but side lighting often gives small objects more texture and shape. If your photos look flat, move one light slightly forward or backward and compare the results. You want soft shadows, not no shadows at all.
Keep your background and props simple
If you are using the lightbox for online store photos, keep the focus on the item. A clean white background usually works best. If you want a lifestyle feel, you can add one or two relevant props, but do not turn a candle photo into an archaeological dig full of unrelated objects.
Choose lights with decent color quality
If you upgrade your lamps later, look for LEDs with a high CRI. Better color rendering means more accurate-looking products, which matters a lot when customers expect “dusty rose” and receive “mystery mauve” instead.
Use a tripod whenever possible
A tripod makes it easier to keep framing consistent, use lower ISO, and shoot slower shutter speeds without blur. It also helps if you photograph several products in a row and want a repeatable setup. In product photography, consistency is not boring. Consistency pays rent.
Common DIY Lightbox Mistakes to Avoid
- Using glossy paper for the background: it reflects too much light.
- Mixing bulb colors: it creates weird color casts.
- Putting lights too close: it can create hotspots and uneven exposure.
- Skipping product cleaning: the camera sees every crumb of betrayal.
- Using direct flash: it usually makes small products look harsh and flat.
- Overstuffing props: your hero is the product, not the decorative fern.
Is an Inexpensive Photography Lightbox Worth It?
Absolutely, especially if you photograph small items for Etsy, eBay, Shopify, social media, or a personal portfolio. A homemade photography lightbox is one of the most cost-effective upgrades a beginner can make. It improves lighting, background control, and shooting consistency without forcing you into expensive gear shopping before you have even mastered the basics.
Will it replace a full commercial studio? No. But for small product photography, content creation, and learning how light behaves, it is a fantastic place to start. It is cheap, practical, and easy to improve over time. That is the rare DIY project that saves money and makes you look more competent online. A true unicorn.
Experience: What Building a Cheap Lightbox Teaches You About Photography
The first thing a budget lightbox teaches you is that great photography is not really about expensive equipment. It is about controlling light. That sounds like something printed on a fancy poster in a studio lobby, but it becomes hilariously obvious the first time you put the same product into three different setups and get three completely different results. On a dark tabletop under a ceiling bulb, the object looks tired. Inside a simple DIY lightbox, it suddenly looks ready for a catalog. Same object. Same camera. Entirely different light.
Another useful lesson is that soft light is often more forgiving than people expect. Beginners usually think they need brighter light, but what they really need is better-shaped light. A homemade lightbox proves that point fast. Even cheap desk lamps can produce cleaner images once the light passes through tissue paper or tracing paper and bounces around white surfaces. The setup is humble, but the effect can be surprisingly polished. It is the visual equivalent of ironing your shirt before a job interview.
Building your own lightbox also teaches patience. Not spiritual-enlightenment patience. More like “why is this tiny bottle still reflecting my entire living room?” patience. Small reflective products are notorious for revealing everything: lamps, windows, hands, camera lenses, and your questionable posture. But that struggle is useful. It trains your eye to notice glare, hotspots, uneven exposure, and distracting reflections. Once you learn to solve those in a lightbox, you become better at seeing light everywhere else too.
There is also something oddly empowering about making decent product photos with basic supplies. Cardboard, poster board, tape, and two lights do not sound glamorous, yet they can dramatically improve online listings, portfolio images, and social posts. That matters if you are a small business owner, crafter, reseller, or hobby photographer trying to make your work look more professional without spending half your budget on gear. The low cost removes some pressure. You can experiment more freely because if a sheet of poster board gets ruined, you replace it and move on. No heartbreak. No insurance claim. No sad violin.
Perhaps the biggest experience-based takeaway is that repeatability matters. Once you have a lightbox that works, you can return to it again and again. Photograph one candle today, one mug tomorrow, and one bracelet next week, and your images can still look cohesive. That consistency is incredibly valuable for branding. Customers may not consciously say, “Ah yes, I admire the disciplined visual language of this online shop,” but they absolutely notice when photos feel clean, reliable, and professionally presented.
Finally, a cheap lightbox reminds you that limitations can be helpful. When you do not have endless gear options, you pay closer attention to placement, angle, distance, color, and texture. You learn faster because the variables are simpler. In that sense, building an inexpensive photography lightbox is not just a DIY project. It is a mini photography course made out of cardboard. And honestly, that is a pretty good return on investment.


