Table of Contents >> Show >> Hide
- Before You Start: What Makes a Crab Look Like a Crab?
- Supplies You Need
- How to Draw a Crab in 9 Easy Steps
- Step 1: Draw a Light Center Guideline
- Step 2: Sketch the Main Body Shape
- Step 3: Add the Eyes
- Step 4: Draw the Front Arms
- Step 5: Draw the Claws
- Step 6: Add Three Walking Legs on Each Side
- Step 7: Add the Final Pair of Lower Legs
- Step 8: Clean Up the Sketch and Add Details
- Step 9: Color the Crab and Finish the Scene
- Easy Crab Drawing Tips for Beginners
- Common Mistakes When Drawing a Crab
- How to Make Your Crab Drawing More Realistic
- How to Make Your Crab Drawing Cute
- Color Ideas for a Crab Drawing
- Practice Ideas After You Finish
- Experience Notes: What I Learned While Drawing Crabs
- Conclusion
Crabs are basically the comedians of the shoreline: they walk sideways, wave dramatic claws, wear their skeletons on the outside, and somehow still look adorable in a sketchbook. If you want to learn how to draw a crab, the good news is that the whole creature can be built from simple shapes: an oval body, two bold claws, round eyes, and a neat set of jointed legs.
This beginner-friendly crab drawing tutorial breaks the process into nine clear steps. You do not need fancy art supplies, a marine biology degree, or the ability to pronounce “crustacean” before coffee. You only need paper, a pencil, an eraser, and a willingness to let your first crab look a little confused. That is part of the charm.
Before You Start: What Makes a Crab Look Like a Crab?
A crab has a wide shell, known as a carapace, two front claws, and multiple jointed legs. Most simple crab drawings exaggerate these features so the animal is instantly recognizable. For a cute cartoon crab, you can make the eyes big and the claws rounded. For a more realistic crab, keep the shell flatter, the legs thinner, and the claws more angular.
The trick is symmetry. Crabs look balanced because the body sits in the center while the claws and legs spread outward on both sides. Do not worry about making every leg mathematically perfect. Nature is not using a ruler either.
Supplies You Need
- Pencil for sketching light guidelines
- Eraser for cleaning overlapping lines
- Black pen or marker for outlining
- Drawing paper, sketchbook paper, or printer paper
- Colored pencils, crayons, or markers
- Optional: ruler for light center guidelines
How to Draw a Crab in 9 Easy Steps
Step 1: Draw a Light Center Guideline
Begin by drawing a very light vertical line down the center of your page. This line helps you keep the crab balanced. Then add a light horizontal guideline across the middle. Think of these as training wheels for your drawing. They will disappear later, but for now they keep your crab from looking like it got caught in a beachside windstorm.
Place the crab slightly below the center of the paper if you want room for a beach background, bubbles, seaweed, or a tiny sandcastle. A little planning now saves you from squeezing scenery into the corners later.
Step 2: Sketch the Main Body Shape
Draw a wide oval or rounded rectangle for the crab’s body. The top can be slightly curved, and the bottom can be flatter. This shape represents the crab’s shell. If you are drawing a cartoon crab, make the body smooth and friendly. If you want a more realistic crab, add subtle points or small bumps along the edges.
Keep the lines light. The first body shape is only the foundation. You can adjust the width, height, or curve before adding darker outlines.
Step 3: Add the Eyes
Draw two short stalks rising from the top of the body. At the end of each stalk, sketch a circle for the eye. Add a smaller circle inside each eye for the pupil, then leave a tiny white highlight if you plan to color the crab later.
Eye placement changes the personality of your crab. Eyes close together make it look curious. Eyes far apart make it look cheerful and cartoonish. Tilt the pupils slightly inward for a playful expression, as if your crab just spotted a snack and is trying to act casual.
Step 4: Draw the Front Arms
On each side of the body, draw a curved arm reaching upward and outward. These arms connect the body to the claws. Use two curved lines for each arm so they look thick enough to support the claws. The arms should mirror each other, but they do not have to be identical.
For a cute crab drawing, keep the arms rounded. For a stronger, more realistic look, add small bends to show the joints. Crabs have segmented limbs, so a few angles can make your drawing feel more believable.
Step 5: Draw the Claws
Now give your crab its star accessories: the claws. At the end of each arm, draw a large oval or teardrop shape. Then cut a V-shaped opening into each claw to create the pincer. Round the tips so the claws look friendly rather than terrifying. Unless, of course, your crab is guarding buried treasure. In that case, a little drama is allowed.
A helpful method is to draw the claw as a mitten first, then add the split. The upper part of the claw can be slightly larger than the lower part. This gives the claw a natural pinching shape.
Step 6: Add Three Walking Legs on Each Side
Draw three legs on the left side of the body and three on the right. Start each leg near the lower side of the shell. Use bent lines or narrow tube shapes to show the joints. Each leg should angle outward, then bend downward or sideways.
Beginners often draw crab legs as straight sticks, but jointed legs look much better. Try using a simple “zigzag tube” shape: out, down, out again. The front legs can point slightly upward, the middle legs can stretch outward, and the back legs can angle downward. This creates movement and prevents the crab from looking like a table with opinions.
Step 7: Add the Final Pair of Lower Legs
Add one smaller lower leg on each side near the bottom of the shell. These can curve gently downward or tuck behind the body. Some crab species have rear legs that look different from the walking legs, especially swimming crabs, but for a simple drawing, you can keep them similar.
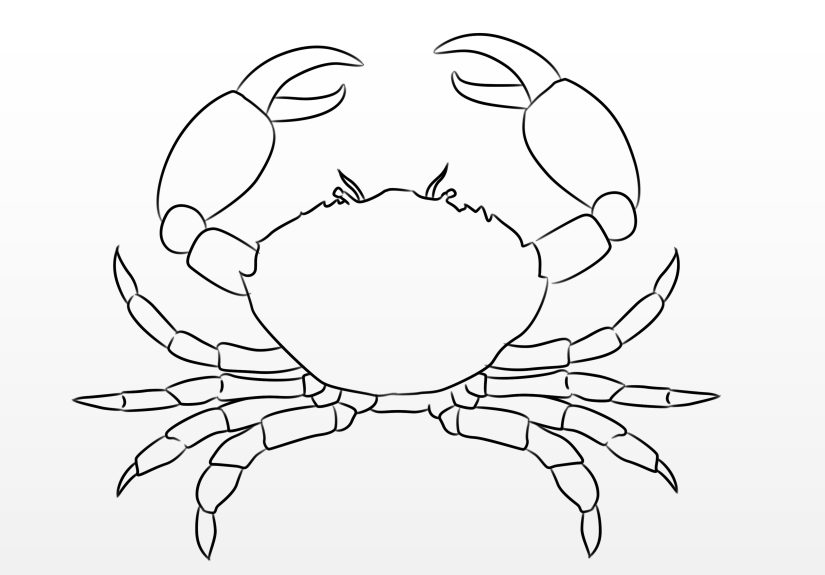
At this stage, step back and check the silhouette. A good crab outline should be easy to recognize even before coloring. You should see a wide shell, raised claws, eyes, and legs spreading from both sides.
Step 8: Clean Up the Sketch and Add Details
Erase the center guidelines and any overlapping lines inside the arms or claws. Then outline your crab with a black pen or darker pencil. Add small details such as curved lines on the claws, tiny shell bumps, cheek marks, or a smiling mouth.
If you want a more realistic crab drawing, add texture to the shell with short strokes and small dots. If you want a cartoon crab, keep the details simple and bold. You can also add eyebrows, rosy cheeks, or a tiny beach hat. Is a crab likely to wear a beach hat? No. Does art allow it? Absolutely.
Step 9: Color the Crab and Finish the Scene
Color your crab red, orange, brown, blue, or even purple. Real crabs come in many colors, and cartoon crabs can come in whatever shade makes you happy. Use darker color along the bottom of the shell and under the claws to create shadow. Add lighter color on the top of the shell and claw tips for highlights.
Finish the scene by drawing sand, shells, bubbles, seaweed, waves, or a bright beach background. A simple sandy oval under the crab can help ground the drawing. Without it, your crab may appear to be floating through space, which is funny but probably not the goal.
Easy Crab Drawing Tips for Beginners
Use Basic Shapes First
Most drawing problems become easier when you break the subject into simple shapes. The crab body is an oval. The eyes are circles. The arms and legs are curved tubes. The claws are mitten shapes with a split. Build the drawing like a puzzle, one piece at a time.
Keep Both Sides Similar, Not Perfect
Symmetry helps a crab drawing look balanced, but perfect symmetry can make it feel stiff. Let one claw sit slightly higher or one leg bend a little differently. Small differences create personality.
Draw Lightly Before You Outline
Light pencil lines are easier to erase and adjust. Many beginners press too hard at the start, then fight with the paper later. Sketch softly, revise freely, and outline only when you are happy with the shape.
Common Mistakes When Drawing a Crab
One common mistake is making the body too narrow. Crabs usually look wide and low, so stretch the body sideways. Another mistake is forgetting the jointed legs. Even a cartoon crab benefits from legs that bend. A third mistake is placing the claws too close to the shell. Leave enough arm space so the claws feel connected and expressive.
Also, do not overload the drawing with details too early. Get the silhouette right first. Details are like seasoning: wonderful in the right amount, chaotic when dumped everywhere.
How to Make Your Crab Drawing More Realistic
To make your crab look more realistic, flatten the shell slightly and add small points along the sides. Make the claws asymmetrical by giving one claw a larger curve. Draw the legs in segments, tapering them toward the tips. Add shell texture with dots, short scratches, and uneven patches of color.
Use shading under the body and where the legs attach to the shell. This creates depth. A darker line beneath the carapace makes the crab feel less flat. You can also add cast shadows on the sand so the crab looks like it is standing on a surface.
How to Make Your Crab Drawing Cute
For a cute crab, exaggerate the eyes, round the claws, and give the body a soft smile. Keep the legs short and bouncy. Add blush circles, tiny eyebrows, or a bubble near the mouth. A cute crab does not need perfect anatomy; it needs charm.
Try drawing a crab holding a tiny pencil, waving hello, or guarding a seashell like it is a royal crown. Small storytelling details make a simple crab drawing more memorable.
Color Ideas for a Crab Drawing
Red and orange are classic choices, especially for a cartoon crab. Brown and olive tones create a more natural beach crab. Blue claws can make the drawing feel inspired by blue crab colors. Pink, coral, and peach work beautifully for a friendly children’s illustration.
If you use colored pencils, layer lightly and build the color slowly. If you use markers, test them on scrap paper first so you know how bright they will appear. For crayons, press harder near the edges and softer in the center for a simple shaded effect.
Practice Ideas After You Finish
- Draw the same crab facing forward with bigger claws.
- Create a family of crabs in different sizes.
- Draw a realistic crab using a photo reference.
- Turn the crab into a sticker-style cartoon.
- Add a beach scene with shells, waves, and seaweed.
- Draw a crab building a sandcastle.
Experience Notes: What I Learned While Drawing Crabs
The first time you draw a crab, you may discover that the legs are the sneaky part. The body seems easy. The eyes are fun. The claws feel dramatic and satisfying. Then the legs arrive, all six or eight of them, demanding organization like tiny crustacean accountants. The best solution is to stop trying to draw every leg perfectly at once. Draw one side lightly, then echo the same rhythm on the other side.
Another useful experience is learning that the crab’s personality appears very early. A wide smile, raised claws, and round eyes make it look friendly. Narrow eyes and sharper claws make it look mischievous. A low, flat shell and thin legs make it more realistic. The same nine steps can create a classroom crab, a sticker crab, a beach poster crab, or a dramatic “do not touch my sandwich” crab.
When practicing with children or beginners, it helps to use phrases instead of technical instructions. For example, “draw a pancake shell,” “add lollipop eyes,” and “make mitten claws” are easier to follow than anatomy-heavy language. Once the drawing is finished, you can introduce words like carapace, claws, and walking legs. That way, art becomes a bridge to science without feeling like a pop quiz in disguise.
Coloring also teaches patience. A crab colored in one flat red shade can still look nice, but adding a darker red under the shell and a lighter orange near the top makes it pop. Beginners often think shading is complicated, but it can be as simple as choosing one side for shadow and one side for light. Even a small shadow under the crab makes the drawing feel more complete.
The biggest lesson is that crab drawings improve quickly with repetition. Draw one crab slowly by following the steps. Then draw a second crab faster from memory. On the third try, change something: bigger claws, smaller eyes, longer legs, or a patterned shell. This process builds confidence because you are not just copying; you are learning how the shapes work together.
A crab is a perfect subject for beginner artists because it is structured but forgiving. If one leg bends strangely, it still looks natural. If one claw is bigger, it adds character. If the eyes are uneven, the crab looks like it just heard gossip from a clam. In other words, mistakes do not ruin the drawing. They often make it funnier, warmer, and more human.
Conclusion
Learning how to draw a crab is a simple, satisfying art project for kids, beginners, teachers, and anyone who wants a cheerful ocean animal in their sketchbook. Start with guidelines, build the shell, add eyes, arms, claws, and jointed legs, then finish with texture and color. Once you understand the basic shapes, you can create many versions: cute, realistic, silly, detailed, or beach-themed.
The key is to draw lightly, work step by step, and enjoy the process. A crab drawing does not need to be perfect to be delightful. In fact, a slightly goofy crab may be the best kind of crab. Give it a sandy floor, a few seashells, and perhaps a heroic claw pose, and your drawing is ready to scuttle proudly across the page.


