Table of Contents >> Show >> Hide
- Why Spider Webs Are Easier to Draw Than They Look
- Supplies You Need for a Spider Web Drawing
- How to Draw a Spider Web Step by Step
- How to Draw a Spider Web in a Corner
- How to Make Your Spider Web Drawing Look Realistic
- Common Mistakes When Drawing a Spider Web
- Creative Spider Web Drawing Ideas
- How to Draw a Cute Spider for Your Web
- Practice Exercise: The Five-Minute Spider Web
- Experience Notes: What I Learned While Drawing Spider Webs
- Conclusion
Learning how to draw a spider web is one of those art skills that looks fancy, spooky, and slightly magical, but it is secretly built from very simple lines. A spider web may seem like nature sat down with a ruler, a compass, and a tiny engineering degree, but you can create a convincing web with nothing more than a pencil, paper, and a little patience. No actual spider required. In fact, the spider may prefer to supervise from a safe distance.
The good news is that a spider web drawing is perfect for beginners because it does not need to be perfectly symmetrical. Real webs are rarely flawless. Wind, leaves, insects, broken threads, and the spider’s own repairs all create tiny irregularities. That means your “mistakes” can become realism. A slightly wobbly curve? Natural. Uneven spacing? Organic. A crooked spoke? Congratulations, you have discovered artistic authenticity.
In this guide, you will learn how to draw a spider web step by step, from the basic web structure to shading, details, corner webs, Halloween-style cobwebs, and small tricks that make your drawing look more dimensional. Whether you are making a classroom art project, a spooky October sketch, a journal doodle, a tattoo-style design, or a decorative illustration, this tutorial will help you build a clean, readable, and eye-catching spider web.
Why Spider Webs Are Easier to Draw Than They Look
A spider web looks complicated because it contains many repeated lines. But the structure is simple: most classic web drawings start with straight lines that radiate outward from a center point. These are often called spokes or radial lines. Then you connect those spokes with curved lines that move around the web in rings. Once you understand that pattern, the web becomes less mysterious and much easier to draw.
Think of it like drawing a bicycle wheel, then softening it with curved threads. The straight lines create the skeleton. The curved lines create the web. The spacing, thickness, and small imperfections create the personality. A neat web can look graphic and decorative. A loose web can look eerie and natural. A broken web can look dramatic, as if a tiny bug had a very bad afternoon.
Supplies You Need for a Spider Web Drawing
You do not need expensive art supplies to create a beautiful spider web. Start with basic tools and upgrade only if you want a more polished finish.
Basic Drawing Supplies
- Pencil for sketching light guide lines
- Eraser for cleaning up construction marks
- Black pen, marker, or fine liner for outlining
- White paper, toned paper, or sketchbook paper
- Ruler if you want straighter radial lines
- Compass or circular object if you want a very even web
If you are drawing a spooky Halloween spider web, a black marker on white paper works beautifully. For a softer illustration, use pencil only and focus on shading. For a dramatic design, try white gel pen on black paper. That last option looks like the web has been caught in moonlight, which is basically the spider web version of a red-carpet entrance.
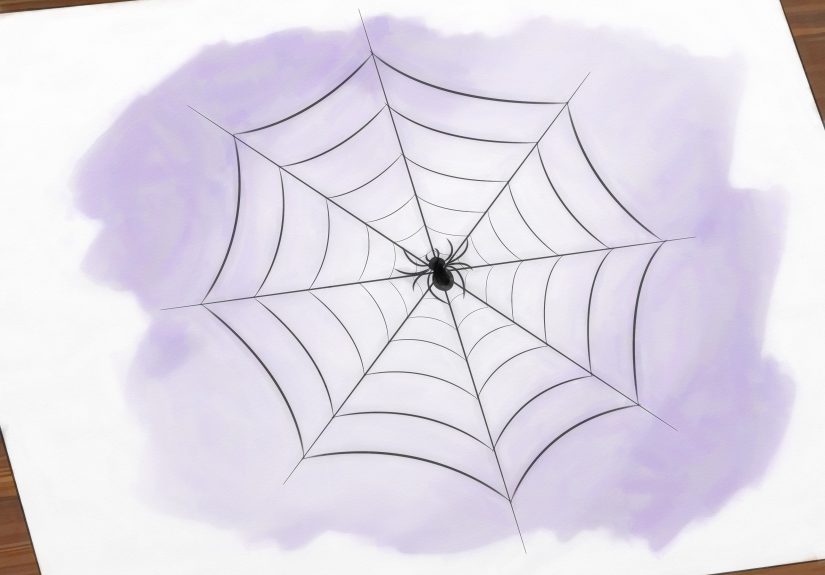
How to Draw a Spider Web Step by Step
This beginner-friendly method creates a classic round spider web. It works well for sketchbooks, craft projects, Halloween decorations, school worksheets, and digital art.
Step 1: Choose the Center of the Web
Start by placing a small dot near the center of your paper. This dot is the hub of the spider web. It does not have to be exactly in the middle. If you place it slightly off-center, your drawing may look more natural and interesting. Many real webs are not perfect circles; they stretch between branches, corners, fences, porch railings, and other uneven supports.
For a clean beginner version, keep the center close to the middle of the page. For a more dramatic design, place it higher, lower, or closer to one side. This gives your spider web drawing a sense of movement and makes the composition feel less stiff.
Step 2: Draw the Radial Lines
From the center dot, draw several straight lines outward like sun rays. Aim for eight to ten lines. You can use a ruler if you want crisp geometry, or draw them freehand if you prefer a natural look. These lines are the main supports of the web.
Do not press too hard with the pencil. Light sketching makes it easier to adjust the web later. If one line looks too long or too short, leave it for now. Spider webs often look better when they are slightly uneven. Perfect symmetry can feel decorative, but small variations make the web feel alive.
Step 3: Add the First Curved Ring Near the Center
Now begin connecting the radial lines with small curved lines. Start close to the center. Draw a short arc from one spoke to the next. Then continue around the web, connecting each section with another curved arc. The curves should bend slightly outward, like tiny smiles.
A common beginner mistake is drawing complete circles over the spokes. Instead, draw separate curved segments between the spokes. This gives the web its classic handmade, thread-by-thread look. Imagine the spider walking from one support line to another, laying silk as it goes. You are not drawing a target; you are drawing a delicate structure.
Step 4: Build More Rings Outward
Continue adding curved connecting lines farther away from the center. Each new ring should be a little larger than the previous one. As you move outward, increase the spacing between the rings. This gradual widening makes the web look more realistic and prevents the design from becoming crowded.
The outer rings can be wider and looser. The inner rings can be tighter. This creates visual rhythm. It also helps guide the viewer’s eye from the center of the web outward to the edges.
Step 5: Make the Outer Edge Irregular
Once the web is mostly built, look at the outer edge. Instead of making it a perfect circle, allow some sections to stretch farther than others. You can extend a few radial lines beyond the final ring. You can also leave gaps or broken strands to make the drawing look more natural.
Real webs are working structures, not decorative lace doilies. They get tugged, repaired, and reshaped. A few uneven edges will make your spider web drawing feel more believable.
Step 6: Ink the Final Lines
When you are happy with the pencil sketch, trace over the final web with a black pen, fine liner, or marker. Keep your hand relaxed. Thin lines usually look more delicate, while thick lines create a bold cartoon or Halloween poster style.
If you want a more realistic web, vary the line weight slightly. Make the main radial threads a little darker or thicker than the curved connecting strands. This subtle contrast helps the structure read clearly.
Step 7: Erase the Pencil Marks
After the ink is dry, gently erase the remaining pencil lines. Do not rush this step. If the ink is still wet, the eraser can smear it, and suddenly your elegant spider web becomes a mysterious ink accident. Let the ink dry first, then clean the page carefully.
Step 8: Add a Spider, Dew Drops, or Shadows
To finish the drawing, add optional details. A small spider hanging from a thread instantly tells the viewer what the web is. Tiny dew drops can make the web look fresh and delicate. A light gray shadow behind some threads can create depth. For a spooky drawing, add a crescent moon, bats, pumpkins, or a dark corner background.
How to Draw a Spider Web in a Corner
A corner spider web is one of the easiest and most useful versions to draw. It works well on greeting cards, notebook pages, comic panels, Halloween posters, and classroom decorations. Instead of starting in the middle of the page, you start in one corner.
Corner Web Method
- Choose a corner of your paper.
- Draw several straight lines radiating from that corner.
- Connect the lines with curved arcs, starting near the corner.
- Add more arcs as you move outward.
- Make the outermost strands slightly uneven for a natural effect.
The corner web is especially good for beginners because you only draw part of the web. It is less intimidating than a full circular web, but it still looks complete. It also leaves plenty of open space on the page for lettering, characters, or other illustrations.
How to Make Your Spider Web Drawing Look Realistic
If your web looks too flat or too perfect, add natural variation. Realistic spider web drawings often depend less on perfect geometry and more on small details.
Use Uneven Spacing
Do not place every curved strand the exact same distance apart. Let some gaps be narrow and others wider. This creates a hand-built look. It also keeps the drawing from looking like a printed pattern.
Break a Few Threads
A broken strand can make the web look older and more interesting. Draw a small gap in one curved line, then add a loose dangling thread nearby. This tiny detail suggests movement, damage, or repair.
Add Dew Drops
Small circles or ovals placed along the web can represent dew. Keep them tiny and do not add too many. A few drops near the intersections of the web are enough. If you are using pencil, shade one side of each drop lightly and leave a tiny white highlight.
Vary the Line Weight
Use slightly thicker lines for the main support strands and thinner lines for the curved connecting strands. This difference creates depth. It also reflects the way many webs have stronger structural threads and finer capture threads.
Common Mistakes When Drawing a Spider Web
Even a simple spider web drawing can go sideways if you rush the structure. Here are the most common mistakes and how to fix them.
Mistake 1: Drawing Perfect Circles
Perfect circles can make the web look like a bullseye. Instead, draw curved segments between the radial lines. The segments can line up loosely, but they should feel like separate strands.
Mistake 2: Pressing Too Hard Too Soon
Heavy pencil marks are harder to erase. Start with light guide lines. Darken the drawing only after the structure looks right.
Mistake 3: Making Every Section Identical
A little symmetry is helpful, but too much can make the web feel mechanical. Let some sections stretch, bend, or wobble. Nature is not a photocopier.
Mistake 4: Overcrowding the Web
If you add too many rings, the drawing can become visually messy. Leave breathing room between strands, especially near the outer edge. Empty space is part of the design.
Creative Spider Web Drawing Ideas
Once you know the basic structure, you can use spider webs in many styles. A simple web can become cute, creepy, elegant, or graphic depending on how you finish it.
Halloween Spider Web
Use bold black lines, add a smiling cartoon spider, and place the web near a pumpkin or haunted house. This style is great for kids’ art projects and seasonal decorations.
Realistic Pencil Spider Web
Use soft pencil lines, delicate shading, and dew drops. Keep the web thin and slightly irregular. This style works well for nature journals and botanical sketches.
Digital Spider Web Illustration
In digital art software, use layers. Put your guide lines on one layer and final web lines on another. Lower the opacity of the sketch layer, then trace cleanly above it. You can also use a symmetry tool, but do not let the web become too perfect unless you want a graphic logo-style result.
Spider Web Lettering Design
Draw a corner web around a word such as “Spooky,” “Boo,” or “October.” Let one strand connect to a letter. This is a fun way to decorate bullet journals, invitations, classroom signs, or seasonal social media graphics.
How to Draw a Cute Spider for Your Web
A spider web does not need a spider, but adding one can make the drawing more playful. Start with a small oval for the body and a smaller circle for the head. Add eight curved legs, four on each side. If you want a cute cartoon spider, give it big eyes and tiny feet. If you want a spooky spider, keep the body dark and the legs long and angular.
Place the spider in the center of the web, on the outer edge, or hanging from a single thread. A hanging spider adds movement and gives the viewer a clear focal point. Just remember: eight legs. Six legs accidentally turns your spider into an insect having an identity crisis.
Practice Exercise: The Five-Minute Spider Web
If you want to improve quickly, try this simple practice exercise. Set a timer for five minutes. Draw one small web without erasing. Focus only on the structure: center point, radial lines, curved connecting strands, and outer edge. When the timer ends, start another web and change one thing. Make the center off to the side. Make the web wider. Make it broken. Make it a corner web.
After five or six quick sketches, you will understand the pattern much better. Fast practice removes pressure. It also teaches your hand how the curves should move from spoke to spoke. The goal is not perfection; the goal is confidence.
Experience Notes: What I Learned While Drawing Spider Webs
Drawing a spider web seems simple until you actually sit down and try to make one look natural. My first attempts looked less like webs and more like nervous pizza slices. The problem was not the idea; it was the stiffness. I was trying to make every line equal, every ring round, and every section mathematically polite. The result felt flat. It looked like a diagram, not a web.
The biggest improvement came when I stopped treating the web like a perfect geometric object. I started placing the center slightly off to one side. I allowed the radial lines to spread unevenly. I made the curved strands sag a little between spokes. Suddenly the drawing looked more alive. It had tension. It had rhythm. It looked like something that could actually hang in a corner of a porch on a cold morning.
Another useful lesson was to sketch lightly first. When I pressed hard from the beginning, every mistake became a permanent guest. Light pencil lines gave me freedom. I could test the spacing, adjust the spokes, and decide how large the web should be before committing with ink. This is especially helpful for beginners because spider webs are built in layers. If the first layer is too dark, the later layers become harder to control.
I also learned that the outer rings matter more than I expected. When the spacing stayed the same from the center to the edge, the web looked cramped. When I gradually increased the gaps as the web expanded outward, the entire drawing felt more open and natural. That one small change made the web look less like a target and more like silk stretched through space.
Adding imperfections became my favorite part. A broken thread here, a tiny repair there, a few dew drops near the intersections, and the web started telling a story. Maybe wind damaged it. Maybe an insect escaped. Maybe the spider was halfway through renovations and had not updated the tiny building permit. These details make a spider web drawing more interesting because they suggest time and movement.
For anyone practicing, I recommend drawing several small webs instead of one huge masterpiece. Small sketches are less stressful, and each version teaches something different. One web can be neat and decorative. Another can be messy and realistic. Another can sit in a corner with a cartoon spider hanging from it. Over time, your hand learns the pattern, and the process becomes relaxing.
The best part is that a spider web drawing welcomes personality. If your lines wobble, the web looks handmade. If your spacing varies, it looks natural. If your spider turns out goofy, it adds charm. A spider web is one of the rare drawings where imperfection is not just acceptable; it is useful. That makes it a perfect subject for beginners, kids, doodlers, and anyone who wants a quick drawing that looks impressive without requiring advanced art skills.
Conclusion
Learning how to draw a spider web is really about understanding structure. Start with a center point, build the radial spokes, connect them with curved strands, and let the spacing widen as the web grows. From there, you can make the drawing cute, spooky, realistic, decorative, or dramatic. The secret is not perfect symmetry. The secret is balance: enough order to make the web readable, enough irregularity to make it feel natural.
Whether you are creating an easy spider web drawing for Halloween, practicing line art, decorating a journal, or teaching a simple art lesson, this subject gives you plenty of room to experiment. Begin lightly, add details slowly, and remember that every wobbly line might just be nature helping you out.


