Table of Contents >> Show >> Hide
- What Makes Minnie Mouse Easy to Recognize?
- Supplies You’ll Want on the Table
- Method 1: How to Draw Classic Minnie Mouse
- Method 2: How to Draw Modern Minnie Mouse
- Method 3: How to Draw Minnie Mouse Full Body
- Common Mistakes When Drawing Minnie Mouse
- How to Practice Minnie Mouse Faster
- Tips to Make Your Minnie Mouse Drawing Look Better
- Experience and Lessons Learned From Drawing Minnie Mouse
- Final Thoughts
- SEO Tags
Minnie Mouse is one of those characters who somehow manages to be both simple and sneaky. At first glance, she looks easy: a few circles, a bow, some lashes, and a smile. Then you sit down to draw her and suddenly one ear is in another zip code, the bow looks like a crumpled sandwich, and Minnie seems mildly concerned about your artistic choices.
The good news? She becomes much easier when you break her into basic shapes and draw her in stages. In this guide, you’ll learn three fun approaches: how to draw a classic Minnie Mouse face, how to create a more modern Minnie look, and how to sketch a full-body version without losing her signature charm. This tutorial is beginner-friendly, but it also includes tips that make your drawing look cleaner, cuter, and more polished.
Grab a pencil, an eraser, and whatever confidence you have left after drawing cartoon hands. We’re going in.
What Makes Minnie Mouse Easy to Recognize?
Before you draw Minnie Mouse, it helps to understand the features that instantly make her look like Minnie and not just “generic cheerful cartoon mouse.” Her design relies on a few memorable shapes and style cues:
- A round head with two circular ears
- A large bow, often centered between or slightly in front of the ears
- Long eyelashes and expressive oval eyes
- A small oval nose and rounded muzzle area
- A sweet smile with a playful, friendly expression
- A classic dress, gloves, and heeled shoes in full-body versions
If you keep those landmarks consistent, your Minnie Mouse drawing will read clearly even if you simplify the style.
Supplies You’ll Want on the Table
You do not need a fancy studio setup. You just need a few basics:
- HB or #2 pencil for light sketching
- Eraser for cleanup and tiny emotional recoveries
- Plain sketch paper or printer paper
- Black pen or marker for final lines
- Colored pencils, crayons, or markers for finishing
The biggest secret is not the pencil. It’s the pressure. Sketch lightly at first. Seriously. If you carve the first circle into the page like you’re engraving a monument, corrections will be painful.
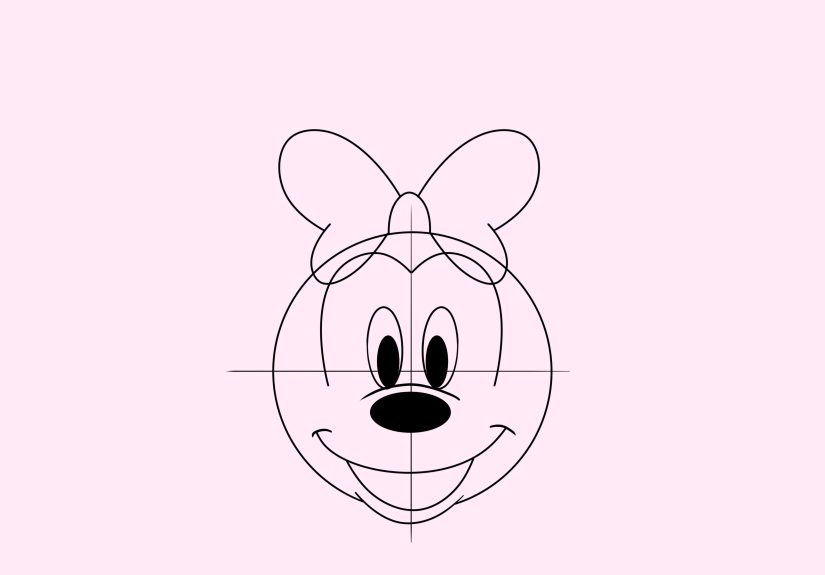
Method 1: How to Draw Classic Minnie Mouse
The classic version is the best place to start because it teaches you Minnie’s core structure. Think timeless bow, sweet expression, and simple shapes.
Step 1: Start With the Head Shape
Draw one large circle for the head. Then add two smaller circles for the ears. Keep the ears rounded and balanced. They do not have to be mathematically perfect, but they should feel evenly placed. If one ear looks like it belongs to another mouse entirely, adjust it now while your lines are still light.
Next, add a horizontal guide line across the face and a light vertical guide line. These construction lines help place the eyes, nose, and bow without guesswork. This step may feel boring, but it saves you from the classic problem of giving Minnie one eye on Monday and the other on Thursday.
Step 2: Draw the Face
Sketch two tall oval eyes above the horizontal guide. Add smaller ovals inside for pupils, leaving a little highlight space to keep them lively. Then add lashes on top. Minnie’s lashes do a lot of heavy lifting in her design, so do not skip them.
Below the eyes, draw a rounded muzzle area and place an oval nose at the center. Under that, add a smiling mouth with a slight curve and a soft cheek line. Keep the face rounded and friendly. Minnie usually looks cheerful, stylish, and ready to host a very organized tea party.
Step 3: Add the Bow and Ears
Now draw the center knot of the bow as an oval or rounded shape. Build each side of the bow with wide, curved loops. A good bow should look symmetrical but not stiff. Add a couple of fold lines inside the loops so it feels soft and dimensional rather than flat.
Once the bow is in place, refine the ears around it. In many Minnie poses, the bow overlaps part of the ears, so let the bow sit proudly in front. This is Minnie Mouse. The bow is not an accessory. The bow is a co-star.
Step 4: Clean Up the Outline
Erase unnecessary guide lines and strengthen the final contours. Make the cheeks smooth, the lashes crisp, and the bow edges clear. If you want a polished look, trace the final lines with a black pen or marker after the pencil sketch is clean.
Step 5: Color the Classic Version
Classic Minnie is usually associated with bold, cheerful colors. Red or pink for the bow, white polka dots, cream or peach-toned face area, and black for the ears and outer head shape work beautifully. Keep the palette clean and simple. A few small highlights can make the drawing pop.
Method 2: How to Draw Modern Minnie Mouse
If classic Minnie is charming and timeless, modern Minnie feels a little sleeker and more fashion-forward. The core design stays the same, but the lines are cleaner, the pose can be more dynamic, and the features often feel slightly more refined.
Use the Same Basic Structure, Then Refine It
Begin the same way: head circle, ears, guide lines, and bow placement. The difference comes in how you shape the face. Modern Minnie often looks a bit more polished, with smoother cheek lines, more deliberate eye placement, and a slightly more confident pose.
Try tilting the head just a little instead of keeping everything perfectly straight. That tiny angle adds life immediately. A slight tilt can make Minnie look curious, playful, or like she just heard gossip and is pretending not to enjoy it.
Make the Eyes More Expressive
For a modern Minnie Mouse drawing, focus on expression. Give the eyes more sparkle with larger highlights. Curve the lashes with intention. Keep the smile soft instead of overly wide. You can even lift one cheek a little more than the other to suggest personality.
This version works especially well for social-media-style fan art, posters, greeting cards, or cute doodles with a more updated Disney-inspired feel.
Upgrade the Bow and Styling
The bow can be larger, more decorative, or colored differently while still staying recognizable. Pink, red, and polka dots remain the go-to combination, but you can also try softer palettes, pastel dots, or a fashion illustration vibe. If you draw a bust portrait instead of the full figure, make the bow slightly oversized so it anchors the composition.
Modern Minnie also looks great with cleaner line weight. Use thinner sketch lines and then vary your final outline, making the outer silhouette a little bolder than the inner details.
Method 3: How to Draw Minnie Mouse Full Body
Now for the fun part: the full-body Minnie Mouse drawing. This is where the design really comes together. You’ll combine head structure, outfit, gloves, legs, and shoes into one complete pose.
Step 1: Build the Figure With Simple Shapes
Draw a large circle for the head near the top of the page. Add the ears and bow. Then draw a smaller circle or oval below it for the torso. Connect the head to the body with short neck lines.
Use simple lines for the arms and legs. Add small ovals for the hands and shoe shapes at the feet. Think of this stage like making a cartoon mannequin. You are mapping the pose, not trying to impress anyone yet.
Keep the body slightly smaller and narrower than you might expect. Minnie’s design reads best when the head stays visually dominant and the limbs remain slim and playful.
Step 2: Add the Dress, Sleeves, and Gloves
Sketch the dress over the torso shape. A classic Minnie dress usually flares outward with a simple skirt silhouette. Add short puffed sleeves or rounded sleeve shapes at the shoulders. Then refine the arms and place gloves on the hands. Cartoon gloves usually look better when simplified into rounded forms instead of realistic fingers.
If the pose is stiff, try bending one arm upward or letting one hand rest outward. Minnie looks especially lively when her pose feels theatrical, like she’s greeting a crowd or about to spin into frame.
Step 3: Draw the Legs and Shoes
Draw long, slim legs under the dress. Then add her heeled shoes with rounded toes. Keep the stance balanced. One leg can be straight while the other bends slightly for a more animated silhouette. That little curve helps the drawing feel less like a mannequin and more like a character.
At this stage, step back and check proportions. Are the shoes too tiny? Is the dress too short or too boxy? Does the head still feel like the star of the show? Small fixes here make a huge difference.
Step 4: Final Lines and Color
Erase construction marks, tighten your outline, and color the drawing. A classic full-body Minnie often includes a red or pink dress and matching bow, white gloves, yellow shoes, a cream-toned face area, and black for the head, ears, body, and limbs. Polka dots are the finishing flourish that instantly pushes the design from “cute mouse lady” to unmistakably Minnie.
Common Mistakes When Drawing Minnie Mouse
- Uneven ears: One ear too high or too small can throw off the whole head.
- Misplaced bow: If the bow floats too high, Minnie looks like she lost contact with gravity.
- Eyes too far apart: This weakens the facial expression fast.
- Skipping guide lines: Yes, they feel basic. No, you are not above them.
- Overworking the hands: Keep gloves simple and rounded.
- Rigid pose: Even a slight tilt or bend brings Minnie to life.
How to Practice Minnie Mouse Faster
If you want to improve quickly, do not draw one giant masterpiece and call it a week. Draw multiple small studies instead. Try this:
- Draw five bow variations on one page
- Practice ten eye-and-lash combinations
- Sketch three head shapes using only circles and guides
- Do two full-body poses with different arm positions
- Color one version in classic colors and one in a modern palette
Repetition builds memory. The goal is not to make every sketch perfect. The goal is to make the next one easier.
Tips to Make Your Minnie Mouse Drawing Look Better
Use Construction First, Details Second
Professional-looking cartoon art often starts with surprisingly plain shapes. Circles, ovals, and guide lines create the structure. Details make it charming later.
Push the Expression
Minnie Mouse should feel warm and lively. Slightly raise the cheeks, soften the mouth corners, and keep the eyes bright. Expression is what turns a correct drawing into a delightful one.
Let the Bow Do Its Job
The bow is a visual anchor. Make it clear, balanced, and a little dimensional. A floppy, thoughtful bow beats a stiff geometric one every time.
Keep the Silhouette Readable
If you squint and can still recognize the head, ears, bow, dress, and shoes, you’re doing great. Strong silhouettes matter in cartoon character drawing.
Experience and Lessons Learned From Drawing Minnie Mouse
The first time I tried drawing Minnie Mouse, I thought I could freestyle it. Big mistake. I drew the head, added the ears, tossed on a bow, and somehow ended up with a character who looked like Minnie’s distant cousin from a low-budget theme park flyer. That was the moment I learned something important: familiar characters feel easy because our brains recognize them instantly, but that same familiarity makes tiny mistakes stand out fast.
After a few more attempts, I noticed that success came down to rhythm more than raw talent. When I started with soft circles and guide lines, everything improved. The face landed in the right place. The ears looked intentional. The bow stopped drifting around like it had its own agenda. It reminded me that drawing is often less about inspiration and more about giving yourself a reliable system.
Another interesting experience came from comparing quick sketches to slower ones. In the fast sketches, Minnie looked more energetic. In the slower drawings, I sometimes overworked the lines and lost the charm. That taught me to loosen up. Cartoon characters thrive on clarity and confidence. They don’t need fifty fussy corrections around every cheek.
Color also taught me a lot. I used to think the final line art mattered most, but once I started finishing Minnie with clean red or pink bows, white polka dots, yellow shoes, and crisp black shapes, the character suddenly came alive. It was a great reminder that color choices are not decoration alone. They help define identity, mood, and readability.
I also learned that full-body poses are easier when you think like an animator rather than a photographer. Instead of making her stand perfectly straight, I began adding a bent knee, a lifted hand, or a slight head tilt. Those tiny changes gave the drawing movement. Minnie started to look as if she were greeting someone, dancing, or preparing for a dramatic little entrance. Much better than “department store mannequin wearing a bow.”
One of the best exercises I ever tried was drawing only parts of Minnie for a whole practice session. Just bows. Just eyes. Just shoes. Just face shapes. It felt repetitive, but it worked. The next time I drew the whole character, the pieces came together more naturally because I was no longer solving every problem at once.
There is also something genuinely fun about drawing a character with such a cheerful design. Minnie Mouse has built-in optimism. Even when a sketch is not perfect, it usually still looks friendly. That makes practice feel less intimidating. You can experiment with line weight, expression, and color without feeling like every attempt has to be gallery-ready.
If you’re teaching kids, drawing with friends, or just sketching for stress relief, Minnie is a fantastic subject because she rewards structure and play at the same time. You get to practice real drawing fundamentals like proportion, symmetry, simplification, and silhouette, but you also get a cute result at the end. That is a very fair trade.
So the biggest takeaway from my experience is simple: don’t rush the foundation, and don’t be afraid to redraw. Minnie Mouse is one of those characters who gets better fast with repetition. Your first attempt may look a little off. Your third will feel smarter. Your tenth will probably make you grin. And honestly, if your bow behaves on the first try, please enjoy that miracle.
Final Thoughts
Learning how to draw Minnie Mouse becomes much less intimidating once you stop seeing her as a finished cartoon icon and start seeing her as a collection of friendly shapes. A classic version teaches structure. A modern version adds style and expression. A full-body version helps you understand pose, clothing, and silhouette.
Take it one stage at a time, sketch lightly, keep the bow balanced, and let the character stay playful. Whether you’re drawing for fun, making fan art, teaching kids, or building your cartoon skills, Minnie Mouse is a terrific subject because she combines simple construction with loads of personality.
And that is the sweet spot in drawing: simple enough to learn, iconic enough to be rewarding, and stylish enough to make polka dots feel like a power move.


