Table of Contents >> Show >> Hide
- What You’ll Need
- Before You Start: Where This “Secret Square” Idea Comes From
- How to Fold Paper into a Secret Note Square in 10 Steps
- Write your message first (future you will thank you)
- Fold “hot-dog style” (lengthwise)
- Fold lengthwise again to make a long, skinny strip
- Make a diagonal triangle on each end
- Fold each triangle diagonally again (the “diamond” step)
- Fold each end straight over to form the square
- Tuck the first triangle inward
- Flip and tuck the second triangle
- Seal the folds with strong creases (no tape needed)
- Label, decorate, and teach the “open” trick
- Why This Fold Works (Tiny Paper Engineering)
- Common Mistakes (and Quick Fixes)
- Fun Ways to Use a Secret Note Square
- FAQ
- Extra: Real-World “Secret Note Square” Experiences (A 500-Word Add-On)
If you’ve ever wanted to turn a plain sheet of paper into a tiny “locked” message that looks innocent but
refuses to open easily (the paper equivalent of a poker face), you’re in the right place. A secret note square
is a classic paper-folding trick: compact, surprisingly secure, and oddly satisfying to snap into shape.
It’s part origami, part old-school note-passing culture, and part “how is this so small now?”
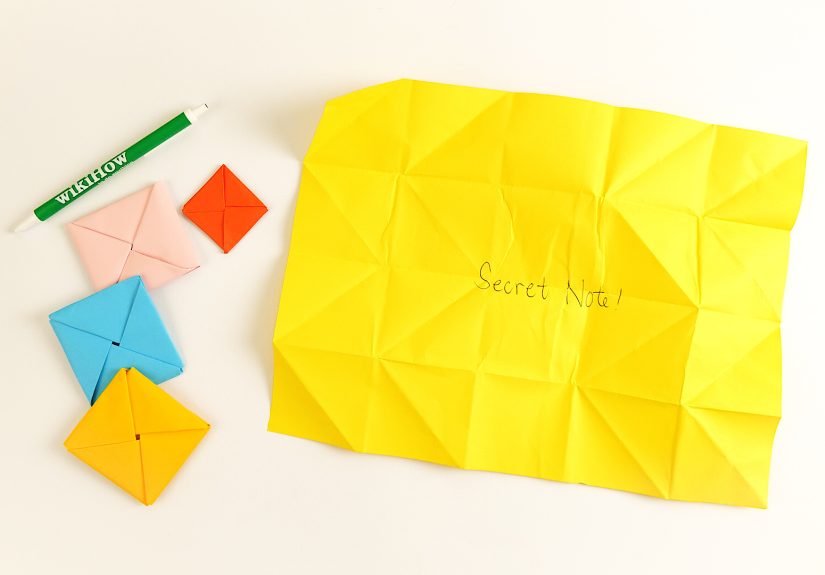
This guide walks you through 10 simple steps to fold a secret note square using standard U.S. letter paper,
plus tips, fixes, and fun ways to use it. And yesthere’s a reason it “locks”: the final tucks create tension and
overlapping layers that hold everything in place without tape.
What You’ll Need
- 1 sheet of paper (best: U.S. Letter, 8.5 x 11 inches)
- A pen or marker for your message
- Optional: a ruler edge or “bone folder” (fancy name for “something to press creases sharply”)
Paper size note (U.S. Letter vs. A4)
This fold works most smoothly with 8.5 x 11 inch paper. If you’re using A4 (common outside the U.S.),
you may need to trim a little off the long side or make a tiny “accordion” pinch in the middle later
to help it settle into a square. Don’t worryI’ll show you where you’ll notice it.
Before You Start: Where This “Secret Square” Idea Comes From
The secret note square is a modern cousin of letterlockingthe historical practice of folding a letter so it
becomes its own envelope. Today’s craft instructions and note-folding tutorials show up across major U.S. DIY and
education sites. This version synthesizes common techniques and best practices found in guides from:
- wikiHow
- The Spruce Crafts
- Scholastic (paper-folding skills and classroom-friendly crafts)
- Instructables
- OrigamiUSA
- MIT News (letterlocking background and modern research)
- Letterlocking.org (what “locked letters” are and why they work)
- Atlas Obscura (hands-on letterlocking methods)
- Library of Congress blogs (envelopes and letterlocking history)
- AIP Inside Science (letterlocking context in science news)
- Wired (popular reporting on “locked letters”)
- I Try DIY (note/envelope folding ideas and paper-size tips)
How to Fold Paper into a Secret Note Square in 10 Steps
-
Write your message first (future you will thank you)
Write your note in the center area of the page and keep it fairly compact. Avoid writing right to the edges
those areas become folds and “pockets.” If you want, add a tiny “To:” on the outside corner where you’ll remember
it later. (Or keep it mysterious and let your friend play detective.) -
Fold “hot-dog style” (lengthwise)
Place the paper flat. Fold it along the long axis by bringing the long edges together to make a long rectangle.
Press the crease firmly. -
Fold lengthwise again to make a long, skinny strip
Fold the long rectangle lengthwise again the same way. Now you should have a narrow stripmultiple layers thick.
A good checkpoint: the strip should look much longer than it is wide (roughly “five-ish times longer,” give or take). -
Make a diagonal triangle on each end
Take one end of the strip and fold the corner diagonally to form a triangle. Repeat on the other end.
Your goal is clean geometry: the triangle edges should align so the new folded edges look parallel with the strip’s long edges.
If it starts looking like a wonky trapezoid, unfold and try againthis step controls whether the square locks cleanly later. -
Fold each triangle diagonally again (the “diamond” step)
Now fold each triangle over diagonally again to create a thin parallelogram/diamond-like flap at each end.
Important: fold the triangles in the correct direction so you don’t end up with a plain rectangle. If you do end up with a rectangle,
it usually means you folded inward instead of creating that angled, “zig-zag” look.Quick visual check: the strip should resemble a sideways “S” or a little staircase shapecenter section straight, ends angled.
-
Fold each end straight over to form the square
Here’s the magic move: fold each end straight across so the shape collapses into a compact square.
One end folds to the front, the other folds behindlike you’re wrapping two flaps around the middle.After this, you should see a square body with two small triangles sticking outone on top, one on bottom.
If you get a rectangle instead of a square, this is where A4 paper often reveals itself. Options:
trim slightly next time, or make a tiny centered pinch fold (accordion) to “shorten” the strip before this step. -
Tuck the first triangle inward
Take the top triangle and fold it toward the center. Slide (tuck) it under the opposite layer so it disappears into the pocket.
This is the first part of the “lock.” Use your fingernail to press the crease sharply so the pocket holds. -
Flip and tuck the second triangle
Turn the note over and repeat with the other triangle. Fold it in and tuck it into the pocket on that side.
When both triangles are tucked, the note square should feel firmlike a tiny paper tile that doesn’t want to open unless you know how. -
Seal the folds with strong creases (no tape needed)
Press along every edge. Good creases are basically the “password” that keeps the square from popping open.
If you have a ruler edge or a bone folder, this is the moment to use it. If not, your thumbnail works just fine. -
Label, decorate, and teach the “open” trick
On the smooth side, write a name, doodle, or a tiny “OPEN HERE →” arrow so your recipient knows where to start.
To open, they’ll gently pull the tucked flap out of its pocket, then unfold in reverse. (No paper wrestling requiredideally.)
Why This Fold Works (Tiny Paper Engineering)
The secret note square isn’t “secure” because paper is magical (sadly). It works because:
- Layering adds friction: multiple layers create resistance, so it won’t unfold accidentally.
- Tucked triangles act like tabs: the tucked points hook into pockets formed by earlier folds.
- Tension holds the shape: the square is slightly “compressed,” so it wants to stay closed.
In other words: it’s a mini lockbox made of cellulose.
Common Mistakes (and Quick Fixes)
“Mine turned into a rectangle, not a square.”
Most common causes: paper proportions (hello, A4), uneven diagonal folds, or the ends weren’t folded in opposite layers (front/back).
Fix: sharpen creases, refold step 6 carefully, and consider trimming the long side if you’re using A4.
“The triangles won’t tuck.”
Usually the pockets are too tight because the earlier folds weren’t crisp or aligned. Fix: flatten the square, re-crease the pocket edges,
then try tucking with a gentle wiggledon’t brute-force it or you’ll tear the paper fibers and it’ll look sad forever.
“It pops open in my backpack.”
Try using slightly thinner paper (regular printer paper is perfect) and press the creases harder.
You can also use the alternate “pinwheel face” method: tuck both triangles into the same side so one face stays extra smooth and stable.
Fun Ways to Use a Secret Note Square
- Lunchbox surprise: write a joke, a riddle, or a tiny pep talk.
- Gift card add-on: tuck a note square under ribbon or inside a card.
- Classroom-friendly challenge: fold blank squares for a fine-motor skill activity (and keep the “secret” part school-appropriate).
- Mini scavenger hunt clue: hide folded squares with hints around the house.
FAQ
Can I do this with notebook paper?
Yesif it’s close to 8.5 x 11 inches. Tear-off notebook paper often has the right width but sometimes a shorter length, which can still work.
If the square doesn’t form cleanly, that’s a sign the proportions are off. Try printer paper first to learn the fold.
Does this count as origami?
It’s in the “origami-adjacent” family: it’s paper folding without glue, and it uses classic geometric creases and tucks.
Many craft sites treat note folds like a practical gateway into origami.
How do I make it harder to “read at a glance”?
Keep the message deep inside the center area and avoid writing on sections that become outer flaps.
You can also use tiny handwriting (legible tiny, not “ant handwriting”) or write in codelike a simple substitution cipher.
Extra: Real-World “Secret Note Square” Experiences (A 500-Word Add-On)
The secret note square has a funny superpower: it turns an everyday piece of paper into a little event. A normal note says,
“Here’s my message.” A folded square says, “Here’s my message… and a mini puzzle.” That tiny pausewhere the recipient rotates the square,
hunts for the right flap, and tries not to rip anythingcreates a moment of suspense that plain paper just can’t compete with.
In schools, camps, and after-school programs, paper folds often become their own informal “language.” One kid learns a fold from a sibling,
shows two friends, and within a week the whole group has opinions about which version is best. Some people like the secret note square because
it’s compact and tossable (not that anyone should be launching paper projectiles in places where it’ll cause troublerules are rules). Others
like it because it feels like a tiny container: a message, a doodle, maybe a small sticker, all tucked into a neat little packet.
There’s also something weirdly calming about the process. The steps are repetitive in a satisfying way: fold, crease, align, crease again.
When your day feels chaotictoo much homework, too many notifications, too many tabs open in your brainpaper folding is one of the few things
that gives you a clear “before” and “after” in under two minutes. A flat sheet becomes a clean square. That’s a win you can hold in your hand.
People also get creative with how they “stage” the message. Some write a simple note inside and decorate the outside like a tiny gift:
stars, doodles, funny warnings like “TOP SECRET,” or dramatic instructions like “OPEN IN CASE OF EMERGENCY (OR BOREDOM).”
Others turn it into a game by writing different words under each flap, or by hiding a clue to a scavenger hunt. If you’re the artsy type,
patterned paper makes the final square look like a miniature quilt. If you’re the minimalist type, plain white paper plus one sharp black pen
looks oddly sleeklike you meant to design it that way.
And then there’s the social side: giving someone a folded note is a small act of attention. It says you spent a little extra time.
Even if the message is just “good luck,” “you’ve got this,” or a terrible pun, the fold turns it into a keepsake. Lots of people end up saving
these squares in pencil cases, drawers, or old notebooks because they’re small and easy to stashlike tiny paper time capsules.
That’s the real charm: it’s not just a folding trick. It’s a simple way to make a message feel special.


