Table of Contents >> Show >> Hide
- Why Growing Ginger Indoors Is Worth It
- What You Need Before You Start
- Step-by-Step Guide to Growing Ginger Indoors
- Step 1: Choose the Right Ginger Root
- Step 2: Pick a Pot That Matches Ginger’s Growth Habit
- Step 3: Use the Right Soil Mix
- Step 4: Plant the Rhizome the Right Way
- Step 5: Keep It Warm While It Sprouts
- Step 6: Give Ginger the Right Light
- Step 7: Water and Feed Without Overdoing It
- Step 8: Top Up Soil and Let the Rhizomes Expand
- Common Problems When You Grow Ginger Indoors
- When and How to Harvest Indoor Ginger
- Real-World Experiences Growing Ginger Indoors
- Conclusion
If your grocery bill keeps side-eyeing you every time you reach for fresh ginger, growing your own indoors is a pretty satisfying act of kitchen rebellion. The good news: ginger is one of the easiest tropical edibles to grow at home if you understand its personality. It likes warmth, steady moisture, rich soil, and a cozy pot where it can spread sideways like it pays rent. It does not like soggy soil, cold drafts, or being treated like a cactus one week and a swamp plant the next.
This step-by-step guide explains exactly how to grow ginger indoors, from choosing the right rhizome to harvesting fresh, fragrant ginger root from a pot in your home. You’ll learn how to set up the best container, what kind of light ginger prefers, how often to water, how to avoid rot, and when to harvest baby ginger versus mature rhizomes. Whether you’re a first-time indoor gardener or someone who has already killed a basil plant and would like a second chance at redemption, this guide will help you grow ginger indoors with confidence.
Why Growing Ginger Indoors Is Worth It
Indoor ginger gardening has a lot going for it. First, fresh homegrown ginger tastes brighter and juicier than the old, shriveled knob that’s been rolling around your refrigerator drawer like a tiny tan potato with anger issues. Second, ginger is a beautiful plant. Its narrow, upright leaves give off a lush tropical vibe, which means your indoor ginger plant can do double duty as both a food crop and a leafy houseplant.
Another major perk is control. When you grow ginger in pots indoors, you control the soil, water, temperature, and drainage. That matters because ginger is a tropical plant, and tropical plants can be a little dramatic when temperatures dip or the soil gets waterlogged. Indoors, you can keep conditions steady, stretch the growing season, and enjoy a harvest that feels surprisingly fancy for something that started in your produce aisle.
What You Need Before You Start
- A fresh ginger rhizome: Look for plump, firm pieces with visible buds or “eyes.” Organic ginger is usually the best bet because it’s less likely to be treated with a sprout inhibitor.
- A wide pot with drainage holes: Ginger grows horizontally, so width matters more than a narrow, deep container.
- Rich, well-draining potting mix: A high-quality mix with compost or other organic matter works well.
- A warm indoor spot: Think bright, cozy, and away from cold drafts.
- A saucer or tray: Useful for indoor watering and catching runoff.
- Optional helpers: Grow light, heat mat, compost, liquid fertilizer, and a little patience. Fine, a lot of patience.
Step-by-Step Guide to Growing Ginger Indoors
Step 1: Choose the Right Ginger Root
The first step in how to grow ginger indoors is choosing a healthy rhizome. Ginger is not grown from seed in the usual home-gardening sense. Instead, you plant a chunk of rhizome, which is the underground stem you buy as fresh ginger root. Pick pieces that are firm, not shriveled, and preferably several inches long. The most important detail is the buds. These look like small swollen nubs or pale points on the surface. No buds, no party.
If the piece is very large, you can cut it into sections. Each section should have at least two or three healthy eyes. After cutting, let the pieces sit out for a day or two so the cut sides can dry and callus over. That simple pause helps reduce the risk of rot after planting. It’s a classic example of gardening wisdom that sounds boring until it saves your crop.
Step 2: Pick a Pot That Matches Ginger’s Growth Habit
Ginger in pots does best in containers that are broad enough for sideways growth. A pot at least 12 inches wide is a smart starting point, though larger is even better if you want a bigger harvest. Depth matters too, but ginger is not trying to tunnel to the center of the earth. It wants room to spread, not a skyscraper apartment.
Drainage holes are non-negotiable. Ginger likes moisture, but it does not want to sit in wet soil. If excess water can’t escape, the rhizome can rot before you get so much as a single sprout. Set the pot on a saucer, and if you want extra insurance, add a light drainage layer only if your setup truly needs it. The main goal is a loose potting mix and a pot that drains freely.
Step 3: Use the Right Soil Mix
If you want to grow ginger root indoors successfully, think fluffy, fertile, and fast-draining. The best soil for indoor ginger is a high-quality potting mix enriched with compost or other organic matter. Ginger prefers soil that stays lightly moist while still allowing air around the rhizome. Heavy, compacted soil is basically a written invitation to root rot.
A slightly acidic soil is ideal, but don’t panic and start interviewing your potting mix. In real-world home growing, the bigger win is simply using a rich, loose blend that drains well. Fill the pot almost to the top, but leave an inch or two so you have room for watering and adding more soil later if the rhizomes begin to peek above the surface.
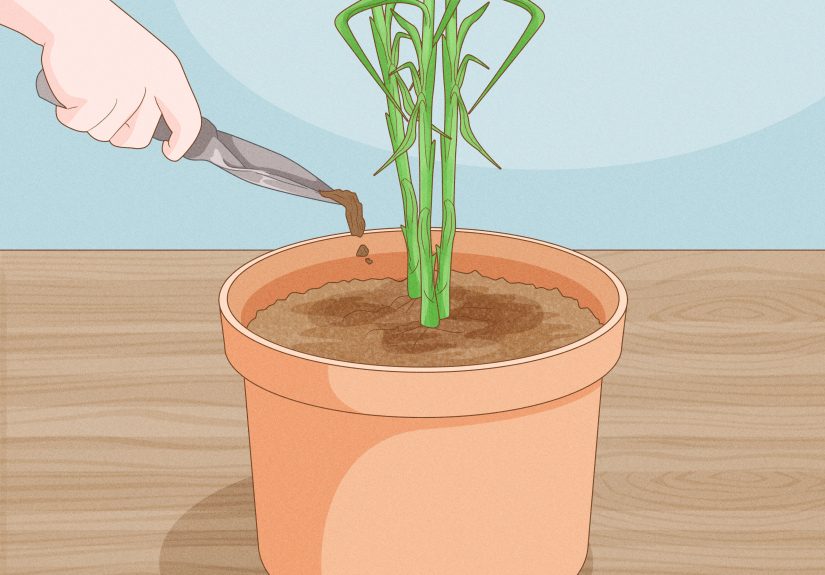
Step 4: Plant the Rhizome the Right Way
Lay the ginger rhizome horizontally on the soil surface with the eyes facing up. Then cover it with about 1 to 2 inches of potting mix. Do not bury it too deeply. Ginger is one of those plants that prefers a shallow setup, especially in containers. You want enough soil to protect the rhizome and hold moisture, but not so much that it stays wet and sulks underground.
Water lightly after planting. The soil should be moist, never soaked. Until you see shoots, keep watering minimal and consistent. Think “barely moist brownie,” not “rice paddy.” If the rhizome stays too wet before it actively grows, it may rot instead of sprout.
Step 5: Keep It Warm While It Sprouts
This is where many indoor gardeners lose confidence. Ginger is slow. Very slow. “Did I plant a vegetable or a decorative paperweight?” slow. Sprouting can take anywhere from a few weeks to nearly two months, depending on warmth and the condition of the rhizome.
The ideal temperature for sprouting ginger indoors is warm room temperature to slightly tropical conditions, roughly 70 to 80 degrees Fahrenheit. If your home is cool, a seed-starting heat mat can help warm the soil. Put the pot in a warm place and resist the urge to dig up the rhizome every four days to “check on it.” That is not checking. That is harassment.
Step 6: Give Ginger the Right Light
Once shoots appear, move the pot into bright, indirect light. Ginger likes a generous amount of light, but harsh direct afternoon sun can scorch the leaves. An east-facing window is often ideal. If your home doesn’t get much natural light, a grow light can make a big difference, especially in winter or in apartments with limited sun.
If the leaves start browning at the tips, the plant may be getting too much intense sun, not enough water, or both. Indoor ginger usually performs best when it receives filtered sunlight, gentle morning sun, or bright light near a window without being blasted all afternoon.
Step 7: Water and Feed Without Overdoing It
Once the plant is actively growing, keep the soil evenly moist. Not wet. Not bone-dry. Moist. Ginger enjoys consistency, and that word alone ruins the fun for many houseplant owners. If the top inch of soil feels slightly dry, it’s usually time to water. If the pot feels heavy and the soil is still damp, back away slowly.
Ginger also appreciates food. Use compost at planting or apply a balanced liquid fertilizer every few weeks during the growing season. If the foliage looks pale or yellowish and the plant otherwise seems healthy, it may be asking for nutrients. On the other hand, if the stems are yellowing and the soil is soggy, the problem is probably not hunger. It’s wet feet.
Because indoor air can be dry, especially in winter, it also helps to maintain some humidity around the plant. You do not need to transform your living room into a rainforest documentary set, but a pebble tray, nearby humidifier, or grouping with other plants can help.
Step 8: Top Up Soil and Let the Rhizomes Expand
As ginger grows, the rhizomes may swell near the surface. If parts become exposed, add a bit more potting mix or compost to cover them. This helps protect them from light and supports continued growth. The plant may reach 2 to 3 feet tall indoors under good conditions, so don’t be surprised if your once-humble spice starts acting like a tropical statement piece.
At this stage, your job is mostly maintenance: steady watering, occasional feeding, good light, and patience. Ginger rewards people who can leave it alone just enough. It is the plant equivalent of a cat: give it what it needs, do not smother it, and eventually it may bless you with success.
Common Problems When You Grow Ginger Indoors
No Sprouts After Several Weeks
The most common causes are cool temperatures, old rhizomes, or store-bought ginger that was treated to prevent sprouting. Warm the soil, check your light setup for once shoots appear, and next time choose plumper rhizomes with visible eyes. Also remember that ginger can simply be slow. Sometimes the fix is not a miracle product. Sometimes it’s time.
Mushy Rhizome or Foul Smell
That’s usually rot caused by excess moisture or poor drainage. Remove the affected rhizome, discard any rotten sections, and start again with fresh potting mix and better drainage habits. Indoor ginger plants hate standing water more than most people hate surprise group projects.
Brown Leaf Tips
This often points to too much direct sun, dry indoor air, or inconsistent watering. Shift the pot away from harsh sunlight, keep the soil more evenly moist, and raise humidity if the air is desert-dry.
Yellow Leaves
Yellowing can happen for a few reasons. Sometimes it means the plant needs fertilizer. Sometimes it means the roots are staying too wet. And sometimes older leaves naturally fade as the plant matures. Context matters. If the soil is swampy, fix that first. If drainage is good and growth is active, a light feeding may help.
When and How to Harvest Indoor Ginger
One of the nicest things about growing ginger indoors is that you do not always have to wait for full maturity. If you want tender, juicy baby ginger, you can start harvesting small sections after about four to five months. Baby ginger has thin skin, a milder bite, and less fiber, which makes it excellent for tea, stir-fries, dressings, and pickling.
If you want mature ginger, wait around eight to ten months. The foliage will often begin to yellow and die back as harvest time approaches. At that point, you can dig up the whole plant, snap off the rhizomes, rinse them well, and save a few of the best pieces for replanting. That’s the beautiful loop of container ginger gardening: dinner and next season’s starter crop in one move.
Fresh ginger stores well in the refrigerator for a while, and it also freezes beautifully. You can grate it straight from frozen, which is one of those kitchen tricks that makes you feel suspiciously competent.
Real-World Experiences Growing Ginger Indoors
A common experience among indoor gardeners is that ginger teaches patience better than any inspirational quote ever could. The first few weeks can feel comically uneventful. You plant the rhizome, water lightly, place the pot somewhere warm, and then… nothing. No tiny stem, no adorable sprout, no cinematic moment where nature rewards your optimism. Just a pot of dirt sitting there like it knows something you don’t. Then one day, almost out of spite, a pointed green shoot appears. And suddenly you are emotionally invested in a plant that used to be a grocery-store ingredient.
Another experience people often share is that ginger grows more like a long-term project than a quick windowsill herb. Basil gives you instant gratification. Mint tries to take over your life by Thursday. Ginger, by contrast, behaves like a slow and steady craft. It rewards consistency. Gardeners who succeed with indoor ginger usually settle into a rhythm: check moisture, rotate the pot, feed occasionally, ignore the urge to overwater, and let time do its thing. That routine can become surprisingly satisfying, especially for people who want a calmer, less chaotic kind of indoor gardening.
Many growers also discover that the hardest part is not planting ginger indoors. It is trusting that the invisible part is still working. Because ginger develops below the soil line, progress can feel mysterious. You are caring for something you cannot fully see, which means you learn to read smaller signals. A new leaf. A thicker stem. A rhizome shoulder pushing up near the edge of the pot. Over time, these subtle changes become exciting. You stop expecting fireworks and start appreciating the small, steady evidence that the plant is building something worthwhile underground.
There is also the very practical joy of harvesting your own ginger for cooking. People often describe that first harvest as oddly luxurious. You brush back the soil, snap off a fresh section, rinse it, and suddenly your tea, soup, curry, or stir-fry tastes brighter and more fragrant than usual. The texture is often smoother and juicier than older store-bought ginger, especially if you harvest it young. It feels like a small domestic victory, the kind that makes you want to mention it casually to guests as if everyone keeps tropical rhizomes by the window.
And then there are the lessons learned the hard way. Indoor ginger growers commonly report one of three beginner mistakes: too much water, not enough warmth, or a pot that is too small. The good news is that these mistakes are fixable. Once gardeners switch to a wider container, warm up the growing area, and stop watering like they are auditioning for a flood documentary, the plant usually responds well. That resilience is part of what makes ginger such an appealing crop for home growers. It may be slow, but it is not especially fragile when given the basics.
In the end, the experience of growing ginger indoors is part practical gardening project, part low-key life lesson. It teaches restraint, observation, and the value of gradual progress. You do a few simple things well, repeat them consistently, and wait. Then one day you are holding homegrown ginger in your hand, wondering why this feels absurdly rewarding. The answer is simple: because it is. You turned a humble piece of rhizome into food, foliage, and a small daily reminder that slow growth is still growth.
Conclusion
If you’ve been wondering how to grow ginger indoors, the formula is straightforward: start with a healthy rhizome, plant it shallowly in rich well-draining soil, keep it warm, give it bright indirect light, and water with a gentle hand. From there, the secret ingredient is patience. Ginger is not fast, but it is deeply rewarding. With the right setup, you can grow fresh ginger indoors for cooking, tea, and future plantingall while adding a tropical, leafy look to your home.
In other words, ginger is one of those rare indoor plants that is useful, attractive, and just challenging enough to make you feel accomplished without making you cry into a bag of potting mix. That’s a pretty good deal for one humble pot.


