Table of Contents >> Show >> Hide
- Why Changing a Soiled Diaper Quickly Matters
- How to Identify a Soiled Diaper
- What Baby Poop Usually Looks Like (and What Can Be Concerning)
- Supplies to Gather Before You Start
- How to Change a Soiled Diaper: 10 Steps
- Step 1: Wash your hands (or sanitize if you’re in a pinch)
- Step 2: Place your baby on a safe changing surface
- Step 3: Open the clean diaper and place it underneath before removing the dirty one (optional pro move)
- Step 4: Unfasten the soiled diaper and use the front of it to remove excess stool
- Step 5: Wipe gently and thoroughly (front to back)
- Step 6: Let the skin dry (pat, don’t rub)
- Step 7: Apply diaper cream or barrier ointment if needed
- Step 8: Fasten the clean diaper correctly
- Step 9: Dispose of the dirty diaper and wipes safely
- Step 10: Clean the surface and wash hands (yours and baby’s, when appropriate)
- Common Diaper-Changing Mistakes to Avoid
- How to Help Prevent Diaper Rash
- When to Call the Pediatrician
- Extra Tips for New Parents and Caregivers
- Experience-Based Section (500+ Words): What Caregivers Learn After the First Few Weeks
- Conclusion
Let’s be honest: diaper changing is one of those parenting skills that sounds simple until you’re holding a wiggly baby, a half-open wipe pack, and a diaper that somehow failed in three directions at once. The good news? Once you know what to look for and follow a reliable routine, changing a soiled diaper becomes fast, safe, and much less dramatic.
This guide walks you through exactly how to identify a soiled diaper and change it in 10 clear steps. You’ll also learn diaper-changing safety basics, diaper rash prevention tips, common mistakes to avoid, and when a poop color or skin irritation may be worth a call to your pediatrician.
Whether you’re a brand-new parent, grandparent, babysitter, or caregiver, you’ve got this. And yes, you may still get peed on at least once. Consider it a rite of passage.
Why Changing a Soiled Diaper Quickly Matters
A soiled diaper isn’t just uncomfortable for your baby. Stool sitting on the skin can increase irritation and raise the risk of diaper rash. Prompt diaper changes help keep the diaper area clean and dry, which is one of the most effective ways to prevent skin problems.
Quick changes also reduce leaks, blowouts, and that mysterious smell that somehow fills an entire room in under two seconds. Beyond comfort, diaper changing is a hygiene task, so a clean process helps reduce the spread of germs to your baby, your hands, and household surfaces.
How to Identify a Soiled Diaper
“Soiled diaper” usually means there’s poop in the diaper (not just urine). Some babies make it obvious. Others act like tiny poker champions. Here’s how to tell.
1) The smell test (the classic)
Sometimes the fastest answer is also the least glamorous one. If you smell poop, it’s time for a diaper change. Newborn stool can vary in odor, and formula-fed babies may have stronger-smelling stools than breastfed babies, but the rule is simple: if it smells off, check the diaper.
2) Baby behavior changes
Many babies have a “poop face” or a pre-poop routine: grunting, turning red, squirming, going quiet, suddenly fussing, or looking deeply offended by life. If your baby seems uncomfortable right after a bowel movement, a soiled diaper is a likely reason.
3) Visual clues
Some disposable diapers make it easy to spot fullness or bulging, and blowouts tend to announce themselves visually. You can also do a quick peek at the back waistband (carefully) if you suspect poop but aren’t sure.
4) Timing patterns
Babies often poop after feeding, after waking up, or at certain times of day. You don’t need a detective board with yarn and thumbtacks, but noticing your baby’s patterns can help you check at the right time.
5) The “weight and sag” check
A very heavy diaper may be mostly urine, but if it feels bulky and your baby is fussy, it’s worth checking. Diapers can hide a lot. Sometimes too much.
What Baby Poop Usually Looks Like (and What Can Be Concerning)
New parents are often surprised by the wide range of normal baby poop colors and textures. Many shades of yellow, brown, and green can be normal. Newborns also pass meconium (that sticky, dark green-black first stool) in the first days after birth.
In general, color alone is not always a problem, but some colors deserve medical attention, especially red, white/gray, or black stool after the newborn meconium stage. If you’re unsure, contact your pediatrician. When it comes to baby poop, “I’m not sure” is a perfectly good reason to ask a professional.
Texture and behavior matter too. A baby who seems sick, has a fever, is dehydrated, or has ongoing diarrhea, blood, or unusual stool changes should be evaluated.
Supplies to Gather Before You Start
The secret to a smooth diaper change is simple: set up first, then start. Babies can roll unexpectedly, and you never want to step away mid-change to hunt for wipes like it’s a game show challenge.
- Clean diaper (or two, if you’ve lived through surprise round two)
- Baby wipes (fragrance-free if your baby has sensitive skin) or warm water + soft cloth
- Diaper cream or barrier ointment (if needed)
- Changing pad or clean, safe changing surface
- Disposable bag or diaper pail nearby
- Extra outfit (especially for newborns and “blowout artists”)
- Hand sanitizer for emergencies (but soap and water is best when available)
Safety setup tip
Keep everything within arm’s reach and keep one hand on your baby if they’re on an elevated changing surface. Even very young babies can move suddenly. A strap can help, but it does not replace supervision.
How to Change a Soiled Diaper: 10 Steps
Step 1: Wash your hands (or sanitize if you’re in a pinch)
Start with clean hands whenever possible. If you’re out and about, hand sanitizer can help until you can wash properly. This small step helps reduce the spread of germs before and after diaper changes.
Step 2: Place your baby on a safe changing surface
Use a changing table, changing pad, or another stable, easy-to-clean surface. Keep one hand on your baby at all times if they’re elevated. Never leave your baby unattendedeven “just for one second” to grab a wipe. Babies are impressively fast when the stakes are high.
Step 3: Open the clean diaper and place it underneath before removing the dirty one (optional pro move)
This is a smart trick many caregivers love. Slide the clean diaper under your baby’s bottom before fully removing the dirty diaper. If your baby pees or poops again mid-change, the clean diaper helps contain the chaos instead of your changing pad.
Step 4: Unfasten the soiled diaper and use the front of it to remove excess stool
Open the dirty diaper, then use the inside front panel to gently wipe away some of the stool before reaching for wipes. This can reduce mess and cut down the number of wipes you need. Fold the soiled diaper inward under the baby’s bottom while you continue cleaning.
Step 5: Wipe gently and thoroughly (front to back)
Use wipes or a damp cloth to clean the diaper area. Wipe front to back, especially for babies with vulvas, to help reduce the risk of spreading bacteria. Be gentle around skin folds, where stool can hide. For babies with penises, clean the area gently without scrubbing.
If your baby has sensitive skin or diaper rash, you may want to use warm water and a soft cloth, then pat dry instead of rubbing. The goal is clean skin, not a polishing job.
Step 6: Let the skin dry (pat, don’t rub)
Moisture is a big contributor to diaper rash. After cleaning, let the diaper area air-dry for a moment or gently pat dry with a clean cloth. Avoid rubbing, especially if the skin looks red or irritated.
Step 7: Apply diaper cream or barrier ointment if needed
If your baby has redness, sensitive skin, or a history of diaper rash, apply a thin-to-generous layer of barrier cream (such as zinc oxide or petroleum-based ointment) as directed by your pediatrician or product label. This creates a protective layer between the skin and moisture.
Skip baby powder. Powders can become airborne and may be unsafe if inhaled.
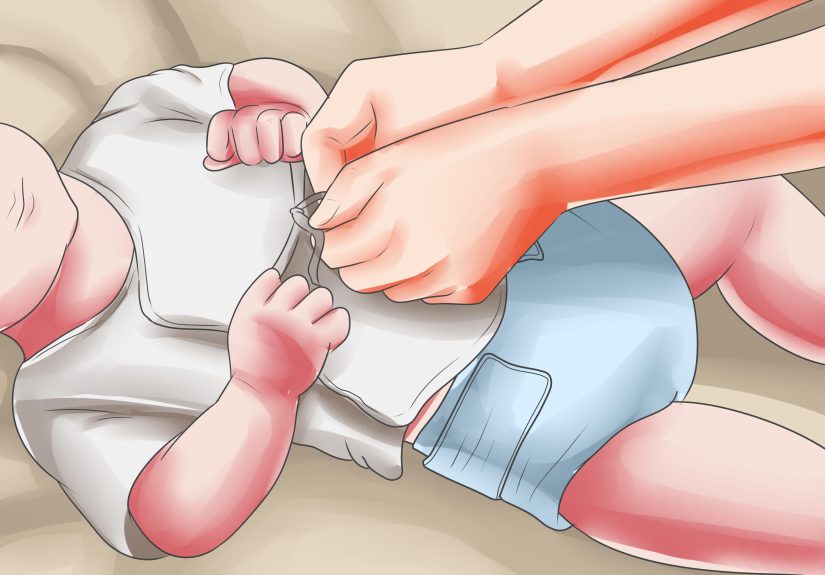
Step 8: Fasten the clean diaper correctly
Bring the front of the diaper up between your baby’s legs and fasten the tabs snugly but not too tight. You should be able to fit a finger or two comfortably at the waist. Check that the leg cuffs are turned outward (not tucked in), which helps prevent leaks.
For newborns, make sure the diaper doesn’t rub the umbilical stump area (many newborn diapers have a cutout, or you can fold the top edge down if your pediatrician has advised that).
Step 9: Dispose of the dirty diaper and wipes safely
Roll up the soiled diaper, secure it with the tabs, and place it in a diaper pail or trash can. If you use cloth diapers, follow your usual routine for handling stool and storing the diaper safely until washing.
If poop got on clothing, bag the soiled clothes and wash them according to fabric care instructions. No one enjoys surprise laundry, but future-you will appreciate a proper rinse.
Step 10: Clean the surface and wash hands (yours and baby’s, when appropriate)
Wipe and disinfect the changing surface if there was any spill, leak, or contamination. Then wash your hands thoroughly with soap and water. Washing your baby’s hands (when practical, especially for older infants/toddlers) is also a good hygiene habit after diaper changes.
Common Diaper-Changing Mistakes to Avoid
- Leaving the baby unattended: The biggest safety risk. Always stay within arm’s reach.
- Forgetting to prep supplies first: This is how you end up asking the universe for wipes with one hand.
- Wiping back to front: This can spread bacteria, especially in babies with vulvas.
- Fastening the diaper too loose or too tight: Too loose leaks; too tight can irritate skin.
- Not drying the skin: Trapped moisture increases the risk of diaper rash.
- Using heavily scented products on irritated skin: Fragrance and alcohol can worsen irritation in some babies.
- Using powder: Powders can be inhaled and are generally not recommended.
How to Help Prevent Diaper Rash
Diaper rash is common, and most caregivers deal with it at some point. The good news is that prevention is mostly about consistency, not perfection.
- Change wet or soiled diapers promptly
- Clean gently and thoroughly
- Let the skin dry before putting on a new diaper
- Use a barrier ointment if your baby is prone to irritation
- Avoid scented wipes, soaps, or products that irritate your baby’s skin
- Give short diaper-free time when practical (on a protected surface)
- Choose a diaper size and fit that isn’t too tight
Mild diaper rash often improves with more frequent changes, gentle cleaning, and barrier creams. If it doesn’t improve, worsens, or looks unusual, your pediatrician can help determine whether it might be yeast-related, bacterial, or another type of skin irritation.
When to Call the Pediatrician
Contact your pediatrician if your baby has any of the following:
- Diaper rash that is severe, spreading, or not improving after a few days of home care
- Rash with fever
- Rash that bleeds, oozes, or causes significant pain
- Open sores, blisters, or signs of infection
- White/gray stool, red stool, or black stool after the normal newborn meconium period
- Persistent diarrhea, blood in stool, or signs of dehydration
- Any stool change or skin issue that concerns you
Trust your instincts. You don’t need to wait until something looks dramatic to ask a medical question. Pediatricians answer diaper-related questions all the time.
Extra Tips for New Parents and Caregivers
Diaper changes in public
Carry a small changing kit: diaper, wipes, disposable bag, changing pad, and backup outfit. Public changing stations can be helpful, but it’s smart to wipe the surface first and use your own pad if possible.
Nighttime diaper changes
Keep the lights dim and supplies organized to avoid waking your baby fully. If there’s poop, change the diaper promptly. If it’s only urine and your baby is sleeping comfortably, many caregivers wait until the next feeding or wake-up (depending on age, skin sensitivity, and pediatrician guidance).
Cloth vs. disposable diapers
The core steps stay the same: safety, gentle cleaning, dry skin, fresh diaper, handwashing, and surface cleaning. The main difference is disposal/storage and washing routine.
Experience-Based Section (500+ Words): What Caregivers Learn After the First Few Weeks
If there’s one thing experienced parents and caregivers will tell you, it’s this: diaper changing looks straightforward in theory and mildly chaotic in real life. The first few days often feel slow and awkward. You’re trying to be gentle, your baby is tiny, and every sound makes you wonder whether you’re doing something wrong. That learning curve is normal.
A common early experience is the “surprise second poop.” You open the diaper, start cleaning, and your baby decides the diaper change itself is the perfect time for an encore performance. This is exactly why many caregivers swear by the trick of sliding a clean diaper underneath before removing the dirty one completely. It feels like a small move, but in practice it can save a changing pad, an outfit, and part of your sanity.
Another very real experience is discovering that babies have preferences. Some babies hate cold wipes. Some dislike being laid flat. Some become suddenly cooperative if you narrate what you’re doing in a calm voice (“Okay, we’re wiping… and now fresh diaper… and now we are not kicking the wipes, thank you”). Caregivers often find that turning diaper changes into a predictable routine lowers stress for everyone. A soft song, a toy reserved just for diaper time, or simply the same order of steps can make a huge difference.
Many caregivers also learn that diaper rash prevention is easier than rash treatment. It’s tempting to delay a change when you’ve just sat down, your coffee is hot for once, and the baby seems content. But repeated delaysespecially with soiled diaperscan lead to irritated skin quickly. Experienced parents often become very fast at the “quick check” and change sooner rather than later, not because they are trying to be perfect, but because they know it usually prevents a bigger problem.
Then there’s the public diaper change phase, which deserves its own award category. You may find yourself changing a diaper in an airport family restroom, the back seat of a car, or a friend’s guest room while balancing a wipe packet with your elbow. The lesson most caregivers learn here is preparation beats improvisation. A compact kit with one or two diapers, wipes, a disposable bag, and a backup outfit can turn a stressful situation into a manageable one. “Pack less” sounds nice until you meet your first road-trip blowout.
New parents also tend to worry about poop colorsometimes a lot. That concern is understandable. Babies produce a surprising range of colors and textures, and it can be hard to know what’s normal. Over time, caregivers usually become more confident by focusing on patterns: Is the baby acting normal? Is the stool color within the common range for this baby? Is there an obvious reason (like a diet change or iron supplement)? Experienced caregivers still stay alert to red flags, but they stop panicking over every green diaper.
One of the biggest mindset shifts comes from realizing diaper changing is not just a chore; it’s also a care moment. You’re checking your baby’s skin, looking for irritation, noticing changes, and responding to discomfort. In those tiny everyday moments, you build confidence. The first week you may need a checklist. A month later, you’ll be fastening tabs one-handed while politely negotiating with a baby who believes socks are unacceptable.
The most helpful takeaway from real-world diapering experience is this: consistency matters more than perfection. If you prioritize safety, hygiene, gentle cleaning, and prompt changes, you’re doing the important things right. The restfaster wipe grabs, fewer fumbled tabs, and improved blowout survival skillscomes with practice.
Conclusion
Learning how to identify and change a soiled diaper is one of the first hands-on caregiving skills many people master, and it gets easier quickly. The best diaper-changing routine is safe, simple, and repeatable: check for signs, prep supplies, keep one hand on the baby, clean gently from front to back, dry the skin, fasten the diaper correctly, and finish with handwashing and cleanup.
Just as important, pay attention to your baby’s skin and stool patterns. Most changes are normal, but unusual stool colors or persistent diaper rash deserve a call to your pediatrician. With a little practice, diaper changes become less “emergency event” and more “quick pit stop”even if the occasional blowout keeps life interesting.