Table of Contents >> Show >> Hide
- What Is a Barbed Fitting?
- Before You Start: The Biggest Mistake to Avoid
- Tools and Materials You May Need
- How to Insert Barbed Fittings in 7 Steps
- Step 1: Match the Tubing, Fitting, and Clamp
- Step 2: Inspect the Fitting and Cut the Tubing Cleanly
- Step 3: Slide the Clamp Onto the Tubing First
- Step 4: Soften the Tubing if It Is Stiff
- Step 5: Twist and Push the Fitting Until It Seats Fully
- Step 6: Position the Clamp Correctly and Tighten It Properly
- Step 7: Test the Connection and Support the Line
- Common Problems and How to Fix Them
- Pro Tips for a Better Barbed Fitting Installation
- Field Notes and Real-World Experience With Barbed Fittings
- Conclusion
- SEO Tags
Barbed fittings are one of those humble little inventions that keep water moving, air flowing, and DIY projects from turning into indoor rainstorms. They look simple enough: a ridged fitting goes into flexible tubing, a clamp locks it down, and everyone lives happily ever after. In real life, though, one wrong size, one jagged cut, or one “I can probably skip the clamp” moment can leave you with drips, blow-offs, and language your toolbox should never hear.
The good news is that inserting barbed fittings is not complicated when you follow a smart process. Whether you are working with vinyl tubing, rubber hose, flexible water lines, garden systems, or certain PEX-style barb connections, the basics are the same: match the parts, prep the tubing, seat the fitting fully, secure it properly, and test before you trust it. This guide walks through the job in seven clear steps so you can get a snug, reliable connection without wrestling your tubing like it owes you money.
What Is a Barbed Fitting?
A barbed fitting is a connector with one or more raised ridges, or “barbs,” designed to grip the inside of flexible tubing or hose. When the tubing slides over the barb, the ridges help resist pull-off. In many systems, a clamp or sleeve is added around the outside of the tubing to create a tighter seal and improve holding strength.
Barbed fittings come in brass, stainless steel, and plastic, and they appear in straight, elbow, tee, reducer, and threaded adapter forms. Some are meant for general-purpose vinyl or rubber tubing. Others are designed for specific systems, such as PEX barb fittings used with crimp or clamp rings. That distinction matters, because “barbed fitting” is a broad category, not a single universal standard.
Before You Start: The Biggest Mistake to Avoid
The most common mistake is assuming that if the tubing sort of fits, the connection must be fine. That is how leaks are born. Barbed fittings work best when the tubing inside diameter matches the fitting size, the tubing material is compatible with the fitting material and application, and the securing method matches the system. A 1/2-inch barb should not be forced into undersized tubing just because optimism is free.
Another frequent problem is mixing components from different systems without checking specifications. Some fittings are designed for clamp rings, some for ear clamps, and some drip irrigation barbs rely on a tight friction fit with no clamp at all. Read the packaging or product sheet, because your future self would rather spend two minutes checking specs than forty-five minutes chasing a mystery leak.
Tools and Materials You May Need
- Correct-size barbed fitting
- Compatible tubing or hose
- Appropriate clamp, sleeve, crimp ring, or cinch ring if required
- Tubing cutter, hose cutter, or sharp utility knife
- Clamp tool, screwdriver, nut driver, or crimp tool depending on clamp type
- Small container of hot water for stubborn tubing
- Clean rag
- Leak-test method appropriate to the system
How to Insert Barbed Fittings in 7 Steps
Step 1: Match the Tubing, Fitting, and Clamp
Start by confirming the tubing inside diameter and the fitting barb size are the same. This sounds obvious, but fittings are sold in enough similar-looking sizes to make eyeballing a terrible strategy. If you are working with vinyl, rubber, or braided tubing, the tubing’s inside diameter usually determines the barb size. If you are working in a branded plumbing system, use fittings and rings approved for that exact tubing type.
Also decide how the connection is supposed to be secured. For many plastic, vinyl, and rubber tubing applications, a stainless steel hose clamp is the standard move. For PEX barb systems, that may mean a crimp ring or cinch clamp positioned over the barb area. For some drip irrigation barbs, the fitting is designed to create a tight interference fit without a clamp. The fitting does not care about your improvisation, but it will absolutely report you to the leak department.
Step 2: Inspect the Fitting and Cut the Tubing Cleanly
Before assembly, inspect both parts. Look for burrs, cracks, deformities, corrosion, dirt, or damage on the fitting. Check the tubing for splits, flattening, kinks, or ragged ends. A damaged fitting can cut the tubing or fail to seal. A damaged hose end can leak even if the clamp is tight enough to make you feel heroic.
Next, cut the tubing as squarely as possible. Use the proper cutter when you have one. If you use a knife, make a clean, straight cut rather than a mashed, diagonal one. A square cut helps the tubing seat evenly against the fitting shoulder and gives the clamp a better chance of compressing uniformly around the barb. Crooked cuts create crooked outcomes. Plumbing has a long memory.
Step 3: Slide the Clamp Onto the Tubing First
Yes, first. Not after. Not “I’ll remember in a second.” First.
If your application calls for a hose clamp, ear clamp, clamp ring, or crimp ring, load it onto the tubing before inserting the fitting. This is one of the most annoying beginner mistakes because once the fitting is seated, backing out to add the clamp often means starting over with a now-stretched tube end. Slide the clamp far enough back that it does not interfere while you insert the fitting, but keep it close enough that it is ready when the tubing is fully seated.
For PEX-style barb connections, manufacturers commonly instruct installers to slide the ring over the pipe first, then push the pipe onto the fitting until it reaches the shoulder. That sequence matters because the ring must end up directly over the barbs, not floating in the wrong postal code.
Step 4: Soften the Tubing if It Is Stiff
Some tubing slides onto a barb easily. Other tubing behaves like it was personally offended by the suggestion. If the material is stiff, especially in cool weather, soften the tubing end before insertion. The easiest method is to soak the end in hot water for a short time. This makes the tubing more pliable and helps it stretch over the barb without excessive force.
Do not turn this into a medieval heating experiment. You want warm, workable tubing, not scorched rubber or deformed plastic. In most household applications, hot water is enough. If you find yourself considering a torch, a heat gun, and a prayer, stop and check whether you are using the right tubing and fitting sizes.
Step 5: Twist and Push the Fitting Until It Seats Fully
Now insert the barbed end into the tubing using steady pressure and a slight twisting motion. Avoid jerky force. The goal is controlled insertion, not an arm-wrestling finale. Push until the tubing is fully seated against the fitting shoulder or until it clearly passes over the barb section designed to seal. With many barb fittings, partial insertion is the main reason a connection leaks or pulls off later.
If the fitting has multiple barbs, make sure the tubing reaches the intended final stop. On a true shoulder-stop design, the tubing should touch the shoulder. On smaller irrigation connectors, seating depth may be shorter, but the tubing still needs to be pushed in firmly and evenly. If the tubing bunches, stretches weirdly, or starts shaving material off the barb, remove it and reassess. A connection assembled in anger tends to age badly.
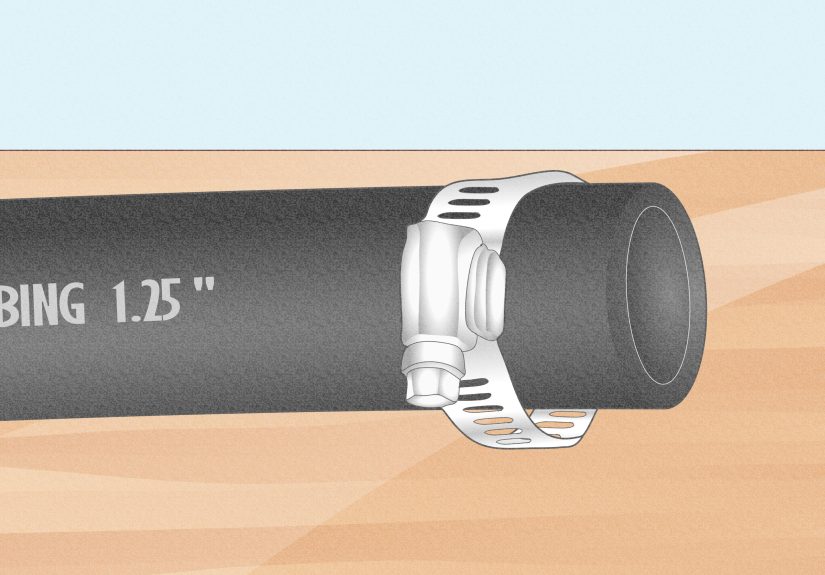
Step 6: Position the Clamp Correctly and Tighten It Properly
Once the tubing is fully seated, slide the clamp into position over the barb area. Do not place it right on the edge of the tubing where it can slip off, and do not place it so far back that it misses the barb altogether. On many clamp-ring barb systems, the ring is typically positioned about 1/8 to 1/4 inch from the end of the tubing so it compresses directly over the barb section.
Tighten the clamp firmly, but do not go full action-movie mode. Over-tightening can cut into soft tubing, distort plastic fittings, or weaken the seal you were trying to improve. Worm-drive hose clamps should be snug and even. Ear clamps should be fully closed per tool guidance. Crimp or clamp rings should be installed with the proper tool, and if your system requires a gauge or visual verification, actually do it. “Looks about right” is not a recognized plumbing standard.
Step 7: Test the Connection and Support the Line
With the fitting installed, test the line under normal working conditions before you declare victory. For water applications, run the system and look closely for drips, sweating, or slow seepage. For air lines, use the appropriate leak-check method for the system. If the connection is part of a higher-pressure or specialized application, follow the manufacturer’s pressure-testing guidance instead of inventing your own laboratory.
Also check the tubing path. A perfectly inserted barb fitting can still fail early if the hose is twisted, sharply bent, pulled sideways, or left vibrating under tension. Add support where needed and avoid strain right at the fitting. Barbed fittings like to hold on, but they do not enjoy being used as tiny structural beams.
Common Problems and How to Fix Them
The Tubing Will Not Go Onto the Barb
Usually this means one of three things: the tubing is too small, the tubing is too stiff, or the barb style is not meant for that hose. Re-check the size, soften the tubing in hot water, and inspect the fitting for burrs or damage. If it still feels impossible, do not force it. “Impossible” is often another word for “wrong part.”
The Connection Leaks
Leaks usually come from partial seating, a crooked cut, a damaged tube end, a poorly positioned clamp, or mismatched components. Remove the connection, trim back the tubing to fresh material, inspect the fitting, and reinstall. If the tubing has already been stretched out or damaged, replace that section.
The Tubing Pops Off Under Pressure
This is often caused by the wrong size combination, no clamp where one is required, insufficient seating depth, or excessive system pressure. Make sure the tubing is fully over the barb, the clamp is in the correct location, and the fitting type is rated for the application. If the line carries more pressure than a simple barb setup should handle, upgrade the connection method instead of hoping the hose develops a stronger personality.
Pro Tips for a Better Barbed Fitting Installation
- Use stainless steel clamps for wet or corrosive environments when appropriate.
- Keep cuts square and clean every single time.
- Warm tubing with hot water instead of attacking it with excessive force.
- Seat the tubing fully to the fitting shoulder whenever the design includes one.
- Do not reuse damaged fittings, distorted clamps, or stretched-out tubing ends.
- Support the line so the fitting is not under constant pull or bend stress.
Field Notes and Real-World Experience With Barbed Fittings
In real-world DIY work, barbed fittings usually fail for very human reasons rather than mysterious engineering drama. Someone cuts the tubing with dull snips and gets a mashed end. Someone forgets the clamp until after the barb is already buried in the hose. Someone decides a connection “feels tight enough” and skips the test run. Then the system behaves perfectly for six minutes, waits until nobody is watching, and starts dripping onto drywall, mulch, or the exact shelf where the paper towels are not.
One of the most useful habits I have seen from experienced installers is that they slow down at the beginning so they do not have to speed-wobble through repairs later. They dry-fit their parts, verify tubing size, line up clamps before assembly, and keep a cup of hot water nearby for stubborn hose ends. It looks almost too simple, but that little bit of discipline is the difference between a clean installation and a sweaty garage monologue about why a half-inch tube apparently believes it is a cast-iron pipe.
Another real lesson is that material feel matters. Soft vinyl tubing can be forgiving and easy to work with, but it can also deform if a clamp is over-tightened. Rubber hose may grip beautifully, but older hose can hide internal wear that makes a fresh fitting less reliable than it appears. PEX-style barb systems feel more structured and repeatable, but only when the ring placement and tool use are correct. In other words, the fitting matters, the clamp matters, and the tubing matters. The connection is only as trustworthy as the least cooperative part in the trio.
There is also a lot of value in knowing when not to force a barbed fitting. People sometimes assume that more pressure from their hands will solve a stubborn install. Sometimes it does. Sometimes it just shaves the tubing, scores the barb, and creates a leak that politely waits until the line is under full pressure. If the fit is absurdly difficult, experienced installers stop and ask better questions: Is the tubing cold? Is the ID correct? Is this the approved fitting for the system? Would a different clamp type work better here? That pause saves time, money, and dignity.
Finally, the best experience-based advice is to trust testing more than confidence. Plenty of connections look perfect and still need one small adjustment. A careful leak test, followed by a second look after the line has been pressurized for a bit, catches most issues before they turn into full-blown messes. And once you have done a few of these correctly, barbed fittings stop feeling like tiny mechanical traps and start feeling like what they really are: simple, reliable connectors that reward clean prep, proper seating, and just enough patience to keep your project from becoming a surprise water feature.
Conclusion
If you want barbed fittings to hold, the formula is wonderfully boring: use the correct size, make a clean cut, soften stiff tubing when needed, push the fitting in fully, place the clamp where it belongs, and test before walking away. That is it. No magic. No gimmicks. Just good prep and correct installation.
Once you get the process down, barbed fittings become one of the handiest connections in any toolkit. They are simple, versatile, and reliable when installed properly. Follow these seven steps, and your tubing connection should stay tight enough that the only thing dripping afterward is your faucet, and hopefully that is next on your repair list.


