Table of Contents >> Show >> Hide
- What You’ll Need (Tools + Materials)
- Before You Start: Inside Mount vs. Outside Mount
- Step 1: Measure Like You Mean It
- Step 2: Mark Bracket Placement (Level Is Your Best Friend)
- Step 3: Drill Pilot Holes and Install Brackets
- Step 4: Snap in the Headrail (The “Aha” Moment)
- Step 5: Finish the Details (Valance, Wand, Cord Safety) and Test
- Troubleshooting: When Your Blinds Get “Dramatic”
- Nice Upgrades (Optional, But Fun)
- When to Call a Pro
- Conclusion
- Bonus: Real-World Experiences That Make Installation Easier (and Less Swear-y)
- 1) The “close enough” measurement is how you buy blinds twice
- 2) Old houses don’t do “perfectly square,” and that’s not your fault
- 3) Drywall anchors are not optional when you’re outside mounting
- 4) The headrail “click” is a real thingdon’t settle for “kind of in”
- 5) Handles, cranks, and locks are the sneaky villains of blind installation
- 6) Cordless blinds are great… and they have a learning curve
- 7) If you’re installing a bunch of blinds, create a tiny assembly line
- 8) Don’t ignore child and pet safety hardware
- SEO Tags
Installing window blinds sounds like one of those “quick weekend projects” that mysteriously eats an entire Saturday. The good news: it doesn’t have to. With the right measurements, a level that isn’t lying to you, and about 30 minutes of focused effort (okay, plus 10 minutes of looking for the drill you swear you just had), you can get crisp, professional-looking blinds up and working smoothly.
This guide walks you through how to install blinds in 5 easy stepswhether you’re doing a sleek inside mount or going bold with an outside mount for better light control and privacy. We’ll also cover the little details that separate “installed” from “installed well,” plus real-world tips from people who’ve learned the hard way so you don’t have to.
What You’ll Need (Tools + Materials)
Most blind kits include brackets, screws, and a valance clip system. You bring the power tools and the confidence.
- Tape measure (the grown-up ruler)
- Pencil
- Level (small torpedo level is perfect)
- Drill/driver + bits (including a small bit for pilot holes)
- Screwdriver (for tight spaces or “I don’t trust power tools” moments)
- Stud finder (helpful for outside mounts on walls)
- Wall anchors (if mounting into drywall, plaster, or crumbly mystery surfaces)
- Step stool or small ladder
- Safety glasses (because eyes are underrated until you lose one)
Before You Start: Inside Mount vs. Outside Mount
Your first decision changes everything: where the blinds will sit. Pick the mount style before you measure, because inside-mount measurements and outside-mount measurements are not interchangeable. (Ask anyone who has ever bought blinds twice.)
Inside mount (clean, built-in look)
- Blinds sit inside the window frame.
- Looks tidy and modern.
- Requires enough depth in the window casing for the headrail and blind stack.
- Best for windows with square, consistent frames.
Outside mount (maximum coverage and light control)
- Blinds sit on the wall or trim above/around the window.
- Better for blocking light gaps and hiding imperfect window frames.
- Great if you don’t have enough depth for an inside mount.
- Often the go-to for bedrooms, media rooms, and “I work nights” situations.
Step 1: Measure Like You Mean It
Installing blinds is 80% measuring and 20% screwing things into place. (Also 12% re-measuring. Yes, that math is intentional.) Measure carefully now and your blinds will look custom instead of “close enough-ish.”
How to measure for an inside mount
- Measure the width of the window opening at top, middle, and bottom. Use the smallest number so the blinds don’t rub or jam.
- Measure the height at left, center, and right. Use the largest number so the blinds cover the full opening.
- Check depth: confirm there’s enough flat space for the brackets and that the headrail won’t hit window cranks, handles, or trim bumps.
How to measure for an outside mount
- Measure the width you want covered (often trim-to-trim), then consider adding extra coverage on each side to reduce light gaps.
- Measure the height from where you want the top of the blinds to sit down to the sill (or below, if you want drama).
- Plan clearance for handles, locks, and any molding so the blinds can raise/lower without getting fussy.
Pro move: Write your measurements down immediately. Do not trust your memory. Your brain will absolutely turn “35 ⅞” into “35 ¼” the moment you step into the store or open a shopping tab.
Step 2: Mark Bracket Placement (Level Is Your Best Friend)
Brackets are the foundation. If they’re crooked, your blinds will be crooked. If they’re uneven, your blinds may stick, tilt weird, or develop a mysterious lean like they’re auditioning for a noir detective film.
Inside mount bracket placement
- Hold the headrail in the window frame (or use it as a guide) and center it.
- Mark bracket locations on the top inside of the casingtypically near each end.
- If your blinds are wide, you may have center support brackets. Space them evenly and keep them away from cords/ladder strings and tilt mechanisms.
- Use a level to confirm the marks line up.
Outside mount bracket placement
- Decide if you’re mounting to the wall, trim, or ceiling (yes, that’s a thing).
- Mark a straight, level line where the top of the headrail will sit.
- Place the brackets along that line and ensure they’re level with each other.
- If you’re mounting into drywall (not wood trim or studs), plan to use anchors rated for the blind’s weight.
Quick reality check: Many windows are not perfectly square. That’s normal. Your job is to install the blinds level so they look right to the human eyeeven if the window frame itself is doing its own thing.
Step 3: Drill Pilot Holes and Install Brackets
This is where the project becomes “official” and you stop being a person holding blinds up to a window like a medieval shield. Pilot holes help prevent splitting wood and make screws go in straight.
Drill pilot holes
- Choose a drill bit slightly smaller than your mounting screws.
- Drill at your marked points. Keep the drill straight (no freestyle angles).
- If you hit metal or masonry, stop and switch to the correct bit and anchors.
Attach the brackets
- Screw brackets in firmly, but don’t overtighten (stripped screws are forever).
- Re-check level once both end brackets are mounted.
- Install any center support brackets if your blind kit includes them.
Safety note: choose cordless when you can
If you’re installing blinds in a home with kids or pets, cordless or inaccessible-cord designs are strongly preferred for safety. If you have corded blinds, use the included safety devices (like cord stops or tensioners), keep cords out of reach, and move furniture away from windows so little climbers can’t access dangling cords.
If your blinds use a continuous cord loop (common on some vertical blinds and shades), install the tension device exactly as instructed so the loop stays taut and doesn’t hang freely.
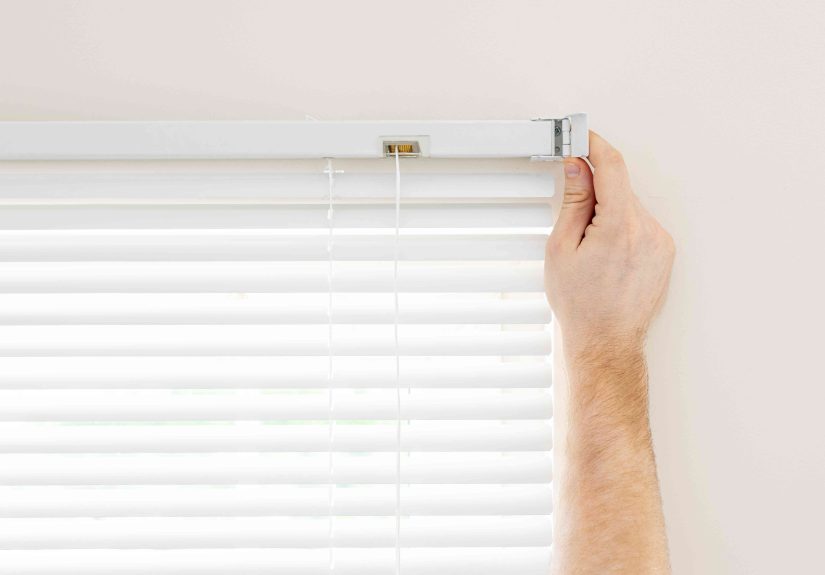
Step 4: Snap in the Headrail (The “Aha” Moment)
Once the brackets are up, the rest feels like magicassuming the headrail clicks in the way it’s supposed to, and not in the way that makes you question physics.
How to install the headrail
- Open the bracket doors (if your brackets have hinged latches).
- Insert the headrail: many systems hook the front lip first, then rotate the back up until it snaps into place.
- Close the bracket doors/locks to secure the headrail.
- Give the headrail a gentle tug (not a rage tug) to confirm it’s locked in. If it slides side-to-side too much, check if the end stiffeners or bracket positioning need adjusting.
If your blinds are wide
Wider blinds often include center supports. Make sure the headrail fully engages each support bracket and doesn’t pinch any cords, ladders, or tilt components. A pinched cord is a future you-problem. Be kind to future you.
Step 5: Finish the Details (Valance, Wand, Cord Safety) and Test
This step turns “functional” into “finished.” It’s also where you catch small issues before they become daily annoyances.
Install the valance (if included)
- Snap valance clips onto the headrail.
- Press the valance into the clips until it clicks.
- If there are corner pieces or returns (side pieces), attach them per the kit instructions.
Attach the wand (or handles) and test operation
- Hook the tilt wand onto the tilt mechanism (usually a small hook at the headrail).
- Raise and lower the blinds fully to confirm smooth travel.
- Open/close slats to ensure they rotate evenly without binding.
Do a final safety and usability check
- Confirm cords (if any) are secured and not dangling within reach of children.
- Make sure the blinds clear window cranks, locks, and handles.
- Check that both ends sit level and the bottom rail hangs evenly.
Troubleshooting: When Your Blinds Get “Dramatic”
Problem: The blinds look crooked
- Re-check bracket level. A tiny tilt at the top becomes a big visual tilt at the bottom.
- Confirm the headrail is fully snapped into both brackets.
- If the window itself is out of square, level the blinds anywayyour eyes care more than your tape measure.
Problem: Blinds won’t raise/lower smoothly
- Look for pinched cords or ladders caught in a bracket or center support.
- Make sure the headrail isn’t squeezed too tightly by brackets mounted too close together.
- Confirm the blind is the correct widthtoo tight inside a frame can cause friction and sticking.
Problem: Valance won’t stay on
- Check you’re using the correct clips (some kits include multiple clip types).
- Press along the length of the valance to fully seat it into each clip.
- If clips feel loose, verify they’re snapped tightly onto the headrail.
Problem: Drywall screws keep spinning (aka “The Wall is Betraying Me”)
- Use wall anchors rated for the blind weight.
- If possible, mount into studs or solid wood trim for maximum strength.
- For old plaster or crumbly surfaces, specialty anchors may be needed.
Nice Upgrades (Optional, But Fun)
No-drill blinds for renters
Some brands offer no-drill headrail systems that clamp into the window opening or use adhesive endcaps. These can be a great option if you can’t (or don’t want to) put holes in the wall. Follow the product-specific instructions closely, since the mounting method differs from traditional brackets.
Smart or motorized blinds
If you’re already installing blinds and you love convenience, consider smart blinds or retrofit tilt devices that can automate opening and closing on a schedule. They’re especially handy for tall windows or hard-to-reach spots.
When to Call a Pro
DIY blind installation is absolutely doable, but it’s okay to outsource if:
- You’re installing blinds on many windows (and want your weekend back).
- You have very tall windows, tricky angles, or specialty shades.
- Your walls are unusual materials (stone, tile, old plaster) and you’re not equipped for the right anchors/bits.
Professional installation costs vary widely by location, window count, and blind type. If you’re balancing time vs. money, it can be worth getting a quoteespecially for complex setups.
Conclusion
Installing blinds doesn’t require wizardryjust careful measuring, level brackets, and a headrail that clicks in the way it’s meant to. Follow the five steps: measure, mark, mount brackets, snap in the headrail, and finish + test. Do it once, do it right, and you’ll get clean lines, better privacy, and light control that makes the room feel instantly more put-together.
And remember: if the blinds look great but don’t operate smoothly, it’s almost always a bracket alignment issue or a pinched component. Small fixes now save big annoyance later.
Bonus: Real-World Experiences That Make Installation Easier (and Less Swear-y)
The internet makes installing blinds look like a five-minute job performed by someone wearing clean white sneakers. In real life, it’s more like: you measure, your window argues, and your drill battery chooses violence. Here are the practical lessons installers and homeowners commonly sharethings that don’t always make it into the “official” instructions.
1) The “close enough” measurement is how you buy blinds twice
A difference as small as 1/8 inch can decide whether an inside-mounted blind glides smoothly or grinds like it’s chewing sand. Many people measure the top of the frame (where it’s widest), order based on that, and then discover the bottom of the frame is narrower. If you’re inside mounting, measuring width in three places and using the smallest number feels conservativebut it’s the kind of conservative that prevents daily regret.
2) Old houses don’t do “perfectly square,” and that’s not your fault
If you live in an older home, the window opening may be slightly trapezoidal. That can make a perfectly level blind look “off” compared to the window trim. The trick is to install the blinds level anyway, because your eyes read the blind as the reference line. If you need to cheat the look a little, an outside mount can hide frame inconsistencies and make everything look intentional, not accidental.
3) Drywall anchors are not optional when you’re outside mounting
People love to say “just screw it in.” If you’re hitting solid wood trim or a stud, sure. But when brackets go into drywall, skipping anchors often ends with a bracket slowly loosening over timeuntil one day the blinds slump like a tired houseplant. Use anchors sized for the load, and don’t be shy about upgrading to better ones if the kit screws feel tiny. A slightly stronger anchor is cheaper than a repair patch and repaint.
4) The headrail “click” is a real thingdon’t settle for “kind of in”
A common frustration is blinds that look installed but rattle, slide, or pop loose when raised. Usually the headrail isn’t fully engaged in the bracket latch. The best practice is to seat the headrail firmly, close the bracket doors, and then do a gentle pull test. If it budges too much, stop and fix it now. A headrail that’s “almost clicked” will eventually become “definitely fell.”
5) Handles, cranks, and locks are the sneaky villains of blind installation
Kitchens and bathrooms love to surprise you with window cranks and protruding locks. If the headrail or blind stack interferes, the blind may scrape or bind. Two common solutions: choose an outside mount for clearance, or use bracket extensions/spacers (if your system supports them) to project the blinds slightly forward. It’s better to plan for clearance upfront than to discover your blind can’t fully lower without bumping into a handle like it’s offended.
6) Cordless blinds are great… and they have a learning curve
Cordless lift systems are clean-looking and safer, but they sometimes require a more deliberate pull or push to engage. Many “these blinds are broken” complaints are actually “I didn’t know it needed a firmer, even lift.” Test gently at first, then use smooth, consistent motion. If it still feels sticky after installation, check that nothing is pinched in a bracket and that the blind isn’t too tight in the frame.
7) If you’re installing a bunch of blinds, create a tiny assembly line
Installing blinds room-by-room is fine. Installing blinds window-by-window is how you lose your mind. People who do multiple windows successfully usually batch the work:
- Measure and label every window first.
- Then mount brackets on all windows.
- Then snap in headrails.
- Then add valances/wands and test everything.
It’s faster, it keeps your tools in one place, and you’ll make fewer mistakes because you’re repeating the same task instead of constantly switching gears.
8) Don’t ignore child and pet safety hardware
If your blinds include cord stops, tension devices, or other safety parts, install them. People skip these because they’re excited to be done, but those components exist for real reasons. Even if you don’t have kids, visiting family or friends might. And pets… well, pets treat cords like invitation-only toys. Secure what needs securing.
Bottom line: the “easy steps” are true, but the smooth experience comes from small choicesaccurate measurements, solid mounting, and a careful final test. Do those, and you’ll get blinds that look sharp, operate smoothly, and don’t require a daily pep talk to function.