Table of Contents >> Show >> Hide
- Why Classic Tiramisu Works So Well
- Ingredients for a Classic Tiramisu
- Before You Start: 5 Pro Tips That Matter
- How to Make a Classic Tiramisu Like a Pro in Only 4 Steps
- Common Tiramisu Mistakes and How to Avoid Them
- Serving Ideas That Make It Feel Extra Special
- How to Store Tiramisu
- Is Homemade Tiramisu Worth It?
- Extra Experience: What Making Tiramisu Teaches You After the First Few Tries
- Conclusion
There are desserts that politely end a meal, and then there is tiramisu. Tiramisu kicks down the dining room door in a silk robe, smelling like espresso and cocoa, and announces that dessert has arrived to steal the spotlight. When it is done well, it feels luxurious, feather-light, deeply coffee-kissed, and just indulgent enough to make everyone suddenly “too full” and yet somehow reaching for seconds.
The good news is that classic tiramisu is not difficult. The bad news is that it has zero respect for impatience. This is a chilled, layered dessert, not a microwave mug cake with delusions of grandeur. But once you know what matters most, you can make a classic tiramisu like a pro in only four steps: build the coffee layer, whip the mascarpone filling, assemble the layers, and chill until everything turns dreamy.
This guide breaks the process down in a clean, foolproof way so your tiramisu tastes elegant instead of soggy, rich instead of heavy, and impressive instead of “Well, at least the cocoa powder covered some of it.” You will get the classic flavor profile people expect, plus the small details that separate a decent tiramisu from one that makes guests stare at you like you have a secret Italian grandmother hidden in the pantry.
Why Classic Tiramisu Works So Well
At its heart, tiramisu is a balancing act. The ladyfingers bring structure. The espresso brings bitterness and depth. The mascarpone filling brings creamy richness. The cocoa adds a dry, slightly bitter finish that keeps the dessert from tasting flat or overly sweet. Some versions include rum, Marsala, or coffee liqueur for extra complexity, but the soul of the dessert is always the same: soft layers, light texture, and bold coffee flavor.
The real trick is restraint. You do not want crunchy cookies, but you also do not want coffee soup. You want a filling that is smooth and airy, not overbeaten and grainy. And you absolutely want time in the refrigerator so the layers settle and slice beautifully. Tiramisu is a make-ahead dessert, which is just a classy way of saying the fridge does a lot of the work while you pretend you planned everything brilliantly.
Ingredients for a Classic Tiramisu
For a traditional-style 9-by-13-inch tiramisu, gather the following:
- 6 large egg yolks, preferably pasteurized if serving uncooked
- 3/4 cup granulated sugar
- 16 ounces mascarpone cheese
- 1 1/2 cups cold heavy cream
- 2 1/2 cups strong espresso or very strong brewed coffee, cooled
- 2 to 3 tablespoons dark rum, Marsala wine, or coffee liqueur, optional
- 1 teaspoon vanilla extract, optional
- 36 to 40 ladyfingers
- Unsweetened cocoa powder, for dusting
- Dark chocolate shavings, optional for garnish
- A small pinch of salt
If you want the safest no-bake route, use pasteurized eggs or a cooked yolk base. That detail matters more than people think. Tiramisu should wake you up with coffee, not with regret.
Before You Start: 5 Pro Tips That Matter
1. Use mascarpone, not cream cheese
Can cream cheese work in a dessert emergency? Technically, yes. But if you want classic tiramisu flavor, mascarpone is the move. It is richer, smoother, and less tangy, which gives the filling that signature velvety finish.
2. Cool the coffee completely
Warm coffee turns ladyfingers into mush at warp speed. Let it cool before dipping so you stay in control of the texture.
3. Dip fast
A quick dip is enough. Think “goodbye handshake,” not “spa weekend.” Ladyfingers absorb liquid quickly and can collapse if soaked too long.
4. Mix gently
Mascarpone can turn dense or curdled if overworked. Fold instead of beating the life out of it. This is dessert, not a grudge match.
5. Chill long enough
Four hours is the minimum. Overnight is even better. Tiramisu improves as the layers soften and the flavors meld together.
How to Make a Classic Tiramisu Like a Pro in Only 4 Steps
Step 1: Make the coffee mixture and prep your pan
Brew your espresso or strong coffee first, then let it cool fully. Stir in the rum, Marsala, or coffee liqueur if you are using it. Pour the mixture into a shallow dish so dipping the ladyfingers is fast and easy.
Next, set out a 9-by-13-inch baking dish or another similarly sized serving dish. A glass dish is especially nice because tiramisu has gorgeous layers and deserves to show off a little. If you want cleaner slices later, you can lightly line the dish with parchment, but this is optional.
This is also the moment to organize your ingredients. Have the mascarpone slightly softened, the cream cold, the cocoa ready, and the ladyfingers within reach. Once assembly starts, tiramisu moves quickly. That is the beauty of it. It is like building edible architecture, except the reward is much tastier than drywall.
Step 2: Make the mascarpone filling
In a heat-safe bowl set over barely simmering water, whisk the egg yolks and sugar together until the mixture becomes pale, slightly thickened, and warm. This takes only a few minutes and helps dissolve the sugar while creating a more stable, silky base. Remove from the heat and let it cool slightly.
In a separate bowl, beat the heavy cream to medium peaks. You want it fluffy and structured, but not so stiff that it starts looking stubborn.
Now work with the mascarpone. Stir it gently in a bowl with a pinch of salt and the vanilla, if using, just until loosened. Fold in the egg yolk mixture until smooth. Then fold in the whipped cream in two or three additions. Move gently, using a spatula, until the filling is airy, smooth, and spreadable.
This step is where tiramisu either becomes elegant or turns into a cautionary tale. Overmixing can make the filling heavy or grainy. Underfolding leaves streaks. What you want is a creamy cloud that holds its shape but still spreads easily.
Step 3: Dip, layer, and repeat
Take one ladyfinger at a time and dip it quickly into the coffee mixture. A second or two per side is usually enough. Arrange the dipped ladyfingers in a single layer across the bottom of the dish. Break a few to fit if needed. Nobody will file a formal complaint.
Spread half of the mascarpone filling over the first cookie layer. Use an offset spatula or the back of a spoon to smooth it evenly. Then dust lightly with cocoa powder.
Repeat with another layer of quickly dipped ladyfingers, then the remaining mascarpone filling. Smooth the top. At this stage, the dessert may look deceptively soft. That is normal. Chilling is what transforms it from “nice mess in a pan” into proper tiramisu.
If you want a slightly more dramatic finish, save the final cocoa dusting for just before serving. That keeps the top looking dark, dry, and restaurant-worthy instead of damp and patchy.
Step 4: Chill, finish, and serve
Cover the tiramisu and refrigerate it for at least 4 hours, though overnight is the real power move. During this time, the ladyfingers soften into cake-like layers, the filling firms up, and the flavors become more unified and balanced.
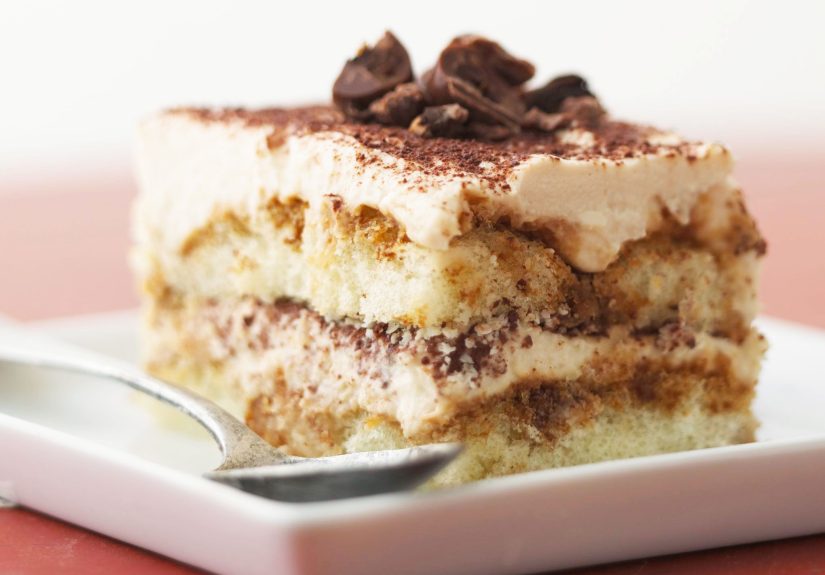
Right before serving, dust the top generously with unsweetened cocoa powder. Add dark chocolate shavings if you want extra drama. Slice into squares or spoon it into bowls if you are going for a more rustic presentation.
The final texture should be soft but sliceable, creamy but not runny, and rich without feeling heavy. Each bite should give you coffee, mascarpone, cocoa, and just enough sweetness to keep things exciting.
Common Tiramisu Mistakes and How to Avoid Them
Soggy ladyfingers
This usually happens because the cookies sat in the coffee too long. Remember: tiramisu is about dipping, not marinating.
Runny filling
This can happen if the cream was underwhipped, the mascarpone was overworked, or the tiramisu did not chill long enough. Texture is built in stages, and the fridge is part of the recipe.
Filling that tastes too sweet or too flat
Use strong coffee and unsweetened cocoa. Tiramisu needs bitterness to stay balanced. Weak coffee leads to bland dessert, and bland dessert is just sweet sadness in a pan.
Grainy mascarpone mixture
Mascarpone is delicate. Fold gently and avoid aggressive beating once it is added. Think calm, steady, graceful movements.
Serving Ideas That Make It Feel Extra Special
Classic tiramisu already brings enough personality to the table, but presentation can make it even better. Serve it in neat squares for a dinner-party look, or layer it in glasses for individual portions. Add chocolate curls, a few espresso beans, or a very light dusting of cocoa at the last minute.
It also pairs beautifully with after-dinner coffee, a small glass of dessert wine, or absolutely nothing at all because tiramisu does not need backup singers. It is the headliner.
How to Store Tiramisu
Keep tiramisu refrigerated and covered. It is usually best within 1 to 2 days, when the texture is set but still fresh. By day three, it can start getting a little too soft, depending on how heavily the ladyfingers were dipped.
If you are making it ahead for guests, the sweet spot is the night before. That gives you the flavor development of an overnight chill without pushing the texture too far.
Is Homemade Tiramisu Worth It?
Absolutely. Store-bought tiramisu can be fine in an emergency, in the same way that airport coffee can be fine when your choices are limited and your spirit has left your body. But homemade tiramisu gives you better texture, better coffee flavor, better balance, and the satisfaction of knowing you made something that looks much fancier than it actually is.
And that is really the magic of this dessert. It feels polished and luxurious, but the process is straightforward once you understand the rhythm: dip, layer, chill, triumph.
Extra Experience: What Making Tiramisu Teaches You After the First Few Tries
If you make tiramisu more than once, you start noticing that the recipe is less about complexity and more about judgment. The ingredients are simple, but your choices shape the final result more than any fancy trick. The first time many people make it, they treat the ladyfingers like tiny sponges that need a full coffee bath. Then they cut into the dessert later and discover a pan with the structural integrity of wet cardboard. That lesson sticks.
After a few rounds, you begin to trust the quick dip. You realize that the cookies keep absorbing moisture as the dessert chills, so there is no prize for soaking them into oblivion. You also start to understand mascarpone better. It is not difficult, but it does demand a gentler hand than cream cheese or buttercream. Once you stop overmixing it, the filling becomes silkier, lighter, and far more professional in texture.
Another thing experience teaches you is that tiramisu gets better when you stop rushing the refrigerator stage. Freshly assembled tiramisu can look promising, but chilled tiramisu is the version that earns compliments. Overnight, the coffee mellows into the cream, the cocoa settles in, and the whole dessert starts tasting less like separate layers and more like one complete, balanced bite. It is one of those rare cases where waiting is not just smart but delicious.
You also learn that strong coffee matters. Weak coffee makes the whole dessert taste timid. Tiramisu should not whisper. It should have enough espresso flavor to stand up to cream, sugar, and cocoa without becoming bitter. That does not mean it needs to punch you in the face, but it should definitely announce itself.
Then there is presentation. At first, people worry about perfect slices, perfect cocoa coverage, and whether the top looks bakery-worthy. But over time, you realize tiramisu is forgiving. Even a slightly messy serving still tastes incredible. In fact, some of the best tiramisus look a little relaxed, like they know they do not have to try too hard. That confidence is part of the charm.
Maybe the best experience-related lesson is this: tiramisu is one of the easiest desserts to use for building kitchen confidence. It teaches texture, timing, restraint, and balance without requiring advanced baking skills. You do not need to wrestle with the oven, temper sugar, or master laminated dough. You just need to pay attention, trust the process, and let the dessert do its thing in the fridge.
So if your first attempt is not flawless, that is normal. Maybe your layers lean a little. Maybe your top cocoa dusting looks like a weather event. Maybe one corner is slightly softer than the rest because you got excited with the coffee dip. None of that means you failed. It means you are now part of the long and honorable tradition of learning tiramisu by making it, tasting it, and immediately thinking, “I know exactly how I’ll make the next one even better.”
And honestly, that is when you know you are getting good at it. Not when it looks perfect, but when you understand why it works. Once that clicks, classic tiramisu stops feeling like a fancy restaurant dessert and starts becoming your signature move.
Conclusion
If you want a dessert that feels sophisticated without requiring pastry-school drama, classic tiramisu is hard to beat. In only four steps, you can build a rich, airy, coffee-forward dessert that looks elegant, tastes balanced, and works beautifully for dinner parties, holidays, or random Tuesday nights when you want to feel like the main character. Use good mascarpone, strong coffee, a light hand, and enough chill time, and you will have a tiramisu that tastes like it came from someone who absolutely knows what they are doing.


