Table of Contents >> Show >> Hide
- Why Classic Tiramisu Still Wins
- What You Need Before You Start
- How to Make Classic Tiramisu in Only 4 Steps
- Pro Tips That Make a Big Difference
- Common Tiramisu Mistakes and How to Avoid Them
- Make-Ahead, Storage, and Serving Advice
- Frequently Asked Questions
- Conclusion
- Real-World Tiramisu Experiences That Make You Better at It
- SEO Tags
Tiramisu is one of those desserts that somehow feels both fancy and dangerously easy to eat. One minute you are serving a neat, elegant square at dinner, and the next minute you are standing in front of the refrigerator with a spoon, making decisions your future self may judge. That is the power of a good tiramisu.
This classic Italian favorite, whose name is often translated as “pick me up,” earns its reputation with layers of espresso-soaked ladyfingers, silky mascarpone filling, and a soft cloud of cocoa on top. It looks polished, tastes luxurious, and does not require turning your kitchen into a pastry boot camp. Better yet, you can make it like a pro in only four real steps.
The secret is not magic. It is technique. You need bold coffee, a creamy filling that does not slump into sadness, ladyfingers dipped just long enough to soften but not so long they become dessert sponges, and enough chill time for everything to settle into those dreamy layers. Get those right, and you will have a classic tiramisu that tastes like you secretly trained in a tiny Italian dessert shop and now refuse to talk about it.
Why Classic Tiramisu Still Wins
There are a thousand modern spins on tiramisu now: pistachio tiramisu, lemon tiramisu, matcha tiramisu, chocolate-heavy tiramisu, berry tiramisu, and probably tiramisu that has been emotionally processed by social media. They can be delicious, sure. But the classic version still wins because it is all about balance.
You get bitterness from the espresso, richness from the mascarpone, lightness from the whipped filling, structure from the ladyfingers, and a gentle cocoa finish that keeps the whole thing from becoming cloying. It is rich without being heavy, sweet without being sugary, and dramatic without demanding a culinary therapy session.
If you want a dessert that feels restaurant-worthy but is totally doable at home, classic tiramisu is the move.
What You Need Before You Start
Ingredients
- 1 1/2 to 2 cups strong espresso or very strong brewed coffee, cooled
- 1 to 2 tablespoons Marsala wine, dark rum, or coffee liqueur (optional)
- 4 large pasteurized egg yolks
- 1/2 cup granulated sugar
- 16 ounces mascarpone cheese, slightly softened but still cool
- 1 cup cold heavy cream
- 1 teaspoon vanilla extract
- 1 package ladyfingers, usually 24 to 40 depending on the pan and style
- Unsweetened cocoa powder, for dusting
- Dark chocolate shavings, optional
Tools
- Mixing bowls
- Hand mixer or stand mixer
- Whisk
- Rubber spatula
- Shallow bowl for dipping
- 8-inch square dish or 9×13-inch baking dish
- Fine mesh sieve for cocoa
A quick note on eggs: classic tiramisu often includes eggs, but food safety matters. Using pasteurized eggs is the easiest smart move for a homemade version. If you are serving pregnant guests, young children, older adults, or anyone immunocompromised, be extra careful and choose a cooked-egg or pasteurized-egg approach. Dessert should be memorable for flavor, not for a conversation with your doctor.
How to Make Classic Tiramisu in Only 4 Steps
Step 1: Make the Coffee Soak
Brew your espresso or extra-strong coffee first, because it needs time to cool. Warm coffee is fine. Hot coffee is not. Hot coffee turns ladyfingers into mush faster than you can say, “Well, maybe it can be a trifle.”
Pour the cooled coffee into a shallow bowl. Add Marsala, dark rum, or coffee liqueur if you want that classic grown-up depth. You do not need much. This is tiramisu, not a cocktail in witness protection.
The goal here is strong flavor, not a flood. A proper tiramisu should taste like coffee in the best possible way. If your soak tastes weak, the finished dessert will too. If it tastes bold and slightly bitter, you are right where you need to be.
Step 2: Build a Silky Mascarpone Filling
In a heatproof bowl set over gently simmering water, whisk the egg yolks and sugar until the mixture becomes pale, slightly thickened, and smooth. This gives you a more stable, polished filling and helps create that luxurious texture people expect from a classic tiramisu.
Take the bowl off the heat and let it cool for a few minutes. Then beat in the mascarpone until smooth. Go gently here. Mascarpone is rich and beautiful, but it can turn grainy or loose if you attack it like it insulted your family. Mix until just creamy.
In a separate bowl, whip the cold heavy cream with vanilla until medium to stiff peaks form. Fold the whipped cream into the mascarpone mixture with a spatula, using broad, gentle motions. You are not stirring soup. You are protecting air. That air is what makes the filling feel light instead of dense and heavy.
When done, the filling should be thick, smooth, and spoonable, not runny. If it looks like something you could pour, stop and regroup. Tiramisu is layered, not poured like pancake batter.
Step 3: Dip Fast and Layer Smart
This is where many tiramisu dreams go sideways. Ladyfingers absorb liquid very quickly. Very quickly. Not “maybe in a minute” quickly. More like “blink and now you have a soggy biscuit” quickly.
Dip each ladyfinger briefly into the coffee soak. A fast dunk is enough. Some bakers dip one side, some both sides, but the key is speed. You want the cookies moistened, not drowning. They will continue softening as the dessert chills.
Arrange a single layer of dipped ladyfingers in your dish. Break a few if needed to fill the corners neatly. Spread half of the mascarpone filling over the top in an even layer. Add another layer of briefly dipped ladyfingers, then finish with the remaining filling.
Use an offset spatula or the back of a spoon to smooth the top. It does not need to be perfect, but it should look intentional. Casual elegance is the sweet spot. Think “European dinner party,” not “construction accident.”
Step 4: Chill, Finish, and Serve Like You Know Exactly What You’re Doing
Cover the dish and chill the tiramisu for at least 6 hours. Overnight is even better. This is not optional drama. Chilling gives the ladyfingers time to soften properly, the flavors time to mingle, and the filling time to set into clean, sliceable layers.
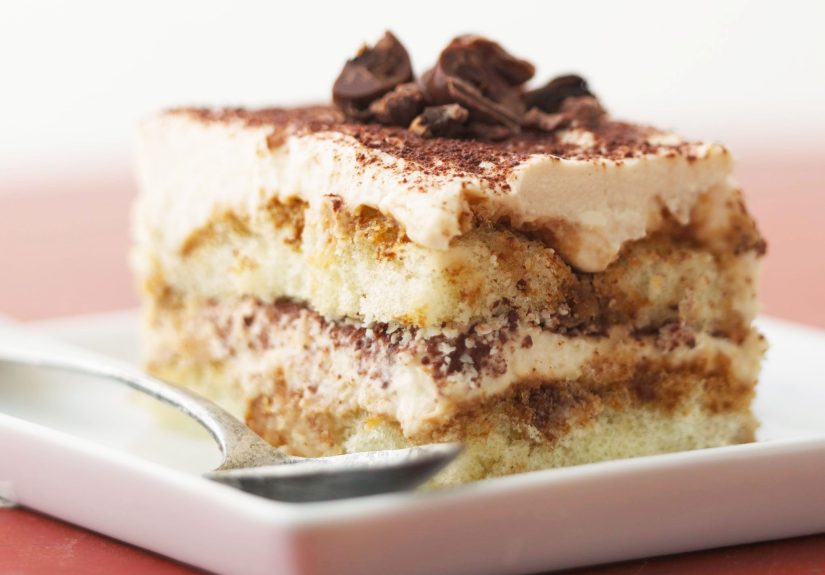
Right before serving, dust the top generously with unsweetened cocoa powder using a fine mesh sieve. Add chocolate shavings if you want a little extra flair. Then slice and serve cold.
A good tiramisu should cut with a spoon but still hold its shape on the plate. It should taste creamy, coffee-forward, and balanced, with no single element trying to dominate the whole dessert like a chaotic dinner guest.
Pro Tips That Make a Big Difference
Use strong coffee, not sad coffee
Tiramisu lives or dies on coffee flavor. Espresso is ideal, but strong brewed coffee works if that is what you have. Weak coffee creates a dessert that tastes like sweet dairy with vague ambition.
Keep the mascarpone under control
Mascarpone should be smooth and creamy, but not overheated or overbeaten. Let it soften just enough to blend easily. If it gets too warm or overmixed, the texture can become loose or grainy.
Do not oversoak the ladyfingers
This is the most common mistake. If your tiramisu turns into a pudding-adjacent swamp, oversoaked cookies are usually the reason. Quick dip. Move on. No lingering.
Chill longer than you think
If you serve tiramisu too soon, the layers will not be as clean and the flavor will not be as developed. It may still taste good, but it will not have that polished, pro-level finish.
Dust the cocoa at the end
For the freshest look and flavor, add the cocoa powder just before serving or after the tiramisu has fully chilled. That keeps the top looking neat instead of damp and patchy.
Common Tiramisu Mistakes and How to Avoid Them
The filling is too runny
This usually happens when the whipped cream was underwhipped, the mascarpone was overmixed, or the warm yolk mixture was combined too soon. Make sure each component has the right texture before folding everything together.
The bottom layer is soggy
You dipped the ladyfingers too long. Congratulations, your cookies were enthusiastic. Next time, make the dip faster and trust the chill time to do the rest.
The tiramisu tastes flat
The coffee was too weak, the cocoa too sparse, or the filling too sweet. Classic tiramisu needs contrast. Bitterness and richness are not flaws here. They are the whole point.
The slices look messy
That is usually a chill-time problem. Let the dessert rest in the refrigerator longer. Also, wipe your knife between cuts if you want cleaner squares. Yes, it is annoying. Yes, it works.
Make-Ahead, Storage, and Serving Advice
One of the best things about tiramisu is that it actually improves after a rest in the refrigerator. This makes it a fantastic make-ahead dessert for dinner parties, birthdays, holidays, or any night when you want applause with minimal last-minute work.
Plan to make it the day before serving if possible. Overnight chilling gives you a better texture and a more unified flavor. Keep it refrigerated until serving time, and do not let it sit out for hours, especially because it contains dairy and often eggs.
Store leftovers covered in the refrigerator. It is usually at its best within the next day or two, before the cookies soften too much. If you are lucky enough to have leftovers, that is.
Frequently Asked Questions
Can I make classic tiramisu without alcohol?
Absolutely. Just leave it out and use more coffee. The dessert will still be delicious, balanced, and very much tiramisu.
Can I use cream cheese instead of mascarpone?
You can in a pinch, but the flavor and texture will change. Mascarpone is richer, smoother, and more delicate. Cream cheese makes the dessert tangier and heavier. In other words, acceptable in an emergency, but not ideal if you want the classic experience.
Can I use store-bought ladyfingers?
Yes, and most home bakers do. Good tiramisu is more about technique than about proving you have endless free time.
Can I use strong brewed coffee instead of espresso?
Yes. Just make sure it is truly strong. Tiramisu should taste like coffee, not like somebody whispered the word “latte” in the next room.
Conclusion
If you break tiramisu down, it is really a lesson in restraint. Strong coffee, gentle folding, quick dipping, and patient chilling. That is it. No complicated decorating, no pastry-school sorcery, no need to panic-buy obscure equipment at midnight.
Make the components well, respect the texture, and let time do its part. The result is a classic tiramisu that looks elegant, tastes balanced, and feels far more impressive than the actual process. Which is, frankly, the kind of cooking trick we should all keep in our back pockets.
So the next time you want a dessert that says “I have excellent taste and probably know what mascarpone costs,” make tiramisu. Four steps. Big payoff. Minimal kitchen chaos. That is a win.
Real-World Tiramisu Experiences That Make You Better at It
Anyone who makes tiramisu more than once learns very quickly that this dessert has a personality. On paper, it looks simple. In real kitchens, it teaches you patience, timing, and humility. The first experience most people have is underestimating the ladyfingers. They look dry, harmless, and almost too crisp to matter. Then you dip one into coffee for a second too long and suddenly it folds like wet cardboard. That moment changes you. After that, you stop treating the dip casually and start moving with the focus of a person carrying a full cup of coffee over a white carpet.
Another classic experience is the great mascarpone panic. You think, “I’ll just beat this until it’s extra smooth,” and ten seconds later the filling starts looking questionable. Tiramisu rewards a lighter touch than many home bakers expect. It is not about whipping everything into oblivion. It is about coaxing the ingredients together so the final texture feels luxurious instead of heavy. Once you get that right, it becomes one of the most satisfying desserts to make because the transformation is immediate. A few separate ingredients suddenly become something silky, rich, and elegant.
Then there is the chill-time lesson. Nearly everyone is tempted to cut into tiramisu too early the first time. It smells amazing, it looks ready, and patience feels like an unreasonable request. But tiramisu has a way of teaching delayed gratification. The version you slice after two rushed hours is fine. The version you uncover the next day is excellent. The layers settle, the coffee softens the cookies perfectly, and the whole dessert tastes more unified. That experience alone turns many casual bakers into make-ahead dessert believers for life.
Serving tiramisu to other people is its own kind of education too. It is one of those desserts that gets a reaction before anyone even takes a bite. People see the cocoa-dusted top and the creamy layers and assume you worked much harder than you actually did. Then they taste it and suddenly everyone is asking for the recipe, the pan size, the coffee brand, and whether you secretly bought it from a bakery. That is the joy of tiramisu: it delivers high-end energy with relatively reasonable effort.
Perhaps the best experience tied to tiramisu is how adaptable it becomes once you understand the classic method. After you learn the rhythm of coffee, cream, layers, and chill time, you start noticing that the real skill is not following a rigid formula. It is knowing how texture behaves. You learn when the filling looks right, when the cookies have enough moisture, and when the dessert is ready to serve. At that point, you are no longer just making tiramisu. You are making it with confidence. And honestly, that confidence tastes almost as good as the dessert itself.


