Table of Contents >> Show >> Hide
- Before You Start: What Makes a Mobile “Work”
- Materials and Tools
- How to Make a Paper Mobile: 11 Steps
- Step 1: Pick a Theme (So You Don’t End Up with “Random Ceiling Salad”)
- Step 2: Choose Your Mobile Style
- Step 3: Build (or Prep) the Base Frame
- Step 4: Plan Your Layout (A 2-Minute Sketch Saves 20 Minutes of “Why Is This Crooked?”)
- Step 5: Create Templates and Cut Your Shapes
- Step 6: Add Dimension (Optional, but It Makes It Look Fancy)
- Step 7: Reinforce the Hanging Points (Because Paper Holes Love to Rip at the Worst Time)
- Step 8: Cut and Prep Strings
- Step 9: Attach Shapes to Strings
- Step 10: Assemble and Balance the Mobile
- Step 11: Secure Everything and Hang It Up
- Design Ideas That Look Great in Real Homes (and Not Just Craft Photos)
- Troubleshooting: Fix the Three Most Common Mobile Problems
- Safety Notes (Especially for Nursery Mobiles)
- Where These Ideas Come From (No Links, Just Credit)
- Extra: Real-World Experiences and Lessons People Learn Making Paper Mobiles (About )
- Wrap-Up
A paper mobile is basically jewelry for your ceiling: lightweight, a little dramatic, and constantly trying to look effortless while physics does all the work. Whether you’re making nursery decor, classroom art, party decorations, or a Calder-inspired kinetic sculpture, the magic is the same: cut paper, hang shapes, balance pieces, and let air currents do their slow, mesmerizing dance.
This guide walks you through how to make a paper mobile in 11 practical steps, with real-world tips on choosing paper, building a sturdy frame, keeping strings from tangling, and balancing everything so it hangs like you meant it (even if you didn’t).
Before You Start: What Makes a Mobile “Work”
A good DIY paper mobile has three jobs: (1) stay together, (2) hang level, and (3) move gracefully. The secret isn’t expensive suppliesit’s smart structure.
- Balance: If one side is heavier, your mobile will tilt and sulk.
- Strength: Paper tears at holes, so you’ll reinforce connection points.
- Airflow: Lightweight pieces move easily, but they also tangle more if spacing is tight.
- Safety: If this is a nursery mobile, it must be hung well out of reach and secured properly.
Materials and Tools
You can keep this super simple or go full “craft goblin with a supply stash.” Here’s a flexible listpick what fits your design.
Paper
- Cardstock (recommended): sturdy, cuts clean, holds shape.
- Construction paper: easy and colorful, but can curl or tear at holes.
- Tissue paper: beautifully light; best when reinforced or laminated.
- Recycled paper: old maps, sheet music, magazinesgreat texture, great bragging rights.
Hanging and Structure
- String, twine, embroidery floss, or clear fishing line
- One base: embroidery hoop, dowels, sticks, bamboo skewers, or paper straws
- Optional: wire, paper clips, or jump rings (for easier adjustments)
Cutting and Assembly
- Scissors (sharp onespaper can sense fear)
- Hole punch (small is ideal)
- Glue stick, craft glue, or Mod Podge
- Tape (washi tape is cute; clear tape is stealthy)
- Optional but helpful: ruler, pencil, craft knife + cutting mat, eyelets/brads
How to Make a Paper Mobile: 11 Steps
-
Step 1: Pick a Theme (So You Don’t End Up with “Random Ceiling Salad”)
Decide what your mobile is saying. Ideas that always look intentional: clouds and raindrops, ocean animals, stars and moons, forest shapes, rainbows, geometric shapes, or a Calder-inspired abstract mobile.
Quick rule: two to three colors looks modern; a full rainbow looks joyful; black + white looks like you have a design degree (even if you don’t).
-
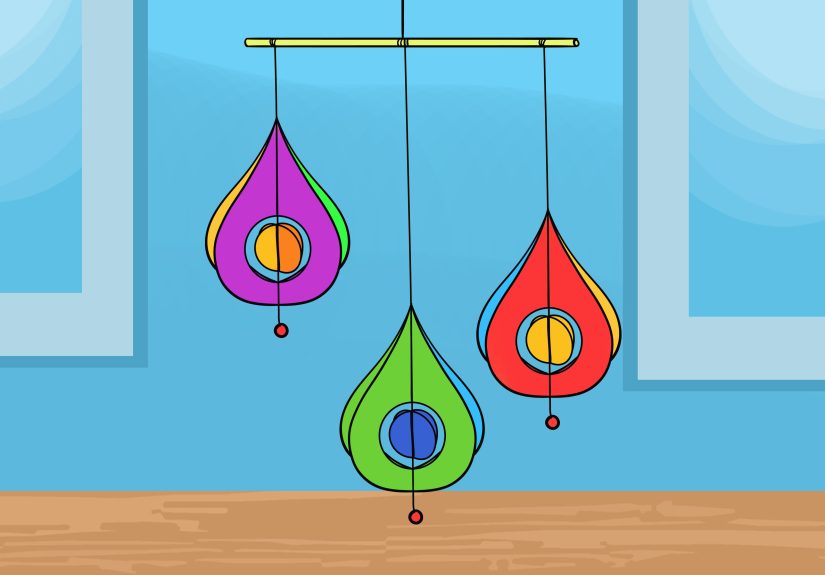
Step 2: Choose Your Mobile Style
Pick one of these structures:
- Hoop mobile: easiest to hang, great for nurseries and parties.
- Crossed-stick mobile: simple “X” frame that feels airy and natural.
- Balanced-rod mobile: the classic science-meets-art versionrods that balance at pivot points.
- Tiered mobile: multiple levels for depth (and extra “wow”).
If you want movement and balance practice, choose balanced rods. If you want fast, choose a hoop.
-
Step 3: Build (or Prep) the Base Frame
Your base is the skeletonmake it sturdy now, so it doesn’t wobble later like a folding chair at a backyard BBQ.
- Embroidery hoop: wrap with ribbon, twine, or leave bare. (A larger hoop gives more room and fewer tangles.)
- Two sticks in an X: cross them at the center and bind tightly with twine. Leave a loop at the top for hanging.
- Straws or thin dowels: great for balanced mobiles; lightweight and easy to adjust.
Pro tip: If using sticks, tighten the binding with multiple wraps in different directions and finish with a solid knot. The mobile will be tugged and adjusted laterplan for that.
-
Step 4: Plan Your Layout (A 2-Minute Sketch Saves 20 Minutes of “Why Is This Crooked?”)
Draw a quick diagram:
- How many hanging strands? (Odd numbers often look more natural.)
- Where do the longest pieces go? (Usually toward the center or one “feature” strand.)
- How much space between strands? (More space = fewer tangles.)
For a hoop: mark 6–10 evenly spaced points. For crossed sticks: plan 2–3 items per arm. For balanced rods: sketch rods stacked vertically (bottom rod balanced first, then work upward).
-
Step 5: Create Templates and Cut Your Shapes
Templates keep your shapes consistent (and keep your brain from trying to “freehand a perfect star,” which is how paper gets emotionally damaged).
Cut shapes from cardstock or reinforced paper. If you want a clean look:
- Cut pairs and glue back-to-back so both sides look finished.
- Mix sizes (small + medium + one larger “hero” shape) for visual rhythm.
- Use a craft knife for crisp corners on geometric designs.
Example idea: An ocean mobile can use fish, jellyfish, turtle, seaweed, and a starfish silhouettesimple shapes read well from a distance.
-
Step 6: Add Dimension (Optional, but It Makes It Look Fancy)
Flat shapes are great. Slightly 3D shapes are chef’s kiss. Try:
- Fold lines: lightly fold wings on birds, fins on fish, leaves on plants.
- Accordion folds: gives paper “bounce” and better motion.
- Mobius strips: loop paper with a half twist for a simple STEAM-friendly kinetic element.
If using tissue paper, consider reinforcing it by adhering it to a clear backing (like transparency film) or by sealing it with a thin layer of Mod Podge.
-
Step 7: Reinforce the Hanging Points (Because Paper Holes Love to Rip at the Worst Time)
The most common mobile failure is not “ugly design.” It’s “the string tore through the paper and now the whale is free.”
Reinforce each hole using one of these:
- Eyelets: the cleanest and strongest option.
- Clear tape sandwich: tape both sides, then punch through.
- Paper tab: fold a tiny strip over the top edge and punch through the doubled layer.
-
Step 8: Cut and Prep Strings
Decide your lengths before you attach anything. A good starting set for a hoop mobile: 8–14 inches, 12–18 inches, and 16–24 inches (mixing lengths adds depth).
Tie a small knot at the bottom end of each string (or loop it through a hole). If using fishing line, add a tiny piece of tape to help thread it through holesfishing line can be slippery like it’s training for the Olympics.
-
Step 9: Attach Shapes to Strings
Connect each shape to a string using a knot, a lark’s head knot through an eyelet, or a paper clip for adjustable prototypes. If your shape is light, the knot alone may hold; if it’s heavier, use a tiny dab of glue on the knot to prevent slipping.
Spacing tip: Keep shapes at slightly different heights so they don’t collide and tangle. You want gentle movement, not a paper traffic accident.
-
Step 10: Assemble and Balance the Mobile
This is the part where your mobile becomes art… and also where you learn that gravity has opinions.
For a Hoop Mobile
- Attach each strand to the hoop with a tight knot or slip knot.
- Use 3 hanging cords spaced evenly around the hoop to create a stable “tripod” for hanging.
- Adjust strand placement so the hoop hangs level.
For a Crossed-Stick (X) Mobile
- Bind two sticks into an X at the center with twine.
- Create a hanging loop by tying the twine ends above the intersection.
- Hang heavier elements closer to the center, lighter ones near the ends.
For a Balanced-Rod Mobile (Classic Kinetic Sculpture)
- Start with the bottom rod: hang two shapes from either side.
- Move shapes closer to or farther from the pivot point until the rod hangs level.
- Attach that rod to the next rod up, then balance again.
Balance rule you can actually use: if one side is heavier, either move that shape closer to the center, move the lighter shape farther out, or swap in a lighter/heavier piece. You’re adjusting the “lever arm,” not performing magic.
-
Step 11: Secure Everything and Hang It Up
Once it balances, lock it in:
- Add a tiny dab of glue to critical knots (optional but helpful).
- Trim excess string neatly.
- Do a gentle spin test to check for tangling.
Hang your paper mobile from a ceiling hook, removable adhesive hook (rated for the weight), or a sturdy fixture. For nurseries: hang well out of reach and avoid small detachable parts.
Design Ideas That Look Great in Real Homes (and Not Just Craft Photos)
1) The “Modern Minimal” Mobile
Use circles, half-moons, or clean geometric shapes in 2–3 colors. Cardstock + an embroidery hoop makes it crisp and lightweight.
2) The “Nature Walk” Mobile
Cut leaves, mushrooms, birds, and clouds. If you want a more organic feel, swap the hoop for a small branch (fully dried).
3) The “Ocean Motion” Mobile
Combine paper sea creatures with a few lightweight recycled elements (like shaped cardboard or painted bottle bottoms) for texture. Vary strand lengths to mimic underwater depth.
4) The “STEAM Mobile”
Add Mobius strips or simple spirals (paper strips curled with scissors). It becomes part art, part physics demoperfect for classrooms.
Troubleshooting: Fix the Three Most Common Mobile Problems
Problem 1: “It’s Tilting and Judging Me.”
- Re-check the top hanging cords (they should be evenly spaced).
- Move heavy strands closer to the center of the base.
- If using rods, re-balance the lowest level first, then work upward.
Problem 2: “Everything Tangles the Second I Look Away.”
- Increase spacing between strands.
- Shorten a few strands so shapes don’t overlap.
- Use slightly stiffer string or embroidery floss instead of ultra-soft thread.
- Add a “stopper bead” or tiny knot above a shape so it doesn’t slide.
Problem 3: “The Paper Is Tearing at the Hole.”
- Reinforce with tape on both sides, then re-punch.
- Use eyelets or a folded tab.
- Switch to cardstock or double-layer the shape.
Safety Notes (Especially for Nursery Mobiles)
Paper mobiles are decor, not toys. If it’s going near a crib: hang it well out of reach, use secure mounting hardware, and avoid small detachable pieces that could fall. Keep cords short enough that nothing dangles where little hands can grab.
Where These Ideas Come From (No Links, Just Credit)
This tutorial synthesizes practical techniques and design guidance commonly shared by reputable U.S.-based craft, education, and museum resources, including:
- PBS KIDS for Parents
- Scholastic Parents
- Martha Stewart
- The Spruce Crafts
- Crayola
- HGTV
- KiwiCo
- Little Bins for Little Hands
- National Gallery of Art (education resources)
- Museum of Modern Art (MoMA)
- Bay Area Discovery Museum
- Grinnell College Museum of Art (education resources)
Extra: Real-World Experiences and Lessons People Learn Making Paper Mobiles (About )
Ask anyone who’s made a DIY paper mobile in a classroom, at a kitchen table, or during a “this will be relaxing” craft night, and you’ll hear the same story: the first ten minutes are pure confidence, the next ten are mild confusion, and the final ten are you negotiating with gravity like it’s a customer service rep. That learning curve is normaland honestly, it’s part of the fun.
One common experience is discovering that paper weight matters more than you think. Lightweight tissue paper looks dreamy, but it can crumple, curl, and tear at the hanging point. Many crafters end up reinforcing delicate paper by backing it with a sturdier layer, sealing it with a thin adhesive coat, or creating double-sided shapes so the mobile looks finished as it turns. That “double-sided” moment is a rite of passage: you hang your mobile, it spins, and suddenly the back side of every shape is shouting, “Hello, I’m unfinished!” The quick fix is gluing matching shapes back-to-back or decorating both sides from the start.
Another very real lesson: mobiles are secretly a spacing problem. New makers tend to cluster shapes too close together (because it looks full and satisfying on the table). Then it hangs, moves, and becomes a slow-motion knot. People who’ve made a few mobiles learn to leave more air between strands than feels necessary, vary the lengths, and place “busy” shapes farther apart. Some even prototype with paper clips firsttemporarily attaching pieces so they can slide and adjustthen commit to knots and glue once the mobile behaves.
Balancing is where the strongest opinions form. In groups (like classrooms), you’ll see two types of makers: the “math first” crowd and the “vibes only” crowd. The funny thing is they usually meet in the middle. Even if you don’t use equations, you naturally start doing lever logic: move the heavier shape closer to the center, push the lighter one farther out, swap a big circle for a smaller one, or shorten a strand that’s pulling the base off-level. People often discover that tiny adjustments beat big changes. A half-inch shift can fix a tilt that felt impossible five minutes earlier.
Finally, there’s the “hanging hardware reality check.” A mobile can look feather-light, but a poorly tied knot or a weak adhesive hook can still fail over time. Experienced crafters test the hanging point, tug gently on cords, and use a three-point hanger (especially on hoops) so the frame stays level. And if the mobile is for a nursery, seasoned makers become extra cautious: secure mounting, no small loose parts, and placement well out of reach. That’s the quiet expert movemaking something beautiful and responsibly built.
The best part? Once you’ve made one mobile, you start seeing them everywherein party decor, seasonal displays, and even science projects. It’s one of those crafts that sneaks up on you: simple materials, surprisingly satisfying results, and a final product that makes any room feel more alive. Plus, it’s hard to be in a bad mood while watching a paper cloud gently spin like it’s thinking deep thoughts.
Wrap-Up
Now you know how to make a paper mobilefrom picking a theme and cutting shapes to balancing, securing, and hanging it neatly. Keep it light, reinforce the holes, leave breathing room between strands, and remember: if it’s slightly imperfect, congratulations, you’ve made something that looks handmade (which is the whole point).


