Table of Contents >> Show >> Hide
- Why Choose a PVC Clothes Rack?
- What You’ll Need
- Before You Cut Anything, Pick a Simple Design
- How to Make a PVC Clothes Rack: 13 Steps
- Step 1: Choose the Location
- Step 2: Decide on the Rack Dimensions
- Step 3: Sketch a Basic Plan
- Step 4: Build a Cut List
- Step 5: Buy the Right Pipe and Fittings
- Step 6: Measure and Mark Every Cut Carefully
- Step 7: Cut the PVC Pipe
- Step 8: Deburr and Smooth the Edges
- Step 9: Dry-Fit the Base First
- Step 10: Add the Uprights and Top Hanging Bar
- Step 11: Square the Frame and Mark Alignment
- Step 12: Glue the Permanent Joints, If Desired
- Step 13: Test, Load, and Style the Rack
- Helpful Tips for a Better PVC Garment Rack
- Common Mistakes to Avoid
- Real-World Experience: What I Learned After Building and Using a PVC Clothes Rack
- Conclusion
If your closet is full, your laundry chair has officially become a second wardrobe, and your bedroom is starting to look like a fabric-based crime scene, a PVC clothes rack can save the day. It is affordable, beginner-friendly, lightweight, and surprisingly useful for bedrooms, laundry rooms, dorms, guest rooms, pop-up shops, and that awkward corner where random hangers go to retire.
The beauty of a DIY PVC clothes rack is that you do not need pro-level carpentry skills, a truck full of tools, or the patience of a saint. With the right measurements, a handful of fittings, and a little planning, you can build a practical garment rack that looks clean, works hard, and does not destroy your budget. Better yet, you can customize the size to fit your space instead of forcing your space to fit a store-bought rack.
In this guide, you will learn exactly how to make a PVC clothes rack in 13 clear steps, along with smart design tips, common mistakes to avoid, and real-world lessons that make the finished rack sturdier and more useful. Let’s build something that finally gives your clothes a proper place to live.
Why Choose a PVC Clothes Rack?
PVC pipe is popular for DIY storage projects because it is inexpensive, easy to cut, simple to assemble, and widely available at home improvement stores. For a clothes rack, it checks a lot of boxes. It is lighter than wood, easier to work with than metal, and less intimidating than anything that begins with the phrase “some assembly required” and ends with six missing screws.
A well-built PVC garment rack is ideal for hanging everyday clothing, organizing outfits, air-drying lighter items, staging seasonal wardrobes, or creating extra storage in small homes. For most household use, a freestanding rack made with 1-inch or 1-1/4-inch PVC is a practical starting point. If you want a heavier-duty rack for coats, thick denim, or a larger load, go thicker, go shorter, and do not get overly ambitious with width.
What You’ll Need
- PVC pipe, usually 1-inch or 1-1/4-inch diameter
- PVC elbow fittings
- PVC tee fittings
- PVC end caps
- Measuring tape
- Marker or pencil
- PVC cutter, hacksaw, or miter saw suitable for plastic
- Sandpaper or deburring tool
- PVC primer and PVC cement if you want permanent joints
- Work gloves and safety glasses
- Optional: spray paint made for plastic, caster wheels, extra braces, or a lower shelf
Before You Cut Anything, Pick a Simple Design
The easiest beginner design is a freestanding rectangular rack with a stable base, four vertical uprights, and one top hanging bar. You can add a lower bar for shoes or storage bins if you want extra function. A beginner-friendly size is about 48 inches wide, 18 inches deep, and 60 to 66 inches tall, but the exact dimensions should match your room and the clothing you plan to hang.
Shorter racks are usually sturdier. Wider racks hold more clothes, but they also have more potential to sag if you overdo it. Translation: yes, your rack loves fashion, but it still has limits.
How to Make a PVC Clothes Rack: 13 Steps
-
Step 1: Choose the Location
Start by deciding where the rack will live. Measure the width, depth, and height of the spot so you do not build something beautiful that cannot fit through the doorway or clear a shelf. Leave enough space around the rack for hangers to slide and for you to actually grab clothes without performing yoga.
-
Step 2: Decide on the Rack Dimensions
Now turn your room measurements into rack measurements. A compact rack might be 36 inches wide, while a more versatile household rack might be 48 to 60 inches wide. For most shirts, jackets, and dresses, a height of 60 to 66 inches works well. If you are hanging long coats or maxi dresses, go taller. If stability is your top priority, do not make it taller than necessary.
-
Step 3: Sketch a Basic Plan
Draw a simple diagram of the rack before you buy or cut anything. This does not need to look like an engineering thesis. A hand sketch with labeled pieces is enough. Mark which sections are the base, uprights, and hanging rod. This step helps you avoid the classic DIY problem of buying twelve fittings and discovering you needed fourteen.
-
Step 4: Build a Cut List
Based on your sketch, write out every pipe piece you need and its length. For example, your list may include four vertical posts, two base side pieces, two base width pieces, one top hanging bar, and one or two lower stabilizing bars. Double-check the cut list against your drawing before heading to the store. Good planning is cheaper than a second trip to the hardware aisle.
-
Step 5: Buy the Right Pipe and Fittings
Choose pipe diameter based on how much weight the rack will hold. Many DIYers prefer 1-inch PVC for light to moderate use and 1-1/4-inch PVC for a sturdier feel. Make sure your fittings match the same pipe size exactly. Pick up elbows, tees, and end caps according to your layout. If you want a permanent structure, buy PVC primer and cement. If you want to test the build first, you can dry-fit everything before deciding which joints to glue.
-
Step 6: Measure and Mark Every Cut Carefully
Lay the pipe on a flat surface and measure each section carefully. Mark the cut lines clearly with a permanent marker. If you rush this part, small errors stack up fast, and suddenly your rack leans like it has opinions. Accurate marks make assembly easier, the frame squarer, and the finished rack more professional-looking.
-
Step 7: Cut the PVC Pipe
Use a ratcheting PVC cutter for smaller pipe or a fine-tooth saw if needed. Cut each piece as square as possible. Clean, straight cuts matter because uneven ends can create sloppy joints and a wobblier frame. After cutting, label the pieces with their purpose if you have several sections of similar size. It saves time later and lowers your chances of assembling the rack like a confused puzzle.
-
Step 8: Deburr and Smooth the Edges
After cutting, remove burrs and rough edges with sandpaper or a deburring tool. This step is easy to skip and annoying to regret. Smooth ends fit better into the fittings, reduce friction during assembly, and help joints seat properly. If you plan to paint the rack, lightly scuffing the outer surface can also help the finish stick better.
-
Step 9: Dry-Fit the Base First
Assemble the base without cement so you can check the footprint and alignment. Push the pieces firmly into the fittings and set the frame on the floor to see whether it sits flat. This is the moment to catch measurement problems, not after the cement has turned your mistake into a permanent art installation.
-
Step 10: Add the Uprights and Top Hanging Bar
Once the base looks good, insert the vertical posts and connect the top bar. Stand back and check the overall proportions. Is it tall enough? Does it look balanced? Will hangers clear the sides? If the rack seems too flexible, consider adding a lower crossbar, a rear brace, or a slightly deeper base. Small structural tweaks make a big difference.
-
Step 11: Square the Frame and Mark Alignment
Before gluing anything, make sure the rack is square and level. Compare opposite sides and corners visually, or use a tape measure to confirm the structure is even. If you plan to cement the joints, draw alignment marks across each pipe and fitting so you can quickly twist pieces into the right final position during assembly. This is one of those boring steps that saves the project from looking homemade in the wrong way.
-
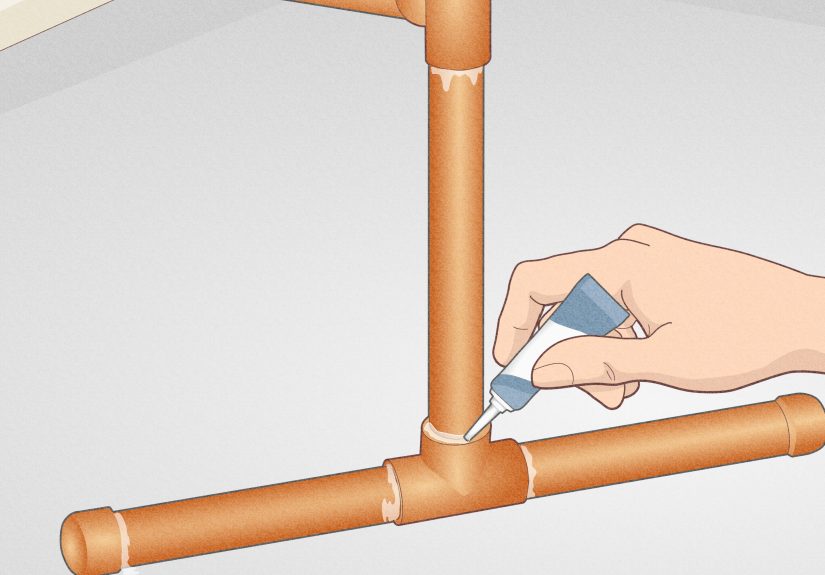
Step 12: Glue the Permanent Joints, If Desired
If you want a more rigid, permanent rack, disassemble one joint at a time and apply primer and PVC cement according to product instructions. Work in a ventilated area, wear gloves, and move quickly because solvent-welded joints set fast. Insert the pipe fully into the fitting, give it a slight twist, and hold it briefly so it does not push back out. Do not glue everything at once like a movie montage. Slow and methodical wins here.
If you want a semi-portable rack, you can leave selected joints unglued, but keep in mind that fewer glued connections usually mean less rigidity. A common compromise is to glue the base and structural corners while leaving one upper section removable.
-
Step 13: Test, Load, and Style the Rack
Let the rack rest long enough for the joints to gain strength, then test it before loading it with your entire wardrobe. Start with a few hangers, then add more gradually. If the rack wobbles, check whether all joints are seated fully and whether the base needs extra bracing. Once it feels solid, put it to work. Add matching hangers, a small bin underneath, or a cloth cover if you want it to look more polished. Congratulations: your clothes finally have a proper address.
Helpful Tips for a Better PVC Garment Rack
Use the Right Pipe Size
For light everyday clothing, 1-inch PVC can work well. For heavier use, 1-1/4-inch pipe often feels more stable. If you are building a wide rack, thicker pipe is usually the safer choice.
Keep the Width Reasonable
A super-wide hanging rod sounds great until it starts bowing under jackets and jeans. For a sturdier build, keep the span moderate or add a center support if your design allows it.
Do Not Skip the Dry Fit
Dry-fitting is the DIY equivalent of proofreading. It catches weird proportions, missing fittings, and accidental measurement chaos before the permanent stage.
Think About the Room
If the rack will live in a bedroom, you may want to paint it for a cleaner look. If it will live in a laundry room, prioritize practicality and easy cleanup. If it will live in a dorm, lightweight portability may matter more than maximum strength.
Use End Caps for a Cleaner Finish
End caps make the rack look more finished and keep open pipe ends from collecting dust and lint. Not glamorous, but very helpful.
Common Mistakes to Avoid
- Making the rack too tall and too narrow, which increases wobble
- Using a long top bar without enough support
- Skipping smoothing after cuts
- Gluing joints before checking alignment
- Buying mixed pipe sizes or mismatched fittings
- Overloading the rack on day one like it owes you rent
Real-World Experience: What I Learned After Building and Using a PVC Clothes Rack
The first time I built a PVC clothes rack, I treated it like a tiny weekend project that would somehow assemble itself through optimism. I measured the wall space, bought the pipe, tossed the fittings into a cart, and came home feeling like a hardware-store genius. Two hours later, I was standing in a sea of white pipe segments wondering why my “simple rack” looked more like a modern sculpture dedicated to poor planning.
The biggest lesson was that measuring the room is not the same as measuring the rack. I had allowed for the width of the wall, but not for the swing of the hangers, the base depth, or the fact that clothing takes up more visual space than naked pipe. Once I trimmed the design down slightly and gave the rack more breathing room, the whole thing worked better. The rack looked tidier, and the room felt less crowded. That alone made the project worth it.
I also learned that PVC has a funny way of exposing impatience. If you cut just one piece a little short, the whole structure tattles on you. A small error at the base becomes a visible wobble at the top. On my first build, one upright was off by less than half an inch. That does not sound dramatic, but the finished rack leaned enough to make me stare at it every time I entered the room. I fixed it, but from then on I became much more careful with marking and labeling each section before cutting.
Another surprise was how much dry-fitting matters. I used to think dry-fitting was just a polite suggestion from overly organized people. It is not. It is the difference between a smooth build and a regret-filled afternoon. Being able to assemble the entire rack without glue helped me see where the frame needed an extra stabilizer and where the proportions looked awkward. It also let me test whether the hanging bar was high enough for longer shirts and jackets. Making changes at that stage was easy. Making them after cement would have been a full-blown DIY tragedy.
In everyday use, the PVC rack ended up being more versatile than I expected. It started as overflow closet storage, then turned into a laundry-day hanging station, then became a spot for planning outfits during a busy workweek. At one point it even held guest coats during a family gathering, which felt like a surprisingly classy moment for a structure born from plastic pipe and stubbornness.
What really sold me on the project was the flexibility. A store-bought rack gives you one size, one style, and one chance. A homemade PVC clothes rack lets you adjust the width, height, color, and layout to match the room and your habits. On my second version, I added a lower bar for shoe bins and left one upper section removable so I could take it apart if needed. That version was cleaner, sturdier, and much more useful.
If I had one piece of practical advice for anyone making a PVC garment rack, it would be this: build for the way you actually live, not for the fantasy version of yourself who owns twelve identical linen shirts and somehow never creates clutter. If you toss hoodies everywhere, make the rack strong enough for hoodies. If you live in a small apartment, keep the footprint compact. If you move often, design it so part of it can come apart. The best DIY rack is not the one that looks most impressive in a photo. It is the one that quietly makes daily life easier.
That is the real magic of this project. It is cheap, useful, customizable, and forgiving enough for beginners. Even if your first version is not perfect, you will learn something helpful with every cut and fitting. And unlike some DIY adventures, this one is very likely to end with a practical object you actually use instead of a mysterious leftover pile in the garage.
Conclusion
Making a PVC clothes rack is one of those rare DIY projects that is both approachable and genuinely useful. With a simple design, accurate measurements, and a little patience, you can create extra clothing storage that fits your home better than many store-bought options. Whether you need a garment rack for a small bedroom, a laundry room, guest storage, or daily outfit organization, PVC gives you a flexible way to build exactly what you need without spending a fortune.
Take your time, dry-fit before gluing, and build for real-life use. Do that, and your finished rack will not just hold clothes. It will hold your room together, too.


