Table of Contents >> Show >> Hide
- What Counts as a “Quiz” in Google Forms?
- Step 0: Plan Your Quiz (Yes, Even If You’re a “Winging It” Person)
- Step 1: Create a New Quiz in Google Forms
- Step 2: Turn On Quiz Mode (The Magic Switch)
- Step 3: Choose the Best Question Types for Quizzes
- Multiple choice (best all-purpose quiz type)
- Checkboxes (great for “select all that apply”)
- Dropdown (clean for longer lists)
- Short answer (powerful, but requires careful setup)
- Paragraph (best for open responses)
- Grids (multiple choice grid / checkbox grid)
- Date, time, file upload, linear scale, rating
- Step 4: Add Questions Like a Pro (Clarity Beats Cleverness)
- Step 5: Set Correct Answers and Points (Answer Key Time)
- Step 6: Use Response Validation for Cleaner Answers
- Step 7: Organize with Sections and Branching (Optional, But Awesome)
- Step 8: Customize the Look Without Turning It Into a Circus
- Step 9: Configure Quiz Settings That Match Your Goal
- Step 10: Preview and Test the Quiz (Don’t Skip This)
- Step 11: Share Your Quiz (Link, Email, Embed, or LMS)
- Step 12: View Responses, Grade, and Release Scores
- Common Problems (and How to Fix Them)
- Best Practices for Quizzes People Will Actually Finish
- Putting It All Together: A Real Example Quiz Build
- Real-World Experiences and Lessons Learned (Bonus )
Want to make a quiz that grades itself, emails results, and doesn’t require you to lug around a stack of papers that mysteriously vanishes the moment you need it? Google Forms has your back. Whether you’re a teacher, trainer, team lead, club organizer, or just someone who loves asking friends “Which potato are you?” with scientific seriousness, Google Forms can create clean, shareable quizzes in minutes.
This complete guide walks you through planning, building, grading, and improving a Google Forms quizfrom a simple five-question check-in to a polished assessment with sections, feedback, and smart settings. Along the way, you’ll get practical examples, common pitfalls to avoid, and pro tips to make your quiz feel less like a pop quiz ambush and more like a well-designed experience.
What Counts as a “Quiz” in Google Forms?
A regular Google Form is great for surveys, signups, and collecting info. A Google Forms quiz is a form with quiz features turned onmeaning you can:
- Assign correct answers (for supported question types)
- Set point values
- Provide answer feedback (for right and/or wrong responses)
- Choose whether to release grades immediately or later
- See score summaries and item-level results
Step 0: Plan Your Quiz (Yes, Even If You’re a “Winging It” Person)
Before you start clicking buttons like you’re speed-running a video game, pause for 3 minutes and answer these questions:
- Purpose: Knowledge check, practice, graded assessment, onboarding, lead magnet, or fun trivia?
- Audience: Students, employees, customers, friends, or “people who will definitely try to Google the answers”?
- Scoring: Auto-graded, manual review, or a blend?
- Length: 5–10 questions for quick checks; 15–25 for deeper assessments; more only if you’re truly committed to chaos.
- Feedback: Do you want learners to see correct answers right away, or learn after review?
Example plan: “10-question onboarding quiz; mostly multiple choice; auto-grade; show missed questions + explanations; collect emails; limit to one attempt.”
Step 1: Create a New Quiz in Google Forms
You have two solid starting options:
- Start from a Blank Quiz template (fastest for quizzes)
- Start from a blank form and turn on quiz mode in Settings
Quick setup checklist
- Open Google Forms (in your browser) and create a new form or choose Blank Quiz.
- Click the title (“Untitled form”) and name your quiz something recognizable.
- Add a short description with instructions (time expectations, allowed materials, retake policy).
Tip: Titles matter. “Week 3 Quiz” is fine. “Week 3 Quiz: The One With the Tricky Definitions” is better. “Week 3 Quiz (please don’t hate me)” is honest.
Step 2: Turn On Quiz Mode (The Magic Switch)
To make your form behave like a quiz:
- Open Settings.
- Go to the Quizzes section.
- Toggle Make this a quiz ON.
Choose how grades are released
Google Forms usually gives you two main choices:
- Immediately after submission: Great for practice quizzes and instant feedback.
- Later, after manual review: Useful if you include questions that require judgment (like short answer nuance) or you want to check responses before releasing scores.
Important note: If you plan to release grades later, you’ll typically need a way to identify respondents (often by collecting email addresses). Otherwise, Forms has nowhere to send the score.
Decide what respondents can see
You can often choose whether the quiz-taker sees:
- Missed questions
- Correct answers
- Point values
For learning-focused quizzes, showing missed questions plus explanations is fantastic. For high-stakes tests, you might hide correct answers until later.
Step 3: Choose the Best Question Types for Quizzes
Google Forms supports many question types, but not all of them work the same way for auto-grading. Here are the most quiz-friendly types and when to use them.
Multiple choice (best all-purpose quiz type)
Use it for: single-correct-answer questions. Add “distractors” (wrong-but-plausible options) to test real understanding.
Example: “Which of these is a renewable energy source?”
- Natural gas
- Coal
- Wind
- Diesel
Checkboxes (great for “select all that apply”)
Use it for: questions with multiple correct answers. This is also where many quizzes get accidentally evilso clearly label “Select all that apply.”
Dropdown (clean for longer lists)
Use it for: compact options when you have many choices (e.g., matching a definition to a term).
Short answer (powerful, but requires careful setup)
Use it for: one-word or tightly constrained responses (definitions, vocabulary, calculations).
Pro tip: Short answers can be auto-graded, but you must design them to avoid “I typed it right but it marked me wrong” drama. Use accepted answers and response validation where possible.
Paragraph (best for open responses)
Use it for: reflections and longer responses. These are usually manual review, not auto-graded in the same way as multiple choice.
Grids (multiple choice grid / checkbox grid)
Use it for: matrix-style questions such as matching or rating multiple statements consistently. Grids can be great, but test them in Preview mode to ensure they display clearly on mobile.
Date, time, file upload, linear scale, rating
Use these for: specialized data collection. Some are less useful for classic “right/wrong” quiz scoring, but they can be valuable for projects and submissions.
Step 4: Add Questions Like a Pro (Clarity Beats Cleverness)
In the Questions tab, add your quiz items one by one. For each question:
- Write the prompt (keep it precise).
- Pick the question type.
- Add answer options (if applicable).
- Turn on Required when the question should not be skipped.
Writing tips that instantly improve quiz quality
- Keep prompts short: If the question needs a paragraph of context, consider a separate “Title and description” block above it.
- Avoid accidental trick questions: Unless your goal is to test mind-reading (not recommended).
- Make choices parallel: If three options are nouns and one is a full sentence, the full sentence screams “Pick me!”
- Use negatives carefully: “Which is NOT…” is fine, but bold the NOT and keep the sentence simple.
Step 5: Set Correct Answers and Points (Answer Key Time)
This is where your form becomes a true quiz.
How to assign correct answers
- Open a question that supports scoring (like multiple choice, checkboxes, dropdown, short answer, and certain grids).
- Click Answer key.
- Select the correct answer(s).
- Assign point value (e.g., 1, 2, 5 points).
- Click Done.
Add feedback (your secret weapon for learning)
Many quiz creators skip feedbackand then wonder why learners repeat the same mistakes. Add short feedback for:
- Incorrect answers: Explain the concept in one sentence.
- Correct answers: Reinforce why it’s correct or offer a next-step resource suggestion.
Example feedback: “Wind is renewable because it’s naturally replenished. Fossil fuels are finite and emit more carbon when burned.”
Step 6: Use Response Validation for Cleaner Answers
Short answer questions can be improved with response validation. This helps prevent junk inputs and forces a format (like numbers, emails, or text containing a keyword).
Common response validation use cases
- Numbers only: Require a number within a range for math or data questions.
- Email format: If you’re collecting an email in a question (not always necessary if Settings collects it).
- Text contains: Ensure a specific word or pattern appears (useful for structured answers).
Example: If a question asks “What is 12 × 8?”, response validation can require a number. The answer key can accept “96.”
Step 7: Organize with Sections and Branching (Optional, But Awesome)
Long quizzes feel easier when they’re broken into sections. You can add a section to group related questions (e.g., “Basics,” “Intermediate,” “Scenario Questions”).
Branching logic for adaptive quizzes
With certain question types (often multiple choice or dropdown), you can send respondents to different sections based on their answer. This is useful when:
- You want a “Choose your path” quiz (beginner vs advanced)
- You need different follow-up questions
- You’re building a diagnostic quiz (“If you missed Q3, you’ll get extra practice items”)
Example branching setup: “Pick your role: Designer / Developer / Marketer” → each role gets role-specific questions in a new section.
Step 8: Customize the Look Without Turning It Into a Circus
Google Forms lets you customize theme color, header images, and fonts. A little branding goes a long way:
- Add a header image (logo, class banner, or simple graphic)
- Choose a readable font
- Use high contrast (especially for accessibility)
Rule of thumb: If your quiz looks like a neon carnival poster, people will focus more on surviving the visuals than answering questions.
Step 9: Configure Quiz Settings That Match Your Goal
Collect emails and identify respondents
If you need to track who took the quiz, use Settings to collect email addresses. This is especially useful for workplace training, classrooms, and any situation where grades or follow-up matter.
Limit to one response (use with care)
This can reduce duplicate attempts, but it typically requires users to sign in with a Google account. That’s perfect for internal audiences and schools; it’s not ideal for the general public.
Shuffle question order (and/or answer options)
Shuffling helps reduce copying when many people take the quiz at once. Use it if questions are independent and don’t rely on earlier context.
Locked mode for Chromebook-based testing (education accounts)
If you’re in a Google Workspace for Education environment using managed Chromebooks, locked mode can help create a more controlled testing setting. It’s not for every situation, but it’s great when you need it.
Step 10: Preview and Test the Quiz (Don’t Skip This)
Before you share the quiz, click the Preview (eye icon) and take it like a respondent would. Check:
- Are questions clear on mobile?
- Do required questions behave correctly?
- Do correct answers score properly?
- Does feedback show as intended?
- Do sections flow in the right order?
Mini stress test: Purposely answer a few items incorrectly and confirm the scoring and feedback make sense.
Step 11: Share Your Quiz (Link, Email, Embed, or LMS)
When you’re ready, click Share (or Send, depending on interface). Common sharing options include:
- Email (send directly to respondents)
- Link (copy and share anywhere)
- Embed HTML (place the quiz on a website)
Sharing tip: write a good intro message
People are more likely to complete your quiz if you tell them:
- How long it takes
- Whether it’s graded
- Whether they can retake it
- What happens after submission (instant score, later review, etc.)
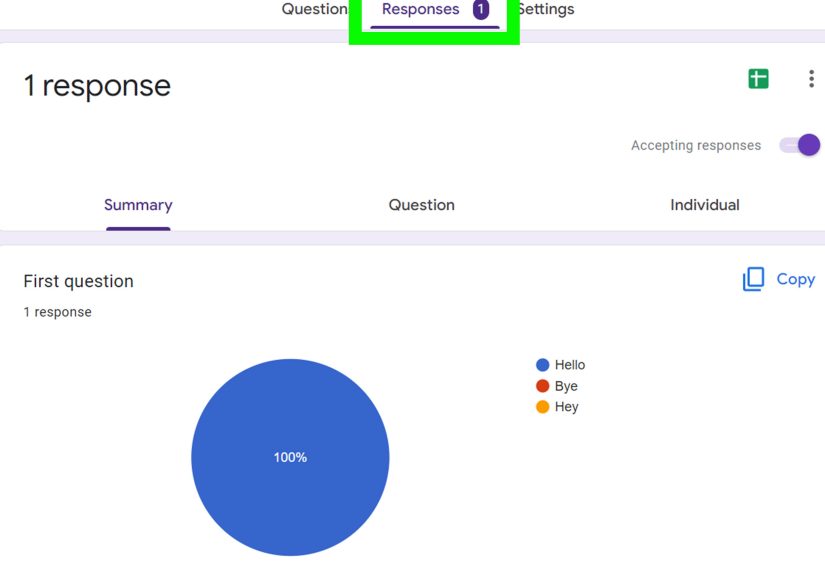
Step 12: View Responses, Grade, and Release Scores
After people start submitting, use the Responses tab. You’ll usually see:
- Summary: Charts and score statistics
- Question: Breakdown per item (helpful for spotting confusing questions)
- Individual: One respondent at a time (great for review)
Auto-grading vs manual review
If you chose “release immediately,” respondents typically see their results right after submitting (depending on what you allow them to view). If you chose “release later,” you can review responses first, adjust points where needed, and then release scores when you’re ready.
Link responses to Google Sheets (for analysis and records)
Connecting your quiz to a spreadsheet makes it easier to:
- Sort and filter results
- Run quick item analysis (which questions were missed most?)
- Create charts or pivot tables
- Keep a long-term record beyond the Forms interface
Common Problems (and How to Fix Them)
“My short answer question keeps marking correct answers wrong.”
- Add more accepted answers (variations in capitalization, spacing, common formats).
- Make the question more constrained (“Enter a number only”).
- Use response validation to force a format.
“I can’t release grades later / it’s forcing email collection.”
Releasing grades later typically requires identifying respondents so the system can deliver results. If your quiz settings require later release, collecting email addresses (or otherwise identifying the respondent) is often necessary.
“People are taking the quiz multiple times.”
- Turn on Limit to 1 response if your audience can sign in with Google.
- Or, leave it off and track duplicates using email collection and response timestamps.
“I need a timer.”
Google Forms doesn’t offer a universal built-in countdown timer for quizzes in all contexts. If timing is essential, consider using an approved add-on or pairing Forms with your learning platform’s timing controls.
Best Practices for Quizzes People Will Actually Finish
- Keep it honest: Say how long it takes and stick to it.
- Use 1–2 question types mostly: Too much variety feels like a pop-up museum exhibit.
- Give feedback on the top “gotcha” questions: That’s where learning happens.
- Review the missed-question report: If everyone misses the same item, it might be the questionnot the learners.
- Use sections to reduce fatigue: Especially on mobile.
- Test on a phone: Many people will take it there, whether you planned it or not.
Putting It All Together: A Real Example Quiz Build
Let’s outline a simple, effective quiz you can build in 15–20 minutes.
Example: “Cybersecurity Basics Check” (10 questions)
- Settings: Make this a quiz ON, release immediately, show missed questions + feedback, collect emails ON
- Questions: 8 multiple choice, 2 checkboxes
- Design: One header image + neutral theme
- Anti-copy: Shuffle question order ON
Sample question: “Which password is strongest?”
- password123
- Summer2026
- CorrectHorseBatteryStaple!72
- qwerty
Feedback (wrong): “Length + unpredictability matter more than replacing ‘a’ with ‘@’.”
This quiz works because it’s short, clearly scored, and teaches through feedbackwithout requiring a second document, a third tool, or a fourth cup of coffee.
Real-World Experiences and Lessons Learned (Bonus )
Google Forms quizzes show up everywherefrom classrooms to corporate training to volunteer onboardingand the best results tend to come from the same handful of real-world lessons. If you’ve ever launched a quiz and then watched confusion bloom like a time-lapse video of a chia pet, you’re not alone. Here are the patterns that show up again and again in how people actually use Forms (and what they wish they’d done earlier).
1) The “short answer trap” is real
In the real world, people type answers in ways you didn’t expect. They add extra spaces. They write “ninety-six” instead of “96.” They use commas, periods, or capital letters like they’re auditioning for a grammar documentary. Teams who rely heavily on short-answer scoring often end up switching those questions to multiple choiceespecially for high-volume quizzesbecause it reduces disputes and makes scoring consistent. When short answer is needed, the best experience usually comes from very constrained prompts (“Enter a number only”) plus validation and multiple accepted answers.
2) Instant feedback boosts completionand goodwill
In training settings, quizzes with immediate grades and short feedback typically get better completion rates than “submit and wait.” People like closure. A quick “You got 8/10nice work” plus a sentence explaining why an answer was wrong turns a quiz from “judgment” into “coaching.” This also reduces follow-up messages like “Why did I get this wrong?” because the explanation is already there. Even a single line of feedback on the top 3 most-missed questions can dramatically improve outcomes.
3) The best quizzes feel shorter than they are
One of the most common improvements creators make is adding sections. Not because sections change the number of questions, but because they change how the quiz feels. A long scroll can feel endless; a “Section 1 of 3” flow feels manageable. People are more likely to finish when the experience is clearly paced. In classrooms, sections also help separate “warm-up” questions from scenario questions so students don’t feel like they got hit with a plot twist on question two.
4) “Limit to 1 response” is amazinguntil it isn’t
For internal audiences, limiting to one response is perfect: it prevents duplicates and keeps reporting clean. But in public-facing quizzes (marketing, community, events), this setting can create friction because it may require respondents to sign in to Google. Many creators learn this the hard way: they share the quiz publicly, then wonder why completions are low. The fix is simpleeither remove the restriction or use it only when you’re confident your audience can sign in.
5) Data review turns quizzes into better teaching tools
The most effective quiz creators don’t stop at “Here are the scores.” They look at question-level results and ask, “Which concept confused the most people?” Often, a heavily missed question isn’t proof that learners are failingit’s evidence the question is unclear, the lesson needs a better example, or the options are too similar. When quiz owners review missed questions and revise wording, quizzes become more accurate, fair, and useful over time. It’s the difference between a one-and-done test and a tool that actively improves learning.
In short: Google Forms quizzes work best when you design for real humansbusy, mobile, sometimes distracted humanswhile using feedback and response data to make the quiz smarter each time you run it.