Table of Contents >> Show >> Hide
- What Makes a Fire Pit “Smokeless”?
- Before You Build: Safety, Placement, and Materials
- Method 1: Build a Permanent Paver-and-Insert Smokeless Fire Pit
- Method 2: Make a Dakota-Style Smokeless Fire Hole
- Best Practices for Less Smoke Every Time
- Common Mistakes That Make a Smokeless Fire Pit Smoke
- Experience-Based Notes: What DIYers Usually Learn After the First Burn
- Final Thoughts
There are few backyard joys better than a crackling fire, a toasted marshmallow, and the smug satisfaction of not playing musical chairs every time the smoke changes direction. That is the magic of a smokeless fire pit. Or, to be more accurate, a low-smoke fire pit, because physics still likes to remind us it is in charge.
If you want to learn how to make a smokeless fire pit without turning your yard into a graduate-level engineering project, you have two solid DIY paths. The first is a permanent backyard build using pavers and a metal insert. The second is a simple Dakota-style fire hole, which is great for temporary use, camping, or testing the concept before you commit to a full build. Both methods rely on the same principle: better airflow, hotter flames, and less smoke.
In this guide, you will learn how smokeless fire pits work, what materials actually matter, how to build each method step by step, and which mistakes will turn your “clean-burning masterpiece” back into an eye-watering smoke machine.
What Makes a Fire Pit “Smokeless”?
A traditional fire pit burns wood from the top down, but it often does a lousy job feeding oxygen to the hottest part of the fire. That incomplete burn creates smoke. A smokeless fire pit improves airflow in two ways: it feeds oxygen to the base of the fire and sends heated air back toward the upper flame area for a secondary burn. In plain English, the pit gives the smoke a second chance to burn before it floats into your face.
That is why the best DIY smokeless fire pit designs use an air gap, intake openings near the bottom, and vent holes near the top of the inner metal wall. The hotter the fire burns, the cleaner it burns. That also means your fuel matters. Wet wood is basically a smoke subscription service. Dry, seasoned hardwood is your best friend.
Before You Build: Safety, Placement, and Materials
Before you grab pavers and start digging like an enthusiastic backyard mole, handle the boring but important stuff first.
Choose a safe location
Set your fire pit on a flat, stable, non-combustible surface such as gravel, pavers, or compacted base material. Keep it well away from your house, fences, low tree limbs, sheds, and anything else you would prefer not to accidentally roast. Also check local burn rules, neighborhood restrictions, and seasonal burn bans before building.
Use heat-friendly materials
For a permanent build, the simplest combination is retaining-wall blocks or fire pit blocks on the outside and a steel fire ring or stock tank ring on the inside. The gravel base improves drainage and stability, while the metal ring helps protect the masonry from constant heat exposure. This is not the moment to get experimental with random decorative stone.
Burn the right fuel
Use seasoned, dry hardwood whenever possible. Wood with roughly 20% moisture content or less burns hotter, cleaner, and with far less smoke than green or damp wood. Do not burn trash, pressure-treated lumber, painted boards, yard waste, or construction scraps. That is not a rustic campfire vibe. That is a bad idea in a costume.
Skip risky liquid-fuel DIYs
If you are tempted by trendy tabletop bowls that burn liquid alcohol, skip them. If your goal is a safe DIY smokeless fire pit, stick to wood-burning designs with controlled airflow. Open liquid-fuel fire pits bring a different risk profile and are not a smart substitute for a backyard wood fire pit.
Method 1: Build a Permanent Paver-and-Insert Smokeless Fire Pit
This is the best method for most homeowners. It looks polished, works well, and gives you a backyard centerpiece that does not feel like a temporary science fair project. The basic design uses pavers for the outer wall and a metal ring for the inner wall, with a small gap between them for airflow.
What you need
- Retaining-wall blocks or fire pit pavers
- Metal fire ring or stock tank ring
- Drainage gravel or paver base
- Landscape or masonry adhesive
- Drill with metal bit or step bit
- Shovel, rake, tape measure, level, gloves, and eye protection
- Optional: high-heat spray paint, fire-rated bricks, quick-set mortar
Step 1: Mark and prep the site
Mark out the footprint of the pit. A beginner-friendly size is usually around 3 to 4 feet across. Remove turf and dig down enough to create a level base. Add drainage gravel or paver base, then tamp and level it carefully. A fire pit can forgive mediocre poetry, but it does not forgive a crooked base.
Step 2: Prepare the metal insert
Take your metal ring and mark a line near the top for vent holes. A common DIY layout is a row of evenly spaced holes around the upper section of the insert. These upper vents help create the secondary combustion that reduces smoke. Smooth any sharp edges after drilling. If you want a cleaner finish, coat the insert with high-heat paint once the metal prep is done.
Step 3: Build the outer paver wall
Place the insert on the prepared base and dry-fit your first row of pavers around it. Leave about a 2-inch gap between the metal insert and the paver wall. That air channel is where the smokeless magic begins. Build the first course, then remove a few pavers from the bottom row at evenly spaced points to create intake openings for fresh air.
Step 4: Stack additional rows
Continue stacking the pavers, staggering the joints for strength. Use landscape adhesive or masonry adhesive between courses if your block system calls for it. Build the wall so the insert sits slightly lower than or roughly level with the finished top edge, depending on your chosen design.
Step 5: Add the insert and test airflow
Set the metal insert into place and check that the air gap remains consistent around the ring. If you notice obvious gaps in the masonry where smoke could escape sideways, seal problem spots on the inside with a bit of quick-set mortar. The goal is to encourage air to rise through the chamber and out the upper vents, not wander off like a distracted tourist.
Step 6: Start a small, hot fire
Use dry kindling and small splits to build your first test fire. Expect some smoke at startup. That is normal. Once the fire gets hotter and the airflow pattern stabilizes, the smoke should drop noticeably. If it still smokes heavily after the fire is established, the usual suspects are wet wood, not enough airflow, or too many leaks in the paver wall.
Why this method works
This design combines bottom air intake, an insulated-style air channel, and upper vent holes that push preheated air back into the flame zone. It is a smart DIY version of the airflow system used in many commercial smokeless fire pits. It also looks great on a patio and can be customized with different block shapes, capstones, or a gravel surround.
Method 2: Make a Dakota-Style Smokeless Fire Hole
If you want a low-cost, temporary option, the Dakota fire hole is the simplest way to make a smokeless fire pit with basic tools and a little dirt. It is especially useful for camping, testing low-smoke fire behavior, or creating a discreet fire area without hauling masonry around your yard like a medieval labor crew.
What you need
- A shovel
- Dry firewood and kindling
- An open outdoor area with safe soil conditions
- Water or a means to fully extinguish the fire
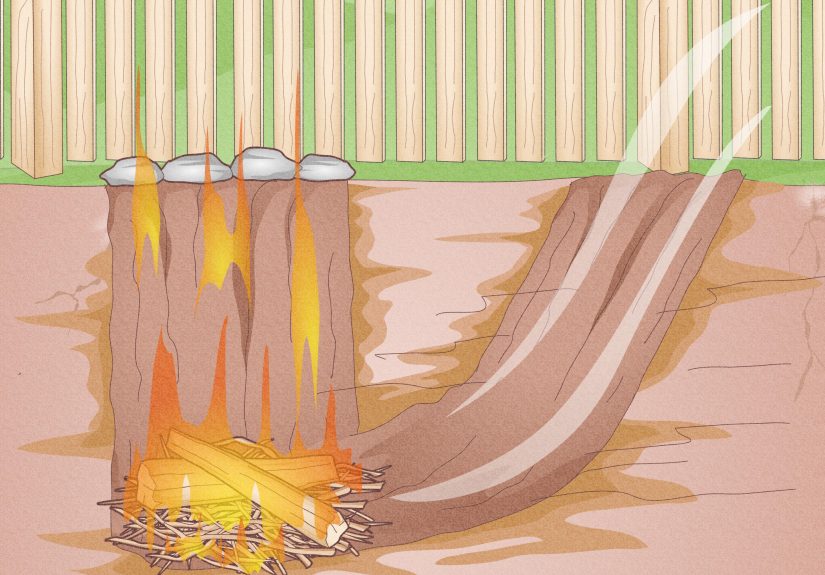
Step 1: Dig the main fire chamber
Dig a hole roughly 12 inches deep and about 12 inches wide. Keep the walls fairly straight. This chamber concentrates heat and shields the flame from wind better than an open fire ring on the ground.
Step 2: Dig the air tunnel
From the bottom of the main hole, dig a second tunnel that exits the ground about a foot away from the fire chamber. The tunnel should be wide enough to pull in air efficiently. That side tunnel feeds oxygen to the base of the fire, which helps the wood burn hotter and cleaner.
Step 3: Light a small fire and feed it gradually
Start with dry tinder and kindling, then add small wood pieces as the flame strengthens. Keep the fire modest. The Dakota method works best when the flame stays concentrated rather than overloaded with giant logs that smother the airflow. In other words, this is a precision tool, not a bonfire pit for a football tailgate.
Step 4: Extinguish and backfill completely
When you are done, extinguish the fire thoroughly. Stir the ashes, add water until everything is cold, and refill the hole if the site is temporary. Never leave a hidden hot coal bed behind. That is how innocent dirt turns into tomorrow’s regret.
Why this method works
The Dakota fire hole creates a natural draft. Air enters through the side tunnel, feeds the base of the fire, and keeps combustion more efficient than an exposed fire laid directly on the ground. It will not give you the polished look of a stone backyard fire pit, but it is fast, cheap, and surprisingly effective when built correctly.
Best Practices for Less Smoke Every Time
Use smaller, drier splits
Even the best smokeless fire pit design cannot rescue soggy logs. Use dry hardwood splits, not wet chunks the size of a couch leg.
Empty ash regularly
Too much ash can choke airflow at the base of the fire. A clean pit burns better and starts faster.
Do not overfill the pit
Piling wood above the vent zone can disrupt airflow and reduce the smokeless effect. Build a sensible fire, not a lumber-based ego project.
Avoid windy days
Strong wind can wreck the airflow pattern, push smoke sideways, and throw sparks farther than you want.
Keep safety gear nearby
Have water, sand, or an extinguisher close at hand. Smokeless does not mean risk-free. It just means you are less likely to smell like a chimney afterward.
Common Mistakes That Make a Smokeless Fire Pit Smoke
- Using damp or green wood
- Skipping the air gap between the wall and insert
- Forgetting lower intake openings
- Drilling too few upper vent holes
- Building on an uneven base
- Ignoring local rules or burn alerts
- Letting ash build up until the pit gasps for air
Experience-Based Notes: What DIYers Usually Learn After the First Burn
One of the most useful things about learning how to make a smokeless fire pit is that the first successful burn teaches you more than ten glamorous product photos ever could. On paper, the design sounds simple: add airflow, burn hotter, get less smoke. In real life, the experience is a little more nuanced, and honestly, that is what makes the project fun.
The first thing many people notice is that a new smokeless fire pit often does smoke at the beginning. That does not mean the build failed. It usually means the fire is still warming the metal, building a coal bed, and reaching the temperature needed for secondary combustion. Once the insert gets hot and the wood is burning cleanly, the difference becomes obvious. Instead of dodging smoke like you are in some weird backyard obstacle course, you actually get to sit still and enjoy the fire.
Another common experience is discovering that wood quality matters far more than expected. A beautifully built DIY smokeless fire pit can still act moody if you feed it damp logs. Many first-time builders assume the airflow design alone will solve everything. Then they toss in half-seasoned wood and wonder why the pit is behaving like an old campfire with trust issues. When dry hardwood is used, though, the flames look brighter, the fire starts faster, and the whole setup feels more efficient.
People also tend to underestimate how much little construction details affect performance. A gap that is too tight restricts airflow. A gap that is too loose can let smoke leak sideways. A ring that sits awkwardly can make the whole system work harder than it should. That is why dry-fitting the insert before gluing anything permanent is such a smart move. It saves you from the DIY classic of saying, “I’ll just make it work,” right before making it very not work.
The permanent paver-and-insert build usually wins for backyard comfort. It feels intentional, looks clean, and becomes a gathering point for family and friends. The Dakota method, on the other hand, often surprises people with how effective it is for something that basically starts with a shovel and ambition. It is not fancy, but it proves the core idea: give fire better oxygen and it rewards you with less smoke.
There is also a maintenance lesson that shows up quickly. Smokeless fire pits like to stay clean. When ash collects at the bottom, airflow drops and performance follows. Builders who empty ash regularly tend to get better repeat burns, easier starts, and more consistent results. It is not a dramatic task, but it makes a dramatic difference.
Finally, there is the social experience. A good low-smoke fire changes how people use the space. Conversations last longer. Guests stop shifting chairs every few minutes. Clothes do not absorb quite as much campfire perfume. You still get the flames, the warmth, and the cozy backyard mood, but with less irritation. That, more than anything, is why DIYers keep coming back to this project. A smokeless fire pit is not just a clever build. It is an upgrade to the whole outdoor experience.
Final Thoughts
If you want the best-looking long-term setup, build the paver-and-insert version. It delivers the most polished result and the strongest backyard appeal. If you want a quick, low-cost, temporary method, go with the Dakota fire hole. Either way, the secret is the same: safe placement, smart airflow, and dry wood.
So yes, you absolutely can make a DIY smokeless fire pit at home. Just remember that “smokeless” is not wizardry. It is good combustion, better design, and a little respect for the laws of fire. Conveniently, those laws also make s’mores taste better.