Table of Contents >> Show >> Hide
- What “Tin Ceiling” Means Today (And Why It’s Budget-Friendly Now)
- Budget Options Ranked (From Cheapest to Most Authentic)
- What It Actually Costs (With a Quick Reality Check)
- Before You Buy: 5 Questions That Save Money (And Regret)
- Tools & Materials Checklist
- Step-by-Step: How to Install a Budget Tin Ceiling (The Smart Way)
- Paint and Finish: The Secret Sauce for a High-End Look
- Budget Tricks That Don’t Look Cheap
- Common Mistakes (So You Don’t Invent New DIY Vocabulary)
- Conclusion: A Tin Ceiling That Looks Expensive (Without Acting Expensive)
- Real-World DIY Experiences (Extra of What Usually Happens)
A tin ceiling is the design equivalent of showing up to a casual dinner party in a tuxedo: dramatic, charming, and slightly suspicious (“Who are you trying to impress, ceiling?”). The good news: you can get that vintage, pressed-metal look without taking out a second mortgage or learning blacksmithing.
This guide walks you through budget-friendly ways to create a tin ceiling, how to choose the right tile type, and exactly how to install it without turning your living room into a museum exhibit titled Man vs. Gravity.
What “Tin Ceiling” Means Today (And Why It’s Budget-Friendly Now)
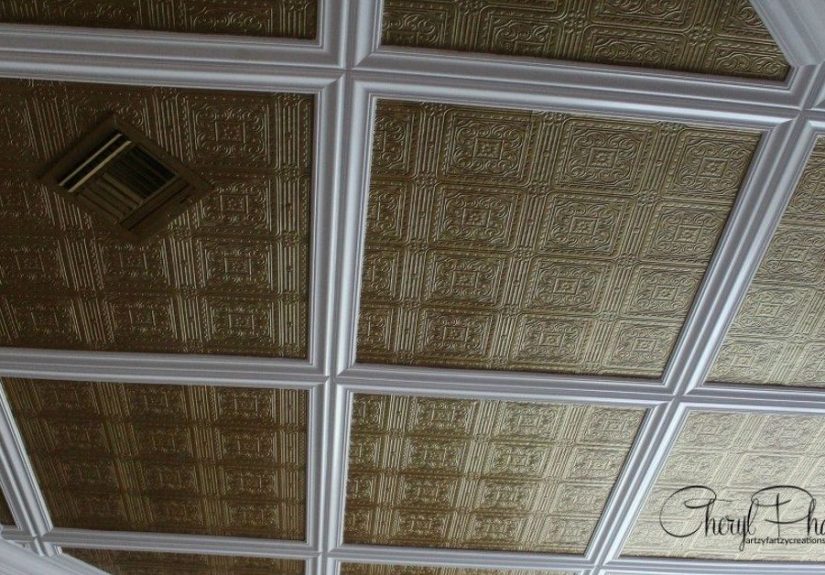
Historically, pressed tin ceilings were a clever alternative to fancy plasterwork. Today, “tin ceiling” can mean a few things: real tin-plated steel panels, aluminum panels, or faux tin ceiling tiles made from PVC, vinyl, or lightweight foam. The look can be nearly identical from the floorespecially once painted.
Your budget win comes from picking the right material for your space, using smart prep, and planning your layout so you don’t waste tiles on awkward slivers at the edges.
Budget Options Ranked (From Cheapest to Most Authentic)
1) Faux Tin (PVC/Vinyl/Foam) Glue-Up or Peel-and-Stick
If your goal is “wow” with minimal “ow,” faux tin ceiling tiles are usually the most budget-friendly and DIY-friendly route. Many are lightweight, easy to cut, and often designed for glue-up installation. Peel-and-stick options can be fast, but they demand a clean, flat ceiling and careful alignment (because “repositioning” is sometimes a myth whispered by optimistic packaging).
- Pros: Lightweight, easier cuts, often cheaper per square foot, less fatigue overhead.
- Cons: Needs a smooth surface; adhesive choices matter; some styles can look “too perfect” up close.
- Best for: Bedrooms, living rooms, dining rooms, and basements where you want style without a wrestling match.
2) Drop-In “Tin Look” Panels for Existing Drop Ceilings
Already have a suspended (drop) ceiling grid? Congratsyou’re basically halfway to a tin-ceiling makeover. Drop-in decorative panels can replace existing tiles and instantly upgrade a basement or office ceiling without messy demo. Planning the perimeter cuts matters so you avoid tiny edge pieces that look like you ran out of ceiling mid-thought.
- Pros: Fast upgrade, easy access to plumbing/wiring, minimal surface prep.
- Cons: Grid still exists (unless you go to extra lengths to disguise it).
- Best for: Basements, rentals (with permission), offices, bonus rooms.
3) Nail-Up Metal Panels (Most Authentic, More Prep)
Nail-up metal panels deliver the “real deal” vibe, but they usually require a proper substrate like plywood or furring strips. That’s extra material and laborstill doable on a budget, but not always the cheapest option up front. It’s the best choice when you want durability and classic depth in the pattern.
- Pros: Authentic look, crisp detail, durable finish.
- Cons: More prep, heavier work overhead, may need priming/painting to prevent rust depending on panel type.
- Best for: Dining rooms, entryways, statement ceilings, historic-style homes.
What It Actually Costs (With a Quick Reality Check)
The cost of a tin ceiling depends on your tile material, your room size, and how much prep you need. As a rough planning range:
- Budget faux tin: often around the low-to-mid dollars per square foot (especially foam/PVC options).
- Midrange decorative panels: typically a few dollars per square foot.
- Real metal nail-up: can climb higher once you add substrate, fasteners, trim, and paint/primer.
A realistic approach is to set a target budget per square foot, then price out: tiles + adhesive/fasteners + trim/strips + paint/primer (if needed) + tools you don’t own.
Example Budget Breakdown: 10′ x 12′ Room (120 sq. ft.)
Let’s say you choose glue-up faux tin tiles and plan for 10% waste (cuts, oops moments, and the tile that gets sacrificed to the ceiling fan bracket gods). You’ll buy about 132 sq. ft. of tile.
- Tiles (132 sq. ft.): depends on style/material.
- Adhesive: construction adhesive designed for the tile type and ceiling surface.
- Finishing strips/trim: optional but very helpful if your room isn’t perfectly square.
- Tools: tape measure, chalk line, level/laser, utility knife or snips, ladder, safety gear.
Before You Buy: 5 Questions That Save Money (And Regret)
1) Is your ceiling flat enough?
Many glue-up/peel-and-stick systems want a flat, clean, sound surface. Heavy texture (like popcorn) can cause poor adhesion or visible bumps. If you’re not sure, assume the ceiling is guilty until proven smooth.
2) Do you need access above the ceiling?
If you have frequent “mystery plumbing noises” or you like to add wiring later, drop-in panels in a grid can be a smarter long-term choice.
3) Is this a humid room?
Bathrooms and laundry rooms need moisture-aware choices. Some metal panels require protective coatings (including the back side) to reduce rust risk, and faux materials may be preferable if humidity swings are intense.
4) Are you painting?
Painting can unify mixed batches, soften a shiny finish, and make pressed patterns look more “architectural” and less “party foil.” But if you’re painting metal panels, plan for proper cleaning and a rust-inhibiting primer where appropriate.
5) What’s your tolerance for overhead DIY?
This is a real question. Working overhead is tiring. Lighter tiles reduce fatigue and “ladder resentment.”
Tools & Materials Checklist
- Measuring tape
- Chalk line (or laser line)
- Level
- Ladder or scaffold (stable enough to avoid “ceiling acrobatics”)
- Cutting tools: scissors/snips for lightweight tiles; tin snips for metal; utility knife for some PVC/foam
- Construction adhesive (matched to tile + surface)
- Fasteners (if nail-up): finishing nails or a nail gun + appropriate nails
- Furring strips or plywood substrate (if needed)
- Safety gear: gloves, eye protection, dust mask when sanding or scraping texture
- Optional: roller/hand pressure tool to set adhesive evenly; paint + primer if finishing
Step-by-Step: How to Install a Budget Tin Ceiling (The Smart Way)
Step 1: Measure and Plan Your Layout (Don’t Skip This)
Measure the room length and width and calculate total square footage. Add 10% for waste. Next, plan the layout so your edge pieces aren’t skinny strips. Centering the pattern usually looks best and helps avoid the dreaded “1-inch tile sliver” around the perimeter.
Tip: snap chalk lines to mark your centerlines. Dry-fit a row or two (even just holding tiles up) so you see where seams land.
Step 2: Prep the Ceiling Surface
For glue-up or peel-and-stick, your ceiling must be flat, clean, and sound. Remove loose paint, repair cracks, and sand down high spots. If you have popcorn texture, you’ll either remove it (messy) or create a smooth surface with a substrate (cleaner).
- Budget-friendly substrate move: install thin plywood or furring strips to create a flat plane.
- Pro-looking move: patch and skim-coat uneven areas if you’re committed to direct glue-up.
Step 3: Choose Your Installation Method
Option A: Glue-Up (Most Common Budget Approach)
- Dry-fit your first tiles: start at your centerlines and work outward. This keeps the pattern symmetrical.
- Apply adhesive: follow the tile manufacturer’s guidance. Many systems use construction adhesive applied in beads or a troweled pattern. Use enough for full contacttoo little leads to sagging; too much leads to glue squishing out like toothpaste in a slapstick comedy.
- Press firmly: hold the tile in place, apply even pressure, and check alignment before moving on.
- Cover seams if required: some glue-up systems use decorative or smooth strips to cover butt joints for a finished look.
- Border cuts: measure from the last full tile to the wall and cut border tiles with the cut edge toward the wall (trim covers minor sins).
Option B: Peel-and-Stick (Fast, But Only If Your Ceiling Behaves)
- Clean the ceiling thoroughly and let it dry completely.
- Snap layout lines and start at the center.
- Peel a portion of backing, align carefully, then press from center outward to avoid bubbles.
- Use firm pressure along edges and seams so corners don’t lift later.
If your ceiling has texture, dust, humidity issues, or you’re installing over questionable paint, peel-and-stick may not stick long-term. Glue-up can be more forgiving.
Option C: Nail-Up (Authentic, Needs a Nailing Surface)
- Install furring strips or plywood: you need a flat, secure nailing base. Shim as needed so the surface is level.
- Start at center: keep your pattern straight and balanced.
- Fasten through edges: nails typically go through the tile edges into the substrate so seams and trim hide them.
- Cut carefully: use tin snips for metal; wear gloves (metal edges are not your friends).
Step 4: Cut Around Lights, Fans, and Vents Without Losing Your Mind
Turn off power at the breaker before working around electrical fixtures. Remove light trim rings if possible. Measure twice, mark clearly, and cut openings gradually. For recessed lights, choose tile designs with enough flat area near the center so the opening looks intentional, not improvised.
Tip: make a cardboard template for repeat cuts. Your future self will thank you, and your ladder time will drop dramatically.
Step 5: Finish Edges and Hide the “Not-So-Square Room” Problem
Most rooms aren’t perfectly square. That’s normal, but it becomes painfully obvious when you’re installing a repeating pattern. This is where border tiles, trim, and decorative seam strips earn their keep. If you have slight gaps at the perimeter, crown molding or ceiling trim can cover a multitude of DIY feelings.
Paint and Finish: The Secret Sauce for a High-End Look
Want your ceiling to look like it cost more than your car payment? Paint is your best friend. White or soft neutrals can modernize pressed patterns and reduce the “shiny new penny” effect.
Painting Tips (Especially for Metal Panels)
- Clean first: remove oils and residues so primer bonds well.
- Use the right primer: for ferrous metal, a rust-inhibiting, oil-based primer is often recommended to prevent rust.
- Humid spaces: consider coating the back side of metal panels too, especially in bathrooms.
- Light sanding: if the surface is glossy, a light scuff can improve adhesion (follow product guidance).
- Topcoat: many ceilings do well with durable interior paint; choose a finish that matches your room’s vibe (matte hides flaws, satin wipes cleaner).
Budget Tricks That Don’t Look Cheap
Buy simpler patterns and let paint do the drama
Intricate patterns can cost more. A simpler pattern painted well can look just as customespecially with great lighting.
Use “statement zones” instead of full coverage
If money is tight, consider a tin ceiling feature over a kitchen island, dining area, or entryway, while leaving surrounding areas simple. Your wallet gets a break, and the room still gets the wow factor.
Install over a smooth substrate instead of ceiling perfectionism
Fighting an old ceiling into perfect flatness can become a time-and-materials black hole. A clean substrate (thin plywood, for example) can be faster and sometimes cheaper than endless patching.
Common Mistakes (So You Don’t Invent New DIY Vocabulary)
- Skipping layout: leads to crooked seams and tiny edge strips.
- Under-prepping the surface: dust and texture are adhesion’s worst enemies.
- Wrong adhesive: can cause tiles to sag, release, or stain through.
- Rushing cuts: fixture cutouts get sloppy fasttemplate it.
- Not planning trim: edges matter. Most “cheap-looking” installs are really “unfinished-edge” installs.
Conclusion: A Tin Ceiling That Looks Expensive (Without Acting Expensive)
Making a tin ceiling on a budget is all about choosing the right tile type, respecting the ceiling surface (because it will not respect you back), and planning a layout that avoids awkward cuts. Faux tin glue-up tiles are often the sweet spot for cost, speed, and looks, while nail-up metal panels deliver maximum authenticity if you’re willing to add a solid substrate.
Do the prep, snap your layout lines, take your time around fixtures, and finish the edges like you mean it. Your ceiling will go from “there” to “HELLO” in a weekend.
Real-World DIY Experiences (Extra of What Usually Happens)
Homeowners who tackle a budget tin ceiling tend to follow the same emotional storyline, and it’s oddly comforting. Act One starts with confidence: “This can’t be that hard. It’s just… tiles.” Act Two is when you’re on a ladder holding a tile overhead, trying to line up a pattern while the adhesive quietly tries to bond to everything except the ceiling. Act Three is victory, plus a new appreciation for anyone who installs anything above their head for a living.
The most common “aha” moment comes from layout. People who start at a wall almost always end up with a weird border on the opposite side a two-inch strip that looks like the ceiling got cropped in a hurry. The folks who snap centerlines and dry-fit a few tiles first usually get a more balanced look and fewer cuts. It’s not that they’re smarter; it’s that they let geometry do the heavy lifting instead of their biceps.
Adhesive is another plot twist. Many DIYers assume more glue equals more better. Then they press a tile up and watch adhesive squeeze out at the seams like frosting from a cake that’s been hugged too hard. The better approach is steady, consistent beads (or the recommended pattern), firm pressure, and a damp cloth ready for quick cleanupbecause dried adhesive has the personality of dried gum.
Cutting around fixtures is where patience pays rent. A common trick is to make a cardboard template of your light opening first. You test-fit the template, adjust it, then transfer the final shape to the tile. People who skip this step often wind up enlarging the hole “just a little more” five times in a row, which is how a tidy cutout becomes a modern art statement. If you do end up with a slightly oversized opening, many light trim rings and medallions can cover itso it’s not the end of the world, just the beginning of your “decorative medallion era.”
Paint is the great equalizer in budget installs. Even when tiles come in a metallic finish, many homeowners find that a single colorespecially a warm white, soft gray, or even a bold matte blackmakes the ceiling look custom instead of “installed from a box.” Paint also helps blend seams and minor variations between batches. The surprising part is how much the room changes once the ceiling reflects light differently; people often describe it as the space suddenly feeling “finished,” like it put on real shoes.
Finally, the best real-world advice is the least glamorous: take breaks. Working overhead is tiring, and fatigue is when alignment drifts, cuts get sloppy, and tiles go up slightly crooked. DIYers who pace themselves (and don’t try to speed-run a ceiling) end up with cleaner seams and a lot less frustration. By the end, most people agree on two things: they love the final look, and they will never again underestimate a ceiling as “just the top of the room.”


