Table of Contents >> Show >> Hide
- Why Baseboards Matter More Than You Think
- Step 1: Clean and Repair Before You “Glitz” Anything Up
- Step 2: Caulk for That Seamless, Custom Look
- Step 3: Pick the Right Paint Color and Sheen
- Step 4: Fake Tall, Custom Baseboards With Clever Trim Hacks
- Step 5: Add Craftsman or Shaker Details for Designer Character
- Step 6: Install Quarter-Round or Shoe Molding for a Finished Floor Line
- Step 7: Pro Painting Tricks That Make Baseboards Look Custom
- Design Ideas for Any Style Home
- Common Mistakes That Make Baseboards Look Cheap
- Real-World DIY Experiences: What It’s Actually Like to Upgrade Baseboards
- Bring It All Together
You don’t have to rip out walls, win the lottery, or hire a celebrity designer to make your home look high-end.
Sometimes, the fastest “wow” upgrade is hiding right at your feet: your baseboards.
Those thin strips of trim around the room can either say “builder-grade 1998” or “custom-home luxury”and the difference often comes down to a weekend of DIY and less than the cost of takeout.
The good news? You can fake the look of tall, custom baseboards with clever trim hacks, a few paint tricks, and some smart cleaning habits.
Inspired by Hometalk-style projects and real DIYers who’ve stretched tight budgets, this guide walks you step by step through how to make your baseboards look expensivewithout actually spending a fortune.
Why Baseboards Matter More Than You Think
Baseboards are like shoes for your room. The outfit (your furniture and decor) might be gorgeous, but if the “shoes” look scuffed and flimsy, the whole look feels off.
Fresh, substantial-looking trim instantly makes a space feel finished, cleaner, and more upscale.
Real estate and home improvement pros note that trim upgrades and baseboard replacements are often one of the most affordable ways to boost perceived home value,
typically costing only a few dollars per linear foot when done strategically.
Even if you’re not selling, crisp, tall-looking baseboards visually raise the room and tie together flooring and wall color, making everything feel more intentional.
Step 1: Clean and Repair Before You “Glitz” Anything Up
If your baseboards are dusty and dinged up, no amount of fancy molding will save them. Start with a deep clean:
- Vacuum along the trim with a brush attachment to grab dust and pet hair.
- Wipe with a damp cloth and mild soapy water to remove grime and shoe scuffs.
- Use a magic-eraser-style sponge for tougher marks, testing in a hidden spot first.
Cleaning experts suggest wiping down baseboards at least once a monthmore often in high-traffic areas, bathrooms, kitchens, and pet zones.
Regular cleaning not only helps them look newer but also reduces allergens that collect along the edges of the room.
Next, patch and repair:
- Fill nail holes and dents with lightweight spackle or wood filler.
- Lightly sand once dry to keep the profile smooth.
- Prime any bare spots so your final paint doesn’t flash or look patchy.
DIY tutorials emphasize that this patch-and-prep stage is what separates “yep, I did this on Saturday” from “was this done by a finish carpenter?”
Step 2: Caulk for That Seamless, Custom Look
Want your baseboards to look like they were born with the house, not slapped on later? Caulk is your best friend.
Use paintable caulk where:
- The top of the baseboard meets the wall.
- Two pieces of baseboard meet at inside or outside corners.
- There are tiny gaps between baseboard and door casing.
Many pro and DIY guides recommend smoothing the bead with a damp finger or caulk tool to create a subtle, rounded seam that disappears once painted.
Just avoid trying to fill huge gapsthose may need backer material or a different fix.
Step 3: Pick the Right Paint Color and Sheen
The fastest way to make your baseboards look expensive is to repaint them in a crisp, durable finish.
Designers often recommend a white or off-white trim color that contrasts with the wallthink classic warm whites or soft neutrals that don’t scream “primer.”
Best Paint Sheens for Baseboards
- Semi-gloss: Popular choice; durable, easy to clean, and reflects just enough light to highlight the profile.
- Satin: A bit more subtle, still wipeable, great if you prefer a softer look.
- Gloss: Very shiny and dramaticgood in formal spaces but unforgiving on imperfect surfaces.
Use a high-quality angled brush (2″ to 2.5″) for the cleanest lines, and don’t overload it with paint.
Multiple thin coats will always look more professional than one thick, gloopy coat.
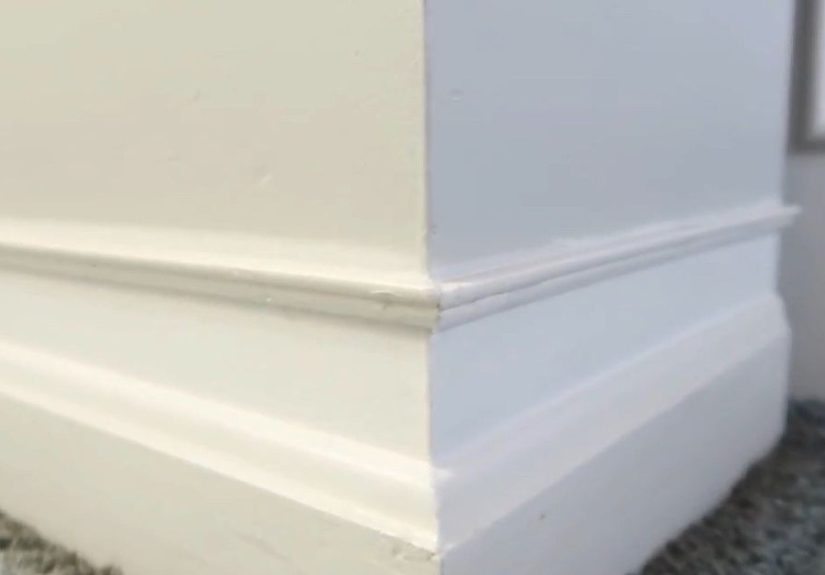
Step 4: Fake Tall, Custom Baseboards With Clever Trim Hacks
Now for the magic trick: you can make short, flat baseboards look tall and custom for about the price of a pizza.
The Classic Hometalk-Style “Taller Baseboard” Hack
The idea is simple and brilliant:
- Leave your existing baseboards in place.
- Add a simple piece of trim (like quarter-round, lattice, or half-round) several inches above the original baseboard.
- Caulk the edges where the new trim meets the wall.
- Paint the original baseboard, the gap of wall between, and the new trim all the same trim color.
DIYers report that this creates the illusion of one wide, chunky baseboardoften looking like an expensive custom profile for around $20–$25 and a few hours of work.
Layer Molding for Extra Dimension
If your baseboards are extremely skinny, you can also:
- Add a flat board (like 1×4 or 1×6) above the existing baseboard to increase height.
- Cap the top with a small decorative molding for a crisp edge.
- Caulk and paint everything as one piece.
Blogs that focus on “chunky” baseboard DIYs show that layering affordable MDF or pine trims creates a high-end look that closely mimics custom-milled profiles at a fraction of the price.
Step 5: Add Craftsman or Shaker Details for Designer Character
If you love that clean, modern-farmhouse or Craftsman vibe, you can adapt your baseboards to match.
Craftsman-style trim is typically:
- Flat and square, with strong horizontal lines.
- Wider than standard builder-grade trim.
- Often paired with matching door and window casings for a cohesive look.
Many tutorials show homeowners upgrading their entire home by swapping or layering trim to create a simple, squared-off Craftsman profile.
Shaker-style baseboards lean similarly minimal, with straight lines and a smooth surface that looks both modern and timeless.
Step 6: Install Quarter-Round or Shoe Molding for a Finished Floor Line
Sometimes the problem isn’t the height of your baseboardsit’s the messy gap where they meet the floor.
Adding quarter-round or shoe molding along the bottom edge hides uneven flooring, gaps, and small imperfections.
Home improvement pros and DIYers frequently recommend this simple addition as an instant “finished” detail, especially in older homes or where floors have been replaced.
Paint the quarter-round the same color as the baseboards for a seamless, high-end look.
Step 7: Pro Painting Tricks That Make Baseboards Look Custom
Once your trim is cleaned, patched, caulked, and upgraded, your paint job is what sells the illusion.
Order of Operations
- If you’re repainting walls too, do the walls first, then the baseboards.
- Tape right above the trim using high-quality painter’s tape; press it firmly for crisp lines.
- Some painters brush a tiny bit of wall color along the tape edge before trim paint to seal it and prevent bleed-through.
Technique Tips
- Work in sections of 3–4 feet, brushing in the direction of the length of the trim.
- Feather your brush strokes to avoid thick ridges.
- Lightly sand between coats if you feel bumps or dust nibs.
Combined with your taller-trim hack, a smooth, semi-gloss finish is what truly makes your baseboards read as “designer” instead of “DIY.”
Design Ideas for Any Style Home
Not all “expensive-looking” baseboards are ornate. In modern and minimalist interiors, a flat 1×4 or 1×6 board with sharp edges can look just as luxurious as detailed colonial molding.
Design inspiration galleries of modern baseboard ideas show everything from ultra-simple square profiles to tall, stepped styles that create subtle shadows along the wall.
A few style directions to consider:
- Modern: Straight, flat trim, often taller (5–7 inches or more), painted the same color as the wall or a crisp white for contrast.
- Traditional: Colonial or ogee profiles with gentle curves and a more decorative top edge.
- Transitional: Simple Craftsman or Shaker profiles that feel clean but substantial, playing nicely with both classic and contemporary furniture.
Common Mistakes That Make Baseboards Look Cheap
Before you break out the nail gun and paint, learn from the mistakes that often sabotage a high-end finish:
- Skipping prep: Painting over dust, glossy old finishes, or unfilled nail holes will highlight every flaw.
- Mismatched whites: If your door trim, crown molding, and baseboards are different shades of white, things can look accidental instead of cohesive.
- Ignoring gaps: Caulk exists for a reason. Visible cracks between wall and trim instantly cheapen the look.
- Too-thin paint: Using bargain paint or only one coat can leave your trim looking streaky and dull.
- Overly ornate in a simple house: That ultra-fancy Victorian profile may clash with a very simple, contemporary interior. Keep the style of the home in mind.
Real-World DIY Experiences: What It’s Actually Like to Upgrade Baseboards
It’s one thing to scroll past a Hometalk post promising “taller baseboards in 2 hours!” and another to actually spend a weekend crawling around your floors.
Here’s what homeowners and DIYers commonly discover when they take on this projectplus a few “wish I’d known that first” lessons.
Experience #1: The 90s Builder-Grade Hallway Glow-Up
Picture a narrow hallway with almond-colored walls, thin baseboards, and doors that have seen better days.
One homeowner decided to try the taller-baseboard hack instead of ripping everything out. They added a simple strip of flat lattice trim about 5 inches above the existing baseboard, caulked the seams, and painted the entire lower band in a fresh, bright white semi-gloss.
The result? The hallway suddenly looked taller and more “architectural,” even though nothing structural had changed. The most surprising part was how much better the doors looked once the trim around them felt more substantial.
The project cost roughly the price of a dinner out, but it completely changed how finished the space felt.
Experience #2: New Floors, Old Baseboards
Another common scenario: someone installs beautiful new hardwood or luxury vinyl plank, but the original skinny baseboards suddenly look sad against the upgraded flooring.
One DIYer opted not to demo the old trim and instead layered a 1×4 board on top, then capped it with a slim molding. The added height balanced the proportions of the wall and made the new floors feel like part of a cohesive, intentional design rather than a piecemeal upgrade.
They did notice one gotcha: in a couple of spots, the taller baseboards ran into existing door casings and had to be notched or adjusted.
Their takeaway? Before you start nailing boards, walk the room and check every doorway, corner, and vent to be sure your new height will clear everything.
Experience #3: Pet Hair vs. Pretty Trim
Baseboards and pet hair are eternal enemies. One family with two large dogs discovered that no matter how tall or pretty the trim was, it looked messy if it was fuzzy with fur and dust.
Their solution was building “baseboard cleaning” into the regular routinequick weekly vacuum passes and a monthly wipe-down with a microfiber cloth.
Interestingly, once the trim was updated and painted in a higher-quality semi-gloss, cleaning became easier.
Dog nose smudges and scuffs wiped off instead of soaking in, and the baseboards stayed crisp-looking for longer. It’s a good reminder that investing a bit in materials up front can save time on maintenance later.
Experience #4: The Confidence Boost Project
Upgrading baseboards is also a great “gateway” DIY if you’re trying to build skills.
One first-time DIYer reported that after successfully adding new trim, caulking, and painting, they suddenly felt capable of tackling bigger projects like door casings, window trim, and even a feature wall.
Because the project is mostly low-risk (you’re close to the floor, mistakes are easy to touch up), it’s a forgiving way to practice cutting, nailing, caulking, and painting.
The big emotional payoff? Walking into a room and thinking, “This looks like a different houseand I did that.”
Bring It All Together
Making your baseboards look expensive isn’t about buying the fanciest trim in the store.
It’s about smart layering, clean lines, thoughtful paint choices, and a bit of maintenance.
With a Hometalk-style tall-baseboard hack, some strategic caulking, and a couple of coats of quality paint, you can turn skinny, tired trim into a detail that actually makes your home feel custom.
So grab your tape measure, your caulk gun, and your favorite podcast. By the time you’re done, your baseboardsand your whole roomwill look like they got a serious upgrade, even if your budget didn’t.


