Table of Contents >> Show >> Hide
- Before You Start: Know What Kind of Hood Paint Job You’re Doing
- Tools and Materials You’ll Need
- Step 1: Set Up the Right Painting Environment
- Step 2: Wash, Degrease, and Decontaminate the Hood
- Step 3: Sand the Hood the Right Way
- Step 4: Repair Chips, Bare Spots, and Rust (If Needed)
- Step 5: Prime the Hood
- Step 6: Final Prep Before Color
- Step 7: Spray the Base Coat
- Step 8: Apply the Clear Coat
- Step 9: Drying, Curing, and Optional Cut-and-Buff
- Most Common DIY Hood Painting Mistakes (and How to Avoid Them)
- How Much Does It Cost to Paint a Hood Yourself?
- Final Thoughts
- Extra: Real-World Hood Painting Experiences and Lessons (Extended)
- SEO Tags
Painting a car hood sounds simple until you’re standing in the garage holding a spray gun, wearing gloves, and wondering why dust appears from nowhere like it pays rent. The good news: a hood is one of the best panels to learn on because it’s flat, visible, and easier to control than a whole car. The bad news: it’s also a giant mirror that will proudly display every prep mistake you make.
This guide walks you through how to paint the hood of a car the right wayprep, sanding, primer, base coat, clear coat, curing, and polishingusing a realistic DIY approach. I’ll also point out where paint systems differ (because they do), so you can avoid the classic beginner move of mixing advice from three products and ending up with one sticky hood.
Before You Start: Know What Kind of Hood Paint Job You’re Doing
There are three common hood-paint scenarios:
- Scenario 1: Faded clear coat only The hood looks chalky or peeling, but the metal isn’t rusty.
- Scenario 2: Surface scratches and chips You need sanding, primer work, and a full repaint of the hood.
- Scenario 3: Bare metal or rust repair You’ll need corrosion protection, more prep time, and a stronger primer strategy.
Most DIY hood projects are Scenario 2, which is what this article focuses on. If your hood has deep dents or heavy rust, fix the bodywork first. Paint is not a magic filter. It’s more like high-definition TV for flaws.
Tools and Materials You’ll Need
Core Materials
- Wax and grease remover (or paint prep cleaner)
- Lint-free towels and tack cloths
- Masking tape and masking paper/plastic
- Sandpaper (multiple grits)
- Primer (epoxy and/or primer surfacer, depending on repair)
- Base coat (color-matched automotive paint)
- Clear coat
- Mixing cups, strainers, and stir sticks (for spray-gun systems)
- Spray gun and compressor (or quality aerosol system if doing a small-budget hood refinish)
Safety Gear You Should Not Skip
- Proper respirator rated for paint fumes/particulates
- Gloves (nitrile)
- Safety glasses
- Paint suit or old long sleeves you don’t mind sacrificing to overspray
Why the safety talk? Because automotive coatings can involve isocyanates and other chemicals that are not “just a strong smell.” They can affect your eyes, skin, and lungs. Treat this like a real refinishing job, not a backyard science experiment.
Step 1: Set Up the Right Painting Environment
A clean workspace matters almost as much as your paint technique. Dust, wind, and humidity can ruin an otherwise good hood job. Ideally, paint indoors in a well-ventilated garage with airflow control. If you use aerosol products, many manufacturers still recommend a well-ventilated area and avoiding windy or dusty conditions.
Temperature and humidity matter too. Different products have different ranges, but a common safe DIY target is moderate temperature and low humidity. If it’s too cold, paint won’t flow out well. If it’s too humid, you can get haze, slow drying, or adhesion problems. In other words, “I’ll just paint it today because I’m free” is not a paint strategy.
Quick Setup Checklist
- Sweep and wet the floor lightly (if appropriate) to reduce dust
- Turn off anything blowing debris (fans aimed at the panel are not your friend)
- Set the hood height so you can spray evenly without leaning over it
- Have clean towels and tack cloth ready before mixing paint
Step 2: Wash, Degrease, and Decontaminate the Hood
Start with a thorough wash using soap and water to remove dirt and road film. Dry it completely. Then use a wax and grease remover (or dedicated paint prep cleaner) with lint-free towels.
This step sounds boring, but it’s where many fish-eyes and adhesion failures are born. Wax residue, silicone detail spray, and grease don’t care how expensive your paint is. They will absolutely sabotage it.
Pro Tip
Use the “wet wipe, dry wipe” method: one towel to apply cleaner, a second clean towel to wipe it off before it flashes. Don’t just smear contamination around like you’re spreading butter on toast.
Step 3: Sand the Hood the Right Way
Sanding depends on the condition of the hood and the paint system you’re using. This is where many DIY tutorials conflictbecause they’re talking about different products. The key is to follow your product data sheet (PDS/TDS), but here’s a reliable workflow that works for most hood repaints.
If the Existing Paint Is Mostly Sound
- Start with a coarse-to-medium grit to remove failing clear and smooth defects.
- Feather chipped edges so you don’t leave a sharp paint ridge.
- Progress to finer grits to remove scratches from the previous grit.
Many automotive refinish workflows use a grit progression approach (for example, moving through intermediate grits and finishing finer before paint). Some DIY systems also recommend a full scuff with a very fine grit or scuff pad before color. The exact final grit varies by whether you’re spraying primer, sealer, base coat directly, or a lacquer system.
Common Grit Logic (Don’t Mix This Up)
- Coarser grits remove damage and failing paint faster.
- Medium grits shape the surface and remove prior scratch marks.
- Finer grits prepare for primer or paint and reduce visible sanding scratches.
If you sand too coarse and jump straight to paint, the scratches can print through later. You might think it looks fine at first, then the sun hits it and suddenly your hood looks like it was brushed by a very organized cat.
Step 4: Repair Chips, Bare Spots, and Rust (If Needed)
If sanding exposes bare metal, don’t ignore it. Bare metal should be sealed and protected before topcoating. For small bare spots, many professional systems recommend an etch primer, epoxy primer, or another approved corrosion-protection step before primer surfacer.
If rust is present:
- Remove rust completely (don’t paint over active rust)
- Treat the area if required by your system
- Prime it properly before continuing
For tiny imperfections, a light skim of body filler may be neededbut only after proper prep and according to the product instructions. Sand smooth and re-check with a guide coat if available. Guide coat is one of those “boring pro steps” that saves hours later.
Step 5: Prime the Hood
Primer isn’t just paint’s understudy. It fills minor sanding scratches, improves adhesion, and creates a more uniform surface for color. Depending on your hood’s condition, you may use:
- Epoxy primer for bare metal sealing and corrosion protection
- Primer surfacer to build and level the surface
- Sealer to create a uniform base before color
How to Apply Primer (General Workflow)
- Mask surrounding areas carefully.
- Clean the hood again with approved surface cleaner.
- Mix and strain primer (if using a spray gun system).
- Apply multiple light-to-medium coats as directed by the product sheet.
- Respect flash times between coats.
- Let primer fully dry/cure before sanding.
This is a major place where product sheets matter. One primer may flash in a few minutes and sand quickly; another may need much longer. A rushed primer stage often creates shrinkage, texture, or sand-scratch telegraphing later.
After Primer: Block Sand for Flatness
Once the primer cures, apply guide coat and block sand. This helps you find low spots and remove texture evenly. Many pro-style systems call for block sanding around the P400 range and then finishing finer (often around P600 for base-coat prep, depending on the system). Some manufacturers specifically recommend dry sanding primer surfacer rather than wet sanding.
Translation: don’t freestyle. If your primer product says “dry sand only,” listen to it.
Step 6: Final Prep Before Color
This is the “last chance to prevent regret” step.
- Blow off dust (clean, dry air only)
- Wipe with approved cleaner if your system allows it at this stage
- Use a tack cloth right before spraying
- Re-check masking edges around fenders, windshield, and cowl
If you’re blending into adjacent panels (less common for a full hood repaint but possible), prep and blend strategy becomes more advanced. For a full hood repaint, most DIYers will paint the entire hood and avoid blending on that panel.
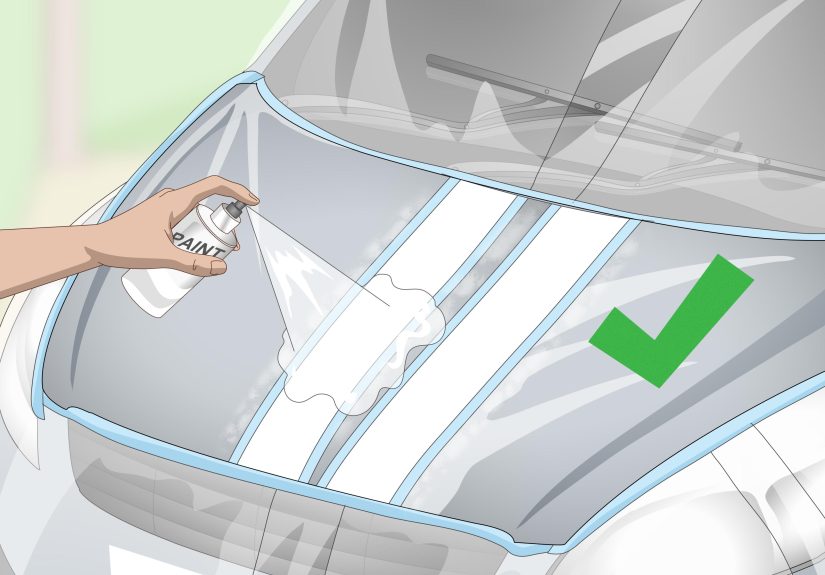
Step 7: Spray the Base Coat
Now for the fun partthe part everyone wants to jump to too early.
Spray technique matters more than people think. The basics:
- Keep a consistent gun distance
- Use even passes with overlap (often around 50%)
- Keep the gun moving to avoid runs
- Spray multiple coats instead of one heavy coat
- Allow proper flash time between coats
For metallic colors, consistency is extra important. Uneven speed or distance can cause blotchiness or striping. Some systems use an orientation coat or drop coat technique to help metallic flake lay evenly.
Base Coat Tips for a Hood Panel
- Start each pass off the panel edge when possible
- Maintain overlap across the whole hood, not just the center
- Watch your lighting angle so you can see wetness and coverage
- Don’t chase a tiny dry spot mid-passfinish the pass, then correct on the next coat
Most systems require enough coats to achieve full hiding and color uniformity. “Almost covered” is not a finish. It’s a future complaint.
Step 8: Apply the Clear Coat
Clear coat gives the hood gloss, depth, UV protection, and durability. If base coat is the color, clear coat is the armor.
Clear is typically applied in multiple coats with flash time between coats. Some systems recommend a lighter tack-style first coat, followed by wetter coats. Again, product sheet rules apply.
How to Avoid Runs in Clear
- Don’t hold the gun too close
- Don’t move too slowly
- Don’t overload the front edge of the hood
- Watch overlap consistency
- Let each coat flash properly before the next
A good clear coat should look glossy but controlled. If it looks like it’s about to slide off the hood, congratulationsyou’re one second away from a run.
Step 9: Drying, Curing, and Optional Cut-and-Buff
Dry time and cure time are not the same thing. Your hood may feel dry enough to touch long before it is fully cured. Follow the product instructions carefully before washing, waxing, or polishing.
If you want a flatter, more professional finish, you can wet sand and polish after full cure (or per the product’s timing guidelines). This step is optional for many DIYers, but it can dramatically improve gloss and remove minor texture.
Typical Finishing Workflow (Optional)
- Wet sand with a fine grit (for example, 1500, then finer if needed)
- Use a polishing compound
- Follow with a finishing polish
- Stay off edges and body lines to avoid burn-through
If you’ve never polished fresh paint before, go slow. The hood is not the place to discover how aggressive your buffer pad is.
Most Common DIY Hood Painting Mistakes (and How to Avoid Them)
1) Poor Cleaning Before Paint
Wax, grease, and silicone contamination can cause fish-eyes and adhesion issues. Clean thoroughly, then clean again.
2) Wrong Sanding Progression
Jumping from coarse sanding straight to primer or paint leaves visible scratches. Work through the grit progression and remove previous scratches at each stage.
3) Ignoring Product Data Sheets
Primer, base coat, and clear coat all have specific flash times, mix ratios, and sanding recommendations. “It looked dry” is not a valid technical specification.
4) Painting in Bad Weather
High humidity, wind, and extreme temperatures can ruin finish quality. Pick the right day and environment.
5) Heavy Coats Too Soon
Heavy coats cause runs, solvent trapping, and uneven curing. Build coverage with controlled coats instead.
How Much Does It Cost to Paint a Hood Yourself?
DIY hood painting costs vary depending on your paint system and what tools you already own.
- Budget aerosol refresh: lower cost, easier entry, but less control and durability can vary
- DIY spray-gun job: higher upfront cost, better finish potential
- Professional body shop: highest cost, best consistency and color-match outcomes in most cases
If you only need to repaint one hood and don’t own a compressor, a quality DIY aerosol system can make sense. If you plan to paint more panels later, spray-gun equipment is a better long-term investment.
Final Thoughts
Learning how to paint the hood of a car is mostly a game of patience, prep, and process control. The actual spraying part is fast. The quality comes from everything before it: cleaning, sanding, priming, masking, and respecting flash/cure times.
If you remember only one thing, make it this: follow one complete paint system and its product sheets from start to finish. Mixing random tips is how you end up sanding the hood again next weekend.
Done right, a hood repaint can transform the entire look of your carbecause the hood is the panel everyone sees first, including you. Every single day. At red lights. In parking lots. While judging your own reflection.
Extra: Real-World Hood Painting Experiences and Lessons (Extended)
One of the most common experiences DIY painters report is that the hood looks great in the garage, then “mysteriously” shows flaws outside in sunlight. This happens because garage lighting hides texture and sanding marks. A hood is a large, flat panel, so it reflects light like a mirror and makes imperfections obvious. The lesson here is simple: inspect the hood under multiple light angles before you spray color. Use a bright handheld light and move it across the panel. If you can see sanding scratches, pinholes, or ripples before paint, the paint will not hide them. It will highlight them.
Another very common hood-paint experience is overconfidence after the first decent coat. A beginner sprays one nice pass of base coat, gets excited, and then goes too heavy on the next pass. That’s when runs start near the front edge or around the hood’s side contours. The front edge of the hood is especially tricky because people tend to slow down there without realizing it. Slower hand speed equals more material, and more material equals a run. A smart habit is to practice your passes with the gun empty or with air only, just to build rhythm. It sounds silly, but it helps.
Many DIYers also learn the hard way that dust control is not optional. You can clean the hood perfectly and still end up with nibs in the clear coat if your workspace is shedding dust. Sweeping right before painting often makes the problem worse because it throws particles into the air. A better approach is to clean the area well before painting day, then do a final wipe-down and light dust control routine just before spraying. People who improve their dust control usually see a dramatic improvement in finish quality even without changing paint brands or spray guns.
Color matching is another big real-world issue, especially when painting only the hood. Even if you buy the correct paint code, the new paint can look slightly different from the fenders because the rest of the car has aged in the sun. This surprises a lot of first-time painters. They think the code guarantees a perfect match. In reality, the code gets you in the ballpark. Paint age, UV exposure, metallic orientation, and application technique all affect the final look. If your car is older or metallic, expect some variation. That doesn’t mean you failedit means automotive paint is picky.
Finally, there’s the “I thought it was cured” experience. Plenty of people touch the hood too early, reinstall washer nozzles too soon, or wash the car before the finish has fully hardened. The hood might feel dry, but the coating can still be curing underneath. This can leave fingerprints, marks, or dull spots that were totally avoidable. The best paintersDIY or professionaltreat curing time like part of the job, not the end of the job. If you’re patient during cure, you usually need less rework, less polishing, and fewer frustrated sentences that begin with, “Well, technically it looked fine yesterday.”