Table of Contents >> Show >> Hide
- Start With the Person, Not the Pinterest Photo
- Choose the Right Shower Type: Walk-In vs. Roll-In vs. “Wet Room”
- Get the Layout and Clearances Right (So It’s Usable, Not Just “Technically Accessible”)
- Install Grab Bars Like You Mean It (Not Like a Towel Bar)
- Add a Seat That Fits the User (Because Standing Is Overrated)
- Use a Handheld Showerhead (With a Long Hose) and Controls You Can Actually Reach
- Prevent Scalds and “Temperature Surprise”
- Choose Slip-Resistant Surfaces (Because Pretty Tile Can Be a Menace)
- Nail the Drainage and Waterproofing (The Unsexy Part That Saves Your House)
- Upgrade Lighting and Contrast (Because Visibility Is Safety)
- Think About the Whole Bathroom Route
- Budget in Layers (So You Can Improve Safety Even If You’re Not Remodeling Yet)
- Don’t Forget the Money Side: Coverage and Funding Reality
- Common Mistakes to Avoid (Learn From Other People’s Regrets)
- A Practical Checklist for an Accessible Shower Upgrade
- Experience Notes: What People Learn After They Actually Use the Shower (Extra 500+ Words)
- Conclusion
A shower should be the place where you relax, not where you practice your “how did I not fall?” face in the mirror.
Making a shower handicap accessible (more accurately: accessible for people with disabilities, limited mobility, or aging-in-place needs)
is one of the smartest safety upgrades you can do in a homebecause bathrooms combine water, smooth surfaces, tight spaces, and gravity’s enthusiasm.
The good news: you don’t need to turn your bathroom into a hospital set. With thoughtful layout choices, safer surfaces,
better controls, and a few “future-you will thank you” upgrades, you can create a shower that’s easier to enter, safer to use,
and more independent for wheelchair users, walkers, or anyone who needs extra stability.
Start With the Person, Not the Pinterest Photo
Before you buy anything, do a quick “real-life” assessment. Accessibility isn’t one-size-fits-alltwo people can both use a cane
and still need totally different setups.
Ask these practical questions
- How does the person enter? Walking, stepping, sliding, using a walker, or rolling in with a wheelchair/shower chair?
- Will they stand, sit, or both? If fatigue or balance is an issue, plan for seated bathing.
- What’s the reach comfort? Can they reach controls without leaning? Can they operate knobs with limited grip?
- What’s the supervision level? Independent use vs. caregiver-assisted changes the space needs a lot.
- What’s the timeline? A “right now” fix may be grab bars + handheld sprayer; a long-term plan may be curbless + wider clearances.
If you want to be extra thorough, an occupational therapist or aging-in-place specialist can help match the layout to real movement patterns.
The goal is simple: reduce slipping, reduce awkward stepping, reduce reaching, and increase stable points of contact.
Choose the Right Shower Type: Walk-In vs. Roll-In vs. “Wet Room”
The biggest accessibility leap is the entry. High curbs are basically tiny walls that love to trip people. A low-threshold or curbless entry
can dramatically reduce falls and make wheelchair access possible.
Option 1: Low-threshold walk-in shower
Best for: people who walk in but need less stepping and more stability. A low threshold (or minimal curb) helps with canes and walkers.
Pair it with a bench and a handheld showerhead, and you’ve made a huge upgrade without rebuilding the whole bathroom.
Option 2: Curbless (roll-in) shower
Best for: wheelchair users or people using a rolling shower chair. Curbless entry removes the “step” problem entirely.
In public/commercial settings, roll-in showers follow specific accessibility guidelines on dimensions and clearances; even in residential remodels,
these specs can be a helpful blueprint.
Option 3: Wet room style
Best for: maximum flexibility and caregiver assistance. A wet room has a continuous floor with a sloped drain area,
meaning the entire space is designed to tolerate water. It’s often the most accessible, but waterproofing details matter a lot.
Reality check: curbless showers are amazing when done rightand a soggy nightmare when waterproofing and slope are done wrong.
Plan carefully for drainage, water containment, and the floor build-up needed to slope to the drain.
Get the Layout and Clearances Right (So It’s Usable, Not Just “Technically Accessible”)
Accessibility lives and dies by space planning. You can install every fancy feature on earth, but if a wheelchair can’t approach the entry or turn safely,
it’s still a daily struggle.
Helpful dimension targets (especially for wheelchair access)
-
Roll-in shower sizing: A common guideline for a standard roll-in shower is around 60 inches wide by 30 inches deep.
This is a widely referenced benchmark in accessibility guidance and is a useful starting point when planning a wheelchair-friendly compartment. - Entry and approach: Doorless or wide-entry designs make access easier. If you do use a door, consider swing clearance and handle usability.
- Threshold: Keep the curb as close to flush as possible; if any threshold exists, keep it minimal and beveled.
Example: If your bathroom is tight, a 60" x 30" roll-in-style shower with a linear drain (so the floor can slope one direction)
often fits better than a “center drain requires a bowl-shaped slope” layout. It’s not always cheaper, but it can be cleaner and more workable.
Install Grab Bars Like You Mean It (Not Like a Towel Bar)
Grab bars are one of the highest-impact upgradesand also one of the most commonly installed incorrectly. A towel bar is for towels.
A grab bar is for body weight, balance recovery, and safe transfers. Different job.
Placement principles that actually help
- Put them where hands naturally go: near the entry, along the control wall, and near the seating/transfer area.
- Use multiple bars: one bar rarely solves everythingthink entry support + in-shower stability + seat/transfer support.
- Height matters: common standards place grab bars around 33–36 inches above the finished floor.
- Anchor into structure: install into studs or solid blocking behind the wallespecially in tile showers.
Pro tip that saves headaches: during a remodel, add blocking behind the wall (extra wood support) wherever grab bars might go,
even if you’re not installing every bar immediately. It’s cheap during demo and expensive later.
Add a Seat That Fits the User (Because Standing Is Overrated)
A shower seat can turn bathing from exhausting to manageable. It also reduces fall risk by removing the “one-legged balancing act” of washing.
Seat options
- Fold-down wall seat: great for smaller showers; choose a sturdy model rated for higher loads.
- Built-in bench: comfortable, stable, and can look high-end (spa vibes, not clinic vibes).
- Freestanding shower chair: flexible and budget-friendlyespecially for temporary needs.
Example: For someone who transfers from a wheelchair, place the seat so it’s easy to approach and pivot onto,
and make sure the controls and handheld sprayer can be reached from the seated position.
Use a Handheld Showerhead (With a Long Hose) and Controls You Can Actually Reach
A handheld sprayer is practically mandatory for accessible showers. It helps seated users, makes caregiver assistance easier,
and reduces awkward twisting and reaching.
What to look for
- Handheld + fixed combo: use it handheld or dock it overhead.
- Long hose: many accessibility specs commonly reference a hose length of about 59 inches for practical reach.
- Easy-grip controls: lever handles or large dials are often easier than small, slippery knobs.
- Reach-friendly placement: controls should be reachable without leaning into the spray or stretching dangerously.
If you’re remodeling, this is also a great time to use a pressure-balanced or thermostatic mixing valve to stabilize temperature.
Which brings us to…
Prevent Scalds and “Temperature Surprise”
Water that’s too hot can burn quickly, especially for kids, older adults, and anyone with reduced sensation. Temperature swings can also cause a startle response,
which is a fancy way of saying, “You jerk your body and slip.” Not ideal.
Smart anti-scald steps
- Set the water heater to about 120°F (a commonly recommended safety target).
- Install anti-scald valves: thermostatic mixing valves or pressure-balancing valves help keep temperature steady.
- Test after plumbing changes: swapping showerheads or valves can affect flow and temperature behavior.
That one setting change can matter: scald risk climbs fast as temperature rises. Pair temperature control with a non-slip floor and you’re stacking safety wins.
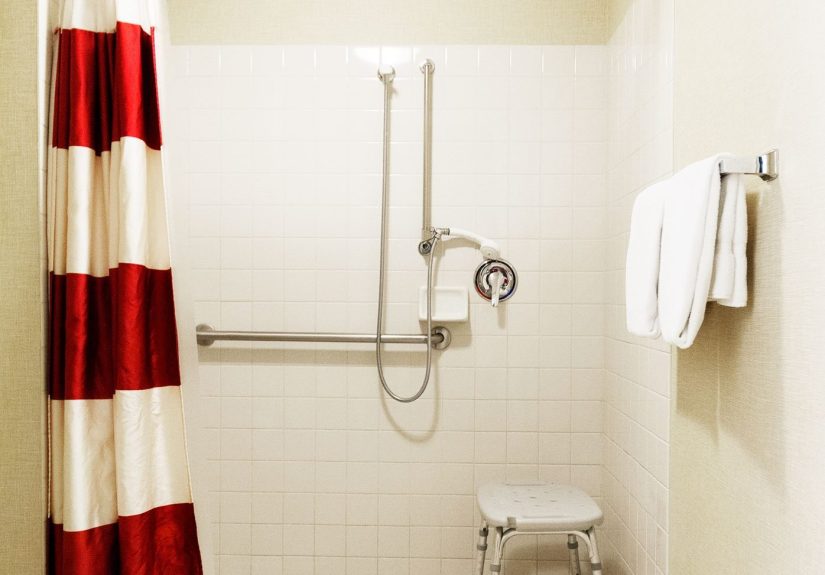
Choose Slip-Resistant Surfaces (Because Pretty Tile Can Be a Menace)
In an accessible shower, traction is everything. You want flooring that stays grippy when wetnot a surface that turns bathing into a surprise ice rink audition.
Traction strategies
- Small-format tile: more grout lines can mean more grip underfoot.
- Textured tile or slip-resistant flooring: look for products designed for wet areas.
- Non-slip strips or mats: helpful for quick upgrades (and great for rentals).
- Keep it clean: soap scum can make even good flooring slippery, so cleaning is a safety task, not just a cosmetic one.
Don’t ignore the “outside the shower” zone. Many falls happen when stepping out onto a wet bathroom floor. A slip-resistant bath mat
(secured so it doesn’t slide) can help, along with better drainage and a shower design that contains splash.
Nail the Drainage and Waterproofing (The Unsexy Part That Saves Your House)
Curbless and low-threshold showers depend on excellent slope and waterproofing. Tile and grout are not inherently waterproof,
so the system behind them matters.
Key build details
- Proper slope to the drain: water should flow reliably with no “puddling zones.”
- Waterproofing membrane system: use a proven shower waterproofing method, not wishful thinking.
- Drain choice: linear drains can simplify slope direction in curbless showers.
- Water containment plan: consider a slight floor pitch, partial glass panel, or strategic entry orientation to keep water where it belongs.
Example: A doorless curbless shower can work beautifully if the shower head is aimed away from the opening,
the floor slope is correct, and a fixed glass panel blocks overspray. Without those details, your “accessible shower” becomes an “accessible flood.”
Upgrade Lighting and Contrast (Because Visibility Is Safety)
Better lighting reduces trips, missteps, and confusionespecially for anyone with low vision. Consider bright, even lighting plus a nightlight pathway.
Visual contrast helps too (for example, a grab bar that contrasts with the wall so it’s easy to spot).
Quick wins
- Add a motion-sensor nightlight: safer for nighttime bathroom trips.
- Reduce glare: avoid harsh spotlights that make shiny tile harder to read.
- Use contrast: choose fixtures and bars that stand out from the background.
Think About the Whole Bathroom Route
A shower can be perfect, but if the path to it is tight, dark, or cluttered, you still have a problem. Safety is end-to-end.
Supportive extras
- Wider doorway and clear floor space: helpful for walkers and wheelchairs.
- Comfort-height toilet and stable sink area: bathroom transfers often happen outside the shower.
- Storage at reachable heights: keep soap and shampoo where they’re easy to grab without bending.
Budget in Layers (So You Can Improve Safety Even If You’re Not Remodeling Yet)
Not every home can do a full bathroom gut remodel today. The good strategy is a layered approach: do the high-impact low-cost items now,
then plan structural upgrades when timing and budget allow.
Layer 1: Quick upgrades (often same-day)
- Non-slip mat or adhesive traction strips
- Handheld showerhead with a long hose
- Freestanding shower chair
- Better lighting and nightlights
Layer 2: Medium upgrades (light construction)
- Professionally installed grab bars anchored into studs/blocking
- Replace controls with easier-grip levers
- Anti-scald/thermostatic or pressure-balanced valve upgrades
Layer 3: Full accessibility remodel
- Curbless or true roll-in shower conversion
- Optimized clearances, seating, and control placement
- Waterproofing system + drainage redesign
Don’t Forget the Money Side: Coverage and Funding Reality
Many people assume Medicare will cover bathroom remodeling. In most cases, Original Medicare typically does not cover home modifications
like grab bars, ramps, or shower conversions as routine benefits. However, some Medicare Advantage plans may offer supplemental benefits,
and other programs (such as Medicaid waivers or certain veteran-focused grants) may help depending on eligibility and location.
The practical move: treat funding as a “stack” problem. Check multiple possibilitiesinsurance plan extras, local aging services, nonprofit programs,
and veteran resourcesthen combine what applies.
Common Mistakes to Avoid (Learn From Other People’s Regrets)
- Installing “pretty” bars that aren’t real grab bars: if it’s not rated and not anchored correctly, it’s decor.
- Putting controls behind the spray: forcing someone to reach through hot water is not accessibilityit’s a prank.
- Ignoring waterproofing: tile is not a raincoat for your framing.
- Choosing slick flooring: if it’s slippery when wet, it’s a no.
- Underestimating splash: curbless needs a water plan (slope, drain, glass, placement).
A Practical Checklist for an Accessible Shower Upgrade
- Entry: low threshold or curbless; minimal tripping hazard
- Stability: properly anchored grab bars at helpful locations
- Seating: bench or seat matched to the user’s transfer needs
- Controls: reachable from standing/seated positions; easy to operate
- Water delivery: handheld sprayer with long hose; optional fixed head
- Safety: anti-scald/temperature stabilization; safer water heater setting
- Traction: slip-resistant floor; clean, grippy exit zone
- Water management: correct slope + drainage + waterproofing
- Visibility: strong lighting and night pathway
Experience Notes: What People Learn After They Actually Use the Shower (Extra 500+ Words)
Here’s the part you won’t always get from a product brochure: the “success” of an accessible shower is decided in everyday moments.
Homeowners, caregivers, and people living with mobility challenges often discover that small design choices create big daily comfortor daily friction.
One common experience: people underestimate how much energy standing requires. Even someone who can walk independently may find that standing to shower
becomes tiring on bad days, after surgery, or during flare-ups. Adding a seat isn’t “giving up”it’s giving the person options.
The best setups make sitting feel normal, not like a temporary workaround. A built-in bench that looks like a design feature is a quiet confidence booster.
Another frequent lesson is about control placement. In real life, people don’t want to step into cold water to reach the handle,
and they definitely don’t want to reach through hot spray to turn the shower off. When controls are reachable from the entry or from the seat,
users can start the water, set temperature, and then move into the shower safely. Caregivers also appreciate this because it reduces awkward leaning and rushing.
Then there’s the “grab bar truth”: the first week, people use them lightly. The first time someone slips a bit, that bar becomes their best friend.
Families often report that the biggest emotional change isn’t just fewer fallsit’s less fear. When someone feels stable, they stop rushing.
When they stop rushing, they’re safer. And when they’re safer, everyone in the house relaxes. That’s a real quality-of-life upgrade.
Curbless showers come with their own real-world storyline. When done well, they’re life-changingwheelchairs roll in smoothly, walkers don’t catch on a curb,
and stepping over edges disappears. But people also learn quickly that “curbless” doesn’t mean “water magically knows where to go.”
Splash control matters. Many successful remodels include a partial glass panel, smart showerhead direction, and a floor pitch that guides water reliably to the drain.
Homeowners who skip these details often end up adding a squeegee routine, extra mats, orworst caseredoing the entry area. The takeaway:
accessibility and waterproofing are teammates, not separate projects.
Finally, a very human insight: accessible design is often most appreciated by people who never expected to need it.
A friend with a temporary injury. A visiting grandparent. A tired parent with a toddler who refuses to be held but also refuses to stand still.
An accessible shower helps all of them. That’s why the best accessible bathrooms don’t scream “special.” They simply work better for real bodies on real days.
Conclusion
Making a shower handicap accessible is about reducing risk and increasing independencewithout sacrificing comfort or style.
Start with the person’s movement needs, choose the right entry type, and prioritize stability (grab bars), seated bathing (a real seat),
reachable controls, anti-scald protection, slip-resistant surfaces, and correct waterproofing/drainage.
If you can only do a few upgrades now, focus on the biggest safety wins: a handheld showerhead, a stable seat, real grab bars installed correctly,
and non-slip traction. If you’re remodeling, plan the layout and water management like your drywall depends on itbecause it does.