Table of Contents >> Show >> Hide
- Before You Start: Figure Out What “Lost” Means
- Method 1: Use Word’s Document Recovery Pane After a Crash
- Method 2: Use “Recover Unsaved Documents” in Word
- Method 3: Search AutoRecover, Backup, and Temporary Files Manually
- Method 4: Check Recycle Bin, Trash, and Cloud Recycle Bins
- Method 5: Restore an Earlier Version with Version History, File History, or Time Machine
- Method 6: Repair a Corrupted Word File
- What If None of These Methods Works?
- How to Prevent Losing a Word Document Again
- Real-Life Recovery Experiences and Lessons Learned
- Final Thoughts
- SEO Tags
Few things ruin a perfectly normal day faster than watching a Microsoft Word document vanish like it just joined the witness protection program. One second you are typing your essay, report, proposal, or novel-in-progress. The next second Word crashes, your laptop restarts, or you accidentally close the file without saving. Suddenly, your masterpiece is gone, and you are bargaining with the universe over a document named “Final_Final_ReallyFinal.docx.”
The good news is that lost Word files are often not truly gone. In many cases, Word, Windows, macOS, OneDrive, or your backup system has been quietly keeping a safety net behind the scenes. Whether your document is unsaved, deleted, overwritten, or corrupted, there is a decent chance you can recover at least part of it, and sometimes all of it.
In this guide, you will learn how to recover Word documents on PC and Mac using 6 easy methods. We will cover built-in Word recovery tools, AutoRecover folders, deleted-file locations, version history, backup systems, and damaged-file repair. I will also explain which method to try first based on what happened, because blindly clicking around in panic mode is not technically a recovery strategy.
Before You Start: Figure Out What “Lost” Means
When people search for how to recover a Word document, they are usually dealing with one of four situations:
- Unsaved document: You created or edited a file, then Word crashed or closed before you saved.
- Deleted document: The file was sent to the Recycle Bin, Trash, or deleted from a synced folder.
- Overwritten or changed document: The file still exists, but you need an earlier version.
- Corrupted document: The file is there, but Word refuses to open it properly.
That distinction matters. If the document was never saved, you should start with Word’s built-in recovery tools. If it was deleted, check the Recycle Bin, Trash, or cloud history. If it opens but looks broken, use Word’s repair features instead.
Method 1: Use Word’s Document Recovery Pane After a Crash
If Word or your computer closed unexpectedly, this is the first method to try. When Word restarts after a crash, it often opens a Document Recovery pane automatically. That pane may contain the last AutoRecover version of your file.
How to recover a Word document on Windows
- Open Microsoft Word again.
- Look for the Document Recovery panel on the left side.
- Open each recovered version and check the timestamps.
- Save the best version immediately with a new filename.
This is the easiest recovery path because Word is basically doing the detective work for you. If you see multiple versions, choose the most recent one, but do not delete the others until you confirm everything you need is there.
How to recover a Word document on Mac
Word for Mac can also reopen recovered files after a crash. Relaunch Word and check whether a recovered version appears automatically. If it does, open it and save a new copy right away.
Best for: Sudden crash, forced restart, power outage, or Word closing itself in dramatic fashion.
Method 2: Use “Recover Unsaved Documents” in Word
If the recovery pane does not appear, do not assume the file is gone. Word often stores unsaved drafts in a special folder and lets you open them manually.
On a PC
- Open Word.
- Go to File > Info.
- Select Manage Document.
- Click Recover Unsaved Documents.
- Open the file you need and save it immediately.
On a Mac
Depending on your version of Word for Mac, you may be able to recover from Word’s open dialog or through the AutoRecovery folder manually. If you do not see an obvious recovery option in Word, skip to Method 3 and check the AutoRecovery path directly.
This method is especially useful when you closed Word without saving, clicked “Don’t Save” by accident, or lost work during a restart. It is one of the most reliable answers to the question how to recover an unsaved Word document.
Example: You spend two hours editing a class paper, your computer reboots during an update, and the file never got a proper manual save. Recover Unsaved Documents may still have a recent draft sitting in Word’s unsaved files folder, quietly waiting to be appreciated.
Method 3: Search AutoRecover, Backup, and Temporary Files Manually
If Word does not hand you the file on a silver platter, it may still be stored in a background recovery folder. This is the “roll up your sleeves” method, but it works surprisingly often.
Windows: Check AutoRecover and backup locations
On Windows, Word commonly stores recovery data in these areas:
C:UsersYourNameAppDataRoamingMicrosoftWordC:UsersYourNameAppDataLocalMicrosoftOfficeUnsavedFiles
Search for files ending in:
.asdfor AutoRecover files.wbkfor backup copies.tmpfor temporary files that may still contain usable data
If you find an .asd file, open Word, browse to that file, and try opening it. If you find a .wbk file called something like “Backup of Quarterly Report,” that is your cue to stop panicking and save a new copy immediately.
Mac: Check the AutoRecovery folder
On a Mac, open Finder, then use Go > Go to Folder and look in Word’s AutoRecovery location. Search for files beginning with AutoRecovery save of. If you find the missing document, open it in Word and save it under a new name.
You can also search your Mac using Finder for AutoRecovery or part of the document’s filename. Sometimes the fastest method is simply letting macOS search the whole machine instead of playing hide-and-seek with hidden folders.
Best for: Unsaved files, missing drafts, documents that disappeared after a crash, or Word files that were never named properly because Past You was living dangerously.
Method 4: Check Recycle Bin, Trash, and Cloud Recycle Bins
If the document was saved at some point and then deleted, recovery gets easier. Your file may still be sitting in a deleted-items folder looking mildly offended.
Windows Recycle Bin
- Open the Recycle Bin.
- Search by file name, extension, or deletion date.
- Right-click the Word file and choose Restore.
Mac Trash
- Open Trash from the Dock.
- Locate the deleted Word document.
- Drag it back out or use the option to restore it to its previous location.
OneDrive or SharePoint Recycle Bin
If the file lived in OneDrive, SharePoint, or a synced work folder, check the cloud recycle bin too. A file deleted locally may still be recoverable online. That is particularly handy when you deleted a Word doc on your laptop and then immediately regretted your life choices.
Best for: Files that were saved before deletion, documents removed from Desktop, Documents, or synced folders.
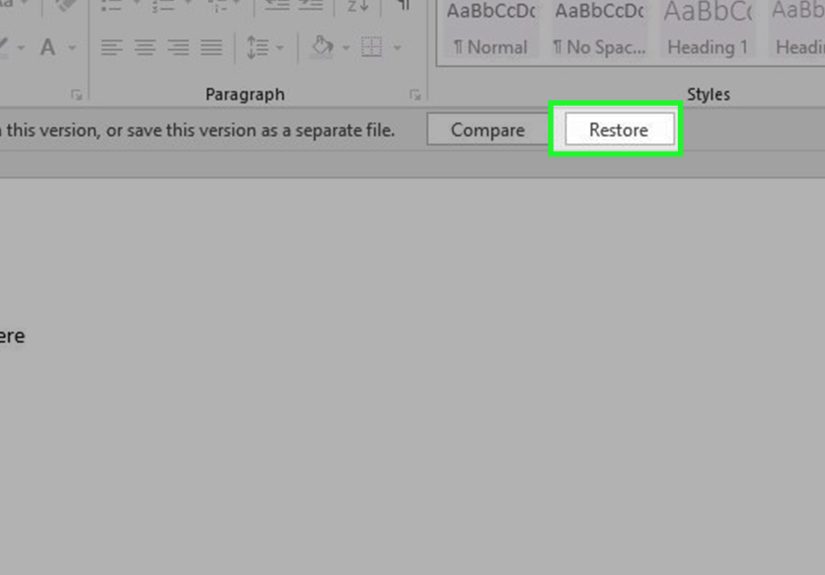
Method 5: Restore an Earlier Version with Version History, File History, or Time Machine
Sometimes the document is not missing. It is just wrong. Maybe you overwrote a chapter, removed pages by mistake, accepted bad edits, or replaced a good draft with a terrible one at 1:13 a.m. In that case, you need version recovery, not file recovery.
Use Version History in Word or OneDrive
If your file was saved to OneDrive, SharePoint, or another Microsoft 365 cloud location, Word may have version history built in.
- Open the file.
- Go to File > Version History.
- Review older versions.
- Open, compare, or restore the version you want.
This is excellent for recovering from bad edits, accidental overwrites, or collaborative chaos. AutoSave can be a hero, but it can also save a mistake very efficiently. Version History is how you politely tell AutoSave, “Thanks, but let’s go back two hours.”
Use File History on Windows
If you had File History enabled in Windows, you can restore a previous version of the file or folder:
- Open File Explorer.
- Go to the folder where the Word document used to live.
- Right-click the folder and choose Restore previous versions.
- Browse versions and restore the one you want.
Use Time Machine on Mac
If you use Time Machine on a Mac, open the folder where the document was stored, enter Time Machine, and browse back through earlier snapshots. Restore the right version when you find it.
macOS may also let you use File > Revert To for documents that support built-in version browsing.
Best for: Overwritten Word files, bad edits, accidental changes, collaboration mishaps, or “who replaced my good draft with this nonsense?” moments.
Method 6: Repair a Corrupted Word File
If the file exists but Word will not open it, or it opens with missing text, broken formatting, or error messages, the document may be corrupted. Fortunately, Word includes a few repair tools that can help.
Use Open and Repair on Windows
- Open Word.
- Go to File > Open > Browse.
- Select the damaged file once.
- Click the arrow beside Open.
- Choose Open and Repair.
If that works, save the recovered file immediately as a new copy. Do not keep working in the damaged original like nothing happened. That is how sequels get made.
Try Recover Text from Any File
If the document still will not open, Word may be able to recover raw text even if formatting is lost. On Mac, you can enable file format conversion and choose the recovery option from the open menu. On Windows, similar recovery options may appear in the open dialog depending on your setup.
This method is not glamorous. It may strip out images, layout, and fancy formatting. But if your main goal is to rescue the actual words, it can be a lifesaver.
Repair Office if the app itself is the problem
If Word keeps crashing, refusing to open documents, or behaving like it was coded during a thunderstorm, repair the Office installation on Windows. In Microsoft 365, a Quick Repair or Online Repair can fix damaged program files. On Mac, reinstalling Office may help if the Word application itself is corrupted.
Best for: Corrupted Word files, Word errors, unreadable documents, or files that open only halfway before giving up on life.
What If None of These Methods Works?
If you have tried all six methods and still cannot recover the file, you still have a few options:
- Search the entire computer for part of the filename or
.docx,.asd, and.wbkfiles. - Check email attachments, Teams chats, Slack uploads, USB drives, or shared folders where an older copy may exist.
- If the file was deleted permanently on Windows and not in the Recycle Bin, consider using Windows File Recovery.
- Ask collaborators whether they still have a local or cloud copy.
Be realistic, though. A permanently deleted and overwritten file is harder to recover than an unsaved or recently deleted one. Recovery odds are best when you stop using the affected drive quickly and avoid saving lots of new data on top of the old space.
How to Prevent Losing a Word Document Again
Recovering a file is great. Not needing to recover it is even better. A few simple habits can save you an absurd amount of stress:
- Save Word files to OneDrive so AutoSave and Version History can help.
- Press Ctrl + S or Command + S like it is a reflex, because it should be.
- Turn on backups such as File History or Time Machine.
- Keep Word and your operating system updated.
- Use meaningful filenames instead of “Untitled document 4.” Future You deserves better.
If you work on high-stakes documents like contracts, research papers, application essays, or long-form content, versioned cloud storage is not optional anymore. It is the digital equivalent of wearing a seatbelt.
Real-Life Recovery Experiences and Lessons Learned
Here is the part nobody talks about enough: recovering a Word document is usually less about technology and more about timing, habits, and how fast you move once something goes wrong.
One common experience is the “I closed Word without saving, but I swear I saved it earlier” situation. What usually happened is that the file was saved once, but the latest round of edits never made it into the final version. In that case, people often open the original document, think everything is gone, and assume the worst. Then they check Recover Unsaved Documents or the AutoRecover folder and discover a near-complete draft. The lesson is simple: even if the main file looks outdated, there may be a newer hidden recovery copy.
Another classic scenario happens on Macs during forced restarts or battery drain. A student writes several pages, closes the lid, the battery dies, and Word reopens with absolutely no dramatic music and only half the work visible. After a few minutes of panic, they search Finder for AutoRecovery save of and find a recent file in Word’s recovery folder. The big takeaway here is that Mac recovery often feels less obvious than Windows recovery, but the files may still be there.
Then there is the deleted-file disaster. Someone cleans up their Desktop, trashes the wrong document, empties the Recycle Bin or Trash, and immediately experiences a spiritual event. If the file was synced to OneDrive or backed up by File History or Time Machine, recovery can still be possible. That is why cloud sync and system backups matter so much. They do not just protect you from crashes. They also protect you from yourself, which, respectfully, is often the bigger threat.
Overwritten files are another sneaky problem. Imagine you open a polished draft, make messy test edits, save over the original, and only later realize you just destroyed your clean version. This is where Version History is worth its weight in gold. People who save Word files locally with no backup often have no easy rollback. People who save to OneDrive can usually rewind to an earlier draft with a couple of clicks. The experience teaches a brutally useful lesson: where you save your file matters almost as much as how often you save it.
Corrupted documents create a different kind of stress because the file is right there, mocking you. You can see the name. You know it exists. Word just refuses to cooperate. In many real-world cases, Open and Repair or text recovery pulls out enough content to save hours of rewriting, even if the formatting comes back looking like it lost a fight. The smart move is to rescue the text first and worry about making it pretty later.
My favorite lesson from all these situations is that people tend to give up too early. They check one place, do not find the file, and assume it is gone forever. But Word recovery is often a chain of possibilities: recovery pane first, unsaved documents next, manual file search after that, then version history, then backup restore, then repair tools. The people who recover their work are usually the ones who calmly go step by step instead of declaring the funeral after the first failed click.
So yes, losing a Word document feels awful. But it is often recoverable, and the experience usually leaves you with better file habits, stronger backup routines, and a permanent emotional attachment to the Save button.
Final Thoughts
If you need to recover Word documents on PC or Mac, start with the built-in tools first. Word’s Document Recovery pane and Recover Unsaved Documents feature are the fastest wins for unsaved files. If that fails, search recovery folders manually, check the Recycle Bin or Trash, look through Version History, restore from File History or Time Machine, and use repair tools for corrupted files.
The most important thing is not to panic and not to overwrite your recovery chances by saving random new files all over the same drive. Work through the methods in order, save recovered files under new names, and once you are done, set up a better backup routine so this little horror story does not become a trilogy.


