Table of Contents >> Show >> Hide
- Why Refinish Wrought Iron Instead of Replacing It?
- Before You Start: Check the Condition
- Tools and Materials You’ll Need
- Step-by-Step: How to Refinish Wrought Iron Patio Furniture
- Pro Tips and Common Mistakes to Avoid
- How to Keep Your Refinished Wrought Iron Looking Good
- Extra : Real-Life Refinishing Experiences & Lessons Learned
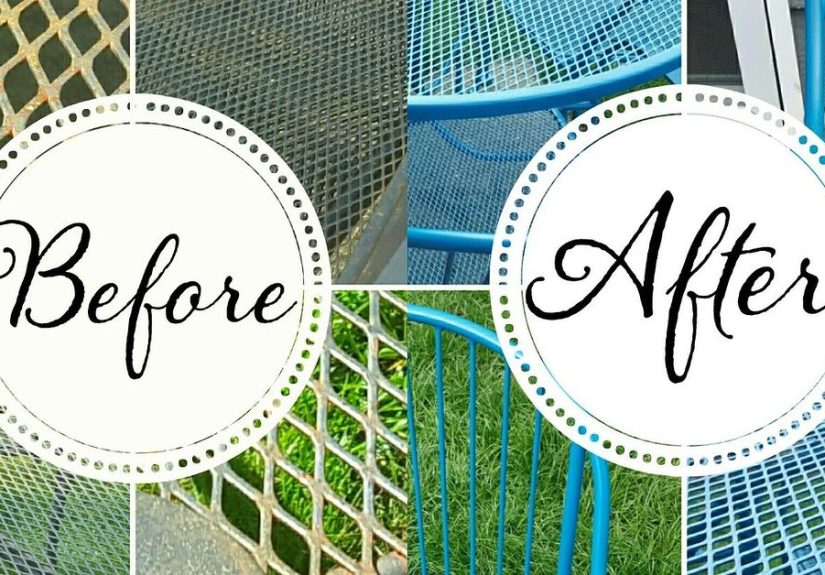
If your wrought iron patio set looks like it’s been through a few too many winters, good news: it’s probably not a lost cause. Wrought iron is tough, classic, and made to last decades. It just needs a little TLC (and maybe a wire brush that means business) to look fresh again. In this guide, we’ll walk through how to refinish wrought iron patio furniture step by step, so you can turn that rusty eyesore into the star of your outdoor space.
We’ll cover how to clean, remove rust, prime, and repaint your furniture, plus pro tips, common mistakes to avoid, and some real-life refinishing experiences at the end. Grab your safety goggles and your “I can totally DIY this” attitudewe’re going in.
Why Refinish Wrought Iron Instead of Replacing It?
Wrought iron patio furniture has a few big advantages over the flimsy stuff:
- Durability: This material is heavy, strong, and can easily last 20–30+ years with proper care.
- Timeless look: Scrollwork, curves, and traditional silhouettes never really go out of style.
- Refinishing-friendly: Unlike some cheap coatings that peel and crumble, wrought iron can be sanded, primed, and repainted again and again.
- Cost savings: A few cans of primer and paint are way cheaper than a brand-new outdoor set.
If you see rust, flaking paint, or faded color, don’t panic. As long as the metal isn’t structurally compromised (no major cracks or pieces breaking off), refinishing is usually the smart move.
Before You Start: Check the Condition
Give your furniture a quick health check:
- Look for deep rust: Surface rust is fine; heavy flaking and deep pitting need more sanding and possibly filler.
- Check welds and joints: Wiggle arms and legs. If something feels loose, you may need a welder to repair it before painting.
- Test stability: If the chair tries to throw you off like a rodeo bull, fix that before worrying about paint color.
Once your furniture passes the “can this safely hold a human?” test, you’re ready to prep.
Tools and Materials You’ll Need
You don’t need a full workshop, but a few key tools make the job much easier.
Basic Tools
- Wire brush or wire-wheel attachment for a drill
- Medium- and fine-grit sandpaper (around 80–120 grit for heavy rust, 180–220 grit for smoothing)
- Sanding sponge for curves and scrolls
- Drop cloths or plastic sheeting
- Clean rags or microfiber cloths
- Bucket and sponge for washing
Cleaning & Prep Supplies
- Mild dish soap and warm water for cleaning
- Optional: degreaser if the furniture is grimy or oily
- Rust converter or rust remover (for stubborn rust spots)
- Painter’s tape and masking paper if you need to protect non-metal parts
Primer & Paint
- Rust-inhibiting metal primer: Look for exterior-grade, “for metal,” “anti-rust,” or “rust-preventive” on the label.
- Outdoor metal paint: Spray paint or brush-on enamel designed for metal and outdoor use.
- Common finishes: satin, semi-gloss, or gloss (glossier finishes usually shed dirt and moisture better).
Safety Gear
- Safety glasses or goggles
- Dust mask or respirator (especially when sanding and spraying)
- Gloves (work gloves for sanding, disposable gloves for painting)
- Long sleeves if you don’t want to wear your overspray for the next few days
Step-by-Step: How to Refinish Wrought Iron Patio Furniture
Step 1: Set Up Your Workspace
Choose a well-ventilated outdoor areadriveway, patio, or yardand check the weather. Aim for a mild, dry day: not too hot, not too cold, and definitely not windy. Wind loves to carry spray paint onto cars, windows, and nosy neighbors’ fences.
Lay down drop cloths or plastic sheeting to protect the ground. If your furniture has plastic or wood details (e.g., arm caps), mask them off with painter’s tape.
Step 2: Remove Loose Paint and Rust
This is the least glamorous step but the most important. Your new finish is only as good as your prep work.
- Start with the wire brush: Scrape off flaking paint and rust. Focus on joints, decorative curls, and edges where water tends to sit.
- Sand the surface: Use 80–120 grit sandpaper or a sanding block to smooth rusted areas and feather the edges of old paint. You don’t have to remove every last bit of paint, but anything loose or bubbled must go.
- Address stubborn rust: For deeply pitted spots, keep sanding or use a rust remover or rust converter according to the instructions. These products help stop rust from spreading and give your primer a better surface.
Yes, this part takes time. Yes, your arms may complain. But skipping thorough rust removal is the fastest way to guarantee peeling and bubbling later.
Step 3: Clean the Furniture Thoroughly
Once the loose paint and rust are gone, your furniture will be dusty and slightly offended. Time to give it a bath.
- Mix warm water with a few drops of mild dish soap.
- Use a sponge or soft brush to scrub away sanding dust, dirt, and grime.
- Rinse with clean watergarden hose is perfect.
- Let the furniture dry completely. Sun + a little time does the trick.
Any leftover dust or grease will mess with adhesion, so don’t skip this step. The metal should feel clean and just slightly textured.
Step 4: Apply Rust-Inhibiting Metal Primer
Primer is the bridge between bare (or partially bare) metal and your beautiful new color. It helps paint stick and protects against future rust.
- Choose the right product: An exterior-grade metal primer that says “rust-inhibiting” or “for rusty metal” is ideal.
- Spray primer: Great for intricate scrollwork and mesh seats. Hold the can 8–12 inches away and use long, sweeping passes.
- Brush-on primer: Better for smaller projects or if you’re sensitive to overspray. Use a small brush to get into curves and crevices.
Apply a light, even coat. It doesn’t have to look perfect or fully opaque; you’re just giving the paint something to grab. Follow the drying time on the canoften 1–2 hours before paint.
Step 5: Paint the Wrought Iron (Spray vs. Brush)
You can refinish wrought iron patio furniture with spray paint, a paint sprayer, or a brush and roller. Each has pros and cons.
Option 1: Spray Paint
This is the most popular choice for wrought iron because it gets into all the curves.
- Shake the can well (30–60 seconds) before starting and occasionally while you work.
- Hold 8–12 inches from the surface.
- Use light, overlapping passes instead of one heavy coat.
- Start spraying slightly before the furniture and release slightly after to avoid dots and blobs.
Pro tip: Flip the furniture upside down first and paint the undersides. Once dry, flip it right-side up and paint the top surfaces. This helps you catch every angle.
Option 2: Paint Sprayer
If you already own a sprayer (or you love excuses to rent tools), an airless or HVLP sprayer can give you a super-smooth, factory-looking finish.
- Thin the paint if required (check the manufacturer’s instructions).
- Test your spray pattern on cardboard first.
- Use slow, controlled passes, keeping the sprayer moving to avoid drips.
Option 3: Brush-On Enamel
Brush-on paint works well if you don’t have outdoor spraying space or if ventilation is limited.
- Use a high-quality angled brush and, for larger flat areas, a small foam roller.
- Apply thin coats in one direction for a smoother finish.
- Don’t overload the brush; that’s how you get runs and sags.
Whichever method you choose, plan on two to three thin coats rather than one heavy coat. Follow the label’s recoat windowsome paints need to be recoated within a certain time frame or fully cured before another coat.
Step 6: Let the Paint Cure Properly
Dry and cured are not the same thing. Your furniture might feel dry to the touch in a few hours, but the coating often needs 24–48 hours (or more) to fully harden, especially in humid weather.
- Avoid stacking chairs or placing cushions until the paint is fully cured.
- Try not to drag pieces across the ground during this time.
- If you must move them, lift rather than slide to protect the finish.
Once cured, you can reattach any cushions, add a cute outdoor rug, and pretend the set just rolled out of a catalog.
Pro Tips and Common Mistakes to Avoid
Pro Tips
- Choose the right weather window: Mild temperature and low humidity help paint level and cure properly.
- Keep a “wet edge” when brushing: Work in sections and blend into the previous area before it dries.
- Sand between coats (optional): A quick pass with fine-grit sandpaper (220) between coats can give a super-smooth finish.
- Label your cans: Write the color name, brand, and date on the lid in case you need touch-ups later.
Common Mistakes
- Painting over loose rust or flaking paint: This is the number one cause of peeling later. If it’s loose now, it will come off under your new paint.
- Skipping primer: Especially on bare metal or rusty areas, primer is a must.
- Spraying too close or too heavy: This leads to drips, sags, and textured spots. Light coats are your friend.
- Rushing the cure time: Sitting on a chair that isn’t fully cured can leave permanent marksor paint on your clothes.
- Ignoring safety: Sanding and spraying without goggles or a mask is a fast way to irritate your eyes and lungs.
How to Keep Your Refinished Wrought Iron Looking Good
You’ve done the hard worknow let’s make the finish last as long as possible.
- Clean it a few times a year: Use mild soap and water, not harsh chemicals or abrasive pads.
- Dry after rain when possible: Wiping down flat surfaces can minimize standing water and rust.
- Touch up chips quickly: Keep an extra can or small jar of matching paint for quick touch-ups before rust spreads.
- Use covers or store indoors in winter: If you live in a harsh climate, covers or off-season storage can add years to your finish.
Think of it like skincare for your furniture: a little routine maintenance beats a big overhaul later.
Extra : Real-Life Refinishing Experiences & Lessons Learned
If you’re still on the fence about refinishing your wrought iron patio furniture, let’s talk about what actually happens in the real world when people tackle this project. Spoiler: it’s rarely perfectbut it’s almost always worth it.
The “Free Curbside Treasure” Story
Imagine driving through your neighborhood and spotting a wrought iron table and four chairs sitting at the curb with a handwritten “FREE” sign. The frames look solid, but the paint is faded, rust is blooming at the feet, and the whole set has that “retired from service” vibe.
You bring it home (after a mini workout lifting those heavy chairs), give everything a thorough scrub, and realize it’s actually in great shape under the rust. The worst spots are around the feet and some decorative scrolls. After an afternoon of sanding and wire-brushing, the rust looks manageable instead of terrifying.
You prime, paint in a deep black or charcoal color, and suddenly that curbside reject looks like something that would cost serious money in a boutique home store. Add new outdoor cushions, and you’ve basically paid the price of a few paint cans for an entire “new” patio set.
The big lesson from stories like this? Don’t underestimate what a solid cleaning and fresh coat of paint can do. Wrought iron looks terrible when neglectedbut it also bounces back dramatically when you refinish it.
What People Usually Regret (So You Don’t Have To)
When DIYers talk about refinishing metal patio furniture, a few regrets come up again and again:
- “I didn’t remove enough rust.” They got impatient, did a quick pass with the brush, and painted over rust that later bubbled through.
- “I chose the wrong color.” Super light colors show dirt and grime faster; very dark colors can get blazing hot in full sun.
- “I skipped safety gear.” Paint dust in eyes, overspray up the nose, or sore lungs from sanding are never part of the dream patio makeover plan.
The fix? Take an extra hour on prep, tape a paint swatch to the furniture and stare at it outside for a day, and put on the mask and goggles. Your future self will be very grateful.
How Long Does a Refinished Set Really Last?
The answer depends on your climate and how kind you are to your furniture, but a well-prepped and properly painted wrought iron set can often go 5–7 years before needing a serious refresh. In milder, drier climates, it might last even longer.
If you:
- Wash it a couple of times a year,
- Cover it or store it during harsh winters, and
- Touch up chips as soon as they appear,
you may only ever need small maintenance jobs instead of another full strip-and-repaint marathon.
Small Tweaks That Make a Big Visual Difference
While you’re refinishing, you can also make design upgrades without spending a fortune:
- Change the color: Classic black is safe, but deep navy, charcoal, or forest green can look sophisticated. For a playful look, try white, soft sage, or even a bold color on just the chairs.
- Update the cushions: Fresh fabric in modern patterns instantly pulls your updated furniture into the current decade.
- Add felt or rubber feet: These protect your deck or patio and help prevent worn spots on the metal legs.
Suddenly, your “old” furniture doesn’t feel old at allit feels custom.
Final Encouragement Before You Start
Refinishing wrought iron patio furniture isn’t a five-minute project, but it’s also not a high-risk, expert-only job. The steps are simple: clean, remove rust, prime, paint, and protect. The most important things you bring to the project are patience and consistencyplus maybe a good playlist while you sand.
When you’re done and you sit down on that freshly painted chair with a drink in hand, looking at a set that looks hundreds of dollars more expensive than it was, you’ll get that very specific DIY satisfaction: “I did this.” And your patio will never be the samein the best possible way.


