Table of Contents >> Show >> Hide
- Why Blank Rows Matter More Than You Think
- Before You Delete Anything, Know What “Blank” Means
- Method 1: Use Go To Special for the Fastest Cleanup
- Method 2: Filter Blank Rows and Delete Only What You Can See
- Which Method Should You Use?
- Bonus Tips for Cleaning Blank Rows in Excel
- Common Mistakes to Avoid
- Conclusion
- Real-World Experiences With Removing Blank Rows in Excel
- SEO Tags
Note: This article focuses on practical, beginner-friendly Excel methods that work well for everyday spreadsheets and data cleanup.
Blank rows in Excel have a special talent: they appear out of nowhere, multiply when nobody is looking, and make an organized worksheet feel like it just gave up on life. One minute you have a clean customer list. The next minute, your spreadsheet looks like it’s taking dramatic pauses between every record.
The good news is that removing blank rows in Excel is usually very easy. The even better news? You do not need a complicated formula, a macro, or a pep talk from a spreadsheet guru. In most cases, you can clean up your file with one of two fast methods: using Go To Special or using Filters.
In this guide, you’ll learn exactly how to remove blank rows in Excel, when each method works best, what mistakes to avoid, and a few bonus cleanup tips that can save your worksheet from future chaos. Whether you’re cleaning a sales export, a contact list, an inventory report, or a survey dump that looks like it survived a storm, these steps will help.
Why Blank Rows Matter More Than You Think
Blank rows are not just ugly. They can also make your spreadsheet harder to sort, filter, scan, print, and analyze. Excel likes clean, continuous data ranges. When empty rows are scattered through a list, features like filters, tables, formulas, and analysis tools can become less reliable or simply more annoying to use.
That is why Excel cleanup is not just cosmetic. Removing empty rows can improve readability, reduce scrolling, and make your worksheet easier to manage. If you share files with coworkers or clients, it also helps your spreadsheet look more polished and less like it was built during a caffeine emergency.
Before You Delete Anything, Know What “Blank” Means
This is the part most people skip, and then regret about three clicks later.
In Excel, a “blank row” can mean two different things:
- A completely empty row where all cells in that record are blank.
- A partially blank row where one or more cells are empty, but the row still contains important data in other columns.
That distinction matters. If you use the wrong delete option, Excel can shift cells upward and scramble the structure of your data. So before you start removing blank rows in Excel, take a second to confirm whether you are deleting rows that are truly empty or rows with missing values in only one column.
That one tiny pause can save you from turning a tidy spreadsheet into modern art.
Method 1: Use Go To Special for the Fastest Cleanup
Best for
Use this method when you want to delete fully blank rows quickly, especially in a worksheet with a clean, structured list.
Step-by-step instructions
- Open your Excel worksheet.
- Select the range that contains your data. If your table is simple and one column should always contain data, you can select just that key column instead.
- Go to the Home tab.
- Click Find & Select.
- Choose Go To Special.
- Select Blanks, then click OK.
- Excel will highlight blank cells.
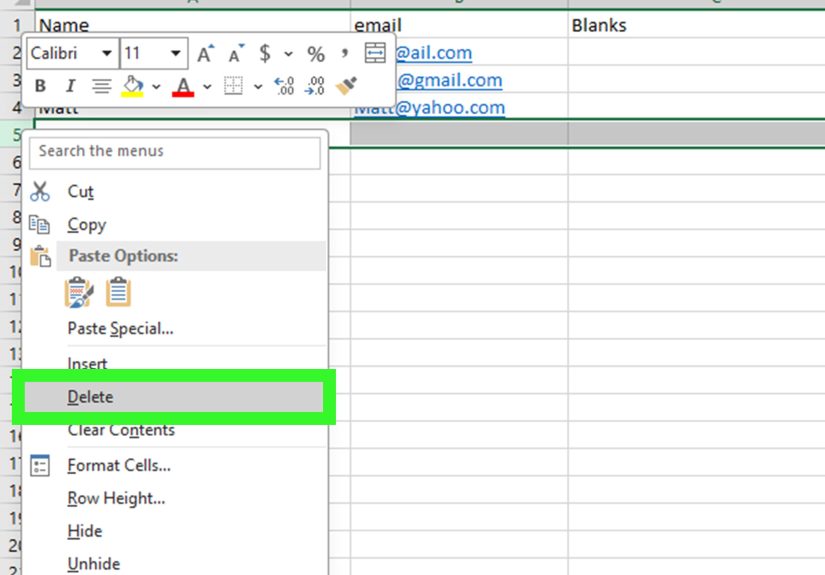
- Now go back to Home > Delete.
- Choose Delete Sheet Rows if those rows are truly empty.
That’s the fast lane. No formula drama. No helper columns. No whispering “please work” at your monitor.
Why this method is popular
The Go To Special method is popular because it is fast, built into Excel, and easy to learn. It works especially well when you’re dealing with a list where every real record should contain a value in a specific column, such as a name, product ID, email address, or order number.
In that situation, selecting the key column first can make the process even cleaner. Excel highlights the blank cells in that column, and when you delete the corresponding rows, the empty records disappear in seconds.
Important warning
This method can be risky if your rows are only partially blank. For example, imagine a row where the email address is missing but the customer name and phone number are still present. If you treat that as a full blank row and delete the entire row, you could remove data you actually need.
Also, if you select a large mixed range, Excel may highlight blank cells that are not part of truly empty records. In that case, deleting sheet rows can be too aggressive. If you only want to remove empty cells inside a range, Excel may instead require a delete option like Shift Cells Up, but that is a different cleanup goal from removing whole blank records.
Quick shortcut version
If you like keyboard shortcuts, you can speed things up like this:
- Press F5 or Ctrl + G
- Click Special
- Choose Blanks
- Press Ctrl + –
- Select Entire row
It feels wonderfully efficient, which is Excel’s version of a magic trick.
Method 2: Filter Blank Rows and Delete Only What You Can See
Best for
Use this method when you want a safer, more controlled way to remove empty rows in Excel, especially in larger datasets, imported reports, or worksheets where some rows contain missing values but are not truly empty.
Step-by-step instructions
- Select your data range, including headers.
- Go to the Data tab and click Filter.
- Open the filter dropdown in a column that should always contain data for valid records.
- Clear Select All, then choose Blanks.
- Excel will now show only the blank rows that match that column condition.
- Select the visible row numbers.
- Right-click and choose Delete Row, or use Home > Delete > Delete Sheet Rows.
- Clear the filter to view your cleaned data.
Why this method is safer
The filter method helps you verify what you are deleting before you delete it. Instead of asking Excel to hunt for blanks across an entire range, you are telling it, “Show me the records where this key field is empty.” That gives you a chance to inspect the results first.
This is especially helpful when cleaning imported CSV files, survey data, export reports, contact databases, and online form responses. In those files, some records may look empty at first glance but still contain notes, dates, or hidden values in other columns. Filtering lets you catch that before you remove something important.
When this method beats Go To Special
If your worksheet is messy, large, or full of inconsistent records, filtering is usually the better choice. It takes a few extra clicks, but it gives you more control. In spreadsheet terms, that is a bargain.
Which Method Should You Use?
| Method | Best Use Case | Speed | Risk Level |
|---|---|---|---|
| Go To Special | Fully blank rows in a clean data range | Very fast | Moderate if rows are only partly blank |
| Filter for Blanks | Larger or messier spreadsheets with key columns | Fast | Lower because you can preview rows first |
If you want the shortest route, use Go To Special. If you want the safest route, use Filters. That’s really the whole decision tree. No flowchart required.
Bonus Tips for Cleaning Blank Rows in Excel
1. Turn your range into a table
If you press Ctrl + T, Excel converts your data range into a table. Tables make filtering, sorting, and structured cleanup much easier. They also tend to behave better when you are managing imported data on a regular basis.
2. Keep a backup before mass deletion
Before deleting hundreds of rows, save a backup copy. Yes, Excel has Undo. No, you do not want your entire cleanup strategy to depend on it. A backup is the calmer, wiser choice.
3. Watch for “blank” cells that are not truly blank
Some cells look empty but actually contain spaces, formulas that return an empty string, or leftover formatting. If a blank row refuses to behave like a blank row, that may be why.
4. Use Power Query for repeated imports
If you regularly import data into Excel, Power Query can remove blank rows as part of a repeatable cleanup process. That is a smart move for weekly reports, exported system files, and recurring data prep work.
5. Use formulas when you want a cleaned copy instead of deleting source data
If you use Excel for Microsoft 365, formula-based options can return a clean version of your data without changing the original range. That can be useful when you want to preserve raw source data and build a separate cleaned output for analysis.
Common Mistakes to Avoid
- Deleting entire rows when only one cell is blank: This can remove valid records.
- Selecting the whole sheet without checking the results: Excel may include blanks you did not intend to remove.
- Ignoring trailing blank rows far below your data: These can affect scrolling, selection, and file behavior.
- Skipping a review after deletion: Always scan your cleaned dataset once more before saving.
Conclusion
If you want to remove blank rows in Excel quickly, the two easiest methods are simple: use Go To Special when your data is clean and the empty rows are truly empty, or use Filters when you want more control and a safer review step. Both methods are easy to learn, fast to apply, and useful for everything from small personal spreadsheets to larger business reports.
The real trick is not just knowing how to delete blank rows in Excel. It is knowing which blank rows should be deleted and which ones are just missing a value in one column. Once you understand that difference, spreadsheet cleanup becomes a lot less stressful and a lot more accurate.
And that, frankly, is the kind of quiet spreadsheet victory that deserves a tiny celebration.
Real-World Experiences With Removing Blank Rows in Excel
One of the most common real-world experiences with blank rows happens after exporting data from another platform. A CRM export, survey tool, inventory system, or email platform often creates a worksheet that looks fine at first, but once you scroll, the file is packed with random empty lines. In that situation, many people start deleting rows one by one. It feels productive for about thirty seconds, and then it becomes a form of spreadsheet cardio. This is where the Go To Special method feels like a rescue mission. Suddenly, instead of spending ten minutes cleaning the file manually, you can highlight the blanks and remove them almost instantly.
Another very common experience is the opposite problem: a row looks blank, but it is not actually safe to delete. Maybe the customer name is missing, but the order number, product, and shipping note are still there. Maybe a student attendance sheet has an empty email cell, but the rest of the record is complete. People often learn this lesson the hard way after deleting entire rows and realizing the worksheet now has missing information. That is why the filter method earns so much respect in real working files. It slows you down just enough to confirm what you are deleting, and that extra check is often what prevents a cleanup job from turning into a repair job.
Blank rows also show up in team workflows more often than people expect. Someone adds manual spacing to “make the sheet easier to read.” Another person copies data from a website. A third person pastes in results from a report generator that includes extra empty lines between sections. By the time the spreadsheet reaches the next person, sorting stops working nicely, filters feel weird, and the data range behaves like it has trust issues. In these cases, removing blank rows is not just about neatness. It restores the worksheet so Excel can treat it like one continuous dataset again.
There is also a practical emotional side to this. Clean spreadsheets are easier to trust. When a worksheet is full of random gaps, people naturally wonder whether records are missing, whether formulas skipped something, or whether the report is incomplete. Once the blank rows are removed, the file feels more reliable and professional. That matters in workplaces where spreadsheets are used for budgeting, sales tracking, operations, hiring, or reporting to leadership. A cleaner file makes people more confident in the information they are reading.
Over time, most Excel users settle into a simple habit: use the fast method for clean files, and use the safer method for messy files. That habit saves time, reduces mistakes, and makes spreadsheet cleanup feel routine instead of annoying. And honestly, any Excel habit that saves time and prevents accidental chaos is a very good habit to keep.


