Table of Contents >> Show >> Hide
- First, Identify What You’re Removing (Because “Grout” Isn’t One Thing)
- Safety + Tile Reality Check (Do This Before You Scrub)
- Tools and Supplies That Work Well on Textured Tile
- Step-by-Step: Remove Grout From Textured Tile (Start Gentle, Then Level Up)
- When You Need More Power: Choosing the Right Cleaner
- Option A: Vinegar solution (only for ceramic/porcelainnever for many natural stones)
- Option B: Sulfamic acid crystals or cement grout haze remover (effective and controlled)
- Option C: If the film is sticky or “plastic-y,” it might not be cement haze
- Option D: Epoxy grout haze (use a dedicated epoxy haze remover)
- Special Scenarios (Textured Tile Loves to Create These)
- If What You Really Need Is Grout Removal Between Tiles (Regrouting Prep)
- How to Prevent Grout From Sticking Next Time (Because This Is the Fun Part)
- Troubleshooting: When Things Look Worse Before They Look Better
- FAQ
- Real-World Experiences (What People Commonly Run Into on Textured Tile)
Textured tile is gorgeousuntil grout decides to move in permanently and start paying rent in every tiny ridge, dimple, and “rustic” crevice.
If you’ve got dried grout clinging to a pebble-finish shower wall, a slate-look porcelain floor, or a tumbled stone backsplash that now looks
like it lost a fight with a powdered donut, you’re in the right place.
This guide walks you through safe, realistic ways to remove grout from textured tile without scratching the surface or accidentally turning your
bathroom into a high school chemistry lab. We’ll cover quick wins, heavier-duty options, and what changes if your grout is cement-based versus epoxy.
We’ll also talk prevention (because future-you deserves nice things).
First, Identify What You’re Removing (Because “Grout” Isn’t One Thing)
“Grout stuck on tile” usually falls into one of these categoriesand each one behaves differently:
1) Grout haze (a cloudy film)
This is the most common issue: a thin, chalky film left behind after grouting. On textured tile, haze collects in low spots and can look like
a dusty shadow that refuses to wipe away.
2) Grout residue (smears, blobs, and crusty patches)
These are thicker depositsoften where grout dried before cleanup, or where textured tile “held onto” the mix like it was a souvenir.
3) Grout in the joints (you want it gone for regrouting)
That’s a different job: removing grout lines between tiles. We’ll touch on it briefly so you don’t attack your tile surface when you really needed a grout saw.
4) What type of grout?
- Cement-based grout: most common; tends to leave a powdery haze that can respond to mild acids (on acid-safe surfaces).
- Premixed / “single-component” / urethane-style: often leaves a sticky or shiny film that doesn’t respond well to acid cleaners.
- Epoxy grout: extremely durable; haze can be stubborn and usually needs a dedicated epoxy haze remover.
Safety + Tile Reality Check (Do This Before You Scrub)
Check your tile material
Textured tile can be porcelain, ceramic, quarry tile, or natural stone (travertine, marble, slate, limestone, etc.). This matters because
acidic cleaners (including vinegar) can damage many natural stones.
If you’re not sure what you have, look up the product name/box, or test in a hidden corner.
Always test a small area first
Pick a spot behind a toilet, under a vanity toe-kick, or in a closet corner. Your goal is to confirm:
(1) the cleaner won’t etch or dull the tile, and (2) the scrub pad won’t scratch.
Basic protective gear
- Nitrile or rubber gloves
- Eye protection (especially for any acidic cleaner)
- Ventilation (open window + fan is usually enough)
- Never mix vinegar/acid products with bleach or ammonia-based cleaners
Tools and Supplies That Work Well on Textured Tile
You don’t need a garage full of gadgets. You need the right “gentle but effective” lineup:
- Microfiber towels (pluralgrout haze loves to redeposit)
- Nylon scrub pads (white is typically the least aggressive)
- Soft nylon brush or old toothbrush for grooves
- Plastic putty knife (for blobs without gouging glaze)
- Wooden craft stick (surprisingly great for picking grout out of texture)
- Two buckets (wash + rinse water) and a sponge
- pH-neutral tile cleaner (safe starting point)
- Optional: white vinegar (ceramic/porcelain only, and diluted)
- Optional: sulfamic acid crystals / grout haze remover (for cement haze on acid-safe surfaces)
- Optional: epoxy haze remover (if you used epoxy grout)
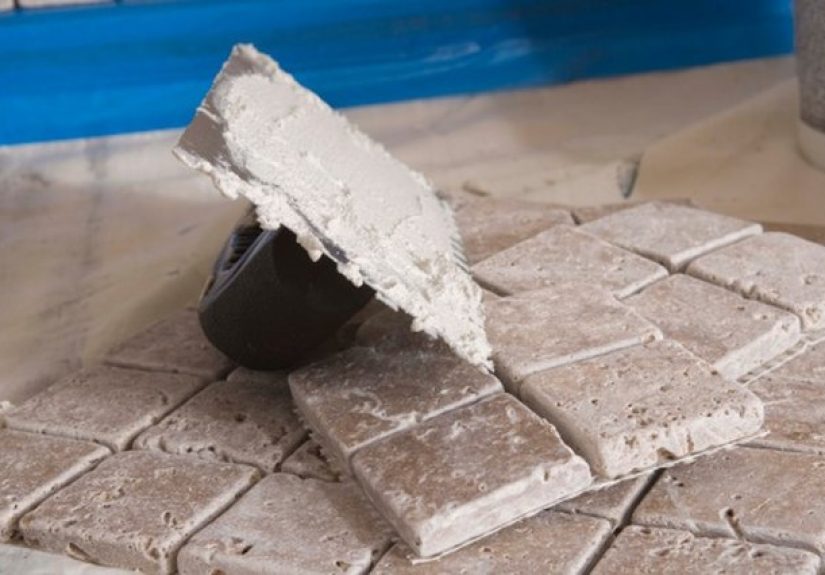
Step-by-Step: Remove Grout From Textured Tile (Start Gentle, Then Level Up)
Step 1: Dry removal first (yes, really)
If you have raised texture, dry grout often sits on top of peaks. Before adding water (which can turn powder into paste),
try dry methods:
- Vacuum or dust the surface to remove loose grit (grit = scratches waiting to happen).
- Buff the tile with a clean, dry microfiber towel.
- Use a soft nylon brush to lift residue out of grooves.
- For small chunks, use a wooden stick to “flick” grout off texture without scraping glaze.
Pro tip: On deeply textured tile, a microfiber towel wrapped around your finger (or a nylon brush) often reaches into pits better than a sponge.
Step 2: Warm water + nylon pad (the safe “workhorse” method)
For light haze and fresh-ish residue, warm water and a nylon pad can do a lotespecially if you’re patient and keep rinse water clean.
- Work in small sections (about 10–15 square feet).
- Lightly dampen the surface with warm water (not soaking).
- Gently scrub with a white nylon pad or soft brush in circular motions.
- Wipe with a damp sponge, then immediately buff dry with microfiber.
- Change rinse water often so you don’t paint haze right back onto the tile.
If this works, congratulationsyou can skip the chemical aisle and keep your weekend intact.
Step 3: Plastic scraper for blobs (careful, controlled pressure)
If you have actual grout “islands” stuck on the surface:
- Use a plastic putty knife at a low angle.
- Push gently; don’t stab downward into texture.
- Follow up with warm water + nylon brush to clean the remaining film.
Avoid metal scrapers unless you are 100% sure your tile can handle itand even then, it’s easy to slip and leave a permanent souvenir.
When You Need More Power: Choosing the Right Cleaner
If warm water isn’t touching the haze, your next step depends on grout type and tile material.
Below are the most common (and safest) escalation paths.
Option A: Vinegar solution (only for ceramic/porcelainnever for many natural stones)
For cement-based grout haze on porcelain or ceramic, a mild vinegar-and-water mix can help dissolve residue.
Start mild so you don’t dull finishes or damage nearby materials.
- Mix 1 part white vinegar to 4 parts water (you can go slightly stronger if needed, but don’t start aggressive).
- Apply to a small test area with a sponge or spray bottle (avoid soaking grout joints).
- Let it sit briefly (a minute or two), then scrub with a non-scratch pad.
- Rinse thoroughly with clean water and buff dry.
Important: If your tile is slate, marble, limestone, travertine, or another acid-sensitive stone, skip vinegar.
Acid can etch or dull the surface, and textured stone is especially unforgiving because damage can look “baked in.”
Option B: Sulfamic acid crystals or cement grout haze remover (effective and controlled)
When cement haze is cured and stubborn, sulfamic acid-based cleaners are commonly used because they’re strong enough to work,
but generally more controlled than harsher acidswhen used exactly as directed.
Here’s a safe, practical approach:
- Confirm the surface is acid-safe. Many porcelain and ceramic tiles are; many natural stones are not. Test first.
- Use a plastic bucket (some instructions warn against mixing acids in metal containers).
- Mix with warm water according to label directionsdo not “freestyle” the concentration.
- Wet the tile with plain water first (this helps prevent the cleaner from absorbing too quickly in porous materials).
- Apply the solution to a small section, scrub with a nylon pad/brush, then rinse thoroughly.
- Buff dry with microfiber to prevent new residue from drying on the tile.
If you’re working on a heavily textured surface (like slate-look ridged porcelain), use a soft nylon brush to get into valleys.
You’re trying to lift haze outnot sandblast it into submission.
Option C: If the film is sticky or “plastic-y,” it might not be cement haze
Some modern grouts (premixed/single-component/urethane-style) can leave a haze that doesn’t respond to acid cleaners.
In those cases:
- Use the manufacturer-recommended haze remover for that grout type.
- Try a pH-neutral cleaner first, then a specialty “non-cement grout haze remover” if needed.
- Don’t keep escalating acid strengthit can damage surfaces and still not remove the film.
Option D: Epoxy grout haze (use a dedicated epoxy haze remover)
Epoxy grout is the overachiever of the grout world: stain-resistant, tough, and absolutely willing to leave a haze that laughs at vinegar.
If you used epoxy grout, reach for an epoxy haze remover and follow the product’s dwell-time and cleanup steps.
Practical tips that matter on textured tile:
- Work in small sections and don’t let the product dry on the surface.
- Use an appropriate scrub pad (non-scratch unless the label suggests otherwise).
- Rinse thoroughly and wipe away residue immediatelyepoxy haze removers are designed to lift film, but you still have to remove it from the tile.
Special Scenarios (Textured Tile Loves to Create These)
You have matte or structured porcelain that “shows everything”
Matte finishes can look cloudy if haze is presentor if you scrub too aggressively and burnish the surface.
Use the least abrasive pad possible, keep water clean, and buff dry after each section.
You have natural stone with texture (tumbled travertine, slate, limestone)
Treat natural stone like a fancy car: it looks amazing, but it does not enjoy random chemicals.
Avoid vinegar and many acidic cleaners unless the stone manufacturer explicitly says it’s safe.
Start with stone-safe, pH-neutral cleaners and consider professional guidance if haze is severe.
The grout is in tiny pits and won’t budge
This is where technique beats brute force:
- Use a soft brush to agitate cleaner into pits.
- Wipe with microfiber, then rinse, then dry-buff.
- Repeat in short rounds rather than one long scrub-fest.
If What You Really Need Is Grout Removal Between Tiles (Regrouting Prep)
If your goal is removing grout from the joints (not the tile face), don’t spend hours scrubbing the surface.
Use tools designed for grout lines:
- Manual grout saw (carbide grit blade)
- Oscillating multi-tool with a grout-removal blade (fast, but keep it centered to avoid chipping tile edges)
- Shop vacuum to remove dust as you go
For most regrout jobs, removing about two-thirds of the grout depth is a common target so new grout has enough bite to bond.
If you’re unsure, a tile pro can confirm what’s appropriate for your tile and grout type.
How to Prevent Grout From Sticking Next Time (Because This Is the Fun Part)
Removing grout from textured tile is doable, but prevention is cheaper, faster, and far better for your blood pressure.
Here’s what actually helps:
Use a grout release (especially on textured or porous surfaces)
Grout release products are made to reduce grout bonding to the tile faceparticularly useful on textured finishes, unglazed tile,
and many natural stones. They can make cleanup dramatically easier.
Work in smaller sections
Textured tile shortens your “cleanup window” because grout hides in crevices.
Spreading grout across a huge area and then taking a snack break is how grout becomes a permanent roommate.
Change your rinse water constantly
Dirty rinse water is basically “haze delivery service.” Two buckets (wash/rinse) and frequent changes keep residue from redepositing.
Buff dry after the final wipe
A quick microfiber buff right after cleaning removes the last film before it dries into a ghostly cloud you’ll notice forever.
Troubleshooting: When Things Look Worse Before They Look Better
“I cleaned haze, but now the tile looks streaky.”
Often that’s leftover cleaner or redeposited residue. Rinse thoroughly with clean water, then buff dry. On textured tile, a second rinse is common.
“My tile looks dull in spots.”
Stop and reassess. Dull spots can be cleaner residue, but they can also be surface damage (especially on natural stone or delicate finishes).
Switch to pH-neutral cleaner, and avoid further abrasion until you identify the cause.
“Nothing is workingand I’m tempted to use a super-strong acid.”
Don’t. Very strong acids can permanently damage tile, grout, metal fixtures, and your lungs.
If sulfamic acid (used properly) or a manufacturer-recommended remover isn’t working, it’s time to identify the grout type and get the correct specialty removeror call a pro.
FAQ
Can I use a magic eraser on textured tile grout haze?
Sometimes, but test first. Melamine sponges can act like very fine abrasives. On some matte or textured finishes, they can change the sheen.
Will a steam cleaner remove grout from textured tile?
Steam can help loosen some residues, especially when paired with a nylon brush. It’s not a guaranteed fix for cured cement haze or epoxy film,
but it can be a gentle option before stronger chemistryparticularly for “grout dust” trapped in texture.
How long after grouting can I still remove haze?
The sooner, the easier. Light haze is often easiest in the first day or two. As it cures, removal usually requires more agitation or a more targeted cleaner.
Epoxy haze often needs a dedicated remover if it has fully cured.
Real-World Experiences (What People Commonly Run Into on Textured Tile)
Let’s talk about what happens in real homesbecause textured tile doesn’t fail in theory, it fails on Saturday afternoon when you’re already tired.
One common experience is the “looks clean when wet” trick. You wipe the tile, everything looks great, you high-five yourself internally, and then it dries…
and suddenly your tile has a mysterious chalky outline like a ghost decided to redecorate. On textured surfaces, water temporarily hides residue in the low spots,
so the best habit you can build is buffing dry after every section. Microfiber towels are basically the bouncers that keep haze from sneaking back in.
Another classic moment: you realize too late that your rinse bucket has turned into grout soup. You keep wiping anyway, because you’re “almost done,”
and then wonder why the haze is spreading like it’s being applied with a paint roller. On textured tile, dirty water is extra disastrous because it deposits
residue into every tiny groove. People who get the best results almost always do two things: (1) they change rinse water frequently, and (2) they work smaller.
It feels slowerbut it’s actually faster than doing the whole job twice.
Many DIYers also discover the “wrong tool regret.” A green scrub pad or aggressive brush might remove grout faster, but it can also leave subtle scratches,
especially on matte porcelain or softer stone. Scratches are sneaky: they don’t always show up until light hits the floor at the exact angle that makes you
question every decision you’ve ever made. The safer approach people learn (sometimes after learning the hard way) is to start with a white nylon pad,
then step up only if the tile finish can take it. If you need more bite, it’s often better to change chemistry than to change abrasion.
Textured shower tile adds its own twist: vertical surfaces encourage drips, and drips can carry cleaner or dissolved grout into corners where it dries again.
A real-world fix is to keep a damp microfiber in your non-dominant hand like a “cleanup assistant,” catching runs immediately. People also find that small,
repeated passes beat one heroic scrub session. Five short rounds (apply, agitate, rinse, buff) are usually safer than one marathon that ends with a sore shoulder
and a tile finish that looks “slightly different” in a way you can’t unsee.
And then there’s the “vinegar debate.” Plenty of folks have success with diluted vinegar on porcelain/ceramic haze, but many also learn that vinegar is not
a universal tile potion. On stone, it can etch. Near metal fixtures, it can be unkind. And if you ever combine the wrong cleaners (like vinegar and bleach),
you’re not cleaning anymoreyou’re auditioning for a cautionary tale. The most common “experienced” advice is: identify the tile, identify the grout,
test a small spot, and use the mildest effective option. It’s less dramatic than dumping mystery liquids on the floor, but it’s also how you avoid
turning your bathroom into an expensive lesson.
Finally, a lot of people end up saying some version of: “I wish I’d used grout release.” That’s because textured tile is basically a grout magnet.
Once you’ve spent time scrubbing valleys with a toothbrush like you’re detailing a sports car made of stone, grout release starts to sound less like an optional add-on
and more like a genius move. The experienced takeaway is simple: textured tile rewards planning. The cleanup still takes effort, but it becomes a normal chorenot a saga.


