Table of Contents >> Show >> Hide
- Before You Start: What to Know First
- How to Remove Mechanical Keyboard Keys With a Tool
- How to Remove Mechanical Keyboard Keys Without a Tool
- How to Remove Large Keys Like Spacebar, Enter, Shift, and Backspace
- What to Do After the Keycaps Are Off
- How to Put Mechanical Keyboard Keys Back On
- Common Mistakes to Avoid
- When You Should Not Remove the Keys
- Final Thoughts
- Hands-On Experience: What Removing Mechanical Keyboard Keys Usually Feels Like in Real Life
Note: This guide is for removable keycaps on mechanical keyboards. It is not a how-to for laptop keyboards, scissor-switch boards, or anything that looks like it would break your heart and your warranty at the same time.
Mechanical keyboards are wonderful little noise machines. They click, clack, glow, and somehow collect enough dust, crumbs, pet hair, and mystery flakes to qualify as their own ecosystem. The good news is that removing mechanical keyboard keys is usually simple. The better news is that you can do it with a proper keycap puller or, in a pinch, without a specialized tool at all.
If you want to deep-clean your board, swap out old keycaps, fix a rattly spacebar, or finally remove the evidence of that “just one snack at the desk” phase, learning how to remove keyboard keys properly is a useful skill. The trick is not brute force. The trick is patience, straight upward pressure, and knowing that larger keys can be dramatic because stabilizers are involved.
This guide walks you through exactly how to remove mechanical keyboard keys with a tool, how to remove them without a tool, what to do with larger stabilized keys, how to clean underneath, and how to put everything back together without creating a keyboard-shaped puzzle you regret immediately.
Before You Start: What to Know First
Before you pull off a single keycap, make sure your keyboard is unplugged or powered off. If it is wireless, switch it off completely. This is less about danger and more about avoiding accidental inputs, odd behavior, and the deeply annoying experience of launching random shortcuts while cleaning.
Next, take a clear photo of your keyboard layout. Do this even if you think you know where everything goes. Confidence is nice. Evidence is better. This matters even more if you have a compact layout like 65%, 75%, TKL, or a gaming board with unusual bottom-row spacing.
Also, confirm that you are working with a mechanical keyboard that has removable keycaps. Most standard mechanical boards do. Some low-profile designs, proprietary stems, and specialty models need more caution. If your board uses MX-style stems, aftermarket keycaps and removal tools are usually straightforward. If it uses something proprietary, go slowly and double-check compatibility before forcing anything.
Basic supplies that help
- Wire keycap puller or plastic keycap puller
- Soft brush or microfiber cloth
- Compressed air
- Bowl of warm water with a little dish soap for washable keycaps
- Cotton swabs
- A small amount of isopropyl alcohol on a cloth or swab for stubborn grime
- A towel for drying keycaps
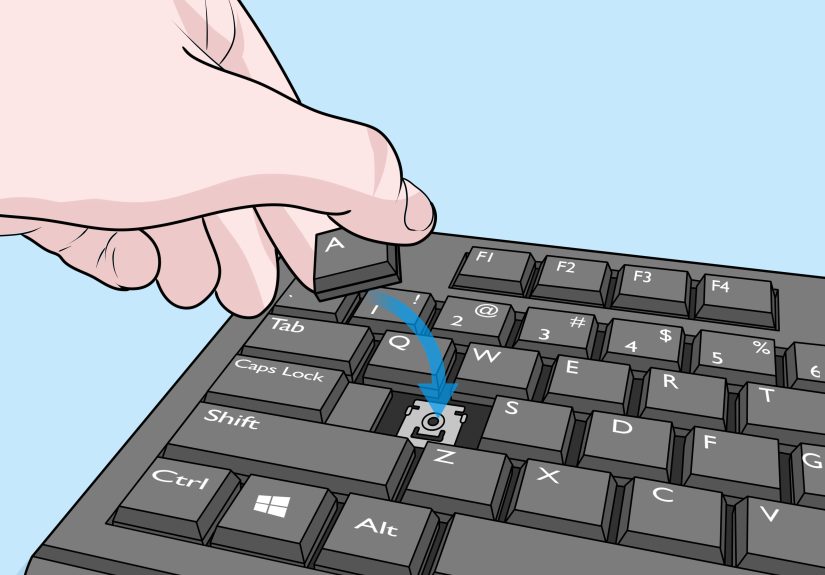
How to Remove Mechanical Keyboard Keys With a Tool
If you own a keycap puller, congratulations: you are doing this the easy way. A wire keycap puller is usually the best option because it grips the keycap securely and is less likely to scratch the sides. Plastic ring pullers work too, though they can be a little fussier on tight layouts.
Step 1: Position the keycap puller correctly
Place the puller over the keycap so it grips opposite sides evenly. On standard square keys like letters, numbers, and function keys, center the puller and make sure both sides are tucked under the cap. You want an even grip, not an awkward half-hug.
Step 2: Pull straight up
Apply slow, steady upward pressure. Do not yank. Do not twist. Do not pull at an angle like you are starting a lawn mower. Most regular keycaps will pop off with a soft release. If the cap feels unusually tight, stop, reset the puller, and try again with gentler, more even pressure.
Step 3: Set keycaps aside in order
Lay the removed keycaps on a towel in roughly the same arrangement as the board, or drop them into a container if you are removing the whole set for cleaning. Keeping them organized saves time later and prevents the classic “why do I have three extra keys and no idea where PgUp went?” moment.
Step 4: Be extra careful with larger keys
The spacebar, Enter, Shift, Backspace, and sometimes the numpad 0 key may use stabilizers. These keys are not harder in theory, but they do require a gentler touch. Pull one side slightly, then the other, and inspect underneath before forcing anything. If the large key does not lift like a normal cap, the stabilizer wire is probably still attached.
For larger stabilized keys, remove surrounding caps first if needed so you can see what is happening. Once the cap loosens, guide the stabilizer wire out carefully rather than trying to rip the whole assembly off in one heroic motion. This is a keyboard, not an action movie.
How to Remove Mechanical Keyboard Keys Without a Tool
No keycap puller? No problem. It is still possible to remove mechanical keyboard keys safely, but you need to be more careful. The goal is the same: even upward pressure with as little side-to-side stress as possible.
Method 1: Use your fingers
For many standard keycaps, your fingers may be enough. Grip the keycap on two opposite sides, press firmly, and pull directly upward. This works best on taller sculpted keycaps with enough room to grip. It is less effective on cramped boards with low-profile caps or tight bezels.
The downside is that fingers tend to wiggle, twist, and slip. That is exactly what you do not want. So if the key resists, stop trying to out-stubborn it and switch methods.
Method 2: Make a DIY keycap puller
A homemade puller can work surprisingly well. A common trick is using two paperclips and a twist tie, or bending a paperclip into a U-shape so you can hook the sides of the keycap. It is not glamorous, but neither is brushing cracker dust out of a switch housing, and yet here we are.
If you try a DIY solution, smooth any sharp points first so they do not scratch the keycaps. Slide the improvised hooks under opposite sides of the cap, then pull straight upward. Keep the motion slow and vertical. The more your DIY tool behaves like a real puller, the better your odds of a clean removal.
Method 3: Use a thin plastic card or nylon pry tool
A thin plastic card or non-metal pry tool can help lift a stubborn cap. Gently work the edge under one side, then the other, and gradually ease the keycap upward. This method is better than using bare metal tools because metal can scratch the cap or mark the plate.
If you absolutely must use a small flathead screwdriver, wrap the tip to soften it and use minimal force. This is a last-resort move for large stabilized keys when you need visibility and leverage. Gentle is the theme here. Always gentle.
How to Remove Large Keys Like Spacebar, Enter, Shift, and Backspace
Large keys deserve their own section because they behave differently from regular alphanumeric caps. Underneath, you will often find a stabilizer wire or stabilizer inserts designed to keep the key from wobbling like a shopping cart wheel.
Start by loosening the keycap carefully with your puller or fingers. Once it lifts slightly, pause and look underneath. If the center stem has disengaged but the sides still feel attached, the stabilizer is still connected. At that point, tilt the keycap gently and unhook the stabilizer ends one side at a time.
Do not bend the wire. Do not force the keycap upward with one violent tug. And do not assume every large key on every board attaches the same way. Some are plate-mounted, some are PCB-mounted, and some proprietary designs have their own ideas about being difficult.
What to Do After the Keycaps Are Off
This is the part where many people realize their keyboard has been quietly storing a small archaeology site. With the keycaps removed, shake the board gently upside down, then use compressed air or a soft brush to clear out dust, hair, and debris. A cotton swab can help with sticky spots around the switches and plate.
If your keycaps need washing, place them in warm water with a little dish soap. Let them soak for a while, then rinse and dry them thoroughly. Thoroughly means completely, totally, unquestionably dry. Even a little lingering moisture is a bad houseguest for electronics.
For the board itself, avoid soaking anything. Wipe surfaces carefully. A small amount of isopropyl alcohol on a cloth or swab can help with grime, but keep liquid controlled and never pour it directly onto the keyboard.
How to Put Mechanical Keyboard Keys Back On
Reinstalling regular keycaps is the easy part. Align the keycap with the switch stem, then press straight down until it seats firmly. If it feels crooked, remove it and try again instead of forcing it. A properly aligned keycap should settle with very little drama.
For larger keys, reconnect the stabilizer first if needed, then align the center stem and press down evenly. Test the key afterward. It should move smoothly, return quickly, and feel centered. If it sticks, rattles excessively, or sits unevenly, remove it and check the stabilizer alignment again.
Common Mistakes to Avoid
- Pulling at an angle: This can stress the stem and make removal harder.
- Skipping the keyboard photo: Memory is brave but unreliable.
- Forcing large keys: Stabilizers need finesse, not aggression.
- Using sharp metal tools carelessly: Scratches happen fast.
- Reinstalling damp keycaps: Water and electronics are not friends.
- Assuming all keycaps fit all keyboards: Stem style, profile, and layout compatibility matter.
When You Should Not Remove the Keys
If your keyboard manual warns against removal, listen to it. The same goes for boards with unusual low-profile mechanisms, fragile proprietary caps, or anything that does not clearly behave like a typical mechanical keyboard. If you are not sure the caps are removable, clean around them first and verify before attempting a full pull.
You also should not remove keys just because one key is unresponsive and you assume the cap is the problem. Sometimes the issue is the switch itself, debris inside the switch housing, or a deeper hardware fault. In that case, keycap removal is only the first step in troubleshooting, not the final fix.
Final Thoughts
Learning how to remove mechanical keyboard keys with and without a tool is one of those small skills that pays off more often than you expect. It helps you clean better, customize faster, fix minor issues, and keep your board feeling fresh instead of crunchy. A real keycap puller is still the best choice because it makes the process easier, safer, and less scratch-prone. But if you do not have one, careful fingers or a well-made DIY puller can absolutely get the job done.
The golden rule is simple: pull straight up, go slowly, and respect the larger keys with stabilizers. Do that, and your keyboard cleanup session will feel less like surgery and more like routine maintenance with slightly better sound effects.
Hands-On Experience: What Removing Mechanical Keyboard Keys Usually Feels Like in Real Life
The first time most people remove mechanical keyboard keys, there is a very specific emotional sequence. First comes confidence: “This should take five minutes.” Then comes hesitation: “Why is the W key fighting for its life?” Then comes discovery: “Apparently I have been typing over a fossil record of lunch.” That experience is almost universal, and honestly, it is part of the charm.
In real-world use, the easiest keys are usually the standard letters and numbers. Once you get the rhythm right, they come off with a satisfying pop and very little resistance. After two or three keys, you stop treating the keyboard like a museum artifact and start moving faster. That is good, up to a point. The mistake many people make is getting overconfident too early and jumping straight to the spacebar like they have suddenly become a keyboard technician. The spacebar often responds by teaching a lesson in humility.
Another common experience is discovering that the keyboard was far dirtier than expected. Even clean-looking boards can hide dust packed around switch housings, oils near frequently used keys, and enough lint to knit a tiny sweater. People often assume their keyboard is only “a little dusty” until the keycaps come off and reality enters the chat. That is why a deep clean feels so rewarding. Once everything is brushed out and reassembled, the board often feels smoother, looks brighter, and somehow sounds better too.
Removing keys without a tool tends to feel doable but slightly awkward. Fingers can work, especially on taller keycaps, but they slip more than you want. DIY paperclip pullers are one of those funny fixes that seem ridiculous until they actually work. They are not elegant, but for occasional maintenance they can save the day. The experience is less “premium enthusiast workflow” and more “competent desk-side improvisation,” which, to be fair, is how many useful projects get done.
People also tend to underestimate reinstallation. Taking keycaps off feels like the big event, but putting them back correctly is where patience matters. Most regular caps snap on quickly. Large stabilized keys are where the real puzzle-solving happens. You line things up, press gently, test the key, remove it again, adjust one tiny wire, and suddenly everything works. It is a little annoying in the moment and extremely satisfying when finished.
Perhaps the best part of the whole experience is the payoff afterward. A cleaned mechanical keyboard feels different under your hands. The keys move more cleanly, the surface looks less grimy, and the whole board feels like a piece of gear you actually care for instead of just attack all day with your fingertips. In other words, removing mechanical keyboard keys is not just maintenance. It is a reset button for your setup, your typing experience, and maybe your desk-related dignity.


