Table of Contents >> Show >> Hide
- Why Replacing One Damaged Brick Matters
- First, Decide Whether This Is a DIY Brick Repair
- Tools and Materials You Will Need
- Before You Start: Match the Brick and the Mortar
- How to Replace a Damaged Brick Step by Step
- Common Brick Repair Mistakes to Avoid
- How to Tell Whether the Brick Failed or the Wall System Failed
- When Repointing Is Enough and When Full Brick Replacement Is Better
- How Long Does It Take?
- Real-World Experience: What Replacing a Damaged Brick Actually Feels Like
- Final Thoughts
A damaged brick has a sneaky way of looking like a tiny problem while quietly auditioning for a much bigger disaster. One crack turns into flaking. One loose brick starts letting in water. Then winter shows up, freeze-thaw cycles do their dramatic thing, and suddenly your wall looks like it has been through a breakup and a tax audit at the same time.
The good news is that replacing a damaged brick is a very doable repair when the damage is isolated and the wall is otherwise stable. The trick is doing it carefully, not aggressively. Brick repair is less about brute force and more about patience, matching materials, and knowing when the brick is the problem versus when it is only the messenger.
This guide walks you through how to replace a damaged brick step by step, how to choose the right mortar, how to avoid the most common mistakes, and when to stop the DIY heroics and call a mason. By the end, you will know how to make the repair look clean, last longer, and not accidentally create three more problems while fixing one.
Why Replacing One Damaged Brick Matters
A cracked, loose, or spalling brick is not just a cosmetic issue. It can expose the wall to moisture, weaken nearby mortar joints, and allow damage to spread to surrounding bricks. On exterior walls, water is usually the real villain. Once moisture gets into masonry and temperatures swing, brick faces can chip, crumble, or pop off.
That is why smart brick repair starts with a simple mindset: replace the damaged brick, but also figure out why it failed. If you skip that part, the wall may look better for a while and then fail again right on schedule.
First, Decide Whether This Is a DIY Brick Repair
Replacing a single damaged brick or a small handful of bricks is usually a reasonable DIY project. But not every masonry problem belongs in the weekend-project category.
Good DIY candidates
- One or two cracked, chipped, or spalling bricks
- A loose brick in an otherwise solid wall
- Minor damage in a brick veneer wall
- Local damage caused by impact, old moisture exposure, or worn mortar
Call a pro if you notice these red flags
- Long stair-step cracks running through multiple bricks and joints
- Bulging, leaning, or bowing walls
- A damaged area above windows or doors where support may be involved
- Chimney damage high above the roofline
- Several bricks failing in the same area
- Persistent leaks, missing flashing, or blocked drainage paths
- Historic or very old brick that may require specialized mortar matching
In plain English: one bad brick is a repair; a pattern of bad bricks is a clue.
Tools and Materials You Will Need
- Safety glasses
- Work gloves
- Dust mask or respirator appropriate for masonry dust
- Drop cloths or plastic sheeting
- Cold chisel or masonry chisel
- Hammer
- Pointing trowel
- Joint tool or tuckpointing tool
- Wire brush or stiff masonry brush
- Spray bottle or small bucket of water
- Replacement brick that matches the existing wall
- Mortar that matches the original as closely as possible
- Sponge for light cleanup
If you use a grinder or drill, take dust seriously. Masonry dust is not just annoying; it is the sort of thing your lungs would strongly prefer not to collect as a hobby.
Before You Start: Match the Brick and the Mortar
This is where many brick repairs go wrong. People focus on removing the old brick, then grab whatever mortar bag is closest at the store and hope confidence will fill in the rest. Confidence is wonderful. It is not a mortar specification.
How to match the replacement brick
Look for a brick that matches the existing one in size, color, texture, and finish. New brick beside older brick may still look a little different at first, but getting close matters. If your house has older or reclaimed-looking brick, bring measurements and photos, and if possible bring a loose sample brick to compare.
How to match the mortar
Mortar should match the original wall in color, texture, and strength as closely as possible. This matters even more with older homes. Mortar that is too hard can cause surrounding bricks to crack or deteriorate faster. For many modern exterior veneer applications, Type N mortar is commonly used, but the smartest move is always to match the wall rather than guess by tradition.
If you are dealing with a historic home, proceed carefully. Older brick is often softer than modern brick and can be damaged by the wrong mortar, harsh cleaning, or overzealous power tools.
How to Replace a Damaged Brick Step by Step
1. Protect the Area
Cover nearby surfaces, plants, trim, and walkways. Masonry debris has a special talent for landing exactly where you did not want it. If you are working indoors or near finished surfaces, protection is not optional.
2. Remove the Mortar Around the Damaged Brick
Use a chisel and hammer to remove the mortar around the damaged brick. Work carefully along the bed joints and head joints without nicking the neighboring bricks. The goal is to free the damaged brick, not turn the repair into a group project involving three innocent bricks next to it.
Manual tools are slower, but they give you more control. If you decide to use a grinder for mortar removal, work carefully and use proper dust control. This is one of those jobs where speed can be expensive.
3. Break the Damaged Brick Inward
Once the surrounding mortar is loosened, break the damaged brick from the center and work outward. That reduces the chance of putting pressure on the adjacent bricks. Remove the brick pieces gradually rather than trying to pry out the whole brick in one dramatic move.
If the brick is stubborn, chip away in small sections. Masonry rewards patience and punishes impatience almost immediately.
4. Clean the Cavity Thoroughly
After the old brick is out, remove all remaining mortar fragments and dust from the cavity. Use a wire brush or stiff brush to clean the surfaces. You want a sound, clean space so the new mortar can bond properly.
Then lightly dampen the cavity and surrounding masonry. Not soaking wet. Not puddles. Just enough moisture so the old brick does not suck water out of the new mortar too fast.
5. Mix the Mortar Correctly
Follow the manufacturer’s directions for the mortar you are using. The texture should be workable and hold its shape without being soupy. Mortar that is too wet will sag, smear, and shrink more as it cures. Mortar that is too dry will fight you every step of the way.
If your mix calls for a brief rest before use, honor that instruction. Mortar has rules, and pretending not to hear them rarely ends well.
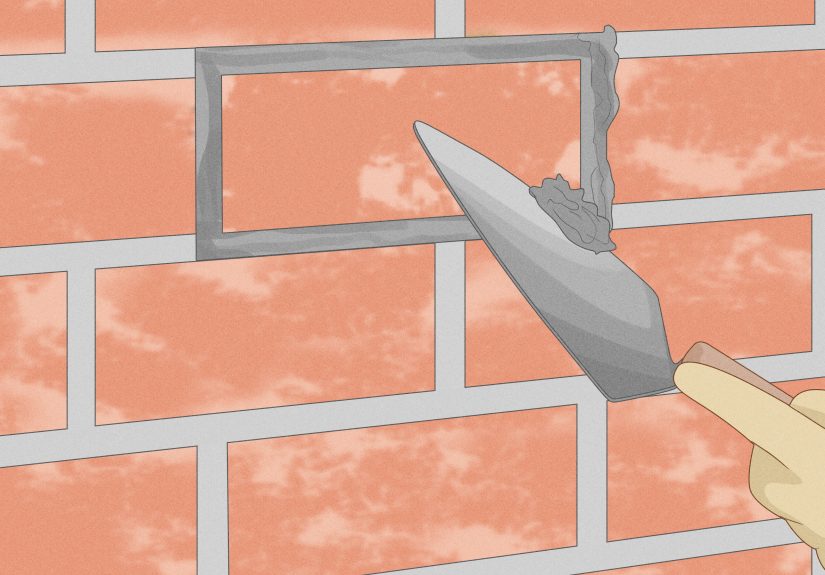
6. Butter the Cavity and the Replacement Brick
Apply mortar to the bottom of the cavity and to the sides of the replacement brick. Some masons prefer bedding the cavity first and then buttering the ends of the brick. The key idea is simple: you want full contact, not hidden gaps.
Slide the replacement brick into place so it aligns with the surrounding wall. Tap it gently with the handle of the trowel or a block of wood until the face is flush with the neighboring bricks.
7. Pack the Joints Fully
Add mortar around all exposed joints and compact it well. Do not just smear mortar on the surface and hope for the best. Full joints help keep water out and make the repair stronger.
Once the mortar begins to firm up, tool the joints to match the existing profile. This step is easy to underestimate, but it makes a huge difference in both appearance and performance. A well-tooled joint sheds water better and looks like it belongs there.
8. Clean the Brick Face Carefully
Brush away crumbs and light residue after the mortar starts to set. Brush diagonally across the joints so you do not drag fresh mortar out of place. Do not scrub aggressively with lots of water. Brick repair is not dishwashing.
If you get mortar smears on the brick face, clean them gently before they fully harden. Avoid pressure washing the area, especially on older brick or fresh repairs.
9. Let the Repair Cure
Protect the repair from heavy rain, extreme heat, freezing temperatures, and direct abuse while it cures. Depending on conditions and product type, curing takes longer than many DIYers expect. The wall may look done long before the mortar is truly ready for real-world weather.
Common Brick Repair Mistakes to Avoid
Using the wrong mortar
This is the biggest one. Mortar should work with the brick, not overpower it. A mismatch can cause cracking, color problems, and premature failure.
Ignoring the moisture source
If water caused the damage, replacing the brick without fixing the moisture problem is like changing a lightbulb while the roof is still leaking on the lamp.
Damaging nearby bricks during removal
Work from the center of the damaged brick outward. The goal is a clean extraction, not a masonry domino effect.
Blocking weep holes or drainage paths
If your wall has weep holes, keep them clear. They help moisture drain from brick veneer systems. Filling or sealing them shut can create bigger water problems later.
Cleaning too aggressively
Fresh mortar is vulnerable. Harsh scrubbing, too much water, or high-pressure cleaning can ruin the finish or weaken the repair.
How to Tell Whether the Brick Failed or the Wall System Failed
Sometimes the damaged brick is simply the result of age, impact, or one bad unit. Other times it is warning you about a larger issue, such as trapped moisture, poor flashing, leaking gutters, rising damp, or worn-out mortar joints nearby.
Check for these clues before and after the repair:
- White powdery deposits that suggest moisture movement
- Repeated damage under window sills or roof edges
- Gutter overflow above the problem area
- Soft, crumbling mortar in nearby joints
- Multiple spalling bricks clustered in one zone
If you see a pattern, treat the pattern. Otherwise, your new brick may soon join the old one in the damaged-brick support group.
When Repointing Is Enough and When Full Brick Replacement Is Better
If the brick itself is sound and the mortar joints are the only failing part, repointing may be all you need. That means removing deteriorated mortar and packing in new mortar without replacing the brick.
But if the brick is cracked through, loose, deeply chipped, or spalling across the face, replacement is usually the smarter choice. Think of repointing as fixing the seams and brick replacement as swapping out the damaged unit. One is joint repair. The other is masonry surgery.
How Long Does It Take?
For one isolated brick, the repair itself may only take a careful afternoon. The real time investment comes from working slowly, matching materials, waiting for the right mortar consistency, and allowing proper curing. In masonry, rushing is usually the most expensive “time-saving” trick available.
Real-World Experience: What Replacing a Damaged Brick Actually Feels Like
Most people imagine this job will be all about swinging a hammer, but the real experience is much more about restraint. The first surprise is how slowly you need to work when removing the old mortar. You start the project thinking, “I am replacing one brick, how hard can this be?” Then you make the first few taps with the chisel and realize the surrounding bricks are close enough that one careless strike could turn your neat repair into a much larger masonry puzzle.
Another common lesson is that matching materials takes longer than expected. The brick itself might seem easy to replace until you hold the new one next to the old wall in daylight. Suddenly “red brick” turns into ten different shades, surface textures, and edge styles. Mortar does the same thing. What looked like a simple gray joint from ten feet away can actually have tan, buff, or sandy undertones once you study it up close. This is the point where a lot of DIYers discover that good repair work is partly construction and partly detective work.
There is also the issue of moisture, which tends to become the star of the show whether you invited it or not. Many homeowners start out trying to replace a damaged brick and end up learning that a gutter, a window detail, or a splash-back zone from a walkway has been quietly feeding the problem for years. That experience changes the way you look at exterior walls. You stop seeing brick as just a hard surface and start seeing it as part of a whole water-management system. It is a useful upgrade for your brain, even if it was not on the to-do list.
The actual moment of setting the new brick is oddly satisfying. After the careful demo, the brushing, the dampening, and the slightly messy mortar mixing, sliding the replacement brick into place feels like the payoff scene. It is also the moment when you realize masonry is unforgiving about alignment. A brick that sits just a little too proud or a little too deep can stand out in a way that seems almost rude. Tiny adjustments matter. Gentle taps matter. Standing back and checking the wall from more than one angle matters.
Then comes the finishing stage, which might be the most underrated part of the whole experience. Tooling the joints at the right moment makes the repair look intentional instead of patched. Too early, and the mortar drags. Too late, and it resists shaping. Hit the timing just right, and the joints compact neatly and start blending with the wall. It is one of those small homeowner victories that nobody throws a parade for, but you will probably admire it every time you walk past.
What many people remember most, though, is not the technical process. It is the shift in attitude. Replacing a damaged brick teaches patience. It rewards careful prep, light hands, and paying attention to materials. It also has a way of making you respect skilled masons a lot more than you did the day before. When the repair is done well, it does not scream, “Look at me, I am new.” It quietly disappears into the wall, which is exactly the point. In home repair, invisible success is often the best kind.
Final Thoughts
If the damage is isolated and the wall is stable, replacing a damaged brick is a smart repair that can improve appearance, restore protection, and help stop moisture from making the problem worse. The keys are simple: diagnose the cause, match the materials, remove the old brick carefully, install the new one cleanly, and let the mortar cure properly.
And if the repair starts revealing bigger issues like movement, widespread spalling, persistent leaks, or structural cracking, take that as useful information rather than bad news. One damaged brick can be a quick fix. A wall trying to tell you a bigger story deserves a better listener.