Table of Contents >> Show >> Hide
- Before You Sort: Make Your List “Sort-Proof”
- The 15 Steps to Sort a List Without Breaking Your Data
- Step 1: Identify your “sort goal” (one sentence)
- Step 2: Freeze the header row (optional, but your eyeballs will thank you)
- Step 3: Click one cell inside the list (not the entire column)
- Step 4: Convert the range to an Excel Table (recommended for living data)
- Step 5: Start with a quick sort (A→Z or Z→A) only when it’s truly simple
- Step 6: Open the full Sort dialog (your control center)
- Step 7: Confirm “My data has headers” (so Excel doesn’t sort your column names)
- Step 8: Choose your primary Sort By column
- Step 9: Pick what you’re sorting on (usually “Cell Values”)
- Step 10: Set the Order (A→Z, smallest→largest, oldest→newest, etc.)
- Step 11: Add levels for multi-column sorting (the “keep it tidy” move)
- Step 12: Use a Custom List when alphabetical order is wrong
- Step 13: Sort by color/icon when formatting is part of your workflow
- Step 14: Turn on Sort Options for special cases (case-sensitive, left-to-right)
- Step 15: Verify the results (and know how to undo fast)
- Sorting Examples You Can Copy
- Common Sorting Problems (and the fastest fixes)
- Real-World Sorting Experience (About )
- Conclusion
Sorting in Microsoft Excel feels like it should be harmless. Click A→Z, sip coffee, enjoy order. And thenbamyour names no longer match the right emails, your prices migrate to a new zip code, and you start questioning every choice that led you to spreadsheets.
The good news: Excel sorting is easy and safe once you do it the right way. The even better news: you can sort by more than just alphabet and numbersthink multi-column priority, dates, custom order (hello, Monday-to-Sunday), and even by cell color for those “red means urgent” moments.
Before You Sort: Make Your List “Sort-Proof”
Excel is great at sorting. Humans are great at accidentally selecting only one column and creating chaos. So before we do the 15 steps, here’s the tiny bit of prep that prevents big messes:
- Use a single header row (one row that labels each column).
- Remove blank rows/columns inside the list (blank lines can split your data into “multiple tables” in Excel’s eyes).
- Avoid merged cells in the range you want to sort (merged cells are sort’s natural enemy).
- Keep related data together (each row should represent one record: one person, one order, one item, etc.).
The 15 Steps to Sort a List Without Breaking Your Data
These steps assume you’re sorting a typical list (a range or a table) where each row is a record and each column is a field. If your data is laid out differently, you can still follow the spirit of the stepsjust keep your selection rules tight.
-
Step 1: Identify your “sort goal” (one sentence)
Decide what “sorted” means before you click anything. Example: “Sort by Department A→Z, and within each Department, sort Salary largest to smallest.” Sorting is way less stressful when it has a purpose.
-
Step 2: Freeze the header row (optional, but your eyeballs will thank you)
If your list is long, freeze your header row so you can still see column names while scrolling. It doesn’t change the sortjust prevents you from sorting “the mystery column” by accident.
-
Step 3: Click one cell inside the list (not the entire column)
Click any cell within the data range you want to sort. This helps Excel detect the full list automatically. Selecting the whole column (like clicking the letter “C”) can accidentally include unrelated cells far below your data.
-
Step 4: Convert the range to an Excel Table (recommended for living data)
If your list grows over time, convert it to a Table so sorting and filtering stay attached as you add rows. Tables also give you handy filter arrows in headers for quick sorts. (If you’re sorting a one-time, static list, you can skip this.)
-
Step 5: Start with a quick sort (A→Z or Z→A) only when it’s truly simple
If you’re sorting by just one column and it’s straightforward (names, numbers, dates), quick sort is fine. Use the sort buttons (ascending/descending) from the ribbon. But the moment you need multiple columns, custom order, or anything fancygo to the full Sort dialog.
-
Step 6: Open the full Sort dialog (your control center)
Go to the Data tab and choose Sort. This opens the Sort dialog where you can: pick the column, the type of sort (values vs. color/icon), and the order, plus add multiple levels.
-
Step 7: Confirm “My data has headers” (so Excel doesn’t sort your column names)
In the Sort dialog, make sure Excel recognizes your header row. If it doesn’t, your headers can get mixed into the data. Nothing says “Monday” like your column titles ending up in row 47.
-
Step 8: Choose your primary Sort By column
In the Sort By dropdown, choose the main column that defines the first big grouping: for example, Department, Status, or Order Date. This is the sort that will have the strongest effect on the final order.
-
Step 9: Pick what you’re sorting on (usually “Cell Values”)
Most of the time you want Cell Values (text, numbers, dates). This is the “normal” sort most people expect. You can also sort on Cell Color, Font Color, or Cell Iconwe’ll get there.
-
Step 10: Set the Order (A→Z, smallest→largest, oldest→newest, etc.)
Choose the direction that matches your goal. A→Z for text, smallest→largest for numbers, oldest→newest for dates. If your results look weird, it’s often because the column is stored as text (like “100” behaving like it belongs between “10” and “11”).
-
Step 11: Add levels for multi-column sorting (the “keep it tidy” move)
Click Add Level to sort by a second column, then a third, and so on. Example: Sort by Department (A→Z), then Hire Date (oldest→newest), then Last Name (A→Z). Multi-level sorting is how you get clean, predictable results that don’t feel random within groups.
-
Step 12: Use a Custom List when alphabetical order is wrong
Some lists have a “human order,” not an alphabetical one: days of the week, months, priority labels (High, Medium, Low), or workflow statuses (New → In Progress → Done). In the Order dropdown (for certain sorts), choose Custom List to use built-in lists (like months) or a custom list you create in Excel’s options.
Example: Sort “Priority” so High comes first, then Medium, then Low. Alphabetical would put High, Low, Medium (which is… not how priorities work in the real world).
-
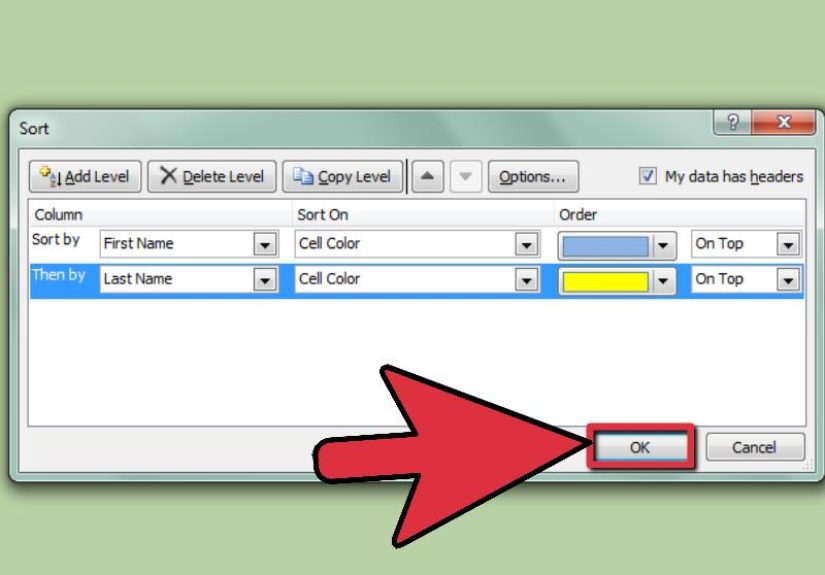
Step 13: Sort by color/icon when formatting is part of your workflow
If your team uses color to signal meaning (red = urgent, green = approved), you can sort on: Cell Color, Font Color, or Cell Icon (from conditional formatting icon sets). The key detail: there is no default color sort orderExcel asks you to choose which color goes on top (or bottom).
Pro tip: Color sorting is amazing for triage, but don’t let color become the only “data.” If it matters, store the meaning in a real column too (e.g., Priority = High/Medium/Low).
-
Step 14: Turn on Sort Options for special cases (case-sensitive, left-to-right)
In the Sort dialog, click Options to unlock two power features:
- Case sensitive: makes “apple” and “Apple” sort separately (useful for IDs or strict naming rules).
- Sort left to right: sorts across rows instead of down columns. Note: Excel Tables typically don’t support left-to-right sorting, so you may need to convert the table to a range first.
-
Step 15: Verify the results (and know how to undo fast)
After sorting, spot-check a few rows to confirm related fields stayed together (names still match emails, items still match prices). If something looks off, immediately undo. Most sorting disasters are fixable in secondsif you catch them right away.
Sorting Examples You Can Copy
Example 1: Sort a contact list by Last Name A→Z
Click any cell in the Last Name column → Data → Sort → Sort by Last Name → Order A→Z → OK. This works best when the list has a single header row and no blank rows inside the range.
Example 2: Sort sales data by Region, then by Revenue (largest to smallest)
Data → Sort → Sort by Region (A→Z) → Add Level → Then by Revenue (Largest to Smallest) → OK. You’ll get a clean regional grouping with top-performing rows at the top of each region.
Example 3: Sort projects by a custom workflow order
If your status column contains: Backlog, In Progress, Review, Donealphabetical order won’t match reality. Use a Custom List so the workflow appears in the order work actually happens.
Example 4: Create a “live sorted view” with a formula (no rearranging the original list)
If you’re on Microsoft 365 / newer Excel, you can create a sorted output using dynamic array functions like SORT and SORTBY. This is great when you want a sorted view while keeping the source table unchanged.
Simple idea: Put your raw data in a Table, then use a SORT/SORTBY formula on another sheet to display the sorted result. When new rows are added, the sorted view updates automatically.
Common Sorting Problems (and the fastest fixes)
- Only one column moved: You likely sorted a single column instead of the whole range. Undo, select a cell inside the list, and sort againensuring Excel expands selection to the full dataset.
- Numbers sort “wrong” (1, 10, 100, 2): The column is stored as text. Convert it to numbers, then sort again.
- Dates sort oddly: Some “dates” might be text. Normalize the date format and re-sort.
- Blank rows break the sort: Remove blank rows inside your data or convert the range to a Table.
- Filtered data confusion: Sorting with filters is fine, but know whether you’re sorting the full list or the visible subset.
Real-World Sorting Experience (About )
I used to think sorting was the “safe” part of Excelthe spreadsheet equivalent of organizing socks. Then I watched someone sort only the “Last Name” column in a customer list while leaving the rest of the row behind, and the sheet instantly became a work of modern fiction: real phone numbers, imaginary people, and a sales team suddenly calling “Mr. 555-0134” to follow up on a quote.
That’s when I learned the first real-life rule of sorting: rows are relationships. In most lists, a row is one record. Sorting should move the entire record together, like a parade floatnot like confetti. If you’re ever unsure, convert the range to a Table and sort using the header dropdowns or the Sort dialog. Tables make it harder to “accidentally divorce” your columns.
The second rule: sorting is communication. In real teams, sorting isn’t just for aestheticsit’s a decision. “Sort by Revenue descending” is basically saying, “Look here first.” “Sort by Due Date ascending” means, “These are the fires.” That’s why multi-level sorting is so powerful: it mirrors how people think. Region first, then salesperson, then deal size. It’s not just tidyit’s readable.
I’ve also seen color sorting become a mini-language: green cells for approved expenses, yellow for pending, red for “do not touch.” Sorting by color is fantastic for triage meetings. But it can also create a weird dependency where the meaning lives only in someone’s head. The best version of this workflow is a combo: keep the colors for quick scanning, but also store the meaning in a real column (like “Status” or “Priority”). That way, your data still makes sense when printed in black-and-white, exported, or shared with someone who doesn’t know your office’s secret color code.
One more lesson from the trenches: case sensitivity is sneaky. Most of the time, people don’t care whether “abc” and “ABC” sort separately. But in ID fields, product codes, or certain naming standards, it matters. If your sorted list looks “almost right” but not quite, check Sort Options. Turning on case-sensitive sorting can be the difference between “perfect” and “why is Excel like this?”
Finally, my favorite “grown-up” sorting trick is using a dynamic sorted view with formulas. When the source list is shared, audited, or used for input, reordering it can feel risky. A separate sorted outputdriven by a SORT/SORTBY formulagives you the best of both worlds: the original stays stable, and your analysis view stays fresh. It’s like having a clean desk and a junk drawer, both perfectly justified.
Conclusion
Sorting a list in Excel isn’t hardbut sorting it safely is where the magic lives. Use the Sort dialog when you need control, add levels for multi-column logic, and lean on custom lists or color sorting when “alphabetical” isn’t the point. Most importantly: treat each row like a single record, and Excel will reward you with clean, trustworthy results.


