Table of Contents >> Show >> Hide
- Why Your Basement Feels Drafty in the First Place
- Start With Detective Work Before You Buy Anything
- The Best Materials and Fixes for a Drafty Basement
- 1. Weatherstripping for Basement Windows and Doors
- 2. A Door Sweep for the Bottom of the Basement Door
- 3. Low-Expansion Spray Foam for Larger Gaps
- 4. Caulk for Small Cracks and Stationary Joints
- 5. Concrete Crack Sealant for Basement Floor and Wall Cracks
- 6. Window Insulation Film or Rigid Foam for Basement Windows
- 7. Foil Tape or Approved Sealant for Leaky Ducts
- 8. Rigid Foam Board at the Rim Joist
- Should You Insulate the Basement Ceiling or the Basement Walls?
- When Replacement Is Better Than Another Patch
- Do Not Ignore Moisture, Radon, and Combustion Safety
- Basement Draft-Proofing Mistakes to Avoid
- A Smart Order of Operations
- Experience-Based Notes From Real Basements
- Conclusion
- SEO Tags
If your basement feels like it’s secretly hosting winter, you’re not imagining things. A drafty basement can make the whole house less comfortable, drive up heating bills, and turn the floor above into one giant pair of cold socks. The annoying part is that basement drafts rarely come from one dramatic hole you can point at like a villain in a mystery movie. They usually sneak in through several smaller trouble spots: rim joists, sill plates, utility penetrations, door thresholds, old windows, foundation cracks, and leaky ducts.
The good news? You usually do not need to rebuild your house, hire a wizard, or wrap the basement in twelve quilts. You need a smart air-sealing plan. And if you shop the way practical home-improvement guides suggest, the best fixes are usually pretty simple: weatherstripping, low-expansion spray foam, caulk, door sweeps, concrete sealants, rigid foam, and a healthy respect for moisture before you start sealing everything in sight.
This guide walks through what causes basement drafts, how to find the real leak points, which products and materials are worth your attention, and which mistakes can turn a quick fix into a bigger mess. Think of it as the no-nonsense version of basement comfort: less drama, more warm toes.
Why Your Basement Feels Drafty in the First Place
Most homeowners blame the obvious suspects first: the basement door or the little window that looks like it belongs in a submarine. Those spots matter, but the biggest air leaks are often hidden higher up and farther back. The rim joist area, where the foundation meets the wood framing, is one of the most common problem zones. So are gaps around plumbing pipes, electrical lines, duct runs, and any place where one material meets another.
There is also a bigger house-wide issue at work: the stack effect, sometimes called the chimney effect. Warm air rises and escapes through leaks in the upper part of the house. When that happens, outside air gets pulled in from lower areas to replace it. Guess which space gets volunteered for that job? Your basement. So even if the basement itself is the place where you feel the draft, the house may be behaving like one connected system. That is why a cold basement often pairs nicely with high bills and a suspiciously drafty first floor.
In plain English, your basement is not just “cold.” It is participating in a full-house air leak relay race, and it is losing.
Start With Detective Work Before You Buy Anything
Before loading your cart with every sealant in the hardware aisle, spend a little time tracking the actual leak paths. Basement draft-proofing goes much better when you fix the right problem instead of enthusiastically foaming random corners.
Where to look first
- Around the rim joist and sill plate along the top of the foundation wall
- At the basement door threshold and around the door frame
- Around basement window sashes, trim, and glazing
- Where pipes, wires, vents, and ducts pass through walls or framing
- Along cracks in the foundation wall or basement floor
- At exposed duct joints, especially in unfinished basements
- Near old flues, vent penetrations, and unused openings
Easy ways to spot leaks
Try the paper test on windows and doors. Close the sash or door on a strip of paper. If the paper slides out too easily, the seal is weak. You can also use a smoke pencil or an incense stick on a still day. Move it slowly around the edges of suspected leak areas and watch whether the smoke wavers or gets pulled in a particular direction.
Another clue is comfort. If one corner of the basement feels like a walk-in fridge while the rest is merely “meh,” that area deserves a closer look. Dust trails, cobwebs moving for no reason, cold floors above a perimeter wall, and peeling paint near trim can all point to air leakage.
The Best Materials and Fixes for a Drafty Basement
If you are building your shopping list, these are the categories that consistently make sense for basement drafts. Not every basement needs all of them, but most drafty basements need several of them working together.
1. Weatherstripping for Basement Windows and Doors
Weatherstripping is the first line of defense for moving parts. Use it around operable basement windows and around the perimeter of the basement door frame. If the window or door opens and closes, weatherstripping is usually the right fix. It compresses when shut, helping block the little air leaks that feel far bigger than they look.
Foam tape is easy and budget-friendly, but it is not always the longest-lasting option in damp or high-traffic areas. Rubber, vinyl, or silicone compression-style weatherstripping tends to hold up better over time. The trick is to match the material to the gap size and the amount of wear the opening gets. A basement entry door used every day deserves something sturdier than bargain-bin foam that gives up by next season.
2. A Door Sweep for the Bottom of the Basement Door
The gap under a basement door is small in appearance and wildly overconfident in performance. A door sweep seals that threshold gap and is often one of the fastest comfort upgrades you can make. If cold air is sneaking under the door from an attached garage, bulkhead entry, or unfinished area, this fix can make an immediate difference.
Look for a sweep that fits snugly without dragging so hard that the door becomes a shoulder workout. If the door is warped or the threshold is uneven, pair the sweep with perimeter weatherstripping. This is one of those rare home improvements where five minutes of work can save you from months of muttering.
3. Low-Expansion Spray Foam for Larger Gaps
For gaps larger than a hairline crack but smaller than “well, that seems concerning,” low-expansion spray foam is a star player. It works especially well around rim joists, pipe penetrations, wire openings, and irregular gaps near basement windows and doors.
The key phrase is low-expansion. Around window and door frames, you do not want aggressive foam bowing the frame and turning your window into a decorative object. Low-expansion foam fills the space and air-seals it without bullying the surrounding materials. It is also great for awkward openings where caulk alone is not enough.
Use it thoughtfully. If the gap is very large, you may need backing material first rather than just pumping in half a can and hoping for the best.
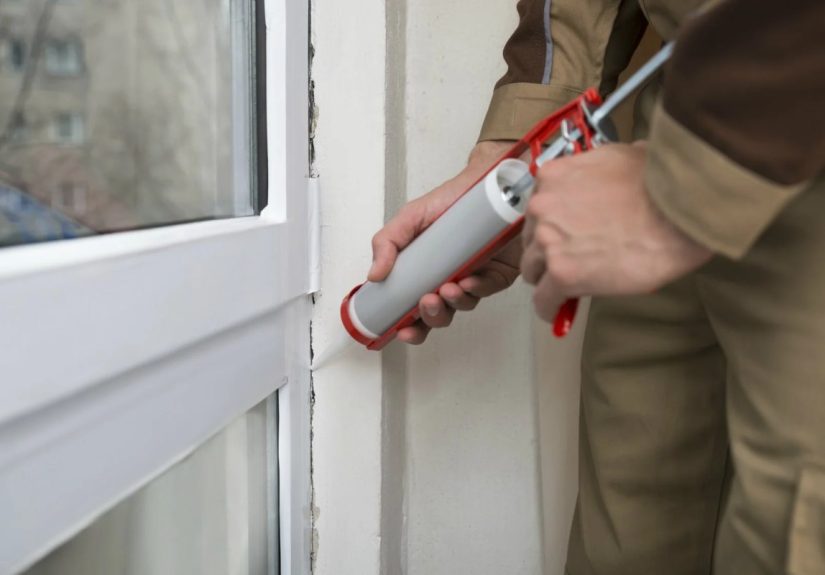
4. Caulk for Small Cracks and Stationary Joints
Caulk is for the places that do not move: cracks around stationary frames, trim, and penetrations where the gap is relatively small. It is perfect for detail work and finish sealing. A lot of basement drafts come from boring little seams between materials, and boring little seams are exactly where caulk earns its keep.
Choose the right type for the job. Paintable acrylic-latex caulk works well for many interior trim locations. Silicone or specialty sealants may be a better choice for damp spots or materials that expand and contract more. Around heat-producing devices or flues, do not improvise with whatever tube is rolling around your toolbox. Use a product rated for high temperatures and follow code requirements.
5. Concrete Crack Sealant for Basement Floor and Wall Cracks
If your foundation or slab has visible cracks, especially at the floor or where the wall and floor meet, those openings can contribute to drafts and moisture problems. Some cracks are mostly cosmetic, while others deserve a structural opinion. But for stable, non-structural cracks that are clearly letting in air, a concrete crack sealant or self-leveling sealant can be a useful part of the fix.
This is also where common sense should tap you on the shoulder. If the crack is widening, leaking heavily, or showing signs of movement, call a pro before you reach for sealant. Air-sealing is smart. Hiding a larger foundation problem under a bead of goop is not.
6. Window Insulation Film or Rigid Foam for Basement Windows
Basement windows are often the awkward cousins of the window family: older, smaller, leakier, and not exactly living-room worthy. If they are drafty but still serviceable, interior window film can help reduce heat loss for the season. It is inexpensive, clear enough for utility spaces, and often gives a noticeable comfort boost.
For very drafty basement windows in unfinished spaces, rigid foam board can be an effective seasonal solution. It is not the glamorous choice, but basement comfort rarely wins awards for glamour. A snug foam insert can dramatically cut cold air infiltration. This works especially well when the basement is unfinished and natural light is not a priority.
7. Foil Tape or Approved Sealant for Leaky Ducts
If you have exposed ducts in the basement, inspect the joints and seams. Duct leaks can make the space feel colder, waste conditioned air, and force your heating system to work harder. Use foil HVAC tape or duct mastic intended for that purpose. Despite the name, ordinary cloth “duct tape” is not the hero here. It tends to fail over time, and your ductwork deserves better.
When ducts run through a cold basement, insulating the ducts can also help, but sealing leaks comes first. A beautifully wrapped leaky duct is still, in technical terms, leaky.
8. Rigid Foam Board at the Rim Joist
If your basement is unfinished and you can see the rim joist bays, this is one of the smartest upgrades you can make. Cut rigid foam board to fit each cavity, set it in place, and seal the edges with foam or caulk. That combination gives you both insulation and air sealing, which matters because insulation alone does not stop air movement.
This is an important point many DIYers miss: stuffing fiberglass batts into the rim joist without air-sealing first is usually not enough. Fiberglass can slow heat transfer, but it is not an air barrier. If air can still snake around it, the draft is not gone; it just has a softer obstacle course.
Should You Insulate the Basement Ceiling or the Basement Walls?
This question comes up every winter, usually right after someone stands barefoot in the kitchen and announces that the floor is “basically ice.” Insulating the basement ceiling can help in some situations, especially if the basement is unconditioned and mainly used for storage. But it is not always the best or most complete solution.
If the basement is part of the conditioned home or might become finished space later, insulating the basement walls and sealing the rim joist often makes more sense. That approach brings the basement more fully inside the thermal envelope, helps keep the space warmer and drier, and can improve comfort upstairs too. In many homes, wall and rim-joist work gives a better overall result than focusing only on the ceiling.
That said, every basement is a little weird in its own special way. The right strategy depends on climate, moisture conditions, how the space is used, and where the real leaks are located. When in doubt, think system-wide, not just “which surface can I stuff with insulation first?”
When Replacement Is Better Than Another Patch
Sometimes the honest answer is that the old basement window or door has had a good run. If the frame is rotted, the sash does not close tightly, the glass is failing, or the unit leaks no matter how much weatherstripping you add, replacement may be the more sensible long-term move.
An insulated exterior basement door or an energy-efficient replacement window can solve comfort problems that endless patching never quite fixes. This does not mean every draft requires a full replacement. It just means that at some point, adding your fifth layer of “temporary” tape becomes less of a strategy and more of a lifestyle choice.
Do Not Ignore Moisture, Radon, and Combustion Safety
This is the serious section, and yes, it matters. Air-sealing a basement without addressing moisture is like putting a lid on leftovers you never should have kept. If the basement has bulk water entry, chronic dampness, condensation, or mold issues, fix those first. Good drainage, foundation maintenance, and humidity control should be part of the plan.
Radon is another reason to be thoughtful. Because basement work changes airflow in the home, it is smart to test, especially before finishing or tightening the space. And if the basement contains atmospherically vented combustion equipment such as an older furnace, boiler, or water heater, air-sealing can affect how that equipment drafts. That is why combustion safety matters before and after major tightening work.
In practical terms, that means:
- Fix water intrusion before insulating or sealing
- Use a dehumidifier if the basement is consistently damp
- Test for radon, especially before finishing the space
- Have a qualified pro assess combustion safety if fuel-burning equipment is present
- Install and maintain carbon monoxide detectors
- Check local code requirements for exposed foam and thermal barriers
Not every basement project needs a contractor, but every basement project needs common sense.
Basement Draft-Proofing Mistakes to Avoid
- Only insulating and not air-sealing: Insulation without air sealing often leaves the real draft path alive and well.
- Ignoring the attic: Basement drafts can be aggravated by leaks at the top of the house.
- Using high-expansion foam near windows and doors: Frames can shift, and suddenly nothing opens correctly.
- Sealing over active moisture problems: Water will win that argument eventually.
- Using the wrong product around flues or hot vents: Heat-rated materials and code compliance matter.
- Forgetting the basement door: The threshold area is often a huge leak point.
- Skipping professional testing when needed: A blower door test or combustion safety check can prevent expensive guesswork.
A Smart Order of Operations
If you want a clean game plan, use this sequence:
- Check for water, mold, and obvious foundation problems.
- Find the leaks at rim joists, windows, doors, penetrations, and ducts.
- Seal small gaps with caulk and larger gaps with the right foam.
- Add weatherstripping and a door sweep where moving parts leak.
- Seal cracks in concrete where appropriate.
- Insulate the rim joist and, if needed, the basement walls.
- Reassess the space after a cold day to see what changed.
This approach works better than buying one miracle product and expecting it to defeat physics on its own.
Experience-Based Notes From Real Basements
What does all of this feel like in the real world? Usually, it starts with a homeowner saying something wonderfully specific like, “The basement itself is cold, sure, but why is my dining room floor trying to assassinate my feet?” That question comes up because basement drafts rarely stay in the basement. Cold air leaking in around the rim joist, sill plate, or utility penetrations can cool the floor system above. So the problem shows up where people actually complain about it: the room upstairs.
One common experience is the “I replaced the window film, but the room still feels cold” scenario. That usually means the window was not the only leak. The paper test on the sash might reveal one issue, but the real culprit may be the gap behind the trim or the rim joist two feet away. Homeowners are often surprised by how much comfort improves once they stop thinking of drafts as “window problems” and start thinking of them as “air path problems.”
Another very normal basement story goes like this: someone stuffs fiberglass into the joist bays years ago, assumes the basement is insulated, and moves on with life. Then winter arrives, and the area still feels like a refrigerated cave. Once the batts come out, the hidden gaps around the edges become obvious. Add rigid foam cut to fit, seal the perimeter carefully, and suddenly the same space feels calmer, less windy, and much easier to heat. It is not dramatic in a reality-show reveal kind of way. It is dramatic in a “Wait, why does this feel normal now?” kind of way.
Doors are another sneaky source of frustration. People often get used to feeling cold air at the bottom of a basement door and treat it like a personality trait of the house. Install a decent door sweep and weatherstripping, and the improvement is immediate enough that it almost feels suspicious. The same goes for an old bulkhead or side entry door. If the basement has outside access, that opening deserves far more attention than it usually gets.
Then there is the homeowner who seals everything enthusiastically and only later notices the basement still feels clammy. That experience is your reminder that comfort is not just about stopping cold air. It is also about moisture control. A damp basement can feel chilly even when the thermometer is not especially low. A dehumidifier, better drainage, and air sealing together often create a bigger improvement than any one of those measures on its own.
And finally, there is the deeply satisfying experience of doing this in layers. First the drafts at the door disappear. Then the basement window no longer rattles like it is auditioning for a ghost story. Then the rim joist gets sealed, and the floor above stops feeling cold. Then the heating system seems to run a little less often. None of those changes alone may feel life-changing. Together, they transform the basement from “that weird cold zone” into a space that behaves like it belongs to the same house as the rest of your rooms.
That is the real payoff. Not perfection. Not a magazine-ready reveal. Just a basement that quits acting like it has diplomatic immunity from indoor comfort.
Conclusion
If you want to stop drafts in your basement, think beyond one window or one crack. The most effective fixes usually combine air sealing, insulation, door and window upgrades, duct sealing, and moisture control. Start with detection, seal the obvious and hidden leaks, insulate the rim joist properly, and do not skip safety checks if your basement houses fuel-burning equipment. In many homes, the smartest improvements are not flashy at all. They are the steady, practical fixes that make the entire house feel better one leak at a time.
In other words: your basement does not need a pep talk. It needs a tighter building envelope.


