Table of Contents >> Show >> Hide
- What Is Eyebrow Threading, Exactly?
- Before You Start: Brow Rules That Save You From Regret
- What You Need
- How to Thread Your Eyebrows: 15 Steps
- Step 1: Let Your Brow Hair Grow In Slightly
- Step 2: Wash Your Face and Dry the Brow Area Well
- Step 3: Brush Your Brows Up and Out
- Step 4: Map Your Brow Shape
- Step 5: Decide What Hair Stays and What Hair Goes
- Step 6: Cut a Comfortable Length of Thread and Tie It Into a Loop
- Step 7: Twist the Center of the Loop
- Step 8: Practice the Hand Motion Before You Go Near Your Brows
- Step 9: Pull the Skin Taut
- Step 10: Start With the Easy Area Between the Brows
- Step 11: Work on the Most Obvious Strays Above the Brow
- Step 12: Approach the Underside of the Brow Carefully
- Step 13: Check Symmetry Often, Not Just at the End
- Step 14: Use Tweezers for One-Off Stubborn Hairs
- Step 15: Soothe the Skin and Leave It Alone
- Aftercare Tips That Make a Difference
- Common Threading Mistakes to Avoid
- Real Brow Threading Experiences: What Beginners Usually Notice
- Final Thoughts
Eyebrow threading looks a little like magic and a little like a dare. One minute, there is a fuzzy halo of random brow hairs. The next minute, there are clean arches and a suspicious amount of confidence. If you have ever watched a pro twist a piece of cotton thread and thought, “Surely I can do that at home,” welcome. You are brave, curious, and possibly standing too close to a magnifying mirror.
The good news is that eyebrow threading can be precise, affordable, and gentler on the skin than some other hair-removal methods. The less-fun news is that it also takes practice. A lot of practice. This is not one of those beauty routines where you wing it and somehow emerge like a movie star in the final scene. Threading requires patience, good lighting, a steady hand, and the emotional maturity to stop before you accidentally turn your brows into punctuation marks.
In this guide, you will learn exactly how to thread your eyebrows in 15 steps, plus how to map your shape, avoid common mistakes, calm your skin afterward, and tell the difference between “cleaning up a few strays” and “starting a new life with pencil-thin brows.” Let’s get into it.
What Is Eyebrow Threading, Exactly?
Eyebrow threading is a hair-removal technique that uses twisted cotton thread to catch and lift hairs directly from the root. Unlike waxing, it does not rely on hot products or chemicals. Unlike tweezing, it can remove several hairs in a clean line instead of one by one. That is why so many people love it for shaping brows. It is precise enough to target strays while leaving the hairs you actually want to keep.
Another reason threading is popular is that it works well for many skin types, especially for people who find waxing too harsh. If your skin gets angry fast, threading may feel like the less dramatic roommate in the hair-removal apartment. That said, “gentler” does not mean “zero sensation.” Expect some tugging, a little sting, and temporary redness. If your skin is already irritated, broken out, sunburned, or healing, this is not the moment to go full brow artist in your bathroom.
Results often last a few weeks because the hair is removed from the root. Still, brow hair grows in cycles, so some tiny regrowth may appear sooner than you would like. Rude, but normal.
Before You Start: Brow Rules That Save You From Regret
Before we get to the 15 steps, here is the first golden rule: your eyebrows do not need to be identical. They are sisters, not twins. If one arch sits a little higher or one tail behaves like it has its own opinions, that is normal. The goal is not mathematical perfection. The goal is clean, flattering, natural-looking brows that still look like they belong to your face.
Second golden rule: do not rush. Threading is one of those activities that punishes confidence without practice. If this is your first time, focus on removing the obvious strays, especially above the brow or between the brows. Leave major reshaping to a professional unless you are very sure of your technique.
Third golden rule: map first. Removing hair before defining your ideal brow shape is how people end up staring into the mirror whispering, “I got carried away.” Brow mapping gives you visual boundaries, and boundaries are a gift.
What You Need
- Clean cotton threading thread or strong cotton sewing thread
- A spoolie brush
- Brow pencil or white eyeliner pencil for mapping
- Small mirror and bright lighting
- Clean scissors if you need a tiny trim
- Tweezers for the occasional stubborn hair
- A soothing product such as aloe vera gel or a gentle, fragrance-free moisturizer
- Optional: an ice cube wrapped in a clean cloth for numbing afterward
How to Thread Your Eyebrows: 15 Steps
Step 1: Let Your Brow Hair Grow In Slightly
If you threaded, waxed, or tweezed yesterday, put the thread down. Threading works best when there is enough hair for the thread to catch. You do not need a full forest, but you do need visible growth. A few days to a couple of weeks of regrowth, depending on your natural hair cycle, usually makes threading easier and more precise.
Step 2: Wash Your Face and Dry the Brow Area Well
Start with clean skin. Remove makeup, sunscreen residue, brow gel, and skin-care products from the eyebrow area. Oils and slip make it harder for the thread to grip the hair, and nobody needs extra difficulty before breakfast. Pat the area dry thoroughly so the thread can move cleanly over the skin.
Step 3: Brush Your Brows Up and Out
Use a spoolie to brush your brow hairs upward and slightly outward. This helps you see your natural shape, spot obvious strays, and figure out whether a couple of hairs are actually part of the brow you want to keep. This is also when you realize your left brow is cooperative and your right brow is a tiny comedian.
Step 4: Map Your Brow Shape
Take a brow pencil and mark three key points: where the brow should start, where the arch should peak, and where the tail should end. A common way to do this is to line a pencil from the side of the nose straight up for the start, angle it through the iris for the arch, and angle it from the nose to the outer corner of the eye for the tail. Connect these points lightly so you know your boundaries.
Step 5: Decide What Hair Stays and What Hair Goes
Now study your map. The hairs inside the shape stay. The obvious strays outside the shape can go. Beginners should keep this simple. Do not try to reinvent your eyebrows on day one. Clean-up mode is smart. Total brow renovation is how legends of regret begin.
Step 6: Cut a Comfortable Length of Thread and Tie It Into a Loop
Cut a piece of clean cotton thread long enough to control comfortably with both hands. Tie the ends together securely to form a loop. The loop should feel manageable, not so tiny that your fingers cramp and not so large that you feel like you are wrangling a jump rope in front of your face.
Step 7: Twist the Center of the Loop
Hold the loop with both hands and twist the center several times to create an hourglass shape. You should end up with a twisted middle section that can move side to side as you open one hand and close the other. That twisting center is the part that catches and removes the hair.
Step 8: Practice the Hand Motion Before You Go Near Your Brows
Before putting thread anywhere near your face, practice opening and closing your fingers so the twisted section moves smoothly. Many beginners practice on the back of the hand or forearm first. This is a good idea. Better to learn the motion on harmless fuzz than to discover your technique by accidentally attacking your brow tail.
Step 9: Pull the Skin Taut
When you are ready to work near the brows, stretch the skin tight with your free fingers or ask someone to help. Taut skin is important because loose skin is easier to pinch or drag. If the skin bunches, threading becomes less precise and much less pleasant. Think smooth canvas, not crumpled bedsheet.
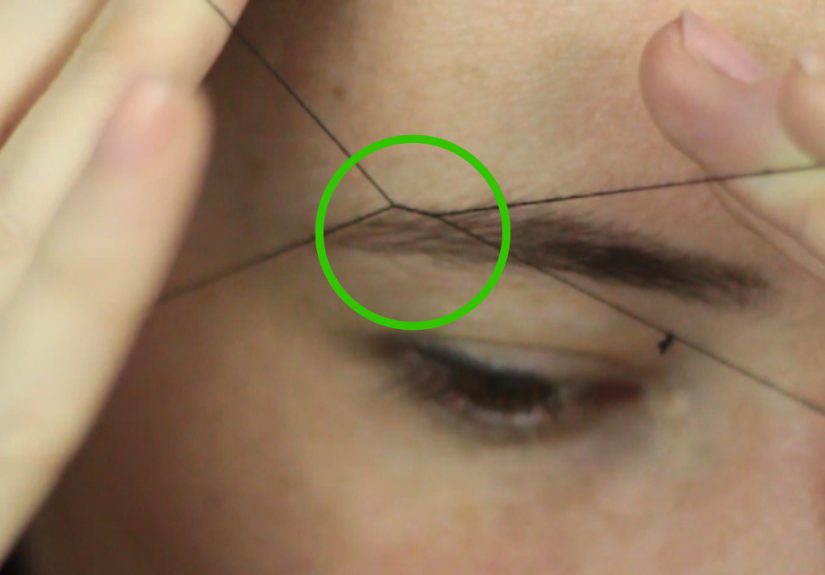
Step 10: Start With the Easy Area Between the Brows
If this is your first attempt, begin in the center area between the brows. It is usually easier than shaping the arch and less risky than working directly under the brow. Position the thread so the twist moves against the direction of hair growth and catches just a few hairs at a time. Start small. Tiny victories are still victories.
Step 11: Work on the Most Obvious Strays Above the Brow
Next, move to the obvious hairs above the brow line. This area is often safer for beginners than the skin directly under the brow, which is thinner and closer to the eyelid. Keep checking your map as you go. If a hair is questionable, leave it. The brow world has never been ruined by one extra hair, but it has been emotionally damaged by one overzealous pass.
Step 12: Approach the Underside of the Brow Carefully
The underside of the brow is where shape really changes, so tread lightly. Remove only a few clear strays at a time. Step back from the mirror often so you can see both brows together. Up close, every hair looks like an emergency. From a normal distance, it often looks completely fine.
Step 13: Check Symmetry Often, Not Just at the End
Do not finish one brow completely and then attempt to “match” the second one from memory and vibes. Alternate sides every few passes. This helps you keep the shape balanced and stops you from overworking one side. Remember: close enough to look harmonious is the goal. Perfectly cloned brows are not a legal requirement.
Step 14: Use Tweezers for One-Off Stubborn Hairs
If one hair refuses to cooperate or sits in an awkward place, use tweezers instead of forcing the thread to do everything. Threading is excellent for lines and groups of strays, but tweezers can be useful for cleanup. There is no prize for making one method do every single job. Beauty is not a one-tool dictatorship.
Step 15: Soothe the Skin and Leave It Alone
Once you are done, rinse or gently wipe the area clean and apply a soothing, fragrance-free product such as aloe vera gel or a simple moisturizer. A wrapped ice cube can help calm redness. For the next several hours, avoid harsh exfoliants, heavy makeup on the area, and excessive touching. Freshly threaded skin can be a little dramatic, but it usually settles down quickly.
Aftercare Tips That Make a Difference
Expect some temporary redness or mild swelling. That is common after hair is removed from the root. What you do not want is unnecessary irritation piled on top of irritation. Skip strong acids, retinoids, aggressive scrubs, and fragranced products on the brow area right after threading. Also avoid threading over active pimples, cuts, raw patches, or raised moles. If the skin looks irritated before you start, it will not magically become thrilled halfway through.
If you are prone to overdoing it, here is a practical trick: once you think you are done, stop. Walk away. Check again in natural light later. Most eyebrow mistakes happen in the final five minutes, when people start “fixing” things that did not need fixing in the first place.
Common Threading Mistakes to Avoid
- Skipping brow mapping: This is how shape disappears.
- Working too fast: Speed is for experienced pros, not first-timers in pajama pants.
- Threading too much underneath the brow: This changes the shape faster than you think.
- Ignoring skin prep: Dirty, oily skin makes everything harder.
- Chasing perfect symmetry: Your brows will never be carbon copies, and that is okay.
- Threading irritated skin: Your skin deserves better than that level of chaos.
Real Brow Threading Experiences: What Beginners Usually Notice
One of the most common first-time threading experiences is surprise. Not because the method is impossible, but because it is oddly mechanical once you understand it. At first, the thread just looks like thread. Then you twist it, move your fingers, and suddenly it behaves like a tiny hair-removal machine that runs entirely on hand coordination and stubbornness. Most beginners spend the first few minutes thinking, “Why is this not working?” followed by one magical pass where a few hairs come out cleanly, and then the confidence level rises by about 400%.
Another common experience is learning that pain is not the whole story. People often expect threading to feel unbearable, but many describe it as more of a quick sting or repetitive snap than true pain. The more sensitive areas, especially near the arch and underside of the brow, definitely get your attention. Still, for many people, the discomfort is brief and manageable. The bigger challenge is not pain. It is coordination. Your fingers need to move smoothly, the skin needs to stay taut, and the thread has to hit the right spot. That is a lot to ask from one bathroom session.
Many beginners also notice how easy it is to become obsessed with tiny details. You step close to the mirror, spot one little stray, remove it, then see another, then another, and before you know it, you are negotiating with your own eyebrows like a hostage mediator. This is why stepping back matters so much. From three inches away, every brow looks like a landscaping emergency. From a normal distance, your face usually looks absolutely fine.
There is also the emotional roller coaster of comparing both brows mid-process. One side may look cleaner faster. One arch may appear sharper. One tail may act like it belongs to a completely different person. That does not always mean you made a mistake. Natural asymmetry is incredibly common. In real-life threading experiences, people often find that their brows look more balanced after they calm down, stop touching them, and check again in softer light.
Then there is the after-threading moment, which can be oddly satisfying. The skin may be a little pink, the brow shape looks cleaner, and the whole eye area often appears more open. Even a small cleanup can make a visible difference. That is why so many people stick with threading once they learn it. It gives a polished result without requiring a dramatic transformation. It is less about changing your face and more about defining what is already there.
The best long-term experience, though, usually comes from restraint. People who have the happiest threading stories are rarely the ones who tried to carve out a brand-new brow shape in one sitting. They are the ones who removed a few obvious strays, respected their natural arch, and left the major shaping alone until they got more comfortable. In other words, the true eyebrow threading glow-up is not just technique. It is self-control. Glamorous? Maybe not. Effective? Absolutely.
Final Thoughts
If you want neat, defined brows without wax, chemicals, or endless tweezer sessions, eyebrow threading can be a smart option. The trick is respecting the learning curve. Start small, map your shape, keep the skin taut, and avoid the temptation to turn a little cleanup into a full architectural project. When done carefully, threading can leave your brows looking polished, natural, and beautifully you.
And if your first attempt is only 70% successful, congratulations. That is still better than many people’s first bangs.


