Table of Contents >> Show >> Hide
- Before You Start: A Fast Checklist
- Windows 10/11: Transfer Files From a Flash Drive
- macOS: Transfer Files From a Flash Drive
- Common Problems and How to Fix Them
- Transfer Like a Pro: Small Habits That Prevent Big Regrets
- Specific Examples: Where Your Files Usually Belong
- Quick FAQ
- Real-World Experiences: The Stuff Nobody Mentions Until It Happens
- Conclusion
A USB flash drive is the world’s tiniest moving truck: plug it in, unload your stuff, and drive away. Most of the time, transferring data from a flash drive to a computer is a quick copy-and-paste job. But every so often you hit a snagyour drive doesn’t show up, a file won’t copy, or you meet the infamous “4GB limit” like it’s a boss battle.
This guide walks you through the simple steps for Windows and Mac, then covers common problems and how to fix them. It’s practical, beginner-friendly, and just technical enough to keep you out of trouble.
Before You Start: A Fast Checklist
- Use the right connector: Many new laptops use USB-C only. If your flash drive is USB-A, you’ll need a USB-C adapter or hub.
- Pick a destination folder: Decide where files will live (Documents, Pictures, a project folder, etc.).
- Check free space: Your computer needs at least as much free storage as the files you’re copying.
- Scan shared drives: If the drive has been used on public/shared computers, run an antivirus scan before opening unknown files.
- Don’t unplug mid-transfer: Wait until copying finishes and you eject safely to reduce corruption risk.
Windows 10/11: Transfer Files From a Flash Drive
Step 1: Plug in the flash drive and open it
- Insert the flash drive into a USB port.
- Open File Explorer (press Windows + E).
- Click This PC in the left pane.
- Under Devices and drives, open your USB drive (often labeled “USB Drive” or with the brand name).
Quick tip: Not sure which drive is the USB? Unplug it and plug it back in while “This PC” is open. The new drive that appears is your flash drive.
Step 2: Copy (recommended) or move (only if you mean it)
For most people, copying is the safest choice because it leaves the original files on the flash drive. Moving removes files from the flash drive after the transfer. If you’re not 100% sure, copy firstdelete later.
- Copy: Select files → Ctrl + C → go to destination → Ctrl + V
- Move: Select files → Ctrl + X → go to destination → Ctrl + V
Step 3: Transfer your files (choose your style)
- Copy/Paste: Select your files, press Ctrl + C, open your destination folder, press Ctrl + V.
- Right-click menu: Right-click selected files → Copy (or Cut), then right-click destination → Paste.
- Drag and drop: Open two File Explorer windows (USB drive and destination). Drag files across. Hold Ctrl while dragging to force a copy.
Step 4: Confirm the transfer
Before you delete anything from the flash drive, do a quick check:
- Open a few copied files (especially large videos or important documents).
- Compare file counts for big folders (did all subfolders arrive?).
- If it’s critical, right-click → Properties and compare file sizes.
Step 5: Eject the flash drive
Windows can be forgiving, but ejecting is still a smart habitespecially right after writing files.
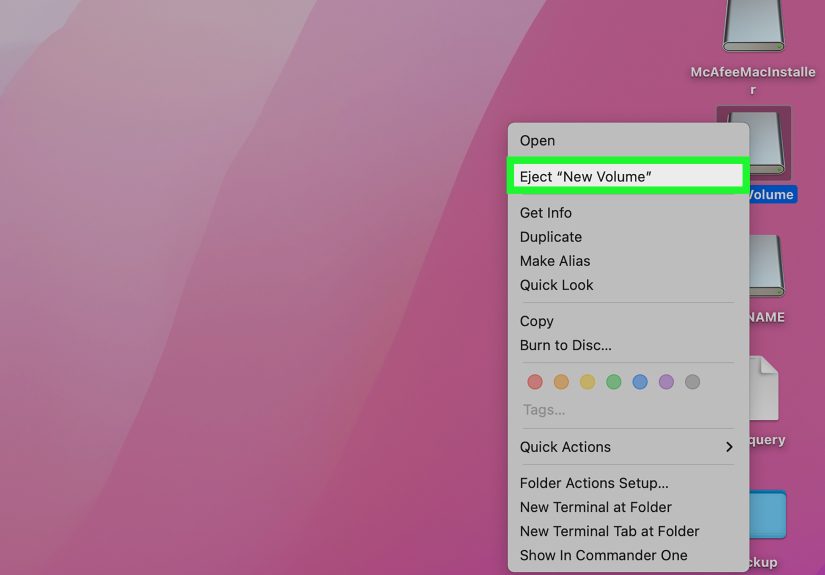
- In File Explorer, right-click the USB drive.
- Click Eject, then unplug after a moment.
If you don’t see “Eject”: Use the system tray Safely Remove Hardware icon, or close open files and try again.
macOS: Transfer Files From a Flash Drive
Step 1: Plug in the drive and find it in Finder
- Insert the flash drive (use a USB-C adapter if needed).
- Open Finder.
- Look under Locations in the sidebar for your drive’s name.
If you don’t see it: In Finder, go to Finder → Settings/Preferences → Sidebar, and check External disks.
Step 2: Copy the files to your Mac
- Drag and drop: Open the USB drive in one Finder window and your destination folder in another, then drag files over.
- Copy/Paste: Select files → Command + C, then destination → Command + V.
Mac tip: Dragging between different drives usually copies. To force a copy while dragging, hold Option (you’ll see a little plus sign).
Step 3: Eject properly (macOS really cares)
To avoid warnings and reduce the risk of corruption, eject before unplugging:
- Click the Eject icon next to the drive in Finder, or
- Right-click the drive → Eject, or
- Drag the drive to the Trash (it turns into an eject icon).
Wait until the drive disappears from Finder, then unplug it.
Common Problems and How to Fix Them
Problem 1: The flash drive doesn’t show up
Start with simple hardware checks:
- Try another USB port and avoid hubs.
- Try a different USB-C adapter/cable if you’re using one.
- Restart the computer.
- Test the flash drive on another computer to rule out a failing drive.
If it still won’t appear:
- Windows: Open Disk Management and look for a removable drive that matches your USB’s size.
- Mac: Open Disk Utility and check whether the drive is listed or needs to be mounted.
Problem 2: “File is too large” or transfers fail at 4GB
If a file over 4GB won’t copy, your flash drive may be formatted as FAT32, which has a 4GB single-file limit. For moving large files between Windows and Mac, exFAT is typically the most convenient format.
Options:
- Copy smaller files first, then handle the large file separately.
- Compress and split the file into parts (many tools support split archives).
- Back up the drive and reformat it to exFAT (reformatting erases the drive, so back up first).
Problem 3: “The disk is write-protected”
This usually means one of three things: a physical lock switch (rare on USB drives), permission restrictions on a managed computer, or a failing drive that has turned read-only to protect data. If you can read files, copy them off first. If the drive keeps acting read-only on multiple computers, replace it.
Problem 4: Mac can read the drive but won’t let you add/edit files
Some drives are formatted as NTFS (Windows). macOS can often read NTFS but typically can’t write to it without extra software. If you need cross-platform read/write, exFAT is the usual answer. If you only use Macs, a Mac format (like APFS) may be better, but Windows won’t read it by default.
Problem 5: Transfers are slow
- Use a USB 3.x port and a USB 3.x flash drive when possible.
- Copy in batches if you have thousands of tiny files.
- Avoid copying while your computer is under heavy load.
- If the drive is old or nearly full, speed may drop significantly.
Transfer Like a Pro: Small Habits That Prevent Big Regrets
Copy first, delete later
If your goal is to clear off the flash drive, copy everything to the computer first, then open a few files to confirm the transfer worked. Only then should you delete the originals from the flash drive.
Verify the important stuff
For anything you can’t easily replace (client work, school projects, family photos), verify a few files from different folders. For high-stakes transfers, comparing file sizes is quick and surprisingly effective.
Be cautious with unknown files
USB drives can carry malware. Be wary of unknown programs and documents that ask you to enable macros. When possible, download software directly from official websites instead of running unknown installers from a flash drive.
Specific Examples: Where Your Files Usually Belong
- Photos and videos: Copy to a dated folder like
Pictures/2025-12 Holiday, then back up. - Work and school documents: Copy to a project folder inside Documents so everything stays together.
- Presentations: Copy the entire folder (slides + images + media), not just the .pptx file, to avoid missing links.
Quick FAQ
Is drag-and-drop safe?
Yes, but it’s easier to accidentally move instead of copy. If it matters, use Copy/Paste.
Do I really need to eject a flash drive?
On Mac, yes. On Windows, it’s still a good habit after writing filesespecially right after a big transfer.
What if I’m using a Chromebook?
Open the Files app, select your USB drive, copy files to Downloads or Google Drive, then eject from the Files app before unplugging.
Real-World Experiences: The Stuff Nobody Mentions Until It Happens
Here are the “learned it the hard way” moments that show up again and again when people use flash drivesplus the quick fixes that save your files (and your mood).
1) The “I swear I copied it” moment: Drag-and-drop can quietly turn into a move, which means the files vanish from the flash drive after you “transfer.” That’s great when you intended to clean the drive, and terrifying when you didn’t. If the files matter, use keyboard shortcuts instead: copy with Ctrl/Command + C and paste with Ctrl/Command + V. You’re explicitly copying, so you keep an original until you decide otherwise.
2) The legendary 4GB wall: A big video fails to copy, you get an error, and suddenly everyone suspects sabotage. Most of the time it’s just FAT32, which can’t hold a single file larger than 4GB. If you regularly move large files between Windows and Mac, keep one dedicated drive formatted as exFAT. If you’re stuck with FAT32 today, split the file into parts or move it via cloud storage as a one-time workaround.
3) The case of the disappearing drive letter: On Windows, your USB drive might be D: today and F: tomorrow depending on what else is plugged in. That’s normal, but it makes people feel lost. The easiest method is visual: open This PC, unplug the drive, plug it back in, and watch which new drive appears. No guessing, no spreadsheets, no “maybe it’s the DVD drive?” confusion.
4) USB-C adapters: tiny devices, huge drama: With newer laptops, the adapter becomes part of your transfer chainso it can also be the weak link. A loose adapter or a flimsy hub can cause transfers to fail halfway through or slow to a crawl. If a copy keeps erroring out at random percentages, try a different port, remove the hub, or swap the adapter. When you’re moving important files, stability beats convenience.
5) “Why won’t it eject?” A drive refusing to eject usually means something is still using it: a photo viewer is open, a document is still running from the drive, or the system is generating thumbnails. Close files that came from the USB, wait a few seconds, and try again. If it still won’t eject, restart the computer and eject before opening anything. Avoid yanking the drive right after a big writeespecially on a Macbecause that’s when corruption is most likely.
6) The three-file spot check: After a big transfer, I open three files: one small, one large, and one from a different folder. It takes 10 seconds and catches the weird failureslike a single corrupted video, a folder that didn’t copy, or a document missing linked assetsbefore I delete anything from the flash drive.
7) The “mystery read-only” drive: If a drive suddenly becomes read-only on multiple computers, treat it like a warning light. Sometimes it’s permissions, but it can also be the drive failing and protecting what data it can. Copy everything off immediately, then replace the drive. Flash drives are cheap; re-creating lost work isn’t.
Conclusion
Transferring data from a flash drive to a computer is usually plug, copy, paste, done. The difference between “easy” and “stressful” is a tiny routine: copy (don’t move) when it matters, confirm a few files opened correctly, and eject before unplugging. Do that, and your USB drive stays what it should bea convenient helper, not a chaos gremlin with a storage problem.