Table of Contents >> Show >> Hide
- What a Magic Eraser Actually Is (and Why It Works)
- Before You Start: The 60-Second Safety Check
- Where a Magic Eraser Shines (Room-by-Room Wins)
- Walls: scuffs, crayon, and “oops” marks
- Baseboards and door trim: the grime magnet zone
- Light switch plates and doorknobs: the high-touch offenders
- Sneakers: especially white soles and rubber edges
- Kitchen: sticky spots, smudges, and “why is that still there?”
- Bathroom: soap scum, water marks, and grout lines (carefully!)
- Kids’ stuff: plastic bins, high chairs, and toy scuffs
- Outdoor and utility areas: patio furniture and scuffed surfaces
- Surfaces to Avoid (or Treat Like a “Proceed With Extreme Caution” Sign)
- Pro Tricks to Make a Magic Eraser Last Longer
- When a Magic Eraser Isn’t the Answer (Better Alternatives)
- Health and Environment Notes (The Stuff Most People Skip)
- FAQ: Quick Answers to Common Magic Eraser Questions
- Real-World Experiences: What People Learn After They Start “Eraser-Cleaning”
- Conclusion: Use the “Magic” Like a Pro (Not a Chaos Goblin)
A Magic Eraser is the cleaning tool equivalent of finding a $20 bill in your winter coat pocket: surprising, satisfying,
and a little suspicious. Like… why does this thing work so well on scuffs, grime, and mystery marks that have survived
your entire cleaning arsenal?
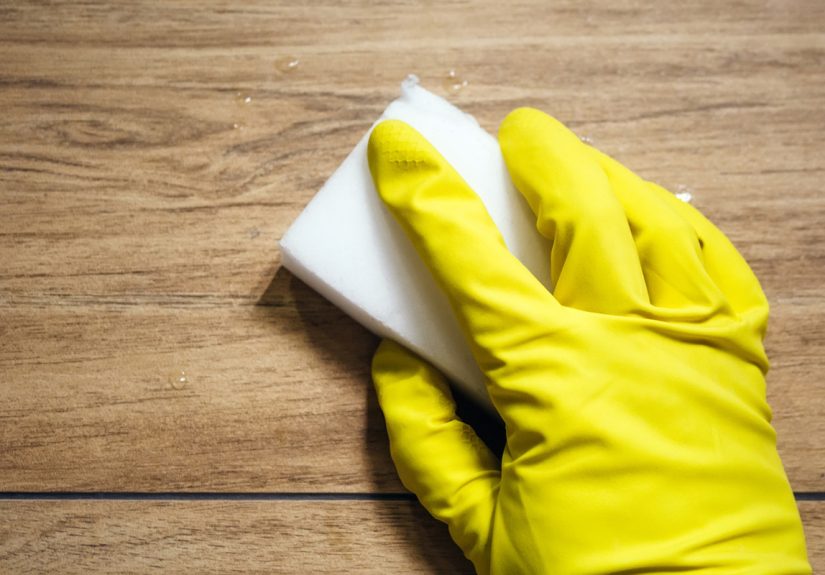
Here’s the non-magic truth: a Magic Eraser (and similar “eraser sponges”) is basically a tiny, soft-looking micro-scrubber.
Used the right way, it’s a fast fix for all kinds of everyday messes. Used the wrong way, it can turn “quick touch-up”
into “why does my wall look less shiny right there?”
This guide breaks down how to use a Magic Eraser around the houseroom by roomwith practical examples, real-world precautions,
and a few “don’t do what I did” lessons you can borrow for free.
What a Magic Eraser Actually Is (and Why It Works)
The cleaning power comes from melamine foam, a material with a structure that acts like extremely fine sandpaper.
When you dampen it, the foam’s micro-edges get into tiny grooves on a surface and help lift off the gunk that regular sponges
glide right over.
That’s also why the eraser slowly “disappears” as you use it: it’s wearing down while it scrubs. Think of it like a pencil eraser
for your homeeffective, but not everlasting.
Before You Start: The 60-Second Safety Check
1) Do the “Would I sand this?” test
If you wouldn’t take a super-fine sanding pad to the surface, don’t take a Magic Eraser to it eitheror at least patch-test first.
The biggest mistakes happen on glossy, coated, polished, or delicate finishes.
2) Dampen, don’t soak
Wet it, squeeze it out, and aim for damp. Dripping wet wastes the sponge and can make a messespecially on walls or wood trim.
The goal is controlled cleaning, not a foam slip’n’slide.
3) Start with feather-light pressure
Let the sponge do the work. If you scrub like you’re trying to erase your search history, you’re more likely to dull paint or scratch finishes.
4) Skip the chemical cocktail
In most cases, water is enough. Avoid pairing with harsh cleaners unless the product specifically says it’s safe. Mixing cleaning products is
a classic way to turn “fresh lemon scent” into “why are my eyes watering?”
5) Keep it off skin, teeth, and anything you’d like to keep attached to your body
Yes, people have tried it. No, you should not. This is a home-cleaning tool, not a beauty hack.
Where a Magic Eraser Shines (Room-by-Room Wins)
Walls: scuffs, crayon, and “oops” marks
Painted walls are one of the most popular Magic Eraser jobsespecially in hallways, entryways, and kid zones. It’s great for
shoe scuffs, fingerprints, and certain pencil/crayon marks.
How to do it:
- Patch-test in a hidden corner (behind a picture frame is perfect).
- Dampen the sponge and squeeze well.
- Use light strokes or gentle circles over the mark.
- Wipe the area with a clean, damp microfiber cloth to remove residue.
- Dry with a soft towel to see the true finish.
Pro tip: Be extra cautious with glossier paint (satin, semi-gloss, high gloss). The sponge can dull the sheen
and leave a “clean spot” that looks like a… not-so-clean spot.
Baseboards and door trim: the grime magnet zone
Baseboards collect dust, shoe marks, pet smudges, and whatever that sticky thing is. A Magic Eraser works well on
painted baseboards and trim that have durable finishesagain, with light pressure and a quick wipe afterward.
Light switch plates and doorknobs: the high-touch offenders
Switch plates get scuffed and smudged constantly. Remove the plate if you want to be extra careful, or clean gently in place.
For metal finishes, go slowsome coatings can dull with abrasion.
Sneakers: especially white soles and rubber edges
If your sneakers have white rubber midsoles, the eraser can make them look dramatically cleaner in minutes.
Focus on the rubbernot delicate fabric or leather uppers unless you’re patch-testing and using a very light touch.
Quick method: Dampen → squeeze → scrub rubber edges lightly → wipe with a damp cloth → air dry.
Kitchen: sticky spots, smudges, and “why is that still there?”
In the kitchen, a Magic Eraser is best as a spot-cleaning specialistnot your default tool for every surface.
- Microwave interior: Great for stuck-on splatters. Follow with a damp cloth wipe-down.
- Refrigerator exterior (painted or matte finishes): Helpful for scuffs and grimepatch-test first.
- Backsplash tile: Can lift residue on many glazed tiles. Avoid delicate stone or unsealed grout.
- Stovetop splatter (on appropriate surfaces): Useful for stubborn spots, but avoid scratching sensitive finishes.
Cabinet warning: Many cabinets have protective coatings (and sometimes a sheen). A Magic Eraser can remove grimeand
also remove a bit of finish. Test in an inconspicuous spot before you go to town on that one mystery smear.
Bathroom: soap scum, water marks, and grout lines (carefully!)
Magic Erasers are famous for bathroom cleanupsoap scum on tile, haze on shower walls, and stubborn sink marks.
But the bathroom is also full of coated finishes (chrome, brushed metals, specialty coatings) that can be dulled by abrasion.
Safer targets:
- Glazed tile walls (light pressure)
- Plastic shower surrounds
- White porcelain sinks (spot test)
- Grout haze on durable grout (use gentle passes and rinse well)
Be cautious with: chrome fixtures, faucet handles, shiny metals, and anything that looks “designer.”
If it has a showroom shine, treat it like it has feelings.
Kids’ stuff: plastic bins, high chairs, and toy scuffs
Hard plastic is often a sweet spot. It’s great for scuffs on storage bins, high-chair trays, and toy marksespecially if you finish by wiping
the surface with a clean damp cloth so no residue remains.
Outdoor and utility areas: patio furniture and scuffed surfaces
Many people use melamine sponges on plastic patio furniture or vinyl surfaces for spot cleanup. Avoid painted or coated outdoor pieces where scratches
will show. And don’t treat your car’s paint like it’s a kitchen counter (more on that below).
Surfaces to Avoid (or Treat Like a “Proceed With Extreme Caution” Sign)
A Magic Eraser can be a hero, but it is not a universal solvent. Here are common “nope” zones that tend to get damaged:
- Glossy, satin, or high-gloss paint (risk of dull spots and sheen changes)
- Finished wood (can remove stain/finish and create uneven patches)
- Natural stone countertops (can wear sealant and dull the surface)
- Leather (can scuff, scratch, and discolor)
- Nonstick cookware (abrasion can damage coatingsuse a gentler method)
- Stainless steel (may scratch or dull; if you try it, test and go with the grain, extremely lightly)
- Electronics screens (too easy to scratch)
- Car exteriors (can haze clear coat and paint)
- Delicate glass or glossy surfaces (risk varieswhen in doubt, don’t)
If you’re unsure, use the patch-test rule. The sponge is inexpensive; refinishing a countertop is not.
Pro Tricks to Make a Magic Eraser Last Longer
Cut it into smaller pieces
Instead of using a whole block for one scuff, slice it into halves or quarters. You’ll get more controlled cleaning and less waste.
Use corners like a detail brush
For tight spots (around faucet bases, sneaker edges, trim corners), use a corner of the sponge. It’s more precise and reduces accidental over-scrubbing.
Wipe after you scrub
The sponge can leave fine residue behind. A quick pass with a damp microfiber cloth makes the finish look cleaner and helps you judge results accurately.
Let it dry between uses
A soggy sponge breaks down faster. Rinse lightly, squeeze, and store where it can air-dry.
When a Magic Eraser Isn’t the Answer (Better Alternatives)
Sometimes the best cleaning move is… not sanding your stuff. If the surface is delicate, try these instead:
- Microfiber cloth + warm water for everyday smudges
- Dish soap solution for greasy residue
- Baking soda paste for gentle scrubbing on durable surfaces
- Vinegar + water (where appropriate) for mineral haze
- Specialty cleaners designed for stone, stainless steel, or wood finishes
Health and Environment Notes (The Stuff Most People Skip)
It’s not “chemical-free” in the way the internet argues about at 2 a.m.
Some versions are primarily melamine foam; some include added cleaning agents. Either way, you shouldn’t eat it, chew it, or let kids treat it like a snack.
If swallowed, it can irritate and create problemsso store it like you would any cleaning product.
Myth check: “It contains embalming chemicals!”
There have been long-running rumors online about formaldehyde being in Magic Erasers. Fact-checkers and poison control resources have addressed these claims.
The practical takeaway is simpler: use the product as directed, don’t use it on your body, and keep it away from children and pets.
Microplastics are a real concern
Because the sponge wears away as it cleans, research has highlighted that melamine sponges can shed microplastic fibers during abrasion.
You don’t need to panicjust be smart about minimizing waste: use the smallest piece that works, scrub gently, and wipe residue into the trash
instead of rinsing it into outdoor drains.
FAQ: Quick Answers to Common Magic Eraser Questions
Can I use a Magic Eraser on painted walls?
Often yesespecially on flat, matte, or eggshell paintif you use light pressure, keep the sponge damp (not dripping), and wipe afterward.
Glossy paint is higher-risk for dull spots, so patch-test first.
Can I use it on kitchen cabinets?
Only with caution. Cabinets often have finishes that can be dulled or stripped by abrasion. Try a gentle soap-and-water wipe first.
If you use an eraser, patch-test in a hidden area and use very light pressure.
Can I use it on stainless steel?
Some people do, but many cleaning experts warn it can scratch or dull stainless steelespecially on visible appliance fronts.
If you try it, go with the grain, use almost no pressure, and test in a hidden spot first.
Are generic melamine sponges the same thing?
Many are functionally similar because the core material is melamine foam. Performance varies by density and durability,
so if one falls apart quickly, try a different brand or a more durable version.
Real-World Experiences: What People Learn After They Start “Eraser-Cleaning”
Once someone discovers the Magic Eraser trick, there’s usually a short honeymoon phase: scuffs vanish, sneakers brighten,
and suddenly you’re eyeing the whole house like a game show contestant with a limited time bonus round.
Then reality kicks inand it’s actually helpful. A common first lesson is that a Magic Eraser is less like a sponge and more like
a very gentle sanding block in disguise. People often notice this after cleaning a wall that has a bit of sheen: the mark is gone,
but the cleaned area looks slightly different under certain lighting. That’s not the sponge “leaving residue.” It’s usually the finish
being subtly altered from too much pressure or too many passes. The fix is almost always the same: lighter touch, fewer strokes,
and patch-testing on anything with shine.
Another frequent experience: realizing one full-size eraser is overkill for small jobs. Many homeowners start cutting them into
smaller squaresespecially for sneaker soles, baseboards, and detail cleaning around handles. It feels oddly satisfying to use
one tiny cube to clean one stubborn scuff, like you just outsmarted the cleaning aisle. And it reduces waste, which matters because
the sponge is designed to wear down as it works.
In kitchens, the “experience lesson” tends to be about restraint. People love the quick results on stuck-on grime inside microwaves
and on tough marks on durable surfacesbut they also learn that cabinets, glossy backsplashes, and appliance finishes aren’t all created equal.
The same sponge that safely removes a scuff from a painted door can make a shiny cabinet panel look dull if you go too hard. Many end up using
the Magic Eraser as a spot-treatment toolthe last step after gentler optionsrather than the first thing they grab.
Bathrooms create a similar pattern. The sponge can knock down soap scum impressively fast on tile and many shower surfaces, but people often report
disappointment after using it on “pretty” fixtures: chrome, brushed finishes, and coated hardware. Even if it doesn’t scratch deeply, it can reduce that
polished look over time. The experience-based strategy that tends to stick is: use it for tile, plastic, and stubborn marksthen switch to microfiber cloths
for metals and finishes you want to keep glossy.
Finally, there’s the universal “aha” moment: cleaning goes faster when you stop scrubbing like you’re mad at the stain. A Magic Eraser rewards patience and
light pressure. People who get the best results tend to do a few gentle passes, check their progress, wipe clean, and stop as soon as the mark is gone.
It’s the opposite of brute-force cleaningand once you learn that rhythm, the sponge becomes a genuinely useful tool rather than a risky one.
Conclusion: Use the “Magic” Like a Pro (Not a Chaos Goblin)
A Magic Eraser is one of the easiest ways to make your home look cleaner fastespecially for wall scuffs, baseboards, sneaker soles,
and stubborn grime in high-traffic areas. The key is treating it like what it really is: a micro-abrasive tool.
Patch-test first, keep it damp, use light pressure, and avoid delicate or glossy finishes unless you’re willing to accept the risk.
Used wisely, it’s not just a cleaning hackit’s a time-saver that earns permanent residency under your sink.


