Table of Contents >> Show >> Hide
- What Is a Submersible Pump?
- Before You Start: Know Which Pump You Have
- Tools and Materials You May Need
- How to Use a Submersible Pump Step by Step
- How to Use a Submersible Sump Pump in a Permanent Setup
- Common Mistakes to Avoid
- Maintenance Tips for Better Performance
- When to Call a Professional
- Real-World Experiences Using a Submersible Pump
- Conclusion
- SEO Tags
If you have ever looked at a puddle the size of a small inland sea in your basement, window well, crawl space, or backyard trench and thought, “Well, this seems rude,” a submersible pump may be exactly what you need. These pumps are built to sit in water and move it somewhere more polite. They are practical, powerful, and surprisingly simple to use once you know the basics.
That said, “simple” should never mean “careless.” A submersible pump mixes water, electricity, hoses, pressure, and sometimes a frantic homeowner in old sneakers. So the trick is not just getting the water out. The trick is doing it safely, efficiently, and without turning your weekend into a live-action plumbing regret.
This guide explains how to use a submersible pump step by step, including setup, hose placement, power safety, common mistakes, and maintenance tips. It also covers the difference between utility-style portable pumps and permanent sump-style installations, so you can match the advice to the job in front of you.
What Is a Submersible Pump?
A submersible pump is a water pump designed to operate while sitting in water. In most residential settings, that means one of two things: a portable utility pump used to remove standing water from places like flooded basements, garages, or pool covers, or a submersible sump pump installed in a basin to automatically move groundwater away from your home’s foundation.
The reason people like submersible pumps is simple. They are compact, efficient, and usually quieter than pedestal-style pumps because the motor is down in the pit or water instead of perched above it. The water around the pump also helps cool the motor while it runs. For many homeowners, that makes a submersible pump the go-to choice for emergency water removal and basement flood prevention.
Before You Start: Know Which Pump You Have
Portable Submersible Utility Pump
This type is for temporary water-removal jobs. You place it in standing water, attach a hose, plug it into a properly protected outlet, and let it move water out of the area. It is commonly used for flooded basements, window wells, garages, rooftops, tanks, and similar cleanup jobs.
Submersible Sump Pump
This version usually lives in a sump basin full-time. It activates when rising water lifts a float or trips a sensor, then sends the water through a discharge pipe away from the house. It is part of a permanent drainage system rather than something you drag out only when the floor starts making lake noises.
Important Reminder
Not every submersible pump is meant for the same liquids. Some pumps are for clean water only. Others are made for wastewater or sewage. Always check the pump’s intended application before using it. If you are dealing with sewage, septic systems, or a deep-well installation, this becomes a more specialized job and is often better handled by a professional.
Tools and Materials You May Need
- Submersible pump
- Discharge hose or discharge pipe
- Garden hose adapter or threaded fitting
- GFCI-protected outlet
- Heavy-duty grounded cord only if your manual permits one
- Rope or handle for lowering the pump if needed
- Work gloves and waterproof boots
- Check valve for sump-style or some hose setups
- Bucket of clean water for testing
How to Use a Submersible Pump Step by Step
1. Pick the Right Spot
Place the pump at the lowest point where water collects. Water is lazy, and thankfully, gravity is predictable. In a flooded basement or garage, that low spot is usually where the pump will work most efficiently.
The pump needs to sit on a hard, stable, level surface. Do not set it directly on mud, dirt, sand, or loose gravel unless the manufacturer specifically allows it. If the area is messy, place the pump on a brick, paver, or other stable base to keep the intake from sucking up debris. This small move can save you from clogs, jammed impellers, and the classic “why did it work for two minutes and then quit?” mystery.
2. Attach the Hose Correctly
Connect the discharge hose or pipe to the outlet on the pump. For many portable utility pumps, that means threading on a garden hose adapter or discharge fitting first, then attaching a hose. Hand-tight is usually enough. Over-tightening can damage plastic fittings and turn a perfectly fine adapter into an expensive crunchy ring.
Use the correct hose size recommended by the pump maker. In general, a larger inside diameter and a shorter hose improve flow. A long, skinny, kinked hose is basically the pump equivalent of trying to breathe through a coffee stirrer while jogging uphill.
3. Route the Discharge Water Away From the House
Once the hose is attached, direct the outlet end to a safe drainage area where the water will not run straight back toward the foundation. That means a downhill area, a proper stormwater path where allowed, or another suitable location on your property. Keep the hose as straight as possible and avoid sharp bends, crushed sections, or surprise loops that restrict flow.
If you are using a sump pump system, the discharge pipe should include a check valve so water does not run back into the basin after each cycle. For permanent installations, rigid PVC pipe is usually preferred over flexible hose, and the line should stay as short and direct as possible.
4. Check the Power Source First
This is the part where you do not improvise.
Use a properly grounded GFCI outlet. Ground-fault protection matters because you are operating electrical equipment in or around wet conditions. Inspect the plug and cord before use. If the cord is damaged, cracked, or looks like it lost a fight with a lawn tool, do not use the pump.
Also, never lower, lift, or carry the pump by its power cord. Use the handle, a rope if the manual allows it, or place it directly on the bottom surface. The power cord is there to deliver electricity, not to moonlight as a lifting strap.
5. Make Sure There Is Enough Water
Many portable submersible pumps need a minimum water depth to prime or activate. Some need about 1 inch of water, while others need more. If the water level is too low, the pump may fail to start, run poorly, or pull in air instead of water.
For utility pumps, do not run the pump dry unless the manufacturer specifically says it can handle low-water operation. Running dry can damage seals and impellers. In plain English, the pump may keep humming while quietly ruining its own day.
6. Plug It In and Start Pumping
Once the hose is secure, the outlet path is clear, and the pump is sitting correctly, plug the unit into the GFCI outlet. If it is a manual or non-automatic pump, it should begin operating once powered. If it has a float or electronic sensor, it may not start until the water reaches its activation level.
Watch the first minute or two carefully. Confirm that water is flowing from the discharge end, the hose is not whipping around, and the pump is not vibrating its way into a worse position. If nothing happens, unplug the pump before troubleshooting.
7. Monitor the Pump While It Runs
Do not plug it in and leave for lunch as if it is emotionally self-sufficient.
Keep an eye on water level, hose position, and pump performance. If the flow slows down, check for clogs, kinks, or a blocked intake screen. If the pump cycles on and off too quickly, debris may be interfering with the float or sensor. If the motor sounds strained, the lift may be too high, the hose may be blocked, or the pump may be trying to do a job it was never designed to do.
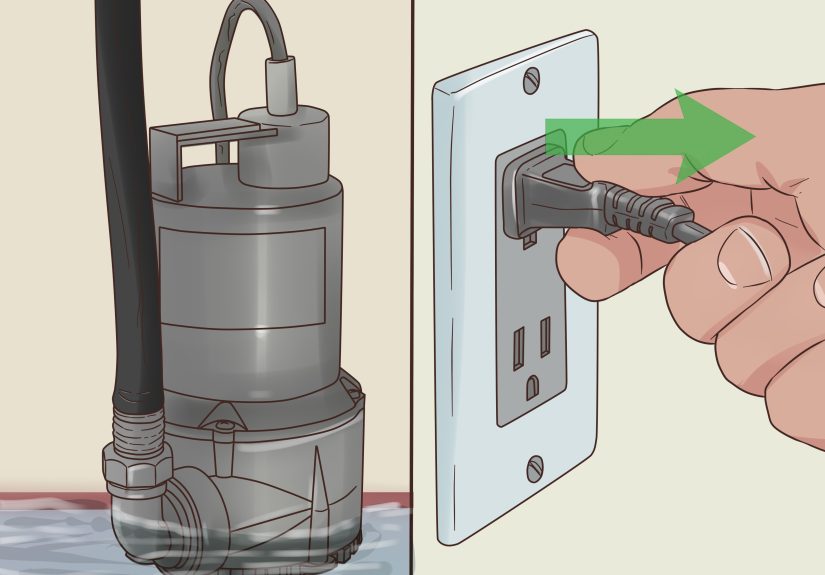
8. Shut It Down the Right Way
When the water level drops to the pump’s minimum operating level, unplug the unit if it is manual. With an automatic model, allow it to shut off on its own if that is how it is designed. Then disconnect the power before handling the pump, removing the hose, or cleaning the intake.
Drain the remaining water from the hose and let the pump dry before storage. If freezing temperatures are possible, do not leave trapped water inside the unit or discharge line.
How to Use a Submersible Sump Pump in a Permanent Setup
If you are working with a basement sump basin rather than a portable cleanup pump, the process is a little different. A permanent sump pump should sit on a solid base in the basin, with enough clearance for the float to move freely. The discharge line should include a check valve, and in many setups, a union or similar connection makes future removal much easier.
Once installed, test the system by pouring several gallons of water into the basin. The float should rise, the pump should switch on, and the basin should empty. Then verify that the water is discharging outside and away from the house. If the float sticks, the check valve is backward, or the discharge line is blocked, the system will not protect your basement when it actually matters.
Common Mistakes to Avoid
- Using the wrong type of pump for the liquid
- Plugging into a non-GFCI outlet in wet conditions
- Lifting or suspending the pump by the power cord
- Setting the pump directly on mud or loose debris
- Running the pump dry
- Using a kinked, undersized, or overly long hose
- Forgetting a check valve on a sump system
- Discharging water too close to the foundation
- Ignoring a stuck float or clogged inlet screen
Maintenance Tips for Better Performance
A submersible pump does not need constant pampering, but it does need basic maintenance. Clean debris from the intake screen, basin, or strainer regularly. Inspect the hose or discharge pipe for blockages. On sump systems, make sure the check valve flap moves freely and points in the correct flow direction.
Test the pump a few times a year, especially before heavy rain season. Pour water into the basin or test the unit in a bucket if your model allows it. Listen for odd noises, check that the pump starts and stops normally, and confirm the outlet path is clear. If your system has a battery backup, test that too. A backup pump that has not been checked in two years is more of a motivational poster than an emergency plan.
When to Call a Professional
Call a professional if you are installing a brand-new sump basin, working with deep-well or sewage systems, dealing with electrical issues, or seeing repeated pump failures. You should also bring in help if the pump is undersized for the job, the drainage path is unclear, or water keeps returning even when the pump appears to work correctly.
A pump can move water, but it cannot fix grading problems, major foundation leaks, or a drainage design that sends the water right back where it came from.
Real-World Experiences Using a Submersible Pump
The first time many homeowners use a submersible pump, it is not during a calm, educational Saturday. It is during a thunderstorm, at 2 a.m., while wearing one sock and making eye contact with an inch of water spreading across the basement floor. That kind of introduction tends to burn the lesson into memory fast.
One common experience is underestimating how much hose routing matters. A lot of people assume that if the pump turns on, the job is basically done. Then they discover the hose is kinked behind a storage bin, or the discharge end is too close to the house, and the water slowly works its way right back inside. After that, they never forget to walk the entire hose path before plugging in the pump again.
Another frequent lesson comes from debris. On paper, “place the pump on a solid base” sounds overly cautious. In real life, setting the pump directly on a muddy floor usually means the intake screen clogs with silt, leaves, grit, or mystery basement sludge. Suddenly the flow drops, the motor sounds unhappy, and the cleanup job gets longer instead of shorter. Homeowners who have dealt with that once usually become very loyal to bricks, pavers, and flat stable surfaces.
People also learn quickly that automatic features are helpful, but they are not magic. A float switch can stick. A sensor can get dirty. A check valve can clog. A GFCI can trip. The pump may be “installed,” but that does not mean it is ready for an emergency. The smart experience many homeowners eventually adopt is a quick seasonal test: pour in water, verify startup, confirm discharge, and reset anything that needs attention. It takes a few minutes and can save thousands of dollars.
There is also the emotional side of using a submersible pump, which nobody talks about enough. When water shows up where it absolutely should not be, a pump gives you control back. It is not glamorous. It will never be the most exciting purchase in your home improvement life. No one posts a dramatic unboxing video called “My New Utility Pump Changed Me.” But when the water starts dropping and the floor begins to reappear, it feels heroic anyway.
Experienced users also get better at matching the pump to the job. For a little puddled water after a storm, a compact utility pump might be perfect. For recurring groundwater in a basement, a permanent submersible sump pump with a backup system is usually the better long-term answer. That distinction matters because many frustrations come from expecting one type of pump to solve every water problem in the zip code.
Perhaps the most useful real-world takeaway is this: a submersible pump works best when you treat it like equipment, not magic. Read the manual. Test it before you need it. Keep the hose path clear. Use a GFCI outlet. Never yank it around by the cord. Clean it after dirty jobs. The homeowners who do those small things are usually the ones telling everyone else, with the relaxed confidence of people who already survived one basement flood, “It’s fine. Go get the pump.”
Conclusion
Learning how to use a submersible pump is mostly about respecting the basics. Put the pump in the lowest spot, keep it on a stable surface, attach the right hose, route water away from the house, use GFCI protection, avoid dry runs, and test the unit before you trust it with a real emergency. Do those things, and a submersible pump becomes one of the most useful problem-solvers a homeowner can keep around.
In other words, when unwanted water shows up, you do not need panic. You need the right pump, a little planning, and a hose that is not tied in a knot like a garden-themed pretzel.


