Table of Contents >> Show >> Hide
- What Is Microsoft Teams Planner?
- Why Use Planner Inside Microsoft Teams?
- How to Add Planner in Microsoft Teams
- How to Create a Plan in Teams
- How to Organize Tasks in Planner
- Understanding the Main Planner Views
- How to Use My Tasks and Assigned Work
- Best Practices for Using Microsoft Teams Planner Well
- Example: Using Planner for a Marketing Team in Teams
- Common Mistakes to Avoid
- Final Thoughts
- Experience and Practical Insights From Real-World Use
If your team has ever managed work through a heroic combination of chat messages, sticky notes, memory, and blind optimism, Microsoft Teams Planner may feel like the office equivalent of finally buying matching food containers. Suddenly, everything has a place. Tasks stop hiding in chat threads. Deadlines stop “surprising” people. And project status stops being interpreted through mysterious emoji reactions.
Microsoft Planner inside Teams is designed to bring task management into the same space where people already talk, meet, and collaborate. Instead of bouncing between apps all day like a caffeinated squirrel, you can create plans, assign tasks, track progress, and organize teamwork right inside Microsoft Teams. It is especially helpful for departments that live in Microsoft 365 and want lightweight project management without rolling out a huge enterprise system for every tiny project.
In this guide, you’ll learn how to use the Microsoft Teams Planner step by step, what the main views do, how to organize work efficiently, and how to avoid turning your beautiful plan into a digital junk drawer.
What Is Microsoft Teams Planner?
Planner in Teams is Microsoft’s work management experience that connects team tasks, personal tasks, and shared plans in one place. Think of it as a task hub that helps you manage everything from a small marketing campaign to onboarding checklists, content calendars, internal approvals, weekly operations, and more.
Inside Teams, Planner lets you:
- Create a shared plan for a team or channel
- Break work into tasks and subtasks
- Assign owners and due dates
- Organize tasks into buckets
- Track work in Board, Grid, Schedule, and Charts views
- See your own tasks across multiple plans
- Collaborate without leaving Teams
That last point matters more than people admit. A planner tool only works when people actually use it. If the task board lives inside the app your team already opens all day, adoption becomes much easier.
Why Use Planner Inside Microsoft Teams?
Using Planner in Teams is less about fancy software and more about removing friction. When a task system is separated from everyday communication, work gets duplicated, forgotten, or trapped in someone’s inbox like a fossil from three Tuesdays ago.
1. It keeps conversations and action items together
You can discuss work in Teams and then turn that work into trackable tasks. That means fewer “Wait, who was doing that again?” moments.
2. It improves visibility
Everyone can see what is not started, in progress, blocked, or completed. No detective work required.
3. It supports both personal and team planning
You can manage your own assigned work while also seeing the broader team plan. This helps individual accountability and team coordination at the same time.
4. It works well for lightweight project management
Not every project needs a full-blown PMO setup, five layers of approval, and a timeline that looks like it belongs in a NASA control room. Planner is great for everyday operational work and collaborative team projects.
How to Add Planner in Microsoft Teams
Getting started is straightforward.
Open the Planner app
In Microsoft Teams, look for Apps or View more apps in the left-hand navigation. Search for Planner and add it. If your organization allows pinning apps, pin Planner so it stays easy to access. This saves you from playing “Where did that app go?” every Monday morning.
Open Planner in a separate window if needed
If you like multitasking, you can open Planner in its own window. This is useful when you want a task board visible during meetings or while reviewing chat discussions.
Use My Plans and My Tasks
Once inside Planner, you’ll usually see a central area where you can access your plans and your tasks. This is where Microsoft’s newer Planner experience becomes especially useful: it brings together plans created across different Microsoft 365 workflows into a more unified work hub.
How to Create a Plan in Teams
A plan is the container for your project or workflow. You might create a plan for content production, hiring, client onboarding, event planning, weekly operations, or product launch tasks.
Choose where the plan should live
Before creating a plan, think about context. Ask yourself: should this plan belong to a whole team, a specific channel, or just me?
- Team plan: Best for shared work across a department or project group
- Channel tab plan: Best when work belongs to a specific channel topic
- Personal planning: Best for individual task management
Name the plan clearly
Use a plan name people can understand instantly. “Marketing Launch Q3” is good. “Stuff to do” is less inspiring and only slightly more useful than yelling into the void.
Start with a structure
Once the plan is created, don’t immediately dump 74 tasks into one giant pile. Build a structure first. That usually means creating buckets, deciding naming conventions, and setting a simple workflow.
How to Organize Tasks in Planner
This is where the magic happens. Or at least where the chaos becomes color-coded.
Use buckets to group work
Buckets are categories inside a plan. You can organize them by:
- Project phase: Planning, Production, Review, Launch
- Team function: Design, Content, QA, Ops
- Status: Not Started, In Progress, Waiting, Done
- Priority or workstream
For example, a content team could build buckets named Ideas, Drafting, Editing, Scheduled, and Published. One glance at the board then tells the whole story.
Create clear tasks
Every task should answer three basic questions:
- What needs to be done?
- Who owns it?
- When is it due?
Good task title: Finalize webinar landing page copy
Bad task title: Website thing
Add task details
Open a task card and add useful details such as:
- Description
- Checklist items
- Due date
- Priority
- Labels
- Attachments
- Comments
Checklists are especially handy because they turn one broad task into manageable steps. Instead of “Prepare monthly report,” you can break it into “pull data,” “review errors,” “draft summary,” and “send for approval.”
Assign ownership
Shared responsibility often becomes unclaimed responsibility. Assign tasks to real people. Planner works best when each task has a clear owner, even if others collaborate on it.
Understanding the Main Planner Views
One of the most useful things about Microsoft Teams Planner is that it gives you different ways to see the same work. Different brains like different layouts. Some people love visual boards. Others want dates, charts, or lists. Planner says, “Why not all of the above?”
Board view
Board view is the classic visual layout. Tasks appear as cards arranged in columns, usually by bucket. It is perfect for moving work through stages and spotting bottlenecks quickly.
Grid view
Grid view is better when you want a more structured overview of tasks, owners, dates, and details. If Board view feels like sticky notes on a wall, Grid view feels like a neat spreadsheet that finally got its life together.
Schedule view
Schedule view helps you see tasks on a calendar. This is useful for editorial planning, deadlines, events, recurring cycles, or any workflow where timing matters as much as task ownership.
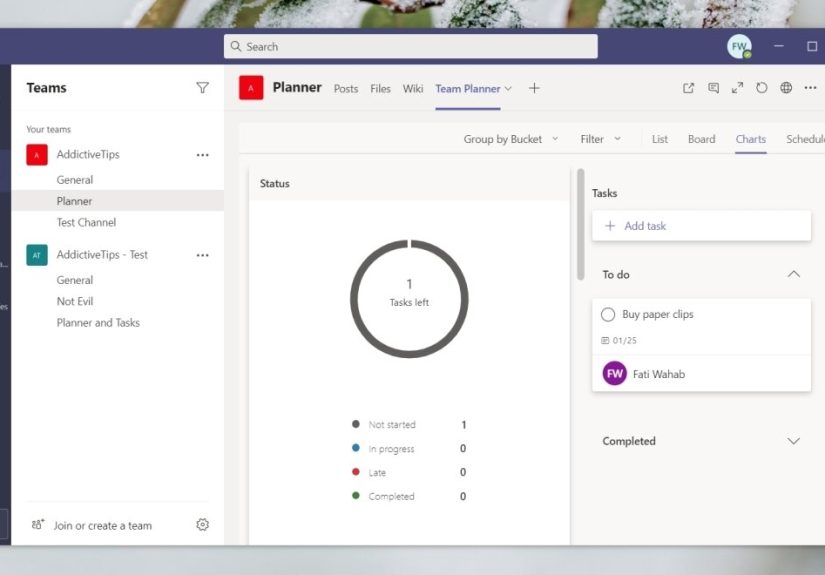
Charts view
Charts give you a quick visual snapshot of status, progress, and workload. Managers love this because it helps them see whether the team is cruising, overloaded, or quietly on fire.
Premium planning features
Some organizations also use premium Planner capabilities for more advanced project management. These features can include expanded planning views and more sophisticated ways to manage larger projects. If your Teams environment includes them, they can be useful for timelines, dependencies, and broader resource planning. For many teams, though, the standard Planner views are already enough to create order out of daily work.
How to Use My Tasks and Assigned Work
One common problem with team planning tools is that people can see the whole project, but they still can’t tell what they need to do today. Planner helps solve that by surfacing assigned tasks in personal views.
Use your personal task area to review what’s assigned to you across plans. This is helpful when you work on multiple teams and would prefer not to maintain six separate mental filing cabinets before lunch.
A practical daily routine looks like this:
- Open Planner in Teams each morning
- Review tasks assigned to you
- Sort by due date or urgency
- Update progress as you work
- Flag blockers in task comments or Teams chat
This turns Planner from a passive storage area into an actual workflow system.
Best Practices for Using Microsoft Teams Planner Well
Keep task titles action-based
Start task titles with verbs whenever possible: draft, review, approve, update, schedule, publish, fix, test. This makes work more concrete and easier to scan.
Do not overstuff tasks
If a task has 22 checklist items, four owners, and three due dates in spirit if not in software, it may actually be a mini-project and should probably be split.
Use labels consistently
Labels are useful only if your team agrees on what they mean. For example, use one label for high priority, one for blocked, one for client-facing, and one for review required. If labels mean random things to random people, they become decorative confetti.
Review the plan weekly
Set a recurring weekly habit to clean up completed work, reassign stale tasks, update dates, and archive what no longer matters. A plan that never gets reviewed slowly turns into digital attic storage.
Build simple workflows first
Do not start by designing the world’s most elaborate bucket taxonomy. Begin with a few buckets, a few labels, and a few clear conventions. You can always refine later.
Example: Using Planner for a Marketing Team in Teams
Imagine a marketing team launching a new product webinar.
Plan name
Spring Webinar Launch
Buckets
- Planning
- Content
- Design
- Promotion
- Post-Event Follow-Up
Sample tasks
- Define webinar topic and speaker
- Draft landing page copy
- Design registration graphic
- Schedule email campaign
- Prepare reminder email
- Upload recording after event
- Send thank-you message and survey
Each task gets an owner, due date, and checklist. During the weekly meeting, the team opens Planner in Teams, checks Board view for movement, checks Schedule view for deadlines, and uses Charts to see what is behind. That is a much healthier process than relying on twelve chat messages and one person’s heroic memory.
Common Mistakes to Avoid
Using Planner like a dumping ground
If every random thought becomes a shared task, your plan becomes noisy fast. Capture real work, not every passing brainstorm.
Forgetting to update progress
A task tool is only as accurate as the team’s habits. If nobody updates status, the board becomes fiction with due dates.
Creating too many plans
Sometimes teams create a new plan for every sneeze, and suddenly nobody knows where anything lives. Fewer, clearer plans are usually better.
Ignoring naming conventions
Consistent naming keeps everything findable. This matters even more when multiple teams use Planner inside the same Microsoft 365 environment.
Final Thoughts
Microsoft Teams Planner is most powerful when you treat it as a shared operating system for work, not just a fancy checklist. It helps teams move from vague intentions to visible action. It gives structure to collaboration, makes deadlines easier to see, and reduces the number of tasks lost in the wilderness of chat history.
You do not need to build the perfect system on day one. Start with one clear plan, a few useful buckets, and a handful of well-written tasks. Train your team to review it regularly. Update task ownership. Use the different views based on what you need to see. Over time, Planner becomes less of a tool you “have to use” and more of the place where work actually gets organized.
And that, frankly, is much nicer than asking in chat for the fifth time, “Hey, who was supposed to do that?”
Experience and Practical Insights From Real-World Use
In real workplace settings, the biggest surprise about Microsoft Teams Planner is not the features. It is the behavior change. Teams often think the hard part is learning the buttons, but the hard part is agreeing on a shared way to work. Once a team decides how it will name plans, define buckets, assign owners, and update statuses, Planner becomes dramatically more useful. Without those agreements, even a good tool can feel messy.
One pattern that shows up again and again is that smaller teams usually adopt Planner faster than larger ones. A team of five can create a plan on Monday and be using it naturally by Friday. A larger department may need a bit more governance, especially if several managers want different structures. In those cases, it helps to create a simple standard. For example, every plan might use the same label colors for urgency, every task title might start with an action verb, and every weekly meeting might include a five-minute Planner review. Tiny rules create big clarity.
Another practical lesson is that Planner works best when it reflects how work actually happens, not how people imagine work should happen in a perfect world. If your content team moves work through pitching, drafting, editing, approval, and publishing, build buckets that match that reality. If your operations team thinks in terms of requests, in progress items, blocked items, and completed items, organize the board that way. Teams become frustrated when the system feels forced. They stick with it when it mirrors their day-to-day workflow.
There is also a human side to using Planner in Teams. People are more likely to update tasks when Planner becomes part of an existing rhythm. For example, many teams open the board during stand-ups, weekly check-ins, or planning meetings. That creates accountability without making task updates feel like extra admin work. Instead of asking everyone to remember another platform later, you make Planner visible during the conversation itself. That is usually when adoption improves.
Many users also discover that less is more. Early enthusiasm can lead to overbuilding: too many labels, too many plans, too many rules, too many task fields. Then the board starts to feel like a tax form with feelings. The teams that succeed long term usually simplify. They focus on a few essential details: owner, due date, status, and next step. They only add more complexity when the work truly needs it.
Finally, one of the most valuable experiences teams report is the drop in repeated status questions. Once Planner is maintained properly, managers stop chasing updates so often, contributors stop hunting through chat for action items, and meetings become more useful because everyone can see the same board. It does not remove the need for communication, but it makes communication smarter. Instead of asking what exists, teams can talk about what matters next. That is when Microsoft Teams Planner stops being just another app and starts becoming part of a healthier workflow.


