Table of Contents >> Show >> Hide
- Before You Wrap: 60 Seconds of Prep That Saves Your Sanity
- Method 1: The Candy-Wrapper Twist (Fastest, Cutest, Most Forgiving)
- Method 2: The Pleated “Fan Finish” (Best for Candles, Jars, and Short Cylinders)
- Method 3: The Bottle “Sleeve” Wrap (Clean and Classic for Wine, Oil, Syrup, Anything with a Neck)
- Method 4: Fabric Wrap (Furoshiki or Tea Towel Style) for a Zero-Waste, High-Impact Look
- Method 5: The “Box or Tube” Strategy (When You Want Maximum Neatness with Minimum Wrangling)
- Pro-Level Details That Make Cylindrical Gifts Look Expensive
- Common Cylinder-Wrapping Problems (and the Fixes)
- Quick Safety + Shipping Notes (Because Broken Gifts Are a Bummer)
- Wrap-Up: Pick the Method That Matches the Cylinder
- Experience Corner: What Wrapping Cylinders Feels Like in Real Life (500-ish Words)
Cylindrical gifts are the rebels of the present world. They roll away. They squirm under paper. They laugh at your perfectly
creased corners. And yet… they’re also some of the most common gifts you’ll ever give: a wine bottle, a candle, a travel
tumbler, a fancy olive oil, a flashlight, a poster tube, a rolling pin, a skincare set that insists on being shaped like a
mini fire extinguisher.
The good news: wrapping a cylinder doesn’t require an engineering degree or a hot glue gun that smells like regret.
You just need the right technique for the type of cylinder you’re dealing with. In this guide, you’ll get five genuinely easy
ways to wrap cylindrical giftsplus pro tips to make it look expensive (even if your wrapping paper came from a clearance bin
that has seen things).
Before You Wrap: 60 Seconds of Prep That Saves Your Sanity
1) Keep it from rolling like it’s auditioning for an action movie
Set the gift on a towel, a silicone baking mat, or even a folded T-shirt while you work. Anything that adds friction will stop
the “whoops, there it goes” routine.
2) Measure like a minimalist, not like you’re building a rocket
The simplest trick: wrap a string (or ribbon) around the widest part of the item once. Add about an inch for overlap. That’s
your paper width. For height, add 2–4 inches extra depending on which method you’re using (twists need more; pleats need a little).
3) Use the right tape for the job
If you want a clean look, use double-sided tape for the seam and regular clear tape where nobody will see it (like under a
ribbon). Your future self will thank you when the package doesn’t pop open in the car like a dramatic plot twist.
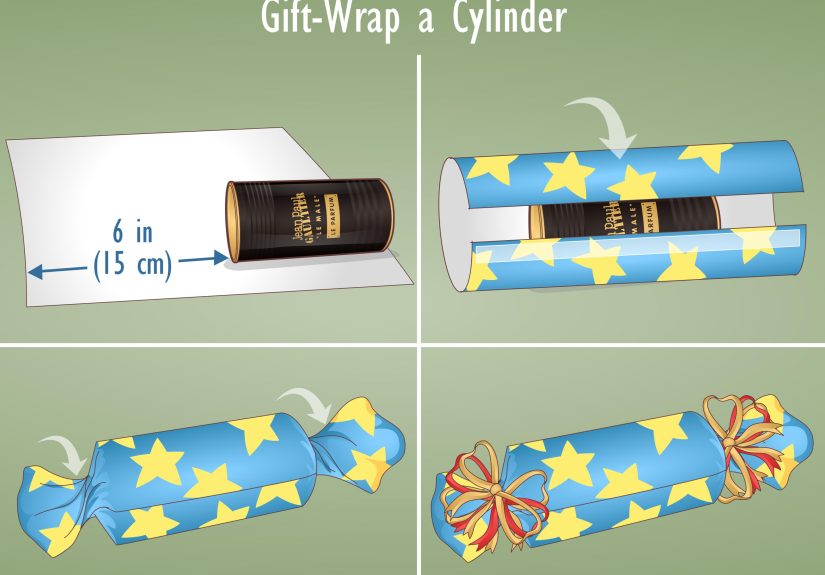
Method 1: The Candy-Wrapper Twist (Fastest, Cutest, Most Forgiving)
This is the “I need it wrapped in two minutes” method. It’s perfect for long, skinny cylinders: travel-size toiletries,
mini body spray, slim candles, a rolled-up pair of socks (yes, socks can be a cylinder if you believe in yourself).
What you need
- Wrapping paper (thin-to-medium weight is easiest to twist)
- Tape
- Ribbon or twine (two pieces)
- Optional: tissue paper or cellophane for extra flair
Steps
- Center the cylinder horizontally on the paper.
- Roll the paper around it and tape the seam so it’s snug.
- Leave extra paper on both ends (usually 3–5 inches per end).
- Twist each end like a candy wrapper.
- Tie each twisted end with ribbon/twine to lock it in place.
Make it look boutique-level
Slide a little tissue paper out of each twisted end so it looks like a fancy “candy” with decorative ends. Or tuck in a gift
tag under one of the ribbons so it looks intentional (instead of “I forgot the tag until the last second,” which… no comment).
Method 2: The Pleated “Fan Finish” (Best for Candles, Jars, and Short Cylinders)
If you’ve ever seen a cylinder wrapped with neat, fancy pleats on the top and bottom, this is that technique. It’s the method
that makes a candle look like it arrived from a gift shop where everything costs $14 more than it should.
What you need
- Wrapping paper (medium weight works best)
- Double-sided tape (recommended for the seam)
- Scissors
- Optional: a bone folder or the edge of a ruler to crease
Steps
- Wrap the paper around the cylinder and tape the seam.
- At one end, press the paper inward gently to create a flat “rim” around the circular edge.
- Make small pleats by folding the paper in little sections (like you’re making a paper fan), working your way around the circle.
- Secure the pleats with small pieces of tape as you go.
- Finish by pressing the pleats down neatly and adding a sticker, ribbon, or tag if you want.
- Repeat on the other end.
Pro tips
- Less paper = cleaner pleats. Too much overhang turns into bulky chaos.
- Work in small folds. Smaller pleats look smoother and more “pro.”
- Use a topper strategically. A ribbon around the middle distracts the eye in the nicest possible way.
Method 3: The Bottle “Sleeve” Wrap (Clean and Classic for Wine, Oil, Syrup, Anything with a Neck)
Bottles are cylinders with a personality. The neck gives you a built-in spot for ribbon, a tag, greenery, or a tiny ornament.
This method creates a neat sleeve around the main body of the bottle, with tidy edges and a “host gift” vibe.
What you need
- Wrapping paper or kraft paper
- Double-sided tape (for a clean seam)
- Ribbon or twine
- Gift tag
Steps
- Cut a rectangle of paper wide enough to wrap around the bottle with about 1 inch of overlap.
- Make the paper tall enough to cover the bottle’s main body, plus a little extra to fold for a straight top and bottom edge.
- Fold the top and bottom edges inward about 1–2 inches to create clean straight lines.
- Wrap the paper around the bottle and secure the seam with double-sided tape.
- Tie ribbon around the neck and add a tag.
Easy upgrades
- Add a sprig of rosemary or evergreen under the ribbon for a “fancy without trying too hard” look.
- Use a patterned paper sleeve with a solid ribbon (or vice versa) to keep it visually balanced.
- Write a tiny note on the tag: “Pairs well with your couch + a good movie.” Instant charm.
Method 4: Fabric Wrap (Furoshiki or Tea Towel Style) for a Zero-Waste, High-Impact Look
If you want your gift wrapping to say, “I’m thoughtful,” “I’m stylish,” and “I didn’t create a trash mountain,” fabric wrapping
is your move. A square scarf, bandana, or tea towel can wrap cylinders beautifullyespecially bottles and tumblers.
Option A: Classic furoshiki-style wrap (great for bottles)
- Lay the fabric flat like a diamond (one corner pointing toward you).
- Place the bottle diagonally across the center.
- Roll the bottle so the fabric wraps around it.
- Tie the two top corners into a secure knot (double knot if it’s a heavy bottle).
- Adjust and “fluff” the knot so it looks intentional (like a bow’s cooler cousin).
Option B: Tea towel bottle wrap (beginner-friendly and adorable)
- Drape the towel over the bottle so it’s centered.
- Fold the bottom corners up against the bottle’s base to create a tidy bottom.
- Fold the sides in snugly like you’re wrapping a burrito you actually respect.
- Gather the fabric at the neck and tie with ribbon.
Why fabric works so well for cylinders
- No creasing drama. Fabric forgives lumps and bumps.
- Built-in topper. The knot is the decoration.
- It becomes part of the gift. A tea towel, scarf, or bandana is instantly useful.
Method 5: The “Box or Tube” Strategy (When You Want Maximum Neatness with Minimum Wrangling)
Sometimes the easiest way to wrap a cylinder is… to stop treating it like a cylinder. If you can place it in a gift box,
bottle box, or sturdy tube, you turn an awkward shape into a clean rectangle (or at least a stable package that won’t roll
off the table like it’s escaping).
Best times to use this method
- Posters, blueprints, art prints: put them in a mailing tube or triangular tube.
- Glass bottles: a bottle box adds protection and makes it look premium.
- Heavy candles in glass: a tall box plus filler keeps it from rattling (and cracking).
- Anything you’re shipping: a real tube/box beats decorative wrapping paper for durability.
How to make it look like you planned it
- Add tissue paper or crinkle paper inside the box/tube to prevent movement.
- Wrap the outside in paper, or keep it plain and decorate with ribbon, labels, or a tag.
- For tubes: add a wide ribbon around the middle and a gift tag on top, so it reads “gift,” not “office supplies.”
Pro-Level Details That Make Cylindrical Gifts Look Expensive
Hide the seam like a magician
Place the seam on the underside (or the back of a bottle). If you’re using ribbon, align the seam under the ribbon line so
the eye never lands on it.
Use tension: snug, not strangled
Pull the paper taut enough to look smooth, but not so tight that it tears when you twist or pleat. Think “tailored jacket,”
not “shrink wrap.”
Let one accessory do the talking
Cylinders look best when you keep decorations simple: one great ribbon, one good tag, one small sprig. Too many add-ons turn
the gift into a craft project that’s begging for an explanation.
Common Cylinder-Wrapping Problems (and the Fixes)
“My paper keeps bunching at the ends.”
You’re using too much extra paper. Trim the overhang down and try pleats (Method 2) instead of smashing it flat.
“It looks lumpy and uneven.”
Use sturdier paper or switch to fabric. Also: tape the seam first, then smooth with your palms from the center outward.
“The gift rolls away while I’m wrapping.”
Put it on a towel, or wedge it between two objects (like a book and a cutting board). Cylinders need a babysitter.
Quick Safety + Shipping Notes (Because Broken Gifts Are a Bummer)
If you’re mailing a cylindrical gift (posters, bottles, rolled items), decorative wrapping paper alone isn’t enough. Use a
sturdy tube/box, add cushioning, and seal it with proper packing tape. If you still want it to look pretty, wrap the outside
of the shipping tube afterwardor add a ribbon and tag once it’s safely packed.
Wrap-Up: Pick the Method That Matches the Cylinder
If you remember one thing, make it this: cylinders aren’t hard to wrapyou just need to stop forcing box techniques onto
round shapes. Use the candy twist for speed, pleats for elegance, a sleeve for bottles, fabric for zero-waste flair, and a
box/tube when you want the cleanest finish. Your gifts will look polished, thoughtful, and (most importantly) not like they
fought you in a parking lot.
Experience Corner: What Wrapping Cylinders Feels Like in Real Life (500-ish Words)
Let’s talk about the part nobody mentions: wrapping cylindrical gifts is rarely done in a calm, quiet room with jazz playing
and a perfectly sharpened pair of scissors. It’s usually done on a kitchen counter that is 40% crumbs, 30% mail, and 30%
“why is this screwdriver here?”
The first “experience” most people have is the Roll of Destiny. You set the bottle down for half a second to grab tape,
and the bottle gently rolls away like it’s headed toward a better life. You catch it with a reflex you didn’t know you had.
This is why the towel trick feels like magicsuddenly the gift stays put, and you’re not doing gift-wrapping parkour.
Then comes the moment of truth: choosing a technique. Many of us start with the classic “I’ll just wrap it like a box”
strategy. The paper bunches. The ends become a wrinkled flower of confusion. You add more tape. Now it looks like a laminated
art project. That’s when you learn the most important cylinder lesson: the ends need their own plan.
Twists (Method 1) or pleats (Method 2) aren’t “extra.” They’re the entire point.
A common win story is discovering the bottle sleeve method right before a party. You cut a neat rectangle, fold the top and
bottom for clean edges, tape the seam, and tie ribbon around the neck. Suddenly the bottle looks like a hostess gift from a
chic little shopno gift bag required, no awkward tissue paper volcano. Bonus: it’s easy to hold, and it won’t rip open when
someone carries it by the top like a chaotic angel.
Fabric wrapping has its own legendary moment: the “I’m out of wrapping paper” emergency. A tea towel or scarf steps in, you
tie a knot at the top, and the gift looks intentionallike you planned a whole eco-friendly aesthetic. People tend to react
to fabric wrapping with the same energy they reserve for seeing a perfectly plated dessert: “Wait… how did you do that?”
You smile politely and pretend you didn’t learn it during a mild panic.
And finally, there’s the poster tube experience. You’re gifting a rolled print or a set of blueprints, and you realize two
things: (1) it’s basically impossible to wrap neatly without structure, and (2) a sturdy tube instantly makes you look
competent. Add a ribbon around the middle and a tag on top, and it stops looking like office supplies and starts looking
like a deliberate, polished gift. This is the “box or tube strategy” doing its best work.
The biggest takeaway from all these real-life wrapping moments is simple: cylindrical gifts reward the right shortcut.
When you match the method to the shape, the wrapping stops being a wrestling match and starts being… kind of fun. Or at least
“fun-adjacent,” which is an achievement in gift wrapping.