Table of Contents >> Show >> Hide
- Start Here: What Exactly Makes a Kitchen Feel “Dated”?
- The 80/20 Plan: Big Results Without Big Demolition
- Step 1: CabinetsBecause They Take Up Like 90% of the Visual Space
- Step 2: LightingThe Fastest Way to Make Everything Look New
- Step 3: BacksplashYour Kitchen’s Statement Necklace
- Step 4: CountertopsWhen Replacement Isn’t in the Cards (Yet)
- Step 5: Faucet + SinkSmall Swap, Daily Happiness
- Step 6: Floors and WallsThe “Frame” Around Your New Look
- Step 7: Organization Upgrades That Feel Like Remodeling
- Step 8: The Unsexy (But Important) Stuff: Safety and Smart Planning
- A “Slow Reno” Timeline: Upgrade Your Kitchen in Weekends
- Conclusion: You Don’t Need a Brand-New KitchenYou Need a Better Version of Yours
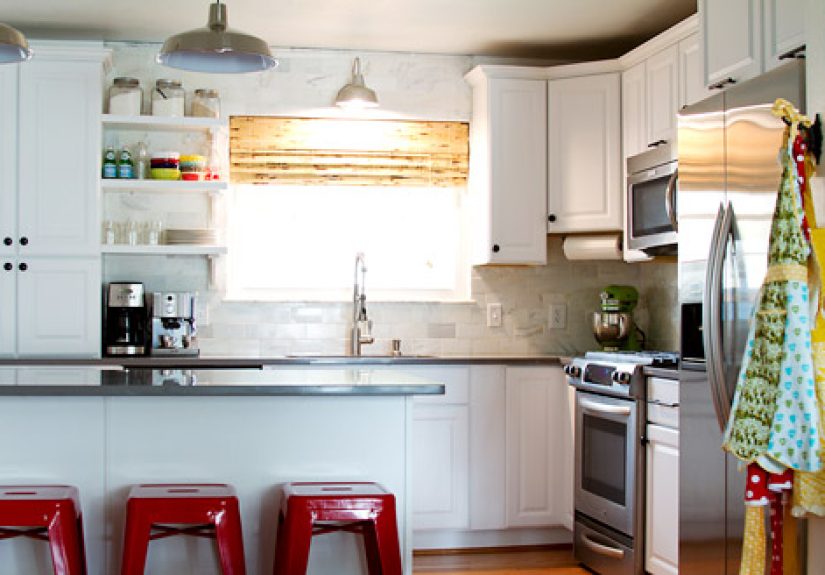
A dated kitchen is rarely “one big problem.” It’s usually a group project: orange-y cabinets, tired hardware, a light fixture that looks like it came free with a 2003 cellphone plan, and a backsplash that’s doing its best… but it’s clearly exhausted.
The good news: you don’t need a full gut remodel to make your kitchen feel current. If the layout works and the cabinets are structurally solid, you can get a dramatic transformation with DIY-friendly upgrades that focus on what your eyes notice first: cabinets, lighting, and surfaces.
This guide walks you through practical, high-impact steps, in a smart order, with real examples and “please don’t learn this the hard way” tips. You’ll end up with a kitchen that feels brighter, cleaner, and more intentionalwithout taking out a second mortgage or living off microwave noodles for six months.
Start Here: What Exactly Makes a Kitchen Feel “Dated”?
Before you buy anything, do a two-minute kitchen audit. Stand at your doorway (the spot guests see first) and note what jumps out:
- Color and finish clashes (honey oak + yellow walls + beige counters = “vintage,” but not in the fun way)
- Low, shadowy lighting (dark corners make everything look oldereven brand-new appliances)
- Busy or worn surfaces (speckled laminate, chipped tile edges, stained grout)
- Mismatchy metals (brassy knobs + chrome faucet + black light fixture: a band with no rehearsal)
- Clutter visibility (zero storage systems = everything lives on the counter like it pays rent)
Your mission is to reduce visual noise and boost brightness. That’s the entire glow-up, in one sentence.
The 80/20 Plan: Big Results Without Big Demolition
If you only do a few things, do the ones that change the room’s “face”:
- Refresh cabinets (paint, new hardware, or added trim)
- Upgrade lighting (overhead + under-cabinet = instant modern)
- Update backsplash (even a small area can change the vibe)
- Swap the faucet (you touch it every day; make it nice)
- Improve organization (a tidy counter reads as “renovated”)
Think of it as styling a room: you’re not rebuilding the houseyou’re removing the “before photo” energy.
Step 1: CabinetsBecause They Take Up Like 90% of the Visual Space
1) Deep clean first (seriouslypaint hates grease)
Kitchen cabinets collect a fine mist of oil, dust, and regret. If you paint over that, the finish may peel like a bad sunburn. Use a degreaser, rinse well, and let everything dry fully.
2) Decide: paint, stain, or “dress them up”
Painting cabinets is the biggest DIY makeover for the money. It’s also the one where prep matters more than your “painting skills.” The goal is a smooth, durable finish that can survive sticky fingers, steam, and the occasional cabinet door slam when you’re late.
When paint is a great idea: cabinets are solid wood or MDF doors in decent shape, but the color screams “I was trendy during flip phones.”
When paint is a bad idea: doors are peeling thermofoil or severely damaged. In that case, consider new doors (keeping cabinet boxes) or a simpler refresh like hardware + lighting + backsplash first.
“Shortcut” cabinet upgrades (no full repaint):
- Replace knobs/pulls with a consistent style and finish
- Add soft-close hinges (your kitchen instantly feels more “expensive”)
- Remove dated decorative arches or scalloped trim (hello, clean lines)
- Add simple trim to flat doors to mimic a Shaker look
- Line the inside of cabinets (especially glass fronts) for a surprise pop
3) Hardware: tiny change, huge payoff
Hardware is jewelry for your cabinets. If your kitchen currently has tiny brass knobs that look like they came from a pirate ship’s gift shop, swapping them is an immediate upgrade.
Pro move: if you’re changing hole spacing (like switching from knobs to pulls), use a drilling template and measure twice. “Just eyeballing it” is how you end up with a drawer pull that leans slightly left for the rest of your natural life.
Step 2: LightingThe Fastest Way to Make Everything Look New
Lighting is the most underrated DIY kitchen update because it changes how everything looks: cabinets, counters, paint color, even how clean your sink appears. (It also helps you actually see what you’re chopping. Minor detail.)
1) Replace the main fixture
One modern fixture can pull your whole kitchen into the current decade. Look for simple pendants, a clean-lined semi-flush mount, or a slim LED fixture that sits close to the ceiling.
2) Add under-cabinet lighting
Under-cabinet lighting is a kitchen cheat code: it adds warmth, highlights the backsplash, and removes those shadowy counter caves. DIY options range from plug-in bars to LED strips. Many setups can be installed with basic tools and careful measuring.
Tip: plan where cords go (or choose hardwired if you’re comfortable and local rules allow). The goal is “glowy and seamless,” not “my cabinets are wearing headphones.”
3) Choose a bulb color temperature that doesn’t make your kitchen look sick
In plain English: not too yellow, not too blue. Many homeowners land in the “bright but not sterile” range. If possible, choose LEDs with a consistent color temperature across fixtures so your kitchen doesn’t look like three different planets.
Step 3: BacksplashYour Kitchen’s Statement Necklace
A dated backsplash can drag down an otherwise nice kitchen. But you have optionsfrom quick refreshes to full DIY tile installation.
Option A: Refresh what you have
- Deep clean + reseal to revive older tile
- Grout pen for stained grout lines
- Tile paint or epoxy if the tile is structurally okay but visually rough
This is perfect for “I want it better” without “I want to learn tile cutting this weekend.”
Option B: Peel-and-stick (yes, it can look good)
Peel-and-stick backsplash panels have come a long way. The key is installation: clean surface, careful alignment, and patience. Some DIYers even use layout tricks (like creative patterns and tidy edge finishes) to make it look more custom.
Option C: Real tile (DIY-friendly if you take your time)
If you want a permanent upgrade, a tile backsplash is one of the most satisfying DIY projectsbecause it’s visible, practical, and screams “this kitchen got upgraded.” Basic steps include:
- Plan your layout and level lines
- Prep the wall (smooth, clean, and flat matters)
- Spread thinset (or use an adhesive system appropriate for backsplash)
- Set tile with spacers
- Grout, wipe haze, and caulk edges
Design tip: keep the backsplash simple if your counters or floors are busy. If your kitchen already has a lot going on, the backsplash should not audition for the lead role.
Step 4: CountertopsWhen Replacement Isn’t in the Cards (Yet)
New countertops can be pricey, but you can still improve the look and function.
Quick wins
- Declutter the surface (a clean counter is a free upgrade)
- Replace the caulk line where counter meets backsplash (fresh caulk = surprisingly dramatic)
- Upgrade accessories like a nice cutting board, a tray for oils, or a paper towel holder that doesn’t look like it survived three moves
DIY surface refresh options
Depending on what you have now:
- Butcher block can be a warm, classic upgradeespecially for smaller kitchens where you don’t need a ton of square footage.
- Countertop refinishing kits can improve worn laminate. Results vary, so follow prep directions like your sanity depends on it.
- Peel-and-stick countertop films can be a temporary fix for rentals or “phase one” renovations.
Reality check: if your counters are actively failing (swollen seams, water damage), prioritize function. No aesthetic upgrade beats a surface that doesn’t crumble when you set down a mug.
Step 5: Faucet + SinkSmall Swap, Daily Happiness
A modern faucet can instantly update your kitchen’s style. It’s also one of the most satisfying DIY upgrades because you use it constantly.
Basic DIY approach: turn off water valves, relieve pressure, disconnect supply lines, remove the old faucet, install the new one, reconnect lines, and check for leaks. Take a photo before you start so you can put everything back the way it was (but cleaner and better).
Bonus tip: if your shutoff valves don’t fully shut off, that’s a sign to replace thembecause your faucet project should not turn into “surprise indoor water feature.”
Step 6: Floors and WallsThe “Frame” Around Your New Look
Cabinets and lighting do most of the heavy lifting, but floors and paint pull everything together.
Wall paint
If your kitchen walls are beige-on-beige, switching to a cleaner neutral can make cabinets and counters look fresher. The trick is choosing a paint that works with your fixed elements (countertop, floor, backsplash). Paint is flexible; tile and counters are not. Let paint be the supporting actor.
Flooring
If your floor is truly dating the room, modern resilient flooring options can provide a big visual upgrade. Focus on durability, water resistance, and a style that doesn’t compete with your cabinets.
Step 7: Organization Upgrades That Feel Like Remodeling
Want your kitchen to feel “new” without changing anything structural? Make it work better.
- Pull-out shelves in lower cabinets (no more crawling inside to find the slow cooker)
- Drawer dividers for utensils and gadgets
- Lazy Susans for corner cabinets
- Trash pull-out or a simple hidden bin solution
- Pantry containers that reduce visual clutter
Function is a style upgrade. A tidy, efficient kitchen looks more moderneven if nothing “major” changed.
Step 8: The Unsexy (But Important) Stuff: Safety and Smart Planning
DIY is fun until it isn’t. A few guardrails keep your project safe and sane:
- Electrical: turn off breakers when swapping fixtures. If you’re unsure, hire a pro for wiring and do the rest yourself.
- Water: know how to shut off supply lines. Keep a small bucket and towels nearby.
- Older homes: if your home is older, use dust control and safe work practices when sanding or disturbing painted surfaces.
- Permits and codes: some electrical or plumbing changes may require permits depending on where you livecheck local requirements.
A “Slow Reno” Timeline: Upgrade Your Kitchen in Weekends
If the idea of doing everything at once makes you want to lie down dramatically on the kitchen floor, take the “slow reno” route:
- Weekend 1: declutter counters, deep clean, replace cabinet hardware
- Weekend 2: update overhead light + add under-cabinet lighting
- Weekend 3: backsplash refresh (grout pen, peel-and-stick, or tile)
- Weekend 4: replace faucet + add organizers
- Later: cabinet paint or trim upgrades when you can dedicate time to prep and curing
This approach keeps your kitchen usable and lets you build confidence project-by-project.
Conclusion: You Don’t Need a Brand-New KitchenYou Need a Better Version of Yours
Updating a dated kitchen yourself is mostly about smart sequencing and high-impact choices. Cabinets, lighting, and backsplash create the biggest visual shift. Hardware, faucets, and organization make the space feel intentional and modern. And when you tackle upgrades in a logical order, you avoid redoing work (or discovering you installed a gorgeous backsplash… behind a light fixture you now hate).
Pick one “hero project” (like painting cabinets or installing a backsplash) and pair it with one “instant win” (like hardware or lighting). You’ll get momentum, visible progress, and a kitchen that feels like it finally belongs in this decade.
Real-Life DIY Kitchen Update Experiences (Bonus +)
DIY kitchen updates come with a predictable emotional timeline, and knowing it ahead of time is basically a superpower. It often starts with wild confidence: you watch three videos, buy a cart full of supplies, and tell yourself, “By Sunday night, I’ll be cooking in a magazine spread.” Then reality arrivesusually in the form of grease you didn’t know existed, screws that refuse to budge, or a cabinet door that looks like it’s been holding onto secrets since 1997.
Cabinet painting is the classic example. Many DIYers say the painting part is oddly satisfying, but the prep is where the kitchen tests your character. Degreasing feels endless, sanding feels dusty no matter how careful you are, and somewhere around the second coat you start noticing every tiny brush mark like it’s a personal insult. The win is learning that patienceletting primer and paint cure properlymakes the difference between “wow” and “why is this peeling near the handle?” A lot of people also report a surprise discovery: once cabinets are clean and bright, the old hardware looks even more dated than before. That’s not bad newsit’s your next easy upgrade.
Hardware swaps tend to be the “thank you, past me” project. It’s quick, affordable, and wildly visible. The most common hiccup is alignmentespecially if you switch from knobs to pulls or change hole spacing. DIYers who measure carefully feel like geniuses; DIYers who eyeball it learn the humbling truth that humans are not lasers. The best advice people share is to use a simple template and work slowly. You can always drill a hole once. (You can also fill a hole, but your future self will absolutely remember the time you had to.)
Lighting upgrades are where many homeowners get their “I can’t believe this is the same kitchen” moment. Under-cabinet lighting especially tends to shock people with how much brighter and more modern everything looks. One common experience: once the counters are well lit, clutter becomes more obvious. That’s not a failureit’s the kitchen encouraging you to add organizers, trays, or a “drop zone” so the counters stay clear.
Backsplashes can be a confidence builder or a comedy show, depending on the day. Peel-and-stick feels easy until you realize walls are not always perfectly flat and corners are not always perfectly… corner-like. DIYers who get the best results usually do two things: they prep the surface thoroughly and they take layout seriously. A little planning prevents the dreaded last-row sliver tile that screams, “I ran out of patience.” For real tile, the biggest “aha” is that cutting and spacing are the time sinks. People often say grouting is the most satisfying part because it magically makes the whole thing look finished.
Across almost every DIY kitchen update story, the shared takeaway is this: small improvements stack. A weekend of hardware and lighting can make you feel like you renovated. A few weekends later, with a refreshed backsplash and better organization, the kitchen stops feeling dated and starts feeling like yourson purpose.


