Table of Contents >> Show >> Hide
- What Is Injera?
- Traditional Injera vs. Home-Friendly Injera
- Ingredients for a Reliable Injera Recipe
- How to Make Injera, Step by Step
- How to Tell If Your Injera Batter Is Right
- Common Injera Mistakes and How to Fix Them
- What to Serve With Injera
- How to Store and Reheat Injera
- Why This Injera Recipe Works for Home Cooks
- Experiences From Making Injera at Home
- Conclusion
There are breads that sit politely on the side of the plate, and then there is injera, which basically is the plate, the utensil, and half the personality of the meal. This Ethiopian sour flatbread is soft, stretchy, tangy, and full of tiny bubbles that make it perfect for scooping up stews, lentils, greens, and all the good things that deserve a proper landing pad. If you have ever eaten Ethiopian food at a restaurant and wondered how that wonderfully spongy bread manages to be both delicate and sturdy, welcome. You have found your next kitchen adventure.
The beauty of injera is that it looks dramatic but relies on a very simple foundation: flour, water, time, and heat. The traditional version is made with teff flour and fermented until the batter develops its signature sour aroma and airy texture. Some home cooks in the United States use a mix of teff and wheat flour to make the bread easier to handle and a little more predictable, especially if this is their first rodeo with fermented flatbread. That is the route this recipe takes. It keeps the spirit of classic injera while giving you a reliable home-kitchen method that does not require mystical powers, a commercial griddle, or the patience of a medieval monk.
If you can stir batter, wait for bubbles, and trust the process when things look slightly odd, you can make injera. And yes, some parts will look suspicious. Fermented batter often does. That is not failure. That is flavor getting dressed.
What Is Injera?
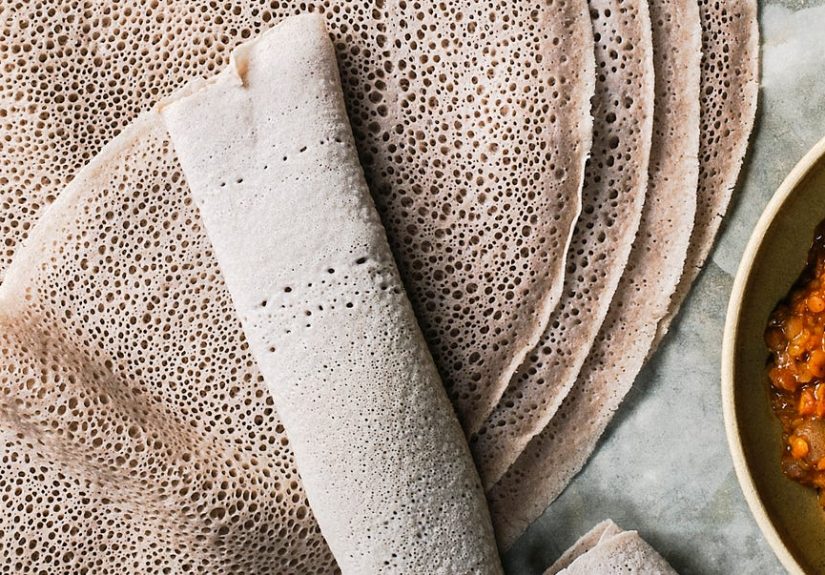
Injera is a sour, spongy flatbread traditionally associated with Ethiopian and Eritrean cuisine. It is usually made from teff, a tiny ancient grain with an earthy, nutty flavor. Unlike fluffy sandwich bread or chewy naan, injera is closer in shape to a large crepe, but the texture is full of little holes, sometimes called “eyes,” which help it soak up sauces like a champ. The bread is usually cooked on one side only, so the bottom stays smooth while the top becomes porous and tender.
At the table, injera does triple duty. A large round is often laid under the meal, additional pieces are served on the side, and diners tear off sections to scoop up dishes by hand. That means a good injera recipe is not just about taste. It also needs flexibility, softness, and enough strength to hold saucy bites without collapsing into a sad beige napkin.
Traditional Injera vs. Home-Friendly Injera
The traditional approach
The most traditional injera is made with 100% teff flour and a long natural fermentation. The flavor is deeper, the tang is more pronounced, and the process can take several days. Some classic methods also use absit, a cooked portion of batter that is mixed back in to help with texture and fermentation. It is wonderful, but it is also the kind of project that asks you to be patient, observant, and not emotionally attached to rigid timelines.
The beginner-friendly approach
Many U.S. home recipes blend teff flour with all-purpose flour, self-rising flour, barley flour, or another secondary flour. Why? Because teff can be pricey, 100% teff batter can be trickier for beginners, and mixed-flour batter is often easier to spread and cook in an ordinary skillet. Some recipes also add a touch of yeast, baking powder, or even sparkling water for a more dependable rise. Purists may raise an eyebrow. Busy home cooks may raise a fork. Both reactions are understandable.
This recipe lands in the middle. It uses teff for the flavor and identity of injera, a little all-purpose flour for structure, and a tiny amount of yeast to nudge fermentation in the right direction. You still get the sourness, the bubbles, and the flexible texture, but with fewer opportunities for your batter to ghost you.
Ingredients for a Reliable Injera Recipe
This formula makes about 8 to 10 medium injera, depending on your pan size.
- 1 1/2 cups teff flour
- 1 cup all-purpose flour
- 1/8 teaspoon active dry yeast
- 3 cups lukewarm water, plus more as needed
- 3/4 teaspoon kosher salt
- 1/2 teaspoon baking powder, optional, for extra lift in a cool kitchen
- Neutral oil or cooking spray, for the pan
Why these ingredients work
Teff flour brings the signature earthy flavor and traditional character. All-purpose flour makes the batter easier to manage and helps the finished bread stay flexible rather than crumbly. A tiny bit of yeast helps the batter get moving, especially in cooler kitchens, without turning the bread into regular pancake territory. Water controls consistency, and consistency is everything with injera. Too thick and it will not spread. Too thin and it will tear or cook up flat and sad. Salt sharpens flavor, and the optional baking powder can help encourage more bubbles if your batter needs a pep talk.
How to Make Injera, Step by Step
Step 1: Mix the batter
In a large nonreactive bowl, whisk together the teff flour, all-purpose flour, and yeast. Slowly add the lukewarm water while whisking until you have a smooth batter with no dry pockets. The mixture should look thinner than pancake batter and a bit thicker than heavy cream. Cover the bowl loosely with a lid, plate, or clean towel.
Step 2: Ferment until bubbly and tangy
Leave the bowl at room temperature for 24 to 48 hours. Warmer kitchens may move faster; cooler kitchens may need more time. When ready, the batter should smell pleasantly sour, and you should see bubbles throughout. Some separation on top is normal. Fermented batter can look dramatic, like it has been having a private crisis overnight. Stay calm and stir it gently back together.
Step 3: Adjust the texture
Whisk in the salt. If the batter seems very thick, add a little more water, a tablespoon or two at a time, until it flows easily. You want a pourable batter that spreads quickly when it hits the pan. If your kitchen is cold or the batter seems sluggish, whisk in the optional baking powder right before cooking. Let the batter rest for about 20 to 30 minutes after seasoning so the bubbles can settle in.
Step 4: Heat the pan properly
Set a nonstick skillet or crepe pan over medium heat. A 9- or 10-inch pan is ideal for beginners. Lightly oil the surface, then wipe away excess so the pan is barely greased. Too much oil interferes with the classic texture. Too little heat causes sticking. Too much heat scorches the bottom before the top develops those prized holes.
Step 5: Pour in a spiral and let the bubbles appear
Pour about 1/3 cup batter into the hot pan, starting from the outer edge and moving inward in a spiral, or simply pour in the center and quickly swirl the pan. The goal is a thin, even layer. Within seconds, little holes should begin to form across the surface. This is the moment when injera starts looking like injera rather than “a situation.”
Step 6: Cover and steam
Once the surface is mostly set but still slightly glossy, cover the pan and let the injera steam for 30 seconds to 1 minute. Traditionally, injera is cooked on one side only. Do not flip it. When the edges lift easily and the center no longer looks wet, slide it onto a towel or cooling rack.
Step 7: Cool before stacking
Let each piece cool completely before stacking, or separate them with parchment if needed. Fresh injera is delicate when hot but becomes more flexible as it cools. Think of it as bread with boundaries. Respect the cool-down period.
How to Tell If Your Injera Batter Is Right
Good injera batter should smell tangy, almost yogurt-like, and look lively. It should pour easily but not behave like plain water. When it hits the skillet, it should spread without needing aggressive wrist acrobatics. If it sits in one thick puddle, thin it slightly. If it races to the edges and leaves bare patches, it may be too thin.
The finished bread should be soft, bendable, and pocked with small holes on top. The underside should be smooth and lightly cooked, not crisp. If your injera feels brittle, the heat may be too high or the batter may be too dry. If it sticks, your pan may not be hot enough, nonstick enough, or emotionally supportive enough. Start with the first two possibilities.
Common Injera Mistakes and How to Fix Them
No bubbles on top
Your batter may be too thick, not fermented enough, or the pan may be too cool. Add a splash of water, let the batter rest longer, or raise the heat slightly.
Injera tears when you lift it
The bread may be undercooked, or the batter may be too thin. Let it steam a little longer and check your consistency before the next round.
Too sour
You fermented it too long for your room temperature. Shorten the fermentation next time or move the bowl to a cooler spot.
Not sour enough
Let it go longer. Injera gets its personality from fermentation. If you rush it, you get flatbread with no plot development.
It tastes good but does not feel flexible
Try slightly lower heat, a touch more water in the batter, or a little more all-purpose flour in your next batch.
What to Serve With Injera
Injera was made for saucy, flavorful dishes. It pairs beautifully with Ethiopian favorites like doro wat, misir wat, kik alicha, gomen, tibs, and spiced lentils. It also plays well with chickpea stews, braised greens, roasted carrots, and tomato-rich vegetable dishes. If you are building a platter, think contrast: one spicy dish, one mild dish, one creamy dish, something green, and plenty of injera. Nobody has ever regretted extra injera.
You can also use leftover injera in creative ways. Tear it into pieces and serve it with dips, crisp it lightly for a snack, or wrap it around roasted vegetables for a lunch that feels far more interesting than another desk salad pretending to be exciting.
How to Store and Reheat Injera
Once cooled, stack the injera and wrap it well or store it in an airtight container in the refrigerator for up to 3 or 4 days. To reheat, steam it briefly, microwave it under a damp paper towel, or warm it gently in a covered pan. The goal is softness, not crispness. This is not toast. Let toast live its own life.
If you want to freeze injera, layer parchment between pieces and wrap tightly. Thaw in the refrigerator, then rewarm gently. Freezing can slightly affect texture, but it is still a smart move if you are making a larger batch.
Why This Injera Recipe Works for Home Cooks
The best home injera recipe is not necessarily the one with the longest fermentation or the strictest old-world method. It is the one that gives you the right flavor, the right texture, and the confidence to make it again. This version works because it balances authenticity with practicality. Teff flour keeps the bread rooted in tradition. The flour blend makes it manageable. The tiny bit of yeast keeps fermentation from becoming a gamble. And the one-side steam cooking gives you that classic porous top without requiring specialized restaurant equipment.
In other words, this recipe respects injera without turning it into a culinary obstacle course. That is a good place to be.
Experiences From Making Injera at Home
The first time I made injera, I treated the bowl of batter like a science fair project that had somehow wandered into my kitchen. Every few hours I would peek under the towel, hoping for bubbles and slightly worried I had created something with opinions. At first, it looked unimpressive: grayish batter, a faint earthy smell, and no dramatic signs of greatness. Then the fermentation kicked in. Tiny bubbles started appearing, the aroma turned pleasantly tangy, and suddenly the whole thing felt alive in the best possible way. Making injera taught me that some foods do not reward impatience. They reward observation. And humility. Mostly humility.
Cooking the first round was its own little emotional journey. I poured too slowly, the batter spread unevenly, and I stared at the pan as if eye contact alone would summon the famous holes. A few bubbles appeared. Then more. Then the surface transformed into that unmistakable lacework that makes injera so special. I covered the pan, let it steam, and slid the bread onto a towel. It was not perfect, but it was recognizably injera, which felt like winning a very niche but extremely satisfying lottery.
By the third or fourth piece, the rhythm started to make sense. Ladle, swirl, cover, wait, lift, cool. The pan became less intimidating. The batter became easier to read. I learned that injera responds to small adjustments: a splash more water, a touch more heat, a few more seconds under the lid. It is one of those recipes that turns you into a better cook because it forces you to pay attention rather than blindly follow a timer.
The most memorable part, though, was not the batter or the pan. It was serving the finished injera with a big platter of lentils, greens, and spiced vegetables and watching everyone tear into it with their hands. Injera changes the pace of the meal. People lean in. They share. They stop cutting and stabbing and start scooping, folding, dipping, and actually talking to each other. The bread creates a different kind of dinner atmosphere, one that feels more generous and communal.
I also learned to appreciate how forgiving injera can be once you stop demanding perfection. Some rounds came out larger, some had more holes, one looked like a map of an imaginary island, and all of them still tasted wonderful. That is a comforting lesson for any home cook. You do not need every piece to be restaurant-perfect for the meal to feel special. In fact, the slightly uneven ones often feel the most homemade in the best possible way.
Over time, making injera became less about “Can I pull this off?” and more about “How sour do I want it this time?” That is when you know a recipe has officially moved into your life instead of staying in the category of rare culinary stunts. You start recognizing the smell of a ready batter. You stop overthinking the first pour. You plan stews around it. You buy teff on purpose. You become the kind of person who casually says things like, “I’ve got injera fermenting,” which is admittedly a very fun sentence.
If you have been curious about making injera at home, the biggest takeaway from my experience is simple: do not wait for the perfect kitchen mood, the perfect weather, or the perfect confidence level. Start with one batch. Watch the bubbles. Accept that the first round might be quirky. Then keep going. Injera has a way of turning uncertainty into excitement, and before long, that tangy, spongy flatbread will feel less like a restaurant mystery and more like something your kitchen has been capable of all along.
Conclusion
If you want a bread project that is equal parts practical, delicious, and impressively different, injera deserves a spot on your list. It is deeply tied to tradition, yet still approachable for home cooks willing to work with a fermented batter and trust a little kitchen magic. Once you get the hang of the texture and timing, you will have a soft, tangy flatbread that does far more than sit on the sidelines. It carries the meal, literally. And that is a pretty great trick for flour and water.


