Table of Contents >> Show >> Hide
- Why Makeup for Dark Skin Needs Smart Shade Choices
- Step 1: Prep Your Skin Like You Mean It
- Step 2: Figure Out Your Undertone Before You Buy Anything
- Step 3: Apply Foundation in Thin, Buildable Layers
- Step 4: Conceal with Strategy, Not Drama
- Step 5: Set Your Base Without Making It Gray
- Step 6: Bring Back Warmth and Shape
- Step 7: Make Eye Makeup Pop on Dark Skin
- Step 8: Pick Lip Colors That Work With Your Undertone
- Step 9: Finish the Look and Check It in Real Light
- Common Makeup Mistakes on Dark Skin
- A Simple Everyday Makeup Routine for Dark Skin
- Makeup Experiences Related to “How to Apply Makeup for Dark Skin (Girls)”
- Conclusion
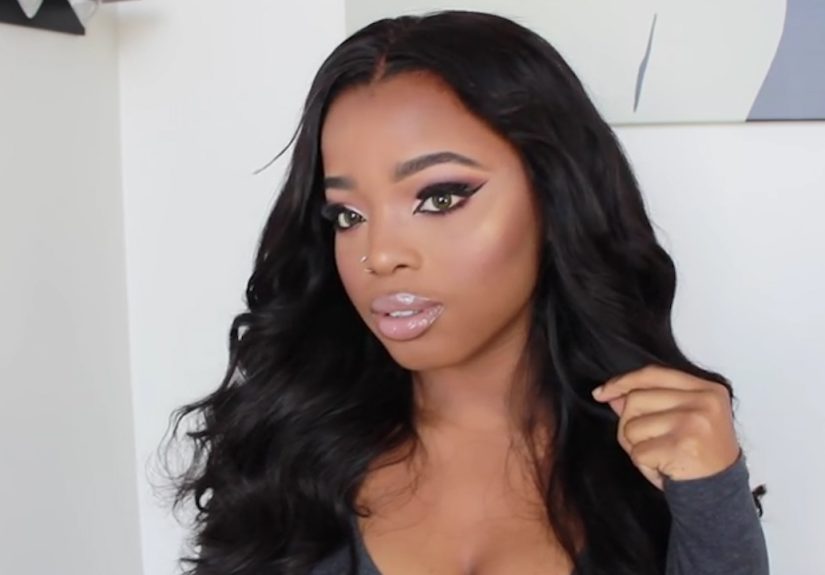
Makeup for dark skin is not about “fixing” anything. It is about choosing shades, textures, and techniques that actually work with rich melanin instead of fighting it like a confused intern on its first day. When your products match well, your skin looks radiant, your features stay defined, and your glam reads polished instead of dusty, gray, or mysteriously orange.
If you have ever tested a foundation that looked perfect in the bottle and then turned ashy on your face, welcome to the club. If a concealer made your under-eyes look like they were edited in a different app, also welcome. The good news is that learning how to apply makeup for dark skin gets much easier once you understand undertones, depth, and placement. The right routine is not complicated. It is just intentional.
This guide walks you through a practical, beginner-friendly method for building a makeup look on deep skin tones. It covers skin prep, base makeup, color choices, and the tiny finishing details that make a big difference. Whether you want a natural school-day face, a soft glam weekend look, or a “yes, I woke up glowing like this” vibe, these steps will help you get there.
Why Makeup for Dark Skin Needs Smart Shade Choices
Dark skin is beautifully diverse. One deep complexion may have warm golden undertones, another may lean cool red, and another may be neutral or olive. That is why copying someone else’s “perfect foundation” rarely works. The first rule is simple: depth matters, but undertone matters just as much.
When makeup goes wrong on dark skin, the problem is usually not skill. It is product selection. A powder that looks translucent in the jar may leave a gray cast. A contour that is too cool can look flat and muddy. A blush that seems soft in the pan may disappear completely once it hits the cheeks. Once you know what to look for, though, you can make products perform much better.
Step 1: Prep Your Skin Like You Mean It
Cleanse, moisturize, and protect
Before you even think about foundation, start with skin prep. Makeup sits best on skin that is clean, moisturized, and protected from the sun. If your skin is dry, base products can cling to rough patches and emphasize texture. If it is oily, makeup can slide around by lunchtime and start a rebellion around your T-zone.
Use a gentle cleanser, then apply a moisturizer that matches your skin type. Lightweight gel creams are great for oily or combination skin, while richer creams are helpful if your skin leans dry. Then apply sunscreen. Yes, even if your skin is dark. Yes, even if you are indoors most of the day. Yes, even if your makeup has SPF and is trying its best. Sunscreen helps prevent dark spots from getting worse and keeps your skin tone more even over time.
Use primer only where it helps
You do not always need primer on every inch of your face. A smoothing primer around the nose and forehead can help with pores and oil. A hydrating primer can help if your makeup tends to look dull or tight. Think of primer as shapewear for makeup: useful in specific places, unnecessary if overdone, and not something you need to wear just because the internet said so.
Step 2: Figure Out Your Undertone Before You Buy Anything
Knowing your undertone is the difference between looking seamless and looking like you borrowed someone else’s face. Undertones usually fall into three broad families:
- Warm: golden, yellow, peach, or red-gold
- Cool: red, blue, or berry-based tones
- Neutral: a balanced mix of warm and cool
If gold jewelry tends to flatter you, you may lean warm. If silver looks especially sharp, you may lean cool. If both work, you may be neutral. This is not a perfect science, though, so do not build your whole beauty identity around one bracelet test. The most reliable method is still swatching complexion products directly on your skin.
Where to test foundation
Swatch two to three shades along your jawline or where your face meets your neck. Then step into natural light. The correct shade should blend in without turning gray, orange, or red. If your face is slightly lighter than your neck or chest, match the area you want your whole complexion to harmonize with. In real life, your makeup needs to make sense from forehead to collarbone, not just under flattering bathroom lighting.
Step 3: Apply Foundation in Thin, Buildable Layers
For dark skin, foundation should look like skin first and makeup second. Heavy layers can flatten the natural dimension of your complexion and make the finish look mask-like. Start with a small amount and build where needed.
Pick the right finish
- Oily skin: soft matte or natural matte formulas often last longer
- Dry skin: luminous or hydrating formulas usually look smoother
- Combination skin: natural finish foundations are often the easiest middle ground
Apply foundation with a damp sponge for a lighter finish or a brush for more coverage. Start in the center of the face, then blend outward. Most people need more coverage around the mouth, nose, and under-eyes than they do on the outer cheeks. Using less product around the perimeter keeps your face from looking flat and overly uniform.
A quick trick for avoiding ashiness
If a foundation looks slightly too light but the undertone is right, it may still work if you sheer it out and bring warmth back with bronzer, blush, or a skin-matching concealer. But if the undertone is wrong, no amount of optimism is going to save it. Put it down and back away slowly.
Step 4: Conceal with Strategy, Not Drama
Concealer has two jobs: correct and brighten. Those are not always the same shade. For blemishes and dark spots, choose a concealer that closely matches your foundation or natural skin tone. For under-eyes, go just one shade lighter, maybe two at most. Going too light can create a stark cast that looks chalky rather than bright.
How to cover hyperpigmentation
Dark skin is more prone to visible post-acne marks and uneven pigmentation, so spot concealing can be more useful than piling on extra foundation. Use a tiny brush to place concealer directly on the spot, let it sit for a few seconds, then tap the edges to blend. Set lightly with powder only where needed.
Color correction helps
If you have deep under-eye darkness or strong discoloration around the mouth, a color corrector can help. Orange, red-orange, or peach correctors often work well depending on your skin depth and undertone. Use a small amount first. The goal is to neutralize discoloration, not paint on a whole second face.
Step 5: Set Your Base Without Making It Gray
Powder can be a friend or a complete traitor. The wrong setting powder is one of the fastest ways to turn a beautiful base into an ashy situation. Choose powders labeled translucent only if they truly disappear on deep skin. In many cases, tinted powders in golden, caramel, deep neutral, or rich brown shades work better.
Press powder into the skin instead of dusting on a thick layer. Focus on the under-eyes, sides of the nose, chin, and forehead if you get oily. If your skin is dry, set sparingly and leave some areas with a fresh, skin-like finish.
Baking is optional, not mandatory
Baking can work for events or long wear, but it is not a rule. On dark skin, too much bright powder left on too long can create flashback in photos or make the under-eye look disconnected from the rest of the face. If you bake, keep it short and blend thoroughly.
Step 6: Bring Back Warmth and Shape
Bronzer and contour are not the same thing
Bronzer adds warmth. Contour adds shadow. For dark skin, bronzers usually look best when they have rich warm or neutral warmth rather than a flat orange tone. Contours should be a bit deeper than your skin tone and not too gray. A contour shade that is one to two shades deeper often looks more natural than a dramatic, cool stripe.
Apply bronzer or contour around the temples, under the cheekbones, and lightly along the jaw if you want more definition. Blend well. The goal is sculpted, not striped.
Blush is not optional
Blush makes dark skin come alive. It adds freshness, warmth, and dimension that foundation alone can erase. The best blush shades for deeper skin tones are often berry, cherry, raisin, terracotta, coral, brick, burnt orange, plum, and rich rose. Soft baby pink can work too, but only if it has enough pigment and the right undertone.
Smile gently, place blush slightly above the apples of the cheeks, and blend upward toward the temples. If you want a lifted effect, keep the color a little higher. Cream blushes create a juicy, natural finish, while powder blushes are great for long wear.
Choose highlighter that glows, not frosts
On deep skin, golden, bronze, copper, rose gold, and warm champagne highlighters tend to look the most flattering. Very pale icy shades can appear chalky. Tap highlighter onto the tops of the cheekbones, brow bone, bridge of the nose, and cupid’s bow if you like extra glow. Keep it light. You want radiance, not a forehead that can flag down aircraft.
Step 7: Make Eye Makeup Pop on Dark Skin
Dark skin can wear color beautifully, which is where the fun begins. Jewel tones, bronze, copper, gold, emerald, plum, navy, burgundy, and bright matte shades can all look stunning. If pastels seem too faint, use a good eyeshadow primer or a slightly lighter base underneath to boost the color payoff.
Brows frame the whole look
Fill your brows with a pencil, powder, or pomade that is close to your hair color. Very dark black products can look harsh unless your brows are naturally that deep. Short, hair-like strokes usually look more natural than drawing one dramatic block shape and hoping for the best.
Eyeliner and mascara tips
Black liner always works, but dark brown, plum, or navy can add softness or interest. Mascara helps define the eyes even in a very simple everyday look. If you wear false lashes, choose styles that lift the outer corners rather than covering the whole lid in one dramatic curtain.
Step 8: Pick Lip Colors That Work With Your Undertone
Dark skin can wear a huge range of lip colors beautifully. Rich reds, wine, berry, chocolate brown, cinnamon nude, mauve, coral, and fuchsia can all shine. The secret is undertone. A nude lipstick that is too pale or too beige can look chalky. A better nude usually has brown, caramel, rose, terracotta, or cocoa in it.
Lip liner is your best friend here. Lining with a slightly deeper brown or berry pencil helps define the mouth and makes lighter lip shades blend more naturally. It is one of the easiest ways to make nude lipstick look intentional instead of accidental.
Step 9: Finish the Look and Check It in Real Light
Once everything is blended, use a setting spray if you want extra longevity or a more natural finish. Then do the final test: check your makeup in daylight or near a window. Indoor lighting can lie with confidence. Daylight does not care about your feelings, but it does help you catch uneven blending, a powder cast, or a foundation mismatch before you leave the house.
Common Makeup Mistakes on Dark Skin
- Choosing foundation based on depth only and ignoring undertone
- Using concealer that is much too light
- Applying too much pale powder under the eyes
- Skipping blush and ending up with a flat complexion
- Using icy or silver highlighter that turns chalky
- Picking nude lipstick with no brown, rose, or warmth
- Testing makeup in store lighting only
A Simple Everyday Makeup Routine for Dark Skin
- Cleanse, moisturize, and apply sunscreen.
- Use primer only where needed.
- Apply a light layer of foundation or skin tint.
- Spot conceal dark marks and brighten under-eyes slightly.
- Set the T-zone and under-eyes with a suitable powder.
- Add blush for life, bronzer for warmth, and highlighter if you want glow.
- Define brows, add mascara, and swipe on lip color.
- Check everything in natural light and blend once more.
Makeup Experiences Related to “How to Apply Makeup for Dark Skin (Girls)”
One of the most common experiences girls with dark skin talk about is the first time they realize that “universal” makeup is not actually universal. A friend says a certain nude lipstick looks amazing on everyone, so you try it, and suddenly your lips look like they are buffering. Or someone hands you a translucent powder that turns out to be translucent only in a marketing meeting, not on your face. That moment can be frustrating, but it is also where real makeup knowledge begins.
Another big experience is learning that dark skin is not one single shade category. Two girls may both wear “deep” foundation, but one needs more golden warmth while the other looks better in red, neutral, or olive undertones. A lot of people spend months thinking they are bad at makeup when the real issue is that they have been using the wrong undertone all along. Once they find a better match, everything changes. Their concealer looks smoother, their blush looks brighter, and their whole routine takes less effort.
Many girls with dark skin also discover that color is their friend much sooner than they expected. At first, they may stick to safe browns because they were told bright shades are “too much.” Then they try a berry blush, a copper shimmer, or a true red lip and realize the opposite is true. Rich color often looks incredibly natural and lively on deep skin. What seemed bold in the tube can look balanced and beautiful once it is actually on the face.
There is also a practical side to the experience. Girls with dark skin often become very good at reading product descriptions, checking undertones, and swatching in natural light. They learn not to trust the bottle, not to trust the filter, and definitely not to trust a powder that claims to disappear on all skin tones while looking suspiciously pale in the pan. Over time, these habits build confidence. Makeup shopping becomes less random and more intentional.
Another real-world lesson involves hyperpigmentation. Many girls with deeper skin tones deal with acne marks that linger longer than the breakout itself. Because of that, they often become experts in thin layers, spot concealing, and patient blending. They learn that piling on foundation everywhere can make the whole face look heavy, while targeted coverage keeps the skin looking more real. It is not about hiding who they are. It is about giving themselves options.
Then there is the emotional side of makeup. For some girls, learning how to apply makeup for dark skin feels deeply affirming. It can be the first time they see tutorials, shades, and techniques that actually reflect them. Instead of trying to squeeze into someone else’s beauty routine, they build one that respects their own features. That matters. Makeup is more fun when it feels like self-expression instead of correction.
And finally, many girls say the best makeup experience is the moment it all clicks. The foundation matches. The blush shows up. The highlighter glows instead of looking dusty. The lip color finally makes sense. Suddenly makeup stops feeling like a puzzle designed to humble you and starts feeling like a creative skill you can enjoy. That is the sweet spot: not perfection, not pressure, just knowing what works for your skin and wearing it with confidence.
Conclusion
Learning how to apply makeup for dark skin is really about understanding color, texture, and balance. Start with healthy skin, match your foundation to both depth and undertone, use concealer with restraint, and choose blush, bronzer, and highlighter shades that add life instead of dullness. Most importantly, trust what you see in natural light and do not be afraid of pigment. On deep skin, color is not the enemy. It is often the magic.
Once you build a routine that works for your complexion, makeup becomes less stressful and much more fun. You do not need a hundred products or a celebrity makeup budget. You just need the right shades, a little blending patience, and the willingness to ignore any beauty advice that clearly was not made with you in mind.


