Table of Contents >> Show >> Hide
- Why Oats and Honey Work So Well Together
- Ingredient Blueprint
- Oats and Honey Bread Recipe (1 Loaf)
- How to Read Dough Like a Pro
- Troubleshooting Guide
- Flavor Variations
- Serving Ideas That Never Get Old
- Storage and Freezing
- Nutrition Notes (Practical, Not Preachy)
- Research Basis Used for This Recipe Approach
- Conclusion
- 500-Word Experience Section: What Real Home Bakers Usually Notice
If your ideal morning includes warm toast, melted butter, and a quiet moment before the day gets noisy, this loaf is for you. Oats and honey bread is soft, lightly sweet, and dependable enough for sandwiches, French toast, and late-night “just one more slice” decisions. It is cozy without being fussy, and simple without tasting basic.
This guide gives you a full method for making oats and honey bread at home, plus the science behind each step so you can fix problems before they happen. You will get exact measurements (cups and grams), dough cues, rise signals, baking targets, troubleshooting tips, and practical variations. Then, at the end, you’ll find a 500-word experience section based on common real-world baking outcomes so you know what to expect after bake one, bake two, and beyond.
Why Oats and Honey Work So Well Together
Oats help your bread stay tender longer
Rolled oats absorb and hold water, which supports a moist crumb and slows staling. That means your loaf is less likely to turn into a dry sponge by day two. Quick oats create a finer texture; old-fashioned oats create more visible flakes and chew.
Honey adds flavor, color, and softness
Honey does more than sweeten. It contributes floral notes, helps browning, and supports a softer eating texture. Because honey is a liquid sweetener and sweeter than table sugar, small formula adjustments matter if you change quantities.
The flavor profile is versatile
Oats and honey bread sits in the sweet spot between savory sandwich loaf and breakfast bread. It can handle peanut butter and jam, grilled cheese, turkey sandwiches, or a dramatic swipe of salted butter like it’s starring in a cooking show.
Ingredient Blueprint
Use a flour blend for both structure and flavor
A mix of bread flour and whole wheat flour gives you strength plus a nutty, balanced taste. Too much whole wheat at once can make a first attempt dense, so this formula keeps things beginner-friendly.
Pick your oats intentionally
- Quick oats: softer crumb, less visible texture
- Old-fashioned rolled oats: heartier crumb, more oat character
Choose a mild honey first
Clover or wildflower honey is great for everyday bread. Strong honeys (like buckwheat) can be delicious but dominate flavor, which is not always ideal for all-purpose sandwich use.
Respect yeast temperature
Yeast is easy to work with once you keep liquid temperature in range. Too cool and fermentation drags; too hot and yeast activity drops fast. If you have a thermometer, use it. If not, aim for “warm bath water,” never hot.
Don’t skip salt
Salt sharpens flavor and helps fermentation stay controlled so the loaf rises with better shape and crumb. Bread without salt tastes flat, even when everything else is perfect.
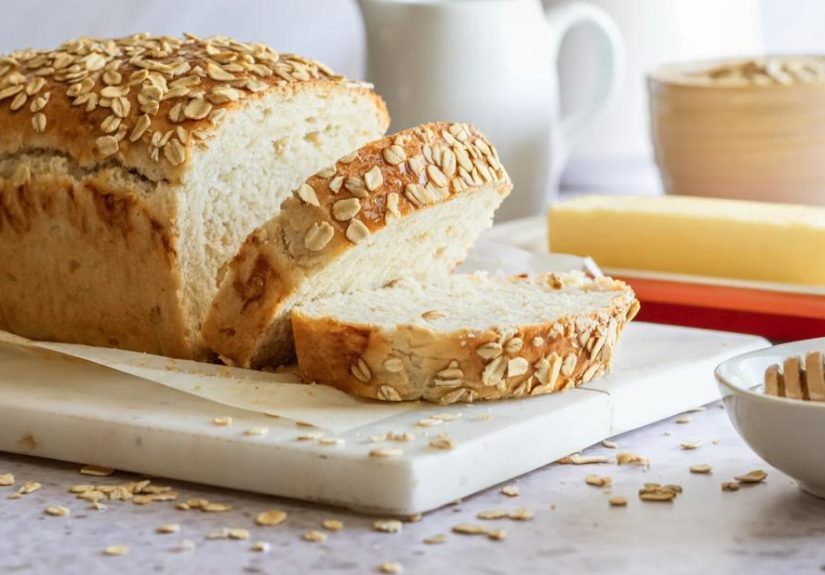
Oats and Honey Bread Recipe (1 Loaf)
Yield
One 8 1/2 x 4 1/2-inch sandwich loaf (about 10–12 slices)
Ingredients
- 1 cup (240g) milk, warm
- 1/2 cup (120g) water, warm (100–110°F if using active dry yeast)
- 1 cup (90g) rolled oats, plus 2 tablespoons for topping
- 2 1/4 teaspoons (7g) active dry yeast (or instant yeast)
- 3 tablespoons (63g) honey
- 2 tablespoons (28g) unsalted butter, softened
- 1 1/2 teaspoons (9g) fine salt
- 2 1/2 cups (300g) bread flour
- 3/4 cup (90g) whole wheat flour
- Optional: 1/2 teaspoon cinnamon
Step-by-step method
- Hydrate the oats: Combine warm milk and 1 cup oats in a large bowl. Rest 10 minutes so the oats soften.
- Bloom the yeast (active dry only): Mix yeast with warm water and 1 teaspoon honey. Rest 5–10 minutes until foamy. (If using instant yeast, add it directly with dry ingredients.)
- Mix the dough: Add remaining honey, butter, salt, bread flour, and whole wheat flour to the oat mixture. Add yeast mixture and stir until a shaggy dough forms.
- Knead: Knead 8–10 minutes in a mixer (or 10–12 minutes by hand) until smooth and elastic. Dough should be slightly tacky, not wet and soupy.
- First rise: Transfer to a lightly greased bowl, cover, and let rise until roughly doubled, 60–90 minutes.
- Shape: Press out major gas pockets, shape into a tight log, pinch seam closed, and place seam-side down in a greased loaf pan.
- Second rise: Cover and rise until dough crowns about 1 inch above pan rim, usually 45–75 minutes.
- Bake: Brush top lightly with milk or water, sprinkle remaining oats, and bake at 350°F for 35–40 minutes.
- Control browning: Tent loosely with foil after about 25 minutes if the crust darkens quickly.
- Check doneness: Aim for about 190°F internal temperature at the center.
- Cool before slicing: Remove from pan after 10 minutes and cool on a rack for at least 1 hour. Cutting too early compresses crumb and makes the loaf seem gummy.
How to Read Dough Like a Pro
Use the windowpane test
Tear off a small piece of dough and gently stretch it. If it becomes thin and translucent before tearing, gluten is developed enough for a stronger rise and better slice structure.
Use visual cues, not only timers
Proofing speed changes with room warmth, dough temperature, and yeast condition. “Doubled” and “slow spring-back after a light poke” are better indicators than strict minute counts.
Troubleshooting Guide
Dense loaf
Cause: under-kneading, under-proofing, or weak yeast.
Fix: verify yeast activity, knead until elastic, and let dough fully rise.
Top browns too fast
Cause: honey accelerates color.
Fix: tent with foil after 20–25 minutes and confirm oven runs true.
Gummy texture
Cause: underbaking or slicing hot bread.
Fix: use internal temperature and cool completely.
Dry loaf
Cause: extra flour, overbaking, or uncovered storage.
Fix: weigh ingredients, pull at doneness, store airtight once fully cool.
Flat loaf after second rise
Cause: over-proofing.
Fix: bake when dough is puffy and responsive, not fragile and collapsed.
Flavor Variations
Cinnamon-raisin
Add 1 teaspoon cinnamon and 3/4 cup raisins near the end of kneading.
Seeded oat loaf
Add 2 tablespoons each sunflower seeds and pumpkin seeds for nutty crunch.
Softer sandwich version
Use quick oats and replace 2 tablespoons water with milk for a more delicate crumb.
More whole grain
Increase whole wheat flour to 1 1/4 cups and reduce bread flour accordingly. Add extra water 1 tablespoon at a time if dough feels tight.
Serving Ideas That Never Get Old
- Breakfast: toasted slice + butter + a thin honey drizzle
- Lunch: turkey, apple slices, and mustard
- Snack: peanut butter + banana + cinnamon
- Dinner: warm slice with soup, stew, or chili
- Dessert-ish: toast + ricotta + berries
Storage and Freezing
- Room temperature (airtight): up to 3 days
- Freeze sliced loaf (well sealed): up to 2 months
- Toast slices directly from frozen for best texture
Nutrition Notes (Practical, Not Preachy)
Oats are a whole grain and provide fiber, including soluble beta-glucan. Honey adds flavor but is still sugar, so think “balanced bread,” not “dessert health halo.” If you want a more filling meal, pair your slice with protein (eggs, yogurt, nut butter) and fruit. If you want more fiber, increase whole grain flour gradually so texture stays enjoyable.
Research Basis Used for This Recipe Approach
This article’s method and guidance were synthesized from U.S. baking and nutrition references, including: King Arthur Baking, Food Network, Fleischmann’s, Red Star Yeast, USDA MyPlate, American Heart Association, Harvard T.H. Chan School of Public Health, Mayo Clinic Health System, Cleveland Clinic, Quaker Oats, Bob’s Red Mill, and FoodSafety.gov.
Conclusion
When oats and honey bread works, it really works: soft crumb, golden crust, gentle sweetness, and enough structure for everyday sandwiches. The big wins come from four controls: proper yeast temperature, full gluten development, proofing by visual cues, and baking to doneness. Start with the base formula, keep notes, and tweak one variable at a time. By your third loaf, you’ll know your dough by feeland your kitchen will smell like you run a tiny bakery with excellent management.
500-Word Experience Section: What Real Home Bakers Usually Notice
In real kitchens, the first surprise with oats and honey bread is how much the dough changes after a short rest. At mix time, it can look rough, sticky, and slightly unruly. Ten minutes later, after oats hydrate, it becomes easier to knead and shape. New bakers often assume they need more flour immediately, but experienced bakers wait first. That one habit prevents a lot of dry, heavy loaves.
The second common experience is discovering that “rise time” is not a universal number. In cooler homes, the first rise can take much longer than expected. In warm kitchens, dough may race ahead and over-proof if you are distracted by one phone call or a quick laundry cycle that becomes a whole life chapter. Bakers who improve quickly stop following time blindly and start tracking dough behavior: has it doubled, does it feel airy, does a gentle poke spring back slowly?
Another pattern: flavor preference becomes more specific after two or three bakes. People who start with bold, dark honey often switch to milder honey for everyday sandwich use, then keep robust honey for toast-focused loaves. Families with young kids usually favor quick oats because the crumb is softer and slices are neater. Texture lovers drift toward old-fashioned oats, sometimes adding seeds for crunch. Neither is “correct”; both are style choices.
Shaping technique also explains many before-and-after results. On early attempts, bakers tend to roll loosely, leaving pockets that become tunnels in the final crumb. Once they learn to gently press out big gas bubbles and roll the dough tightly with a sealed seam, slice quality improves dramatically. It is one of the fastest skill upgrades in bread baking: same recipe, same oven, much better structure.
Doneness testing changes confidence levels too. Many bakers grow up using the “tap the bottom” method and hoping for the best. Switching to internal temperature makes outcomes more predictable and reduces gummy centers. The next breakthrough is cooling discipline. Slicing too soon makes even a properly baked loaf seem underdone because steam has not redistributed yet. Waiting at least an hour feels impossible the first time and completely normal by loaf four.
Storage habits are another real-world learning curve. Leaving bread exposed dries it quickly; sealing while hot traps steam and softens the crust too much. The sweet spot is to cool fully, then bag airtight. Busy households often bake two loaves, slice both, and freeze one. Toasting from frozen works surprisingly well and makes weekday breakfasts easier.
Finally, most bakers report that oats and honey bread becomes a “confidence recipe.” It teaches fundamental bread skills without demanding advanced shaping or specialty gear. People who thought yeast bread was intimidating often keep this loaf in rotation because it is forgiving, adaptable, and consistently useful. The most repeated reaction sounds like this: “I started baking it for the recipe, but I kept baking it for the routine.”