Table of Contents >> Show >> Hide
- What You’re Making (and Why Baby Backs Are Perfect for It)
- Flavor Strategy: Rub + Steam + Set + Glaze
- Shopping Tips: What to Look For
- Tools That Make This Easier (Not Fancier)
- Step 1: Prep the Ribs Like You Mean It
- Step 2: Choose Your Rub (and Use Enough)
- Step 3: Oven Cook Low and Slow (The Tenderness Engine)
- Step 4: Rest, Unwrap, and Save the Foil Juices
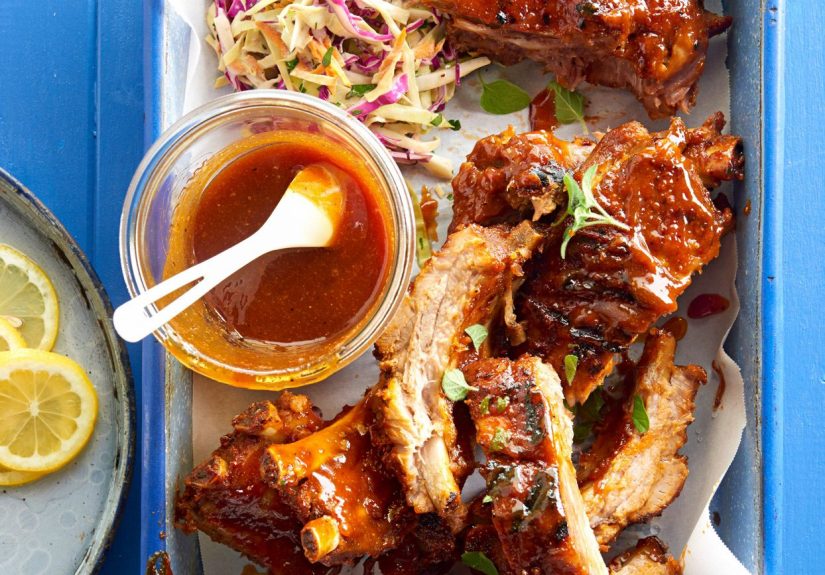
- Step 5: Grill Finish (Where the Magic Gets Sticky)
- Picking a Sauce Style (and Matching It to Your Mood)
- How to Tell They’re Done (Without Overthinking Your Life)
- Troubleshooting: Fixes for Common Rib Drama
- Serving Ideas That Make It Feel Like a Cookout (Even on a Tuesday)
- Storage and Reheating (Because Leftovers Are a Gift)
- of Real-World Rib Experience (a.k.a. Things People Learn the “Fun” Way)
- Conclusion
If you’ve ever tried to grill baby back ribs from raw to glorious, you already know the emotional arc: confidence, confusion, smoke in your eyes, and thensomehowburned sauce on the outside with “is it done?” vibes on the inside. The oven-to-grill method is the plot twist your ribs deserve.
Here’s the promise: the oven gives you reliable, low-and-slow tenderness without babysitting a fire for hours. Then the grill steps in at the end like a finishing school for flavoradding char, caramelization, and that backyard-barbecue energy. You get ribs that are tender, juicy, and sticky in the best way, without having to take a master class in “coal whispering.”
What You’re Making (and Why Baby Backs Are Perfect for It)
Baby back ribs come from high on the hognear the backboneso they’re typically leaner and a little more tender than spareribs. That leanness is exactly why the oven helps: controlled heat gently renders fat and relaxes connective tissue so the ribs don’t dry out while you’re trying to chase grill marks.
The end goal is “tender to the tooth.” You want meat that bites cleanly with a slight tug (unless you’re on Team Fall-Off-the-Bone, in which case: no judgment, just a slightly different finish). Either way, the method below gets you there without guesswork.
Flavor Strategy: Rub + Steam + Set + Glaze
Great ribs are built in layers. The oven phase is about tenderness and deep seasoning; the grill phase is about texture and concentrated flavor. Think of it as a two-act play:
- Act 1 (Oven): Season aggressively, wrap tightly, cook low and slow until tender.
- Act 2 (Grill): Unwrap, sauce, and grill briefly to set a sticky glaze and add light char.
The wrap is key. When ribs are sealed in foil, moisture and rendered fat circulate around the meat like a spa day for pork. This accelerates tenderizing and keeps the surface from drying out. Then the grill takes over to dry the surface slightly and caramelize sugars in the saucebecause sticky ribs are basically a food group.
Shopping Tips: What to Look For
- Meat coverage: Look for racks with even thickness and good meat on top of the bones.
- Marbling: A little fat is your friend. Too lean can cook up dry.
- Size: Most racks run 1.5–2.5 lb. Bigger racks may need a bit more oven time.
- Freshness: Avoid strong odors or excess “purge” (liquid) in the package.
Tools That Make This Easier (Not Fancier)
- Rimmed sheet pan (because rib juices are sneaky)
- Heavy-duty foil (or double-layer regular foil)
- Instant-read thermometer (optional, but confidence-boosting)
- Tongs + a brush for saucing
- Two-zone grill setup (gas or charcoal)
Step 1: Prep the Ribs Like You Mean It
Don’t rinse them
Rinsing raw ribs won’t make them “cleaner,” but it can spread bacteria around your sink and counters. Instead, pat them dry with paper towels. Dry surface = better rub adhesion and better browning.
Remove the membrane (a.k.a. the “mystery chew layer”)
On the bone side there’s often a thin, papery membrane (silver skin). It can block seasoning and turn into a tough, plasticky bite. Slide a butter knife under it near one end, lift gently, then grab with a paper towel for traction and peel. If it tears, keep goingno one’s grading you.
Step 2: Choose Your Rub (and Use Enough)
You can use any store-bought dry rub you love, but a simple homemade blend gives you full control over salt and sweetness. Here’s a balanced, crowd-pleasing rub that works with almost any barbecue sauce style.
Classic sweet-smoky rub (for 2 racks)
- 2 tbsp brown sugar
- 1 tbsp kosher salt
- 1 tbsp smoked paprika
- 2 tsp chili powder
- 2 tsp garlic powder
- 2 tsp onion powder
- 1 tsp black pepper
- 1/2 tsp cayenne (optional, for gentle heat)
Lightly coat the ribs with a thin film of oil or yellow mustard (optional “glue”you won’t taste it once cooked), then apply the rub generously on both sides. If you think you used enough, add a little more. Ribs are big; they can handle it.
Quick analysis: salt now or later?
Salting earlier helps seasoning penetrate. If you have time, rub the ribs and refrigerate uncovered for 2–12 hours. That mini dry-brine improves flavor and can help the surface dry slightly for better bark later. If you’re short on time, even 20–30 minutes on the counter while the oven heats is still worth it.
Step 3: Oven Cook Low and Slow (The Tenderness Engine)
Preheat the oven to 275°F. Place each rack on a large sheet of foil (bone side down is common), then wrap tightly. Tight wrap = trapped steam = tender ribs.
Oven timing guide (approximate)
- 275°F: 2.5–3.5 hours (most consistent “tender to the tooth” result)
- 300°F: 2–3 hours (good if you’re slightly impatient)
- 350°F: ~1.5–2 hours (works, but watch tenderness so they don’t go mushy)
You’re looking for ribs that bend easily when lifted with tongs and show some meat pullback from the bone ends. If you use a thermometer, remember: ribs are safe at lower temps, but they’re typically pleasantly tender after collagen has had time to softenoften somewhere in the higher temperature range. Don’t chase one magic number; chase texture.
Step 4: Rest, Unwrap, and Save the Foil Juices
When the ribs are tender, remove from the oven and let them rest in the foil for 10–15 minutes. Carefully open the packets (steam is not your friend), then pour the juices into a bowl.
Those juices are liquid gold: smoky, porky, and full of flavor. Skim off excess fat, then stir a few spoonfuls into your barbecue sauce for an instant upgrade. It’s like adding a secret bass line to your favorite song.
Step 5: Grill Finish (Where the Magic Gets Sticky)
Preheat your grill for two-zone cooking:
- Gas: one side medium-high, the other side medium-low or off
- Charcoal: coals piled on one side, empty space on the other
Brush the ribs lightly with sauce, then start them on the hotter side briefly to set color. Move to indirect heat to finish glazing without burning.
Grill finishing timeline
- 2–4 minutes on direct heat to develop light char (watch closely)
- 10–20 minutes on indirect heat, saucing once or twice more, lid closed
Most barbecue sauces contain sugar, and sugar can scorch fast. That’s why indirect heat is your best friend here. You want caramelized and glossy, not “campfire marshmallow that fell in the ashes.”
Picking a Sauce Style (and Matching It to Your Mood)
Use what you love. But if you want to steer the vibe, here are easy matches:
- Kansas City style (sweet & thick): sticky, classic, kid-friendly
- Carolina vinegar style: tangy, bright, cuts through richness
- Alabama white sauce: creamy, peppery, unexpectedly addictive
- Spicy-fruity glazes: bourbon, apricot, peachgreat for a “fancy cookout” feel
Pro move: sauce in thin layers. Thick sauce too early can burn before it ever becomes glossy. Think “paint,” not “plaster.”
How to Tell They’re Done (Without Overthinking Your Life)
Signs of great rib doneness
- Bend test: lift with tongs; the rack bends easily and the surface may crack slightly
- Pullback: meat retreats from bone ends a bit
- Tooth test: a toothpick slides into the meat between bones with little resistance
If the rack is still stiff and tough, it needs more time in the oven phase. If it’s falling apart when you pick it up, you can still save dinnerjust move it gently and skip aggressive flipping on the grill.
Troubleshooting: Fixes for Common Rib Drama
“They’re tough!”
Tough ribs usually mean undercooked connective tissue. Wrap back up and return to the oven for 20–30 minutes, then re-check. Ribs are stubborn until they aren’t, and then they’re amazing.
“They’re dry!”
Dry ribs are often overcooked or cooked unwrapped too long. Next time, ensure a tight foil seal and don’t overdo the grill finish. For today: slice, sauce lightly, and serve with extra sauce on the side (no shame).
“My sauce burned!”
Heat was too direct or too high. Scrape off the worst bits, re-sauce lightly, and finish on indirect heat. Also: keep a spray bottle of water handy to tame flare-ups from dripping fat.
Serving Ideas That Make It Feel Like a Cookout (Even on a Tuesday)
- Classic coleslaw + corn on the cob
- Mac and cheese + pickles (the tangy crunch matters)
- Potato salad + baked beans (stir in a spoon of those rib juices… trust)
- Grilled peaches or pineapple for a sweet-smoky side
Storage and Reheating (Because Leftovers Are a Gift)
Cool ribs, wrap tightly, and refrigerate up to 3–4 days. To reheat, warm wrapped ribs in a 275°F oven until heated through, then brush with sauce and quickly grill or broil to re-gloss the surface. The goal is to warm gently and finish hotsame strategy as the original method, just faster.
of Real-World Rib Experience (a.k.a. Things People Learn the “Fun” Way)
The oven-to-grill rib method has a funny effect on people: it turns “I’m not a grill person” into “I might buy a new set of tongs just for this.” In home kitchens, the first big revelation is usually how calm the process feels. The oven does the heavy lifting while you set the table, make sides, and briefly consider whether you should start a band called Foil Packet Confidential.
One of the most common first-timer moments is the membrane discovery. Someone flips the rack over, sees that translucent layer, and wonders if it’s packaging they forgot to remove. (It’s not.) Once people learn the paper towel trick for grip, it becomes a weird little rite of passagelike you’re initiated into the Society of Ribs. The payoff is real: seasoning penetrates better, and the bite is cleaner.
Then there’s the sauce lesson. A lot of cooks assume sauce should go on early and thick, like frosting. The grill politely disagrees. Sugary sauces can scorch fast, especially over direct heat, so experienced rib-makers learn to “paint in coats.” Thin layer, set it, another thin layer, set it again. The result is glossy and stickymore lacquer than lava. If someone does burn sauce the first time (it happens), the fix is almost always the same: move to indirect heat, close the lid, and let the ribs finish gently while the sauce settles down.
Another real-world win: make-ahead sanity. People hosting friends often bake the ribs earlier, refrigerate them, and then grill right before serving. It’s the kind of move that makes you look like you’re effortlessly running a backyard restauranteven if you were just inside five minutes ago wearing socks and arguing with a jar of pickles. The grill finish brings everything back to life: heat, char, aroma, and that unmistakable “something awesome is happening outside” smell.
Finally, there’s the doneness confidence that grows over time. Many cooks start off relying on exact times, then slowly graduate to reading the ribs: the bend, the pullback, the toothpick slide. It becomes less about “Did I hit the perfect number?” and more about “Is this tender where it counts?” That shift is the real secret. The oven-to-grill method isn’t just easierit teaches you what good ribs look and feel like, so every batch gets better. And if a rack turns out a little too tender or a little too chewy? Congratulations: you’ve made ribs. Sauce them, share them, and try againbecause practice tastes like barbecue.
Conclusion
Oven-to-grill baby back ribs are the best of both worlds: dependable tenderness from the oven and bold, caramelized barbecue character from the grill. Focus on the fundamentalsremove the membrane, season generously, wrap tightly, cook until tender, then finish with controlled grill heat to set a sticky glaze. You’ll get ribs that taste like you spent all day outside, even if most of the work happened indoors (with air conditioning and a much lower chance of chasing a runaway paper plate).


