Table of Contents >> Show >> Hide
- Why Repurposed Farm Windows Are DIY Gold
- Where to Find the Perfect Old Farm Window
- Step-by-Step: Turn a Farm Window into Show-Stopping Wall Art
- Creative Ideas for Repurposed Farm Windows
- Styling Tips: Make Your Repurposed Window Look Intentional
- Care, Safety, and Maintenance
- Real-Life Experiences with Repurposed Farm Windows
- Lesson 1: The “perfectly imperfect” look takes restraint
- Lesson 2: Hanging hardware matters more than you think
- Lesson 3: Plan your design before you commit
- Lesson 4: Old windows reveal their personality as you go
- Lesson 5: Family and guests notice more than you think
- Lesson 6: Start simple, then level up
- Final Thoughts
If you’ve ever driven past an old farmhouse and thought, “I’d take that crusty window home in a heartbeat,” this article is for you. Repurposed farm windows are the DIY world’s equivalent of a secret menu item: humble, a little mysterious, and capable of becoming something seriously amazing with the right treatment.
On Hometalk and other DIY communities, old farm windows get transformed into everything from farmhouse wall decor and chalkboards to garden art and statement mirrors. A repurposed farm window brings instant character, tells a story, and lets you flex your upcycling muscles without needing a full woodworking shop in your garage.
Whether you’re going for rustic farmhouse style, shabby chic charm, or a more modern cottage look, this guide walks you through how to turn an old window into beautiful decor, plus real-life experiences and lessons learned from working with these vintage pieces.
Why Repurposed Farm Windows Are DIY Gold
Before you start hunting for your own window treasure, it helps to know why these pieces have become a staple on Hometalk, Pinterest, Etsy, and DIY blogs across the U.S.
1. Built-in farmhouse character
Modern decor often tries to fake “character” with distressed finishes and faux patina. A true farm window already has that naturally: chippy paint, weathered wood, a slightly crooked frame, and maybe a scratch or two in the glass. Instead of fighting those imperfections, farmhouse decor celebrates them and uses them as a focal point.
2. Budget-friendly wall decor
A large piece of art or a framed mirror can get expensive fast. A salvaged farm window is often cheaper and gives you more personality for your money. With paint, a handful of glass gems, photos, or a wreath, you can create a statement piece that looks like it came from a curated boutique, not the clearance aisle.
3. Sustainable and sentimental
Repurposing an old window keeps solid wood and glass out of the landfill. If the window came from your own property or a family home, it also carries sentimental weight. That’s not just decor; that’s a family story hanging on your wall.
4. Endless DIY possibilities
Old farm windows are like the blank canvases of rustic decor. Common ideas include:
- Farmhouse wall art with a wreath and greenery
- A photo display or “family gallery” in each pane
- A chalkboard or dry-erase board for the kitchen
- Garden art with colorful glass gems in each pane
- Backyard screens to hide eyesores like pool pumps or AC units
- Seasonal decor that you can refresh with each holiday
Where to Find the Perfect Old Farm Window
If you don’t already have a window lurking in your shed or barn, don’t worry. Old windows are surprisingly easy to track down once you know where to look.
- Antique shops and flea markets: Great for already “curated” pieces, often with plenty of patina.
- Habitat ReStores and salvage yards: Often have stacks of old doors and windows pulled from renovations.
- Garage sales and curbside finds: Homeowners frequently set old windows out for free when they replace them.
- Online marketplaces: Local listings often include old farm windows for cheap or even free if you haul them away.
- Window replacement companies and construction sites (with permission): They sometimes have old windows destined for the dumpster.
Look for solid wood frames, reasonably intact joints, and, if you plan to keep the glass, panes that aren’t cracked in dangerous ways. A little wear is charming; a frame that disintegrates when you touch it is… less charming.
Step-by-Step: Turn a Farm Window into Show-Stopping Wall Art
Let’s walk through a classic Hometalk-style project: turning a repurposed farm window into a farmhouse wall decor piece that works in an entryway, living room, or dining room.
Step 1: Clean and inspect the window
Put on gloves and, if the paint looks very old and flaky, a dust mask. Carefully brush off loose dirt and spider webs. Then:
- Use a shop vac or a stiff brush to remove debris from corners.
- Wipe the frame with a damp cloth and mild soap.
- Clean the glass with standard glass cleaner or vinegar and water.
Check for soft spots in the wood, loose panes, or cracked glass. If any glass is dangerously broken, remove it entirely and plan a glass-free design or replace it with plexiglass, mirror, or chalkboard panels.
Step 2: Light sanding and repairs
Lightly sand any rough edges or splinters. You don’t want to erase the old character, just make it safe to handle and hang. If joints are loose, add a bit of wood glue and clamp them. You can also tighten or replace any small nails or brads that hold the panes in.
Step 3: Paint, stain, or embrace the chippy look
This is where you decide on the overall style:
- Chippy white farmhouse look: Leave most of the original paint, lightly sand, and seal with a clear matte sealer so it doesn’t keep flaking everywhere.
- Soft color wash: Use diluted paint in shades like sage, duck egg blue, or warm gray. Wipe back before it fully dries for a worn, layered look.
- Clean and modern: Sand more thoroughly and repaint in a solid color (black, deep navy, or crisp white) for a farmhouse-meets-modern vibe.
Let everything dry fully before you move on. If you’re painting over glass to create a chalkboard, use chalkboard paint or specialized glass paint and follow the instructions for curing.
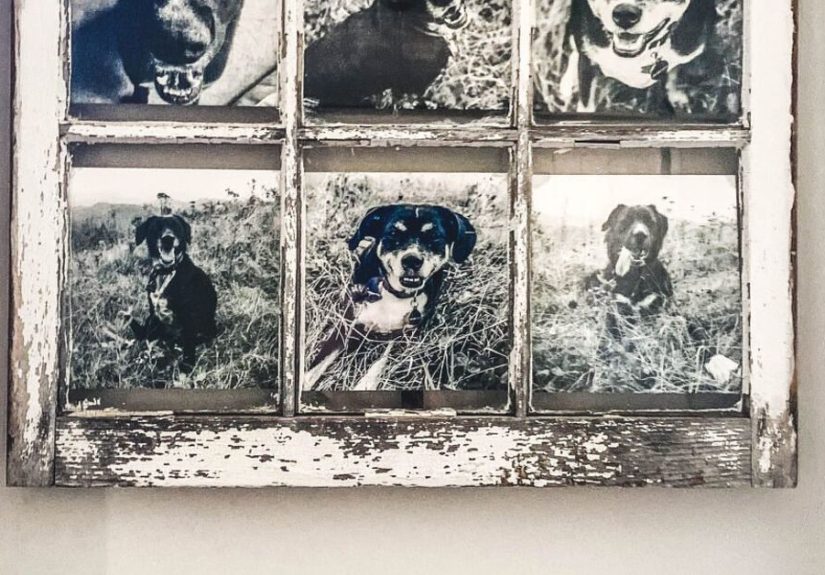
Step 4: Choose your “insert” mirror, chalkboard, photos, or gems
Each pane of your window is an opportunity for creativity. Popular options include:
- Mirror: Turn your window into a vintage-style mirror by having mirror glass cut to size or using mirror adhesive film. It’s great for an entryway or small room.
- Chalkboard or dry-erase: Paint the back of the glass with chalkboard paint or turn one side into a chalkboard and the other into a dry-erase board for menu planning and notes.
- Photo display: Leave the panes clear and use twine, mini clothespins, or small photo mats to display family photos, postcards, or seasonal prints.
- Glass gems or faux “stained glass”: Use glass gems, translucent paint, or faux stained glass techniques for garden art or a sun-catching piece in a window or porch.
Step 5: Add farmhouse details
This is where you give your repurposed farm window a personality. Consider:
- Hanging a wreath or greenery in the center
- Adding small hooks at the bottom for keys, mugs, or dog leashes
- Stenciling a word or phrase (“Gather,” “Farmhouse,” “Welcome”) across one of the rails
- Layering the window behind other decor on a mantel or console table
Step 6: Hang it safely
Old farm windows can be heavy, especially with original glass.
- Install sturdy D-rings and picture wire on the back of the frame.
- Use wall anchors or screw directly into studs.
- For very heavy windows, consider using two screws or a French cleat system rather than a single nail.
Once it’s up, step back and admire your work. You just turned a thrown-away farmhouse relic into decor that looks like it came straight out of a home magazine.
Creative Ideas for Repurposed Farm Windows
Ready to think beyond basic wall art? Here are some fun ways DIYers are using these windows all over the house and yard:
1. Farmhouse entryway focal point
Hang a repurposed farm window above a bench in the entryway. Add hooks for bags and hats, a wreath for texture, and a small basket underneath for shoes. The window instantly makes the space feel intentional instead of “pile of stuff by the door.”
2. Kitchen command center
Turn panes into a combination of chalkboard, cork, and dry-erase spaces. Use them for weekly menus, grocery lists, and family notes. It’s practical, cute, and way more charming than a plain whiteboard on the fridge.
3. Hidden-eyesore solution in the yard
DIYers often repurpose multiple old windows or shutters into a small “wall” to hide pool pumps, AC units, or trash bins. Attach the windows to posts, add hinges if you want access, and decorate with plants and hanging baskets.
4. Garden art with light-catching details
Use glass gems, translucent paint, or mosaic techniques inside the panes and set the window in the garden or on a fence. When the sun hits it, it creates a colorful, stained-glass effect that makes the garden feel magical.
5. Seasonal showcase
Keep the base window simple and let the decor change with the seasons: mini pumpkins and plaid ribbon for fall, evergreen branches and ornaments for winter, pastel florals in spring, and bright florals or nautical touches for summer. One repurposed window frame, year-round fun.
Styling Tips: Make Your Repurposed Window Look Intentional
A repurposed farm window looks best when it’s styled like a deliberate design choice, not a random thing you just nailed to the wall because you had it.
- Balance the scale: If the window is big, pair it with a console table, bench, or large plant so it doesn’t feel like it’s floating on the wall.
- Layer textures: Combine the rough wood frame with soft textiles (throws, pillows), metal accents (lanterns, metal vases), and greenery.
- Stick to a color story: Echo the colors in the frame (white, wood, black, muted greens) in your surrounding decor so everything feels cohesive.
- Avoid clutter: The window is already visually interesting. Don’t overwhelm it with too many little objects in every pane.
Care, Safety, and Maintenance
Repurposed farm windows can be decades old, so they deserve a little extra care:
- Lead paint awareness: Many truly old windows were painted with lead-based paint. Avoid sanding aggressively, and if you suspect lead, follow safety guidelines or seal the paint under a clear topcoat instead of stripping it yourself.
- Secure glass: Check periodically that panes are still firmly held by glazing points or caulk. Reseal if needed.
- Indoor vs. outdoor use: If you display your window outdoors, use exterior-rated sealant and paint, and expect it to weather more over time (which might be part of the look you want).
Real-Life Experiences with Repurposed Farm Windows
Working with repurposed farm windows looks picture-perfect online, but behind every gorgeous project there are usually a few lessons learned, some accidental splinters, and at least one moment of, “Why is this thing so heavy?” Here are some experience-based insights to help you avoid common headaches.
Lesson 1: The “perfectly imperfect” look takes restraint
One of the biggest mistakes beginners make is overworking the finish. You start with a beautifully aged, weathered frame, then sand too much, repaint three times, and end up with something that looks like it came from a big-box store. The trick is to do just enough: spot-sand rough areas, maybe add a thin wash of paint, and seal. When in doubt, walk away for a bit and come back with fresh eyes before adding “one more coat.”
Lesson 2: Hanging hardware matters more than you think
A repurposed farm window can weigh significantly more than a standard framed print, especially if it still has all the original glass. People often underestimate this and hang it on a tiny nail. Over time, the nail pulls out, or the wire breaks. Using heavy-duty D-rings, good picture wire, and wall anchors rated for the weight of the piece isn’t just a “nice to have” it’s what keeps your project from crashing down at 2 a.m.
Lesson 3: Plan your design before you commit
It’s tempting to start gluing, nailing, and painting as soon as you get your hands on the window. But you’ll save time (and materials) if you plan the layout first. Sketch out where the wreath will go, where hooks might be attached, and which panes will be mirror, chalkboard, or photo spaces. Lay your elements on the frame before permanently attaching anything. That extra 10–15 minutes of planning can prevent you from drilling a hook exactly where you later want to place a word stencil or photo mat.
Lesson 4: Old windows reveal their personality as you go
Many DIYers report that their repurposed window projects “change direction” halfway through. Maybe you planned on a pure-white, clean farmhouse look, but once you started cleaning, the original color peeking through was too good to cover completely. Or you realize that the crackled varnish has a warm tone that looks great with a natural wreath and simple twine instead of a bold, painted finish.
It helps to treat the project as a conversation with the piece. Instead of forcing it to match a saved photo exactly, let its quirks guide your choices. That’s how you end up with decor that feels genuine rather than like a copy of something you saw online.
Lesson 5: Family and guests notice more than you think
Repurposed farm windows tend to start conversations. Guests often ask, “Where did you get that?” or “Was this from your old house?” If your window actually came from your family’s property, it becomes a natural storytelling piece. Even if it didn’t, you can share the story of where you found it the flea market, the salvage yard, that time you rescued it from the curb on trash day.
Many people discover that once they hang one repurposed farm window, they get requests from friends and relatives: “If you find another one, can you make one for me?” That’s how a simple DIY project can turn into a small side hustle or a series of gifts for birthdays, weddings, or housewarmings.
Lesson 6: Start simple, then level up
If this is your first repurposed window project, keep it simple: maybe a quick cleaning, light sanding, a clear sealer, and a wreath or photo display. Once you’ve lived with that piece for a while, you’ll have a better feel for what you like and what you’d change next time. Then you can try more advanced ideas like glass-gem garden art, layered mixed-media panels, or a full chalkboard-and-mirror combo window for your kitchen.
The beauty of repurposed farm windows is that no two are ever exactly alike. Each frame has its own history, proportions, and quirks and your project becomes a one-of-a-kind expression of your style and creativity.
Final Thoughts
A repurposed farm window is more than just decor. It’s a piece of architectural history turned into art, a sustainable project, and a surprisingly practical way to add farmhouse charm to your home. With a little cleaning, some thoughtful design choices, and a few simple DIY skills, you can turn a forgotten window into a conversation-starting focal point that reflects your personality.
Start with one window, one idea, and a willingness to let the imperfections shine. Before long, you might find yourself scanning every curb, barn, and salvage yard for your next “old window, new life” project.


