Table of Contents >> Show >> Hide
- Paint Prep That Makes Everything Look Better
- Wall & Ceiling Paint Projects
- 1) Ombre Wall Gradient
- 2) Color-Washed Walls
- 3) Oversized Stenciled Accent Wall
- 4) Geometric Tape Pattern Wall
- 5) Half-Painted Wall (Modern Wainscot Look)
- 6) Painted Arch Nook
- 7) Painted Ceiling Medallion Illusion
- 8) “Haint Blue” Porch Ceiling Refresh
- 9) Painted Trim in a “Same Color, Different Sheen”
- 10) Faux Headboard Wall Block
- Furniture & Built-In Paint Projects
- 11) Two-Tone Dresser Makeover
- 12) Chalk-Style Painted Side Table
- 13) Painted Nightstands with a “Designer Pop” Interior
- 14) Painted Kitchen Cabinets (Mini Refresh)
- 15) Painted Bathroom Vanity with Fresh Hardware
- 16) Painted Bookshelf Back Panel
- 17) Color-Dipped Chair Legs
- 18) Painted Door Upgrade (Inside or Front)
- 19) Faux Built-In Look on IKEA-Style Units
- 20) Painted Fireplace Brick (Modernize Fast)
- Floors, Tile, and “Hard Surface” Paint Projects
- Small Decor, Art, and Crafty Paint Projects
- Extra : The Real-Life Experience of Doing 31 DIY Paint Projects
Paint is basically a personality test you can roll onto your walls. It can make a rental feel like “mine,” turn thrift-store finds into
“I totally meant to buy that,” and rescue furniture that looks like it survived a toddler rodeo. The best part? Most DIY paint projects
don’t require power tools, a design degree, or a pact with a home-improvement deity.
Below are 31 creative DIY paint projects that personalize your home decorfrom quick weekend wins to “wow, is that the same room?”
transformations. Each idea includes what it is, why it works, and a practical tip so your final result looks intentional (not “Oops, that’s permanent”).
Paint Prep That Makes Everything Look Better
Great results are usually 20% painting and 80% “annoying stuff you’ll be grateful you did.” Before you start any home decor painting idea:
- Clean first: grease and dust are paint’s mortal enemies (especially in kitchens and bathrooms).
- Scuff-sand when needed: slick surfaces (laminate, glossy trim, tile) benefit from a light abrasion so primer can grip.
- Prime smart: use bonding primer on tricky surfaces; it’s cheaper than repainting your regret.
- Test your color: paint a sample where lighting changes during the day. Morning sunshine is a liar.
- Choose the right sheen: flat hides wall sins; satin/eggshell cleans easier; semi-gloss is durable but shows texture.
Wall & Ceiling Paint Projects
1) Ombre Wall Gradient
Blend from light to dark (or one hue to another) across a single wall. It adds drama without busy patterns. Use three sections and mix transitional shades
so the change feels smooth. Tip: work in small bands and feather edges with a barely damp brush or roller.
2) Color-Washed Walls
Color washing creates a soft, cloudy “Old World” vibe that forgives imperfect technique. You apply a base coat, then a watery glaze in a crisscross motion.
Tip: practice on poster board first; your wall doesn’t want to be the first pancake.
3) Oversized Stenciled Accent Wall
A large-format stencil looks custom and architecturallike wallpaper, but you get to brag. Use painter’s tape to keep crisp edges and a small roller for even coverage.
Tip: less paint on the roller = fewer bleeds.
4) Geometric Tape Pattern Wall
Painter’s tape is basically temporary math. Create triangles, diamonds, or angled stripes, then paint over. Peel tape while paint is slightly tacky for sharper lines.
Tip: burnish tape edges with a plastic card before painting.
5) Half-Painted Wall (Modern Wainscot Look)
Paint the lower half one color and leave the top lighter. It grounds a room and hides scuffs (great for hallways). Add a thin painted stripe at the “chair rail” height
to look extra intentional. Tip: use a laser level if you want your line to look calm, not caffeinated.
6) Painted Arch Nook
Paint an arch behind a console, bed, or desk to create a “built-in” focal point without building anything. It frames furniture and adds depth.
Tip: trace a large round object (or use a string-and-pencil compass) for symmetry.
7) Painted Ceiling Medallion Illusion
Fake a ceiling medallion around a light fixture with a stencil or careful circular taping. It adds vintage charm and makes basic lighting feel upgraded.
Tip: keep contrast subtle if your ceiling is low.
8) “Haint Blue” Porch Ceiling Refresh
A soft blue-green ceiling on a porch reads airy, classic, and welcoming. Historically, it’s tied to Southern coastal traditions; today it’s also just gorgeous.
Tip: choose an exterior paint rated for humidity and temperature swings.
9) Painted Trim in a “Same Color, Different Sheen”
Paint walls and trim the same color, then switch sheen (eggshell walls, satin/semi-gloss trim). It looks designer and makes odd trim layouts feel intentional.
Tip: this works especially well in small rooms and older homes.
10) Faux Headboard Wall Block
Paint a large rectangle (or soft curved shape) behind the bed to mimic an upholstered headboard. It’s budget-friendly and great for guest rooms.
Tip: add a slim “border” line for dimension.
Furniture & Built-In Paint Projects
11) Two-Tone Dresser Makeover
Paint the body one color and drawers another (or leave drawer fronts wood). It adds contrast and modernizes dated furniture fast.
Tip: label drawers as you remove them so you don’t play “drawer roulette” later.
12) Chalk-Style Painted Side Table
Chalk-style paint is beginner-friendly and great for vintage looks because it typically doesn’t need perfect prep on many surfaces.
Tip: seal with wax or a durable topcoat if it’ll see heavy use (coffee rings are relentless).
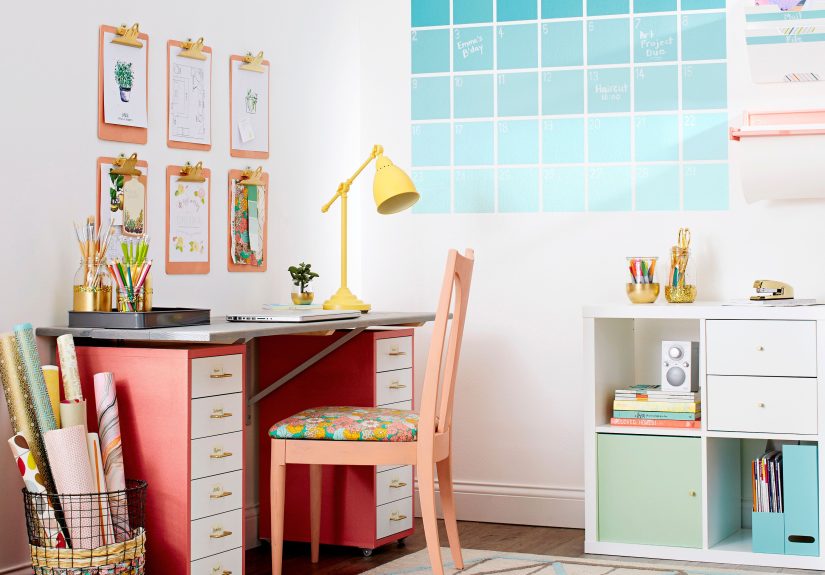
13) Painted Nightstands with a “Designer Pop” Interior
Keep the outside neutral and paint the inside of open shelves or drawers a bold color. It’s a surprise detail that feels custom.
Tip: a high-gloss interior looks especially polished.
14) Painted Kitchen Cabinets (Mini Refresh)
Repainting cabinets is high impact, but it’s a marathon. Clean, scuff-sand, prime, then use a mini roller for flat areas and “lay off” to reduce texture.
Tip: let doors cure fully before rehanging, or your cabinets will “kiss” and stick.
15) Painted Bathroom Vanity with Fresh Hardware
Vanities handle moisture, so prep matters: degrease, sand lightly, use a bonding primer, then a durable enamel.
Tip: upgrade knobs/pulls for the “new vanity” illusion without the new vanity price.
16) Painted Bookshelf Back Panel
Paint the back of a bookcase a contrasting color to make books and decor pop. It adds depth like an instant shadow box.
Tip: remove shelves if possible; it’s faster than cutting in around them.
17) Color-Dipped Chair Legs
Paint only the bottom third of chair legs for a playful, modern look. It’s subtle enough for grown-up rooms, fun enough for kids’ spaces.
Tip: wrap tape evenly around all legs using a measuring guide so the dip height matches.
18) Painted Door Upgrade (Inside or Front)
A door in a bold color becomes functional art. Paint recessed details with a brush, then roll larger sections for a smooth finish.
Tip: paint early morning/late afternoon outdoors to avoid harsh sun drying too fast.
19) Faux Built-In Look on IKEA-Style Units
Paint multiple matching units the same color as the wall to make them read as “custom.” Add trim molding for the final cheat code.
Tip: use a cabinet-grade enamel so it resists scuffs.
20) Painted Fireplace Brick (Modernize Fast)
Painting brick can brighten a room dramatically. Clean well, prime masonry, then brush mortar lines and roll the face for even coverage.
Tip: choose a finish that fits your spacesatin is forgiving and wipeable.
Floors, Tile, and “Hard Surface” Paint Projects
21) Stenciled Tile Floor (Statement Pattern)
Painted tile floors can look incredible, especially with a stencil patternbut they’re best treated as a “high-effort, medium-term” makeover in wet, high-traffic zones.
Tip: plan for touch-ups and use products made for floors (plus a tough topcoat where recommended).
22) Painted “Rug” on Wood or Concrete Floor
Tape off a rectangle (or oval), paint a border, then add a simple motif or stencil. It’s great for entryways where real rugs get abused.
Tip: keep the design slightly distressed on purposethen wear looks like “character,” not damage.
23) Checkerboard Floor (Classic, Not Cheesy)
A checkerboard floor can be timeless if you keep the palette calm (think cream + soft charcoal). It works in laundry rooms, mudrooms, and breakfast nooks.
Tip: measure twice, tape once, and don’t eyeball squares unless you enjoy chaos.
24) Painted Stair Risers
Add stripes, numbers, or a repeating pattern to risers onlyso it’s decorative without becoming a slip hazard.
Tip: use durable enamel and let it cure fully before heavy traffic.
25) Tile Backsplash Refresh with a Refinishing Kit
If you’re stuck with dated tile, a tile refinishing kit (often epoxy-based) can give you a clean, bright backsplash without demo.
Tip: ventilation is non-negotiablefans, open windows, and patience.
26) Painted Countertop Coating (Budget “New Counter” Look)
Countertop coating kits can mimic stone-like finishes if you follow directions carefully and keep a wet edge while rolling.
Tip: respect cure timesset a “no one touches this” rule and mean it.
Small Decor, Art, and Crafty Paint Projects
27) Thrifted Frame Color Collection Wall
Buy mismatched frames, then paint them one unifying color (or two alternating shades). It looks curated and costs very little.
Tip: spray paint is fastestlight coats prevent drips and texture.
28) Spray-Painted Planters (Indoor/Outdoor)
Refresh terracotta or plastic planters with matte spray paint, then add a simple stripe or color block.
Tip: apply multiple light coats; heavy coats are how runs are born.
29) Painted Vases and Bottles (High-End Look, Low Effort)
Glass bottles become modern decor with a few coats of paint (or a frosted spray finish). Group them in threes for instant “styling.”
Tip: add texture with a stipple brush or dabbed sponge.
30) Painted Lampshade Pattern
Add stripes, dots, or a simple scallop edge to a plain lampshade for a custom look. It’s quirky in the best way.
Tip: use fabric paint or a flexible medium so it doesn’t crack when you move the shade.
31) Stenciled “House Numbers” or Welcome Sign Board
A painted wood sign with crisp lettering upgrades curb appeal and makes delivery drivers love you.
Tip: seal outdoor pieces with a weather-rated clear coat so your sign doesn’t become abstract art after one rainy season.
Extra : The Real-Life Experience of Doing 31 DIY Paint Projects
Let’s talk about the part no one puts in the highlight reel: the lived experience of DIY paint projects. Not the dreamy “before/after” montage
the in-between moments where you discover you’ve been leaning your forearm into wet paint like it’s a supportive friend.
First, most people learn (usually once) that paint has a calendar, not a clock. “Dry to the touch” is not the same as “ready for hardware,”
“safe for shower steam,” or “won’t fingerprint if your cousin insists on poking it.” If you’re painting cabinets, doors, or anything that closes, plan for
real curing time. Future-you will be grateful when the finish doesn’t stick, scuff, or peel just because you got excited.
Next: prep is a mood. Cleaning sounds boring until you paint over invisible grease and your finish starts behaving like a teenagerrefusing to
cooperate for no obvious reason. Kitchens are the worst offenders. Degreasing is the difference between “smooth and durable” and “why is my paint crawling away?”
Bathrooms add moisture to the drama, which is why bonding primer and the right product choice matter so much on tile, vanities, and trim.
Another universal experience: tape confidence. You will feel powerful applying painter’s tape. You will feel even more powerful pulling it off.
And then you’ll feel humble when you see a tiny bleed and realize you’re still a mortal. The trick most DIYers adopt is burnishing tape edges and using less paint
near the tape line (a nearly dry roller is your friend). Also: removing tape at the right momentwhen paint is still slightly tackyoften prevents tearing and jagged edges.
Then there’s the sheen surprise. Flat paint forgives. Semi-gloss exposes your wall’s “texture story” like high-definition lighting at a high school reunion.
Many DIYers end up loving eggshell or satin on walls because it balances washability and softness. For trim and cabinets, stepping up sheen can be a durability win, but only
if your prep is solid.
And yes, the big emotional arc: the ugly middle. Every project has a phase where it looks worse than before. Patchy first coats. Tape lines everywhere.
Drop cloths making your room look like a crime scene. That’s normal. It’s also why pros do multiple thin coats, sand lightly between layers when needed, and keep going.
If you can push past the ugly middle, you usually land in the “wait… this is actually working” zone.
Finally, DIYers often report the same unexpected benefit: your home starts reflecting you. When you choose a color, design a stencil pattern, or revive a beat-up
dresser, you’re not just decoratingyou’re editing the story your space tells. And if a little paint ends up on your elbow? Consider it proof you did something real.


