Table of Contents >> Show >> Hide
- Before You Start: Inspect the Railing Like a Pro
- Way 1: Remove Surface Rust, Prime, and Repaint
- Way 2: Tighten or Reset Loose Railing Posts
- Way 3: Patch Small Holes, Pits, and Minor Metal Damage
- Way 4: Cut Out and Replace Severely Rusted Sections
- How to Choose the Right Wrought Iron Railing Repair Method
- How to Prevent Future Rust on Wrought Iron Railings
- Common Mistakes to Avoid
- Cost Expectations for Wrought Iron Railing Repair
- Real-World Experience: What Repairing a Wrought Iron Railing Teaches You
- Conclusion
A wrought iron railing has one job: stand there looking elegant while quietly keeping everyone from doing an accidental stunt fall. The problem is that rain, snow, humidity, salty air, loose anchors, chipped paint, and plain old time can turn a sturdy railing into a rusty, wobbly, “please don’t lean on that” situation.
The good news? Many wrought iron railing problems can be repaired without replacing the entire railing. Whether you are dealing with surface rust, a loose post, small holes, peeling paint, or a section that has corroded near the base, there is usually a smart fix. The key is knowing which repair method matches the damage. A tiny rust spot does not need a welding truck, and a railing leg that is hollowed out by corrosion does not need wishful thinking and a heroic coat of paint.
This guide explains four practical ways to repair a wrought iron railing, including when to DIY, when to call a professional, what tools to use, and how to keep the railing from rusting again. Think of it as railing rehabwith fewer dramatic speeches and more wire brushing.
Before You Start: Inspect the Railing Like a Pro
Before grabbing a grinder, paintbrush, or tube of metal filler, take a slow walk around the railing. Shake it gently. Look at the feet where the posts meet concrete, brick, stone, or wood. Check the underside of the handrail, the joints between balusters, and the areas where paint has cracked or bubbled. Rust often hides under paint like it is renting the place.
Signs Your Wrought Iron Railing Needs Repair
- Orange or brown rust spots
- Flaking, peeling, or bubbling paint
- Loose railing posts or anchors
- Cracks around the concrete base
- Small holes or pitted metal
- Wobbly handrail sections
- Severely corroded railing legs
- Broken welds or separated joints
Safety comes first. If the railing guards stairs, a porch, balcony, or any raised walking surface, do not ignore movement. A railing that feels loose under hand pressure may not protect someone during a slip. Local building codes can vary, but residential guards and handrails are expected to be structurally reliable, properly anchored, and safe to grip. If the railing is severely unstable, cracked through, or rusted at multiple structural points, bring in a qualified metalworker or railing contractor.
Tools and Materials You May Need
- Work gloves and safety glasses
- Dust mask or respirator
- Wire brush or wire wheel attachment
- Scraper or putty knife
- Sandpaper in coarse, medium, and fine grits
- Drill or angle grinder
- Rust remover or rust converter
- Degreaser or mild soap
- Rust-inhibiting metal primer
- Exterior metal paint
- Metal-reinforced epoxy or filler
- Anchoring cement or masonry repair material
- Replacement screws, bolts, or anchors
- Caulk or sealant rated for exterior use
Important safety note: If your home was built before 1978, old paint may contain lead. Scraping or sanding lead-based paint can create dangerous dust. For older homes, test the paint first or hire an EPA-certified lead-safe contractor. Also, if rusty metal cuts your skin, clean the wound promptly and make sure your tetanus vaccination is current. Rust itself is not the villain; contaminated wounds are.
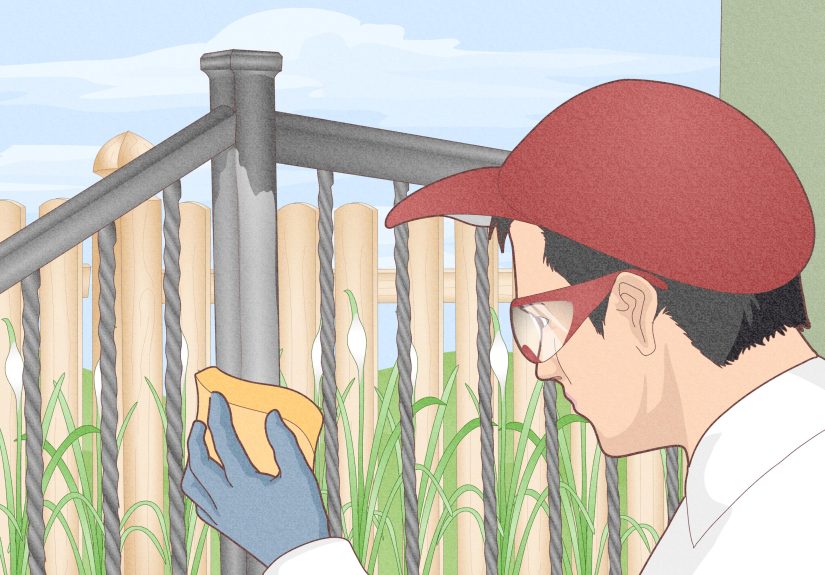
Way 1: Remove Surface Rust, Prime, and Repaint
This is the most common wrought iron railing repair, and it is perfect when the railing is still solid but looks like it has been auditioning for a haunted mansion. Surface rust usually appears as orange spots, powdery flakes, or bubbling paint. Left alone, it spreads. Fixed early, it is manageable.
Best For
- Light to moderate rust
- Peeling paint
- Cosmetic damage
- Railing that is still structurally sound
Step-by-Step: How to Repair Surface Rust
1. Clean the railing. Start with mild soap and water to remove dirt, pollen, grease, and spider architecture. Rinse well and let the metal dry completely. Paint and primer do not bond well to damp or dirty surfaces.
2. Remove loose rust and paint. Use a wire brush, scraper, sandpaper, or drill-mounted wire wheel. Focus on curved scrolls, joints, and the lower portions of the railing where moisture collects. You do not always need to strip every inch to bare metal, but you must remove all loose material.
3. Sand the edges smooth. Feather the edges where old paint meets exposed metal. This helps the new coating blend better and prevents obvious ridges.
4. Apply rust converter if needed. For stubborn rust in pits or tight details, a rust converter can help stabilize remaining oxidation. Follow the product directions carefully. Do not treat rust converter like hot sauce; more is not automatically better.
5. Prime bare metal. Use a rust-inhibiting primer made for exterior metal. Primer is not optional. It is the handshake between the metal and the paint, and without it, the paint may fail faster.
6. Paint with exterior metal paint. Apply two thin coats rather than one thick coat. Thin coats dry harder, look smoother, and resist drips. Use a brush for detailed wrought iron scrollwork and spray paint for even coverage on simple railings, as long as you protect surrounding surfaces.
Pro Tips for a Longer-Lasting Finish
Paint on a dry day when temperatures are within the product’s recommended range. Avoid painting in direct blazing sun because the surface can dry too fast and trap solvents. Pay special attention to the underside of the handrail and the bottoms of posts. These hidden areas are where rust often starts its sneaky comeback tour.
Way 2: Tighten or Reset Loose Railing Posts
A loose wrought iron railing is more than annoying. It is a safety issue. Posts can become loose when anchors rust, concrete cracks, masonry crumbles, or water gets into the base and expands during freeze-thaw cycles. If your railing wiggles, do not just paint over it and hope gravity takes a day off.
Best For
- Wobbly railings
- Loose posts set into concrete
- Rusted or failing anchors
- Small cracks around post bases
Step-by-Step: How to Fix a Loose Wrought Iron Railing
1. Identify the source of movement. Check whether the post itself is rusted through, the anchor bolts are loose, or the concrete around the base has failed. The repair depends on the cause.
2. Remove loose debris. If the post is set in concrete, clean out crumbling material around the base with a chisel, wire brush, or vacuum. You need a clean cavity so the repair material bonds properly.
3. Treat exposed metal. If the railing foot is rusty but still solid, wire-brush it and apply a rust-inhibiting primer or rust treatment before resetting it.
4. Use anchoring cement for concrete bases. Fast-setting anchoring cement is commonly used to secure handrails, bolts, and metal posts in concrete. Mix only what you can use quickly because some products set in minutes. Pour or pack it around the post, making sure it fills gaps completely.
5. Replace failed fasteners. If the railing uses surface-mounted plates, replace rusted screws or bolts with exterior-rated masonry anchors or appropriate fasteners for the base material. Do not reuse hardware that looks like it was recovered from a pirate ship.
6. Seal the joint. Once the repair is cured, seal around the base to help keep water out. Water sitting at the post foot is one of the main reasons railings rust from the bottom up.
When to Call a Professional
If the post is rusted through at the base, resetting it in cement will not solve the problem for long. The weak metal may continue to crumble. In that case, the damaged section should be cut out and replaced, usually by a welder or metal fabricator.
Way 3: Patch Small Holes, Pits, and Minor Metal Damage
Small holes and pitting can appear when rust eats into the metal but has not yet destroyed the railing’s strength. For non-structural damage, metal-reinforced filler or epoxy can restore the surface, improve appearance, and help prevent moisture from collecting in the damaged area.
Best For
- Small rust pits
- Minor holes in decorative areas
- Surface imperfections
- Non-load-bearing sections
This method is not suitable for major structural repairs. Filler can smooth and protect, but it cannot magically become a new railing leg. If the handrail, post, or main support is deeply corroded, replacement is safer.
Step-by-Step: How to Patch Minor Damage
1. Remove rust down to solid metal. Use a wire wheel, grinder, or coarse sandpaper to remove rust, old paint, and loose debris. Extend the sanding slightly beyond the damaged area so the filler bonds to clean material.
2. Clean the surface. Wipe the area with a degreaser or cleaner recommended by the filler manufacturer. Let it dry completely.
3. Mix the filler correctly. Metal-reinforced fillers usually use a hardener. Mix thoroughly according to the instructions. If you guess the ratio, you may end up with filler that stays gummy, cracks, or cures faster than you can say, “Well, that was educational.”
4. Apply in thin layers. Press the filler firmly into pits or holes. For deeper repairs, use multiple thin applications rather than one oversized blob. Shape it slightly proud of the surface so you can sand it flush later.
5. Sand smooth. After curing, sand the patch until it blends with the surrounding metal. Use progressively finer grits for a cleaner finish.
6. Prime and paint. Seal the repair with metal primer and exterior paint. Bare filler or exposed metal should never be left unprotected outdoors.
Smart Example
Suppose your railing has a few pencil-tip-sized pits on a decorative scroll. The scroll is not supporting the entire railing, and the metal around it is firm. That is a good candidate for filler. But if the bottom of a main post has a hole large enough to fit a screwdriver tip, and the post flexes when pushed, filler is not the answer. That post needs structural repair or replacement.
Way 4: Cut Out and Replace Severely Rusted Sections
Sometimes a wrought iron railing is past the “scrub and repaint” stage. If a section is rusted through, cracked, broken at a weld, or loose because the metal itself has failed, the safest repair is to replace the damaged part. This may involve cutting out a railing leg, welding in a new section, fabricating a new foot plate, or replacing an entire panel.
Best For
- Rusted-through posts
- Broken welds
- Severely weakened bottom rails
- Missing or bent balusters
- Railing sections that fail a stability check
How This Repair Usually Works
1. Support the railing. Before cutting anything, the railing must be supported so it does not shift, fall, or damage stairs and masonry.
2. Remove damaged metal. A reciprocating saw, angle grinder, or cutting wheel may be used to remove the rusted part. The cut should be made back to solid metal, not just to the nearest convenient spot.
3. Fabricate or buy replacement parts. Replacement pieces may include a new post bottom, baluster, mounting plate, or section of rail. Matching old wrought iron can take skill, especially on decorative railings.
4. Weld, bolt, or mechanically fasten the new part. Welding often creates the strongest and cleanest repair, but some railings can be repaired with brackets, plates, or mechanical fasteners, depending on design and code requirements.
5. Grind, prime, and paint. After the repair is structurally complete, welds and rough spots should be smoothed, then sealed with primer and paint.
DIY or Hire a Pro?
If you already have welding experience, proper safety equipment, and a clear understanding of railing loads, this may be a DIY project. For most homeowners, however, structural wrought iron railing repair is best handled by a professional. A beautiful weld that fails under pressure is not a repair; it is a decorative liability.
How to Choose the Right Wrought Iron Railing Repair Method
The right repair depends on the depth of the damage, the railing’s location, and whether the affected part is structural. Use this quick guide:
- Light rust and peeling paint: Clean, sand, prime, and repaint.
- Loose post but solid metal: Reset with anchoring cement or replace fasteners.
- Small pits or cosmetic holes: Use metal-reinforced filler, then prime and paint.
- Rusted-through support or broken weld: Replace the damaged section.
When in doubt, ask this simple question: “Would I trust this railing if someone slipped and grabbed it hard?” If the answer is “maybe,” treat the problem as structural and get expert help.
How to Prevent Future Rust on Wrought Iron Railings
Repairing a wrought iron railing is satisfying, but preventing the same problem from coming back is even better. Rust prevention is mostly about moisture control and coating maintenance.
Keep the Railing Clean
Wash the railing at least once or twice a year with mild soap and water. Dirt holds moisture, and moisture encourages rust. In coastal areas, rinse more often because salt can speed corrosion.
Touch Up Chips Quickly
A tiny paint chip may look harmless, but it exposes metal to air and water. Keep a small can of matching exterior metal paint on hand. Touch-ups take minutes and can save hours of repair later.
Inspect the Base After Heavy Weather
Rain, snow, ice, and sprinkler overspray often attack the base of railing posts. Look for cracks, standing water, and rust stains around the footings.
Use the Right Paint System
For outdoor wrought iron, use a rust-inhibiting metal primer and a durable exterior metal paint. A quality coating system is cheaper than replacing railing sections later.
Improve Drainage Around Posts
If water pools at the base of the railing, fix the drainage problem. Seal gaps, slope patching material away from posts, and keep soil or mulch from touching the metal.
Common Mistakes to Avoid
Painting over rust: This is the classic shortcut that turns into a future headache. Rust under paint continues spreading, and the new finish will bubble or flake.
Using indoor paint outdoors: Interior paint is not designed for weather, UV exposure, or moisture. Use exterior-rated products for metal.
Ignoring loose posts: A railing that moves is telling you something. Listen before it has to shout.
Skipping primer: Primer helps paint bond and protects bare metal. Without it, even expensive paint may fail early.
Using filler for structural damage: Metal filler is helpful, but it is not a substitute for solid steel or iron in load-bearing areas.
Cost Expectations for Wrought Iron Railing Repair
DIY surface rust repair is usually inexpensive. Most homeowners need sandpaper, primer, paint, brushes, and maybe a wire wheel. Patching small pits costs more if you buy metal-reinforced filler, but it is still generally affordable.
Loose post repair may require anchoring cement, new fasteners, masonry bits, or minor concrete repair materials. Professional welding or railing fabrication costs more because it involves labor, tools, skill, and sometimes custom metalwork. Still, repairing a damaged section is often less expensive than replacing an entire railing, especially if the railing has decorative character worth preserving.
Real-World Experience: What Repairing a Wrought Iron Railing Teaches You
One of the first things people learn when repairing a wrought iron railing is that the damage is usually worse than it looksbut not always in a scary way. A railing may look terrible because the paint is flaking like a sunburn, yet the metal underneath is still strong. On the other hand, a railing may look decent from three steps away while the bottom of one post is quietly crumbling behind a neat ring of paint. The lesson is simple: inspect with your hands and eyes, not just your hopes.
A common homeowner experience starts with a small rust spot near the base of a stair railing. You scrape it, expecting a quick touch-up, and suddenly a silver-dollar-sized patch of paint lifts off. This is not a disaster. It is the railing showing you where the coating failed. Once the loose paint is gone and the metal is cleaned properly, the repair becomes straightforward. The real mistake would be brushing paint over the bubble and pretending the rust fairy moved out.
Another practical lesson is that preparation takes longer than painting. In fact, painting is often the easiest part. The wire brushing, sanding, wiping, masking, and priming are what determine whether the finish lasts two seasons or ten. Many DIY repairs fail because the final coat looks good on day one, but the surface underneath was dusty, damp, rusty, or glossy. Paint is not a magic blanket. It needs a clean, stable surface.
Loose railing posts teach a different lesson: strength matters more than appearance. A freshly painted wobbly railing is like a tuxedo on a scarecrow. It may look dressed up, but nobody should lean on it. When a post moves, the base needs attention. Sometimes the fix is as simple as replacing fasteners or packing new anchoring cement around a solid post. Other times, the metal is too far gone and needs replacement. The trick is being honest about what the railing is being asked to do.
Homeowners also discover that small tools can make a big difference. A hand wire brush works, but a drill-mounted wire wheel can save a lot of time on curves and tight spots. A small artist’s brush can help primer reach decorative scrollwork. A putty knife can reveal hidden loose paint. Good gloves prevent scraped knuckles, which is important because wrought iron seems personally committed to finding unprotected skin.
The most satisfying part of repairing a wrought iron railing is the transformation. A rusty railing can make a porch look neglected, even if the rest of the home is tidy. After cleaning, patching, priming, and painting, the same railing can look sharp, historic, and intentional again. Black is the classic finish, but dark bronze, charcoal, and deep green can also work beautifully depending on the home’s exterior.
Finally, wrought iron repair teaches patience. Let primer dry. Let filler cure. Apply thin coats. Check the weather. Rushing saves an hour today and may cost you a weekend next year. A good repair is not just about making the railing look better; it is about giving it a longer life. Done well, a repaired wrought iron railing can keep its charm, strength, and curb appeal for yearsand continue doing its quiet job of preventing dramatic stairway moments.
Conclusion
Repairing a wrought iron railing starts with the right diagnosis. Surface rust needs cleaning, primer, and paint. Loose posts need secure anchoring. Small pits and holes may need metal filler. Severely rusted or broken sections need replacement or professional welding. The best repair is the one that restores both appearance and safety.
If your railing is mostly solid, a weekend of careful prep can make a dramatic difference. If the railing is weak, unstable, or rusted through, do not gamble with it. A wrought iron railing is more than decorationit is a safety feature with style. Treat it well, and it will keep holding the line for years to come.
Note: This article is for general home improvement education. For structural railing damage, elevated surfaces, older lead-painted homes, or code-sensitive repairs, consult a qualified contractor, metal fabricator, or local building authority.


