Table of Contents >> Show >> Hide
- Why Oven-to-Grill Baby Back Ribs Work So Well
- Ingredients for Oven-to-Grill Baby Back Ribs
- Step 1: Prep the Baby Back Ribs
- Step 2: Bake the Ribs Low and Slow
- Step 3: Finish the Ribs on the Grill
- How to Know When Baby Back Ribs Are Done
- Best Barbecue Sauce for Oven-to-Grill Ribs
- Flavor Variations to Try
- Common Mistakes to Avoid
- What to Serve With Oven-to-Grill Baby Back Ribs
- Make-Ahead and Storage Tips
- Extra Experience: What Cooking Oven-to-Grill Baby Back Ribs Teaches You
- Conclusion
- SEO Tags
Some foods politely ask for attention. Baby back ribs kick open the patio door, announce that dinner is about to become an event, and make everyone suddenly “available” to help taste-test. The trouble is, traditional barbecue ribs can feel intimidating if you do not own a smoker, babysit charcoal like a pitmaster, or enjoy spending half your Saturday wondering whether your grill temperature has developed a personality disorder.
That is where oven-to-grill baby back ribs earn their crown. This method gives you the best of both worlds: the oven handles the slow, gentle cooking that makes ribs tender, while the grill delivers the smoky char, sticky glaze, and backyard barbecue flavor everyone actually came for. Think of it as teamwork: the oven does the quiet studying, and the grill gives the final presentation with flames.
This guide walks you through how to make tender baby back ribs in the oven, finish them on the grill, build layers of flavor with a dry rub and barbecue sauce, and avoid the common mistakes that lead to tough, dry, or burned ribs. Whether you are cooking for a weekend cookout, game day, Father’s Day, July Fourth, or a Tuesday that needs emotional support, this oven-to-grill ribs recipe is reliable, approachable, and deliciously messy in all the right ways.
Why Oven-to-Grill Baby Back Ribs Work So Well
Baby back ribs come from the upper part of the pig’s rib cage near the loin. They are usually shorter, leaner, and more curved than spare ribs, with tender meat between and on top of the bones. Because they contain connective tissue, they need time and gentle heat to become truly tender. Quick, high-heat cooking can tighten the meat before the collagen has time to soften, which is why ribs can turn chewy if rushed.
The oven solves that problem by creating a steady, controlled environment. When the ribs are wrapped tightly in foil and cooked low and slow, moisture stays trapped around the meat. The dry rub has time to season deeply, the fat begins to render, and the connective tissue relaxes into that tender texture people describe as “fall-off-the-bone.” Technically, many barbecue lovers prefer ribs with a slight tug instead of total collapse, but either way, the oven gives you control.
The grill then adds what the oven cannot: charred edges, caramelized sauce, a hint of smoke, and that unmistakable grilled finish. You are not trying to cook the ribs from raw on the grill. You are finishing them. That means less stress, fewer flare-ups, and a much better chance of serving ribs instead of barbecue-flavored shoe leather.
Ingredients for Oven-to-Grill Baby Back Ribs
You do not need a shopping cart full of secret ingredients to make great ribs. The magic comes from balance: savory spices, a little sweetness, gentle heat, and a sauce that caramelizes without burning.
Main Ingredients
- 2 racks baby back ribs, about 2 to 2 1/2 pounds each
- 2 tablespoons yellow mustard or olive oil, used as a binder
- 1/2 cup barbecue sauce, plus more for serving
- 1/4 cup apple juice, apple cider, or water for moisture
- 1 tablespoon apple cider vinegar, optional but useful for brightness
Dry Rub Ingredients
- 2 tablespoons brown sugar
- 1 tablespoon smoked paprika
- 1 tablespoon kosher salt
- 2 teaspoons black pepper
- 2 teaspoons garlic powder
- 2 teaspoons onion powder
- 1 teaspoon chili powder
- 1/2 teaspoon ground cumin
- 1/4 to 1/2 teaspoon cayenne pepper, optional
Brown sugar helps create a caramelized surface, smoked paprika brings gentle smokiness, and garlic and onion powder provide the savory backbone. Cayenne is optional because not every cookout needs to become a dare.
Step 1: Prep the Baby Back Ribs
Start by patting the ribs dry with paper towels. Moisture on the surface can prevent the rub from sticking evenly, and ribs deserve better than patchy seasoning.
Next, check the bone side of the ribs for the thin, silvery membrane. This membrane can turn chewy and can block seasoning from reaching the meat. To remove it, slide a butter knife under one corner, loosen enough to grab, then pull it off using a paper towel for grip. Sometimes it comes off in one dramatic sheet, which feels oddly satisfying. Sometimes it tears into pieces and tests your patience. Both outcomes still lead to dinner.
Rub the ribs lightly with yellow mustard or olive oil. Mustard does not make the ribs taste mustardy once cooked; it simply helps the seasoning cling. Sprinkle the dry rub generously over both sides, pressing it into the meat rather than rubbing aggressively. Baby back ribs are food, not a stubborn stain.
Step 2: Bake the Ribs Low and Slow
Preheat the oven to 275°F. This temperature is low enough to gently tenderize the ribs but warm enough to get the job done in a reasonable amount of time. Place each rack on a large sheet of heavy-duty aluminum foil. Add a splash of apple juice, apple cider, or water around the ribs, then wrap tightly so steam stays inside.
Place the foil packets on a rimmed baking sheet, meat side up, and bake for about 2 1/2 to 3 hours. Smaller racks may be ready closer to 2 1/2 hours, while thicker racks may need the full 3 hours or slightly more.
The ribs are ready for the grill when the meat has pulled back slightly from the bone ends and the rack bends easily when lifted with tongs. If you use an instant-read thermometer, remember that pork is safe at a lower internal temperature, but ribs become tender at a higher range because collagen needs time and heat to soften. For tender ribs, many cooks look for roughly 190°F to 205°F between the bones, along with the bend test and probe tenderness.
Step 3: Finish the Ribs on the Grill
Heat a gas or charcoal grill to medium, about 350°F to 400°F. If possible, create two zones: one side with direct heat and one side with lower or indirect heat. This gives you a safe place to move the ribs if the sauce starts caramelizing too quickly.
Carefully unwrap the ribs. Watch for hot steam when opening the foil. Transfer the ribs to the grill, meat side up, and brush with barbecue sauce. Grill for about 8 to 12 minutes, turning and brushing occasionally, until the sauce becomes glossy, sticky, and lightly charred at the edges.
Do not walk away during this stage. Barbecue sauce often contains sugar, and sugar can go from beautifully caramelized to “we need to order pizza” surprisingly fast. Keep the lid open or partially open if your grill runs hot, and move the ribs to indirect heat if flare-ups appear.
How to Know When Baby Back Ribs Are Done
Great ribs are not judged by time alone. Time gives you a useful estimate, but tenderness tells the truth. Use these simple tests to decide when your oven-to-grill baby back ribs are ready.
The Bend Test
Pick up the rack with tongs from one end. If the ribs bend easily and the surface begins to crack slightly, they are tender. If the rack stays stiff and straight like a tiny pork snowboard, it needs more time.
The Probe Test
Insert a thermometer probe or skewer between the bones. It should slide in with little resistance, almost like pushing into softened butter. If it feels tight or rubbery, the collagen has not fully broken down.
The Bone Pullback Test
Look at the ends of the bones. If the meat has shrunk back by about 1/4 to 1/2 inch, that is a good visual clue. This test is helpful, but it should be used with the bend or probe test because every rack is a little different.
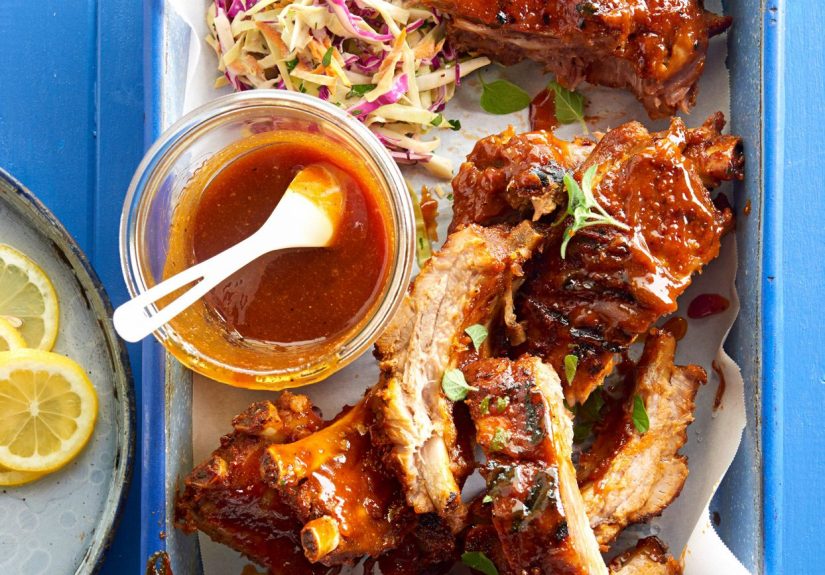
Best Barbecue Sauce for Oven-to-Grill Ribs
The best sauce depends on your flavor mood. A Kansas City-style sauce is thick, sweet, tomato-based, and perfect for sticky ribs. A Carolina-style sauce leans tangy with vinegar and mustard. A Memphis-inspired finish may use less sauce and let the dry rub shine. A spicy chipotle sauce adds smoke and heat without needing a smoker.
If you are using store-bought barbecue sauce, choose one with enough sweetness to glaze but enough acidity to keep the ribs from tasting flat. For a quick upgrade, simmer 1 cup of bottled sauce with 1 tablespoon apple cider vinegar, 1 tablespoon honey, 1 teaspoon hot sauce, and a pinch of smoked paprika for 5 to 8 minutes. Suddenly your grocery-store sauce has a backstory.
Flavor Variations to Try
Classic Sweet and Smoky Ribs
Use brown sugar, smoked paprika, garlic powder, black pepper, and a thick tomato-based barbecue sauce. This is the crowd-pleasing version that disappears fastest at cookouts.
Spicy Honey Ribs
Add cayenne to the dry rub and mix honey with barbecue sauce before grilling. The result is sweet at first, warm at the finish, and very good with coleslaw.
Apple Cider Vinegar Ribs
Add a splash of apple cider vinegar to the foil packet and choose a tangy sauce. This version cuts through the richness of the pork and pairs well with baked beans or potato salad.
Dry-Rubbed Grill-Finished Ribs
Skip the heavy sauce and finish the ribs on the grill with only a light brushing of melted butter or a thin vinegar mop. This keeps the spice crust front and center.
Common Mistakes to Avoid
The first mistake is skipping the membrane removal. While not every rack has a stubborn membrane, removing it usually improves texture and helps seasoning reach the meat.
The second mistake is cooking the ribs uncovered in the oven for the entire time. Foil helps trap moisture, especially for leaner baby back ribs. Without it, the ribs may dry out before they become tender.
The third mistake is saucing too early. Barbecue sauce should be added near the end because sugar burns quickly. Sauce belongs in the finishing stage, not as a three-hour oven blanket.
The fourth mistake is grilling over flames that are too hot. The ribs are already cooked when they hit the grill. Your goal is to caramelize and char lightly, not carbon-date them.
The final mistake is slicing immediately. Let the ribs rest for 5 to 10 minutes before cutting between the bones. This helps the juices settle and keeps each bite moist.
What to Serve With Oven-to-Grill Baby Back Ribs
Ribs are bold, rich, and saucy, so the best side dishes add contrast. Creamy coleslaw brings crunch and coolness. Cornbread adds sweetness. Baked beans bring smoky depth. Potato salad is a classic for a reason. Grilled corn with butter and lime makes the plate feel summery even if you are eating indoors while pretending the weather cooperated.
For a lighter meal, serve ribs with cucumber salad, roasted vegetables, watermelon wedges, or a crisp green salad. For a full barbecue spread, add macaroni and cheese, pickles, jalapeño cornbread, and extra napkins. Actually, add more napkins than you think. Ribs are not finger food; they are finger commitment.
Make-Ahead and Storage Tips
One of the best things about oven-to-grill baby back ribs is that you can do most of the work ahead of time. Bake the ribs in foil, let them cool slightly, and refrigerate them still wrapped. When ready to serve, bring them closer to room temperature for about 20 to 30 minutes, then finish on the grill with barbecue sauce.
Cooked ribs can be stored in an airtight container in the refrigerator for 3 to 4 days. To reheat, wrap them in foil and warm in a 300°F oven until heated through. Add a little sauce or apple juice before wrapping to help keep them moist. You can also reheat them gently on the grill over indirect heat, brushing with sauce near the end.
Extra Experience: What Cooking Oven-to-Grill Baby Back Ribs Teaches You
The first time you make oven-to-grill baby back ribs, you may feel like you are cheating. After all, barbecue culture often comes with serious opinions, expensive equipment, and people who say things like “I monitor my smoke profile” with a straight face. But after you take that first bite, you realize this method is not cheating. It is smart home cooking.
The biggest lesson is that tenderness and smoky flavor do not have to come from the same step. The oven is excellent at controlled tenderness. It keeps the heat steady, protects the ribs from drying out, and allows you to cook without hovering over the grill. The grill, meanwhile, is excellent at surface flavor. It gives sauce that sticky shine, adds charred edges, and creates the aroma that makes neighbors suddenly remember they “just happened to be outside.”
Another useful experience is learning how each rack of ribs behaves differently. Some racks are meaty and thick. Others are leaner and cook faster. Some have more fat, some have more curve, and some look like they were packaged by someone having a complicated day. This is why relying only on a timer can disappoint you. After making ribs a few times, you start noticing the signs: the meat pulling back from the bones, the rack bending more easily, the foil packet filling with savory juices, and the surface becoming tender but not mushy.
You also learn that seasoning does not need to be complicated. A balanced dry rub can turn a simple rack of ribs into something memorable. Salt seasons the meat. Sugar helps browning. Paprika adds color and smoke. Garlic and onion powder bring savory depth. Pepper adds bite. Once you understand the basic formula, you can adjust it confidently. Want sweeter ribs? Add more brown sugar. Want more heat? Add cayenne or chipotle powder. Want a deeper barbecue flavor? Add smoked paprika and a touch of cumin.
The grill-finishing stage teaches patience in the opposite direction. During the oven stage, patience means waiting long enough for tenderness. During the grill stage, patience means not overdoing it. A few minutes can make the sauce shiny and delicious. Too many minutes can burn the sugars and turn the glaze bitter. The best move is to brush on thin layers of sauce, turn the ribs gently, and let the heat build flavor gradually.
Serving ribs also teaches a funny truth about food: presentation matters, but not as much as joy. You can slice the ribs neatly, stack them on a platter, sprinkle them with herbs, and serve them with polished confidence. Five minutes later, everyone will have sauce on their fingers, someone will be licking barbecue glaze off a knuckle, and the platter will look like a delicious crime scene. That is part of the charm.
For family dinners, this method is especially helpful because it reduces stress. You can bake the ribs earlier in the day, clean the kitchen, prepare side dishes, and finish the ribs on the grill right before eating. For parties, it lets you serve ribs with confidence instead of performing live fire management while guests ask whether dinner is ready every seven minutes.
The most rewarding part is how repeatable the process becomes. Once you understand the oven-to-grill method, you can make ribs in almost any season. Rainy day? Bake them and finish under the broiler if needed. Summer cookout? Grill them outside for the full effect. Feeding spice lovers? Make a hot honey glaze. Cooking for kids or mild-flavor fans? Use a sweet, smoky sauce and keep the heat gentle.
In the end, oven-to-grill baby back ribs are not just a recipe. They are a confidence builder. They prove that great barbecue-style food can be practical, flexible, and friendly to real-life kitchens. You do not need a competition smoker or secret pitmaster handshake. You need good ribs, steady heat, balanced seasoning, a hot grill, and the wisdom to keep extra napkins nearby.
Conclusion
Oven-to-grill baby back ribs are the perfect solution for anyone who wants tender, flavorful ribs without spending an entire day managing a smoker. The oven gently cooks the ribs until they are juicy and tender, while the grill adds the sticky sauce, caramelized edges, and smoky finish that make ribs feel like a celebration.
By removing the membrane, using a balanced dry rub, baking the ribs low and slow, and grilling them briefly with sauce at the end, you get consistent results with less guesswork. This method is beginner-friendly, party-friendly, and hungry-family-friendly. Serve the ribs with classic barbecue sides, give them a short rest before slicing, and prepare yourself for the kind of silence that only happens when everyone at the table is too busy eating to talk.
SEO Tags
Note: This publish-ready HTML includes only the body section, written in standard American English, with SEO metadata displayed in JSON format at the end.