Table of Contents >> Show >> Hide
- What This Tile Actually Is (and Why People Buy It)
- The Design Win: “Coffered-ish” Without the Coffered Price
- Grid Compatibility: 15/16 vs. 9/16 (Choose Your Adventure)
- Planning Your Project: Measure Like a Pro (Without Becoming One)
- Installation Overview: What You’re Doing (and Why It Works)
- Performance: Acoustics, Fire Rating, and Day-to-Day Practicality
- Maintenance and Cleaning: Keep It Nice Without Overdoing It
- Style Ideas: Make the Ceiling Look Intentional (Not Default)
- Common Mistakes (So You Don’t Join the Club)
- Is This the Right Ceiling Tile for You?
- Conclusion
- Real-World Experiences With the Single Raised Panel (500+ Words)
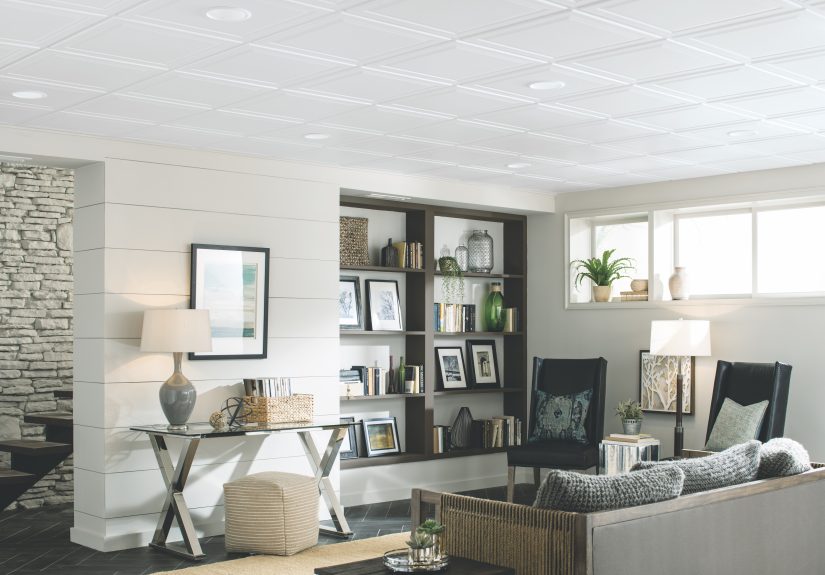
Some ceilings try to be “the ceiling.” This one tries to be the whole vibe. The Armstrong Ceilings Single Raised Panel 24 in. x 24 in. tile is a classic drop-ceiling panel that borrows the look of a coffered ceilingwithout demanding you learn carpentry, buy a table saw, or make peace with crown molding corners.
If you’re finishing a basement, updating a rec room, renovating a small office, or simply trying to hide a maze of ductwork that looks like it was designed during a caffeine shortage, this tile is a practical, good-looking option. It’s designed for a suspended grid, so you still get the number-one superpower of a drop ceiling: easy access to wiring, plumbing, and everything else you don’t want sealed behind drywall forever.
What This Tile Actually Is (and Why People Buy It)
The Single Raised Panel is a 2 ft. x 2 ft. mineral-fiber ceiling tile with a raised-panel pattern. The “raised” detail gives you that shallow coffered lookenough depth to feel intentional, not enough depth to feel like your ceiling is cosplaying as a waffle.
Quick specs you’ll care about in real life
- Nominal size: 24 in. x 24 in. (fits standard 2×2 ceiling grids)
- Typical carton coverage: 24 sq. ft. per case (commonly 6 tiles per carton)
- Material: Mineral fiber
- Edge style: Flush tegular (made to minimize the visible grid look)
- Fire rating: Class A (typical listing for this product line)
- Acoustics: Rated as a sound-blocking ceiling tile (commonly listed with CAC around 30)
Translation: you’re getting a decorative panel that doesn’t scream “office building,” installs into common ceiling systems, and adds some noise control compared with leaving a basement ceiling open and echo-y.
The Design Win: “Coffered-ish” Without the Coffered Price
Traditional coffered ceilings are gorgeousand famously time-consuming. The Single Raised Panel tile gives a similar structured geometry in a format that’s essentially “snap in, step back, admire.” It’s a smart compromise for homeowners who want something more elevated than flat fissured tiles but still want a ceiling they can open up later to fix a leak, run cable, or investigate the mysterious sound your house makes at 2 a.m. (Spoiler: it’s always the ductwork.)
Best rooms for the look
- Basements: Great for covering pipes and wiring while keeping access
- Home offices: More polished than exposed joists on video calls
- Family rooms: Adds detail without making the space feel busy
- Retail or studio spaces: Upgrades the ceiling plane without expensive build-outs
Grid Compatibility: 15/16 vs. 9/16 (Choose Your Adventure)
Before you buy tiles, decide what grid you’re installingor what grid you already have. This tile is commonly sold in versions that work with both standard and narrower systems.
15/16-inch grid (the “standard” look)
Many homeowners go with a 15/16-inch system because it’s widely available and forgiving. The Single Raised Panel version designed for this grid is often associated with Armstrong’s Prelude-style systems, and it can also be installed using homeowner-friendly hanging hardware kits designed to simplify alignment and leveling.
9/16-inch grid (the “sleeker” look)
If you want a more refined appearance, 9/16-inch grid reduces the visible metal lines. Armstrong’s Suprafine-style systems are common in this category. With a decorative tile like Single Raised Panel, that narrower grid can make the pattern feel more “built-in” and less “dropped-in.”
Either way, the flush tegular edge is doing a lot of the aesthetic heavy lifting. Tegular edges sit in a way that visually downplays the grid, so the ceiling reads as panels first, metal second.
Planning Your Project: Measure Like a Pro (Without Becoming One)
A drop ceiling looks simpleuntil you realize your room is not a perfect rectangle and your walls were apparently framed by someone who hated right angles. Good planning prevents the “why is my border tile 1.5 inches wide?” moment.
Step 1: Calculate how many tiles you need
Each 2×2 tile covers 4 square feet. A carton commonly covers 24 square feet. Measure your room’s length and width, multiply for total square footage, and add a little extra for cuts and mistakes. (You will make at least one mistake. It’s basically the initiation fee for DIY.)
Step 2: Decide the grid layout
The best-looking drop ceilings usually avoid tiny border pieces. A simple trick: map your grid so both sides get similar border widths. That way your room doesn’t look like the ceiling gave up near one wall.
Step 3: Plan around lights, vents, and access points
Drop ceilings are excellent for integrating light panels, can lights, HVAC vents, speakers, and access panels. But each accessory adds weight and requires proper supportso plan locations early.
Installation Overview: What You’re Doing (and Why It Works)
A suspended ceiling is basically a lightweight metal grid hung from the structure above, with tiles laid into the openings. The key is getting the perimeter level and the grid squarethen the tiles behave themselves.
Core steps (the non-scary version)
- Mark the ceiling height: Choose the finished height, then snap a level line around the room.
- Install wall molding: This perimeter trim supports the grid ends and sets the visual line.
- Locate joists and hang the grid: Use the ceiling structure above to anchor hangers or brackets.
- Install main beams and cross tees: Build the grid in the correct spacing for 2×2 tiles.
- Square and level the grid: This is where patience becomes a personality trait.
- Cut border tiles and place tiles: Cut tiles face-up with a sharp blade for a cleaner edge.
If you’re using homeowner-oriented hanging systems, note that drop ceilings require enough space above the grid to insert and remove tiles. Minimum clearances vary by system and by what’s above your ceiling (pipes, ducts, lights), but you generally want enough room to lift and angle tiles into place without forcing them.
A few installation tips that save your sanity
- Use a laser level if you can: It turns “is this level?” into “yes, because lasers don’t lie.”
- Keep your border tiles generous: Very thin perimeter cuts look accidental and are harder to fit cleanly.
- Listen for the click: Cross tees often “click” into the main beam slots when fully seated.
- Support fixtures independently: Don’t let the grid carry loads it wasn’t designed to carry.
Performance: Acoustics, Fire Rating, and Day-to-Day Practicality
Decorative is great, but ceilings also have jobs. The Single Raised Panel tile is commonly positioned as an acoustical mineral-fiber panel and is frequently listed with a Class A fire rating. If you’re finishing a basement or converting a space into a media room, the added sound control can be a real quality-of-life upgrade.
Sound: what a CAC-style number means in plain English
Many product listings highlight a sound-blocking rating (often shown as CAC). In practical terms, higher CAC generally means better reduction of sound traveling between spaces separated by the ceiling assembly. It won’t turn your basement into a recording studio, but it can make upstairs conversations feel less like they’re happening in your room.
Fire rating: why it matters even if you’re not planning a bonfire
A Class A fire rating is commonly cited for these panels, which is reassuring for typical residential and light commercial use. Local codes still rule, and if you’re doing a permitted renovation, your inspector may care more about the whole assembly grid, fixtures, clearances, and accessthan any single component.
Maintenance and Cleaning: Keep It Nice Without Overdoing It
Mineral-fiber tiles are pretty forgiving, but they’re not “hose it down and call it a day” forgiving. The good news: most ceiling maintenance is basicdust control, spot cleaning, and not doing anything dramatic.
Simple cleaning routine
- Dust first: Use a soft brush or a vacuum attachment to remove loose dirt.
- Spot clean carefully: Use gentle tools for scuffs (an eraser can help with certain marks).
- Use mild cleaners sparingly: A lightly damp cloth with mild, clear detergent is usually safer than harsh sprays.
- Never soak mineral fiber: Too much water can warp tiles or damage the finish.
If your space is prone to moisture (bathrooms, laundry rooms, damp basements), manage humidity first. A drop ceiling can hide the evidence of a problem, but it can’t negotiate with physics. Fix leaks, control humidity, and choose ceiling materials designed for the conditions.
Style Ideas: Make the Ceiling Look Intentional (Not Default)
The Single Raised Panel pattern already adds architecture overhead, but a few small choices can make it look especially polished.
Easy upgrades that punch above their weight
- Match the grid color: A white grid blends; a contrasting grid becomes a design choice (bold, but it can work).
- Coordinate lighting: Even simple flush-mount fixtures look better when aligned with the grid pattern.
- Use the pattern to your advantage: The raised detail can visually “frame” zoneslike a seating area or workspace.
- Keep borders symmetrical: Balanced border cuts read custom, even when the ceiling is purely modular.
Common Mistakes (So You Don’t Join the Club)
1) Buying tiles before choosing the grid
The tile and grid are a matched system. Confirm whether you’re building a 15/16-inch or 9/16-inch system and buy the correct tile edge profile.
2) Forgetting clearance above the grid
You need room to tip tiles up into the grid opening and bring them back down for access later. Low clearance turns tile installation into a puzzle nobody asked for.
3) Letting the grid support heavy fixtures
Ceiling grids are engineered systems, but heavy lights, fans, or other loads usually require independent support per manufacturer guidance and code.
4) Tiny border tiles everywhere
A layout that creates skinny perimeter cuts can make the whole ceiling look like a misprint. Adjust the grid so borders are wider and more even.
Is This the Right Ceiling Tile for You?
The Armstrong Single Raised Panel 24 in. x 24 in. is a strong pick if you want:
- A decorative, coffered-style look without custom carpentry
- Drop-ceiling access to pipes, ducts, and wiring
- A cleaner grid appearance (thanks to a flush tegular edge)
- Solid baseline performance for everyday spaces (including acoustical and fire-rating considerations)
If you need high-humidity performance, extreme scrubbability, or specialized healthcare-grade features, you may want a different tile category. But for a huge number of residential basements and multipurpose rooms, Single Raised Panel hits the sweet spot: looks upgraded, installs realistically, and stays practical later.
Conclusion
A ceiling doesn’t have to be the most exciting part of your renovationyet it’s one of the largest surfaces in the room, and it quietly sets the tone for everything underneath it. The Armstrong Ceilings Single Raised Panel 24 in. x 24 in. is a smart way to get a more finished, architectural look while keeping the everyday benefits of a suspended ceiling: accessibility, flexibility, and the ability to swap a tile instead of repairing an entire ceiling.
Choose the right grid, plan your layout so the borders look intentional, and take your time leveling the system. Do that, and you’ll end up with a ceiling that reads “designed,” not “default”which is the DIY equivalent of getting a standing ovation.
Real-World Experiences With the Single Raised Panel (500+ Words)
In real homes, this tile tends to show up at the exact moment someone decides their basement should stop looking like a utility tunnel and start acting like a room. One common story goes like this: the space is mostly finishedpainted walls, decent flooring, maybe a couch but the ceiling is still a web of pipes, wires, and ducts that makes the whole room feel temporary. The Single Raised Panel becomes the “final layer” that makes the basement feel legitimate. People often describe the before-and-after as surprisingly dramatic, because the raised detail adds structure overhead without making the ceiling feel heavy.
Another frequent experience: the tile is chosen specifically to avoid the “office ceiling” stereotype. Flat, speckled tiles can read very commercial, especially in a cozy room with warm lighting. The raised panel pattern softens that vibe and can make a simple grid ceiling feel more like a design decision. DIYers often mention that guests don’t immediately clock it as a drop ceilingespecially when the grid color blends well and the border cuts are balanced. In other words, it passes the “did you do something fancy?” test without requiring fancy work.
On the practical side, homeowners with older houses tend to appreciate the access. Someone installs the ceiling, feels proud, and thensix months laterneeds to add a network cable, repair a plumbing connection, or track down a minor leak. With drywall, that becomes a messy cut-and-patch project. With a suspended ceiling, it becomes: remove a tile, do the work, put the tile back. People also like that if one tile gets stained (say, from an HVAC condensation hiccup), the fix is often a single replacement tile instead of repainting an entire ceiling.
The installation experience itself usually comes down to patience and leveling. Most DIYers report that placing tiles is the “fun” part and the grid is the “character-building” part. The good news is that once the perimeter is level and the main beams are straight, the rest starts to go quicklyespecially with non-directional patterns that don’t require constant orientation checks. The first row of tiles tends to be the moment of relief: suddenly the ceiling looks like something, not like a construction site.
A final, very real experience: lighting changes everything. People often start with a single central fixture and end up upgrading to more even lightingrecessed cans, LED panels, or a better layoutbecause once the ceiling looks finished, the lighting becomes the next “weak link.” The tile’s raised detail plays nicely with warm LEDs, giving a subtle shadow line that adds depth. It’s not dramatic, but it’s enough to make the ceiling look intentionallike it belongs in the room rather than hovering above it as a necessary evil.