Table of Contents >> Show >> Hide
- Why Decorating Kitchen Shelves Is About Function First
- How to Decorate Kitchen Shelves So They Look Styled, Not Stiff
- 1) Start with a Color Plan
- 2) Use the Rule of Contrast
- 3) Layer Front to Back (Yes, Even on Narrow Shelves)
- 4) Keep Breathing Room
- 5) Mix Open Display and Hidden Helpers
- 6) Style in Odd Groupings
- 7) Add One Living Element
- 8) Display What You Actually Use
- 9) Choose Containers That Earn Their Spot
- 10) Repeat One Shape Across Shelves
- 11) Use Under-Shelf Hooks Thoughtfully
- 12) Treat Shelf Styling Like Seasonal Editing
- Practical Layout Ideas by Kitchen Type
- Common Mistakes When Decorating Kitchen Shelves
- A Simple Weekly and Monthly Shelf Maintenance Rhythm
- Safety and Installation Essentials You Shouldn’t Skip
- 2026 Direction: “Less, But Better” Open Shelving
- 500-Word Experience Section: Real-World Shelf Styling Stories and Lessons
- Conclusion
Your kitchen shelves are not just storagethey’re a daily mood board for your home. They can make a small kitchen feel airy, help a busy family grab what they need faster, and show off personality without turning your counters into a clutter convention. The tricky part? Open shelves are honest. If your system is chaotic, your shelves will announce it like a town crier.
This guide gives you a practical, stylish, and real-world approach to decorating kitchen shelves so they look great on Monday morning, not just in staged photos. We’ll cover layout logic, styling formulas, color and texture balance, maintenance, safety, and examples that work for different kitchen sizes and budgets. Expect in-depth advice, specific ideas, and a few jokes to keep the dusting conversation emotionally survivable.
Why Decorating Kitchen Shelves Is About Function First
The best shelf styling starts with a question most people skip: What do I actually use every day? If you style first and function later, you’ll likely end up with pretty shelves and no place for your cereal bowls, olive oil, or that one mug everyone in the house fights over.
Use the “Daily-Weekly-Occasionally” Sorting Method
- Daily items: plates, bowls, glasses, coffee cups, cooking oils, salt cellar.
- Weekly items: blender pitcher, serving bowls, bakeware you rotate in often.
- Occasional items: holiday platters, specialty gadgets, “I use this twice a year but I paid for it so I keep it” tools.
Put daily items at eye level and within easy reach. Weekly items can sit on upper or lower shelves. Occasional items should go highest, or into closed storage. If everything is “display,” nothing is truly useful.
Create Shelf Zones (Like a Tiny Department Store)
When decorating kitchen shelves, divide by use case rather than random object categories:
- Coffee zone: mugs, beans, sweetener jar, grinder.
- Prep zone: oils, vinegars, salt, spices, cutting board stand.
- Serve zone: plates, bowls, napkins, tray.
- Style zone: small art, vase, sculptural object, plant.
This approach keeps shelves beautiful and prevents the “Where is the cinnamon?” crisis at 7:30 a.m.
How to Decorate Kitchen Shelves So They Look Styled, Not Stiff
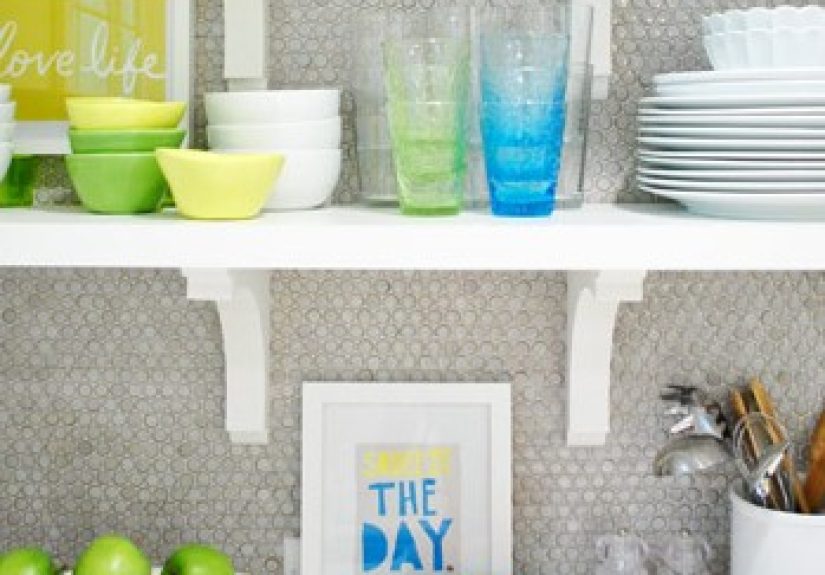
1) Start with a Color Plan
Pick one dominant neutral and one accent family. For example:
- Base: white ceramics + clear glass
- Accent: warm wood + muted green
This prevents visual noise and helps mismatched items feel intentional. If your dishes are eclectic, unify with repeated tones (e.g., all warm earth colors) or repeated materials (e.g., stoneware + wood).
2) Use the Rule of Contrast
Great kitchen shelf decor relies on contrast in height, shape, and texture:
- Stacked plates (horizontal) next to a tall pitcher (vertical)
- Smooth ceramics near woven baskets
- Matte items mixed with reflective glass
If everything has the same silhouette, shelves look flat. If everything competes, shelves look messy. Contrast gives rhythm.
3) Layer Front to Back (Yes, Even on Narrow Shelves)
Place one anchor item in back (tray, framed print, cutting board), then smaller functional items in front (salt jar, oil bottle, mug). This creates depth without overcrowding. Think “little stage set,” not “museum storage room.”
4) Keep Breathing Room
One of the most common open shelving mistakes is filling every inch. Leave deliberate empty space. Negative space gives your eye a break and makes your favorite pieces stand out. A shelf with 70–80% occupancy often looks better than one at 100%.
5) Mix Open Display and Hidden Helpers
Use a couple of attractive bins or lidded baskets for less photogenic essentialstea bags in mismatched wrappers, snack bars, random measuring spoons that seem to multiply overnight. You still get styled shelves, but your reality remains welcome.
6) Style in Odd Groupings
Groups of three or five objects often feel more natural than rigid pairs. Try a small trio: mini plant + salt box + short stack of bowls. It feels effortless, even when it absolutely was not effortless during setup.
7) Add One Living Element
A small herb pot, trailing plant, or seasonal branch arrangement softens hard kitchen lines. If you choose real plants, keep placement practicalbright area, easy to water, away from high-heat splash zones.
8) Display What You Actually Use
If your shelf only holds decorative objects and none of your daily kitchenware, you may end up with pretty photos and inconvenient mornings. Open shelves work best when they carry both utility and personality.
9) Choose Containers That Earn Their Spot
Clear jars and labeled canisters can make pantry staples look tidy while improving visibility. Keep labels simple, consistent, and easy to read. If you decant food, rotate stock so older items get used first.
10) Repeat One Shape Across Shelves
Repeating a formround bowls, amber bottles, or rectangular canisterscreates cohesion. You don’t need a full matching set; just a visual echo across zones.
11) Use Under-Shelf Hooks Thoughtfully
Hooks can hold mugs, small tools, or tea towels. They’re great for maximizing shelf function, but avoid hanging too much at eye level or your kitchen starts looking like a boutique gift shop on moving day.
12) Treat Shelf Styling Like Seasonal Editing
Rotate a few accents every season: spring greenery, summer citrus tones, fall woods and brass, winter ceramics and warm textiles. You don’t need a full resetjust a light refresh to keep shelves intentional.
Practical Layout Ideas by Kitchen Type
Small Kitchen
- Use two to three shelves, not a full wall, to avoid visual overload.
- Prioritize light-reflective finishes and slimmer objects.
- Store everyday dishes on lower shelf; decorative items up high.
Family Kitchen
- Dedicate one shelf to grab-and-go breakfast items.
- Use durable, stackable dishware in repeat colors.
- Keep fragile decor above child reach zones.
Minimalist Kitchen
- Limit palette to 2–3 tones.
- Use hidden-bracket shelves for a clean architectural look.
- Display only high-frequency items and one statement piece.
Collected/Maximal Kitchen
- Curate by theme (vintage jars, blue-and-white ceramics, cookbooks).
- Use symmetry to control visual richness.
- Balance detailed pieces with plain stacks and open space.
Common Mistakes When Decorating Kitchen Shelves
- Decorating without measuring: tall vases that block upper shelf access are not “bold”; they’re impractical.
- Ignoring cleaning reality: if it can trap dust or grease, it needs a maintenance plan.
- No anchor items: all tiny objects makes shelves look fussy.
- Too many trends at once: pick one trend direction and blend with timeless basics.
- Unsafe placement near heat: keep flammables and delicate items away from active cooking zones.
A Simple Weekly and Monthly Shelf Maintenance Rhythm
Weekly (10–15 Minutes)
- Wipe shelf surfaces and high-touch items.
- Return out-of-place objects to their zones.
- Check oils/spices for drips or sticky rings.
Monthly (30–40 Minutes)
- Remove everything from one shelf at a time.
- Dust and degrease thoroughly.
- Edit items: keep, relocate, or store.
- Re-style with better spacing and improved flow.
If that sounds like “a lot,” remember: open shelves are low-door, high-discipline storage. Beauty tax is real, but manageable.
Safety and Installation Essentials You Shouldn’t Skip
Decorating kitchen shelves is not just about aesthetics; it’s also a structural and safety decision.
- Install shelves into studs whenever possible for better load support.
- If studs are unavailable, use wall anchors rated for the shelf + object weight.
- Keep combustible materials away from stovetops and high-heat zones.
- Avoid storing fragile glass directly above heavy daily-use areas where breakage risk is higher.
- Do a gentle stability test after stylingespecially if you add stacks of dishes, jars, or cast-iron pieces.
Style should never outrun safety. A well-decorated shelf that can’t support your dinner plates is just a suspense thriller waiting for Act 2.
2026 Direction: “Less, But Better” Open Shelving
One clear direction in recent kitchen design thinking: expansive open shelving is giving way to more restrained, intentional shelf moments. Instead of removing all uppers, many homeowners are blending smaller open sections with glass-front cabinetry or closed storage. The result is a calmer look with less daily upkeep pressure.
Translation: you can still have gorgeous open shelvesjust not an entire wall of dishes that requires a weekly emotional support group.
500-Word Experience Section: Real-World Shelf Styling Stories and Lessons
In one small city apartment kitchen, the homeowner replaced a single upper cabinet with two oak floating shelves. At first, she styled them with vintage pitchers, framed art, and tiny decor objects because the internet told her to “layer personality.” It looked beautiful for two days. On day three, breakfast required opening three cabinets to find a cereal bowl while stepping around decorative objects. Her fix was simple and brilliant: top shelf for low-use pretty items, middle shelf for daily dishes, and lower counter zone for prep tools. Suddenly, the kitchen felt both charming and efficient. Her biggest lesson: if an item is touched daily, it deserves prime shelf real estateno exceptions.
A family of five took the opposite approach in a suburban kitchen and treated open shelving like a logistics system. They created “stations”: weekday breakfast, lunch prep, and coffee. The breakfast shelf had bowls, a granola jar, and a fruit basket; lunch prep had containers and snack bins; coffee had mugs and beans. They also color-coded canister labels so kids could find things fast. Their shelves were not magazine-perfect, but mornings became calmer, and the kitchen looked warmer because the objects on display were truly used. Their big takeaway: decorating kitchen shelves works best when style follows real household behavior, not the other way around.
Another homeowner loved maximalist decor and tried to display every ceramic piece she owned. The result was visual overload and constant fear that something would topple. During her reset, she applied a “one hero per shelf” rule: one statement object, one practical stack, one filler texture. She rotated the hero piece monthly, which kept the space fresh without buying more decor. She also moved her most sentimental ceramics away from the stove-adjacent shelf after noticing fine grease buildup. Her lesson: editing creates luxury. You don’t need fewer beautiful thingsyou need clearer placement and better rhythm.
A renter working with strict lease rules used bracketed shelves and removable styling tricks: lightweight art leaning against the wall, matching jars for dry goods, and a tray to corral oils. She avoided over-drilling and focused on portable organization. When she moved, almost every styling element transferred to the next kitchen with minimal effort. Her biggest win was discovering that “temporary” can still look polished if you repeat materials and keep spacing intentional. Her lesson: permanence is optional; consistency is what makes shelves feel designed.
In a renovated farmhouse kitchen, the owners installed long wood shelves and immediately filled them end to end. It felt impressivebut heavy. After living with it for a month, they introduced blank gaps, replaced half their decor with stacked white everyday dishes, and added one trailing plant at the window end. The kitchen looked brighter overnight. They also implemented a monthly “shelf audit” where anything not used in 60 days got relocated to closed storage. Their lesson: empty space is not wasted space. It is visual breathing room that makes both function and beauty easier to maintain.
Across all these experiences, the pattern is clear: successful kitchen shelf decor is never random. It’s a living system that combines design, routine, and restraint. The shelves that last are the ones that help you cook, clean, and move through the day with less friction. If your shelves are gorgeous but inconvenient, they’re stagingnot living. If they’re functional but joyless, they’re storagenot design. The sweet spot is where both coexist, and once you find that balance, your kitchen starts working for you.
Conclusion
Decorating kitchen shelves is equal parts strategy and style. Build around real routines, then layer in beauty through color, contrast, and curated objects. Keep safety in mind during installation and placement, and commit to a light maintenance rhythm so your shelves stay inviting instead of overwhelming. Whether your kitchen is compact, busy, minimalist, or collected, the goal is the same: create open shelving that feels useful, personal, and effortlessly put togethereven on a Tuesday morning when everyone is asking where the clean mugs went.


