Table of Contents >> Show >> Hide
- Why This Miniature Project Works So Well
- Materials and Tools
- Step 1: Plan the Layout Before You Glue Anything
- Step 2: Build the Pool Base
- Step 3: Create a Realistic Water Effect
- Step 4: Build the Patio Surround
- Step 5: Add Furniture, Shade, and Landscaping
- Best Color Palettes for a Miniature Pool Patio
- Common Mistakes to Avoid
- How to Make It Look More Expensive Than It Is
- Experience: What Building a DIY Miniature Doll Swimming Pool and Patio Actually Feels Like
- Final Thoughts
Some craft projects whisper, “This will be cute.” This one cannonballs into the room wearing tiny sunglasses and demanding a lounge chair. A DIY miniature doll swimming pool and patio is one of those builds that looks wildly impressive when finished, but is surprisingly manageable when you break it into simple steps. It mixes the best parts of crafting: painting, styling, problem-solving, and the deeply satisfying act of turning ordinary materials into a tiny luxury retreat.
Whether you are building for a dollhouse, a display shelf, a themed photo setup, or just because your desk clearly needed a micro-resort, this project has range. You can make it sleek and modern, bright and playful, tropical and leafy, or so glamorous it looks like a movie star’s weekend escape in miniature form. Better yet, you do not need fancy specialty supplies to make it look believable. Foam board, clear plastic, acrylic paint, craft sticks, glue, and a little patience can go a very long way.
In this guide, you will learn how to plan the layout, build the pool, create a realistic water effect, design a miniature patio, and add details that make the whole scene feel finished instead of “tiny rectangle with ambition.” The goal is not perfection. The goal is charm, realism, and a tiny outdoor space that makes people say, “Wait, you made that?”
Why This Miniature Project Works So Well
A miniature doll swimming pool and patio has strong visual payoff because it combines structure, color, and storytelling. The pool adds shine and depth. The patio adds texture and personality. Together, they create a scene that feels lived in, even if the “resident” is six inches tall and has never paid property taxes in her life.
It also gives you room to improvise. You can use a shallow tray shape for the pool, then build the surrounding patio with faux pavers, painted “concrete,” pea gravel effects, mini planters, a sun umbrella, or lounge furniture. In real patio design, small spaces look better when they avoid clutter, use clear zones, and mix materials thoughtfully. That idea works beautifully in miniature too. A defined deck area, a pool edge, a little greenery, and one or two standout accessories can make even a compact setup feel complete.
Materials and Tools
Basic Build Materials
For the pool structure, use foam board, rigid craft foam, thick cardboard, or dry floral foam if you want to carve a recessed pool. If you prefer a flatter and faster build, you can create a raised pool using layered foam board and top it with a clear plastic “water” surface. Clear acetate, acrylic sheet, or sturdy clear packaging plastic can work for the water layer. The patio base can be made from foam board, cardboard, thin wood, or a small plaque from a craft store.
For finishing, gather acrylic paint in blues, white, beige, gray, tan, and brown. A glossy acrylic medium or clear gloss gel is helpful if you want ripples and shine without using anything messy or overly dramatic. A matte sealer is useful for the patio, while a water-resistant craft finish is a smarter choice for decorative accents that you want to protect. Translation: the patio can be matte and chic; the pool should look glossy and ready for tiny splashy drama.
Helpful Tools
You will want a craft knife, metal ruler, cutting mat, pencil, paintbrushes, fine-tip detail brush, scissors, sandpaper, and glue. A hot glue gun can help with structure, though tacky glue or craft glue is often better for delicate finishing pieces. Tweezers are useful for tiny accessories, and a toothpick is perfect for placing mini details, spreading glue, or pretending you are a giant landscape architect.
Step 1: Plan the Layout Before You Glue Anything
Start by deciding your scale and footprint. Are you building for a dollhouse display, a fashion doll, or a general miniature scene? The exact scale matters less than keeping the proportions believable. A pool that is too deep can look like a sinkhole. A patio that is too narrow can look like someone forgot to finish the build halfway through their iced coffee.
Sketch a simple top-down plan. Mark the pool shape first, then assign space for the surrounding patio. Rectangular pools are easiest and usually look the most convincing in miniature. Kidney-shaped pools can be adorable too, but they require more careful cutting and smoother edges. Leave enough room for at least one seating zone, a walkway, and a planter or two. Even a tiny build looks better when it feels designed instead of crammed.
Step 2: Build the Pool Base
Option A: Recessed Pool
If you are using floral foam or stacked foam board, carve or cut out the pool cavity. Smooth the inside walls and round the corners slightly so the pool looks intentional and not like it was attacked by a nervous box cutter. Seal rough foam surfaces with gesso, white glue, or another paintable base coat before painting. This helps protect the surface and gives your paint a cleaner finish.
Option B: Raised Pool
If you want an easier method, create a shallow raised pool using layered foam board or cardboard walls around a flat base. This works especially well when you plan to place a clear plastic sheet on top as the water surface. It is clean, quick, and less likely to end in a tiny structural crisis.
Paint the pool interior before adding the water layer. Use darker blue, teal, or gray-blue tones toward the center and lighter tones near the steps or edges. This simple gradient creates the illusion of depth. Add a faint tile effect if you want extra realism. Tiny grid lines in white or pale blue can mimic pool tiles without making you question every life choice that led to painting microscopic squares.
Step 3: Create a Realistic Water Effect
One of the easiest ways to make miniature water look realistic is to use a clear plastic sheet over a finished pool base, then add texture with a clear acrylic gloss medium or gel. This approach creates shine, depth, and gentle ripples without requiring a deep pour. It also gives you more control, which is important because miniature projects have a mean little habit of going from “adorable” to “mystery blob” in record time.
Cut your clear sheet slightly larger than the opening if it needs to sit on top, or exactly sized if it will fit inside a frame. Test-fit it before gluing. If you want calm pool water, leave the surface mostly smooth. If you want a breezy, just-used look, brush on a little gloss gel in subtle wavy strokes. Keep the ripples small. Tiny scale means tiny texture. Big dramatic waves make your doll pool look less Beverly Hills and more miniature hurricane season.
For extra depth, you can tint parts of the underside of the plastic very lightly with transparent blue or blue-green. Do not overdo it. Realistic miniature water works best when the effect stays restrained and layered.
Step 4: Build the Patio Surround
The patio is where the personality lives. This is your chance to decide whether your tiny outdoor retreat feels modern, rustic, coastal, tropical, or “my doll has inexplicably strong opinions about hardscaping.”
Painted Concrete Look
For a clean modern patio, paint the base in warm gray, soft tan, or sandy beige. Sponge on slightly lighter and darker tones for variation so it does not look flat. This simple finish mimics poured concrete and pairs beautifully with white lounge chairs, black planters, or a tiny umbrella.
Faux Paver Patio
To mimic pavers, score a grid into foam board or glue down thin rectangles cut from card stock, chipboard, or craft foam. Keep spacing even. A little dry brushing around the edges helps each “paver” stand out. If you want more character, vary the shade slightly between stones. In real patio design, pavers are popular because they add structure, visual rhythm, and a DIY-friendly look. In miniature, they also make you look much more talented than your gluey fingers may suggest.
Pea Gravel Effect
For a relaxed backyard feel, create a pea gravel zone using fine sand, model gravel, or tiny pebbles fixed in place with glue. Use edging strips to keep it contained visually. This works well for side patios, plant borders, or a decorative strip around the main seating area. Mix it with pavers or a painted slab for contrast.
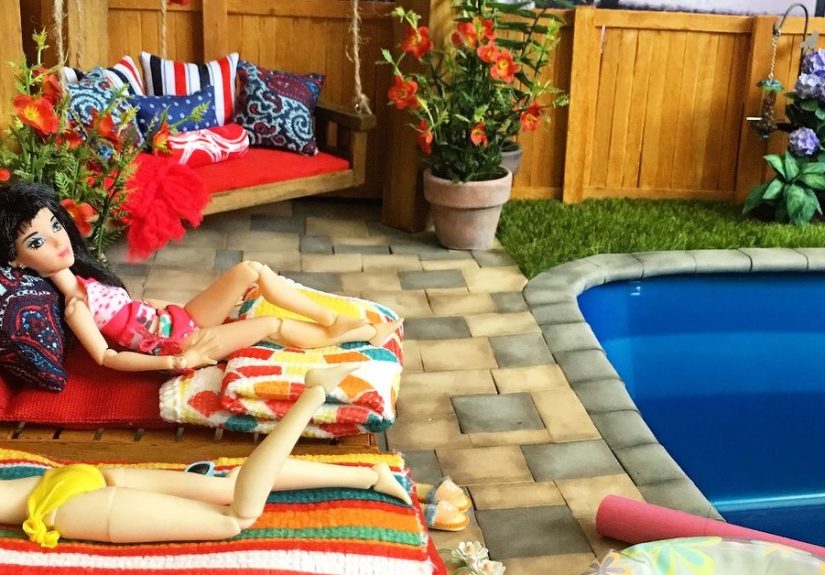
Step 5: Add Furniture, Shade, and Landscaping
A good patio scene needs zones. One for lounging, one for walking, and one for visual balance. In full-size patio design, rugs, furniture groupings, planters, and shade structures make outdoor spaces feel like rooms. The same idea works in miniature with much less budget and much more cuteness.
Create lounge chairs from craft sticks, thin balsa wood, or repurposed plastic pieces. Add cushions made from felt, foam, or folded fabric scraps. A small side table can be made from stacked beads, bottle caps, or wood circles. For a shade feature, try a miniature umbrella made from a dowel and a fabric-covered paper circle, or build a tiny pergola from skewers or square dowels.
Landscaping is what makes the whole project feel alive. Use faux moss, tiny succulents, model greenery, or even clipped plastic leaves from old craft florals. Place planters near corners and transitions to soften hard lines. Add a rolled towel, tiny drink cup, mini pool float, or little sandals if you want storytelling details. These finishing touches are the visual equivalent of seasoning your fries. Technically optional. Emotionally necessary.
Best Color Palettes for a Miniature Pool Patio
Modern Resort
Use white, charcoal, pale wood tones, and clear aqua blue. Add geometric pavers and a single oversized planter. Minimalist, polished, and suspiciously expensive-looking.
Sunny Retro
Try coral, turquoise, yellow, and white. Add striped towels, cheerful planters, and a bright umbrella. This style says, “Yes, there is poolside lemonade, and yes, it is fabulous.”
Tropical Escape
Choose warm stone tones, deep green plants, woven textures, and a richer pool blue. Add bamboo-style fencing or a pergola for a vacation vibe.
Common Mistakes to Avoid
First, do not make the water effect too thick. Thick, cloudy, uneven finishes can swallow the realism instantly. Second, avoid using only one color on the patio. Real surfaces have variation, shadows, and wear. Third, do not overstuff the space with accessories. A small patio looks best when it has breathing room. A chair, a table, a planter, and one statement item usually work better than twenty tiny objects fighting for attention.
Also, test your glue and finish on scraps before committing. Some clear plastics fog, some paints streak, and some sealers are better described as “surprisingly emotional.” A ten-minute test can save a whole afternoon of regret.
How to Make It Look More Expensive Than It Is
Use repetition. Matching planters or coordinated lounge chairs create polish. Keep your color palette tight. Use matte finishes for “stone” and glossy finishes only where water or glass would naturally shine. Sand rough edges. Straight lines matter. Neat edges matter. In miniatures, tiny imperfections can look huge, so clean construction is half the magic.
Photography also helps. If you plan to share or sell your work online, shoot the scene against a simple background, use side lighting, and avoid overhead clutter. A well-styled miniature patio looks even more convincing when the camera angle drops to doll-eye level. Suddenly your craft table becomes a private resort brochure.
Experience: What Building a DIY Miniature Doll Swimming Pool and Patio Actually Feels Like
The first time I built a miniature pool patio scene, I expected the pool to be the star. Technically, it was. Emotionally, the patio stole the show. Once the basic blue pool shape was finished, the whole project started to behave like interior design with tiny scissors. I kept shifting chairs by half an inch, moving planters around, and deciding that one corner needed “a little more texture,” which is craft language for “I am now fully invested and will not be reasonable for the next two hours.”
What surprised me most was how much realism came from layering simple choices instead of using complicated materials. A slightly darker shade at the center of the pool made it look deeper immediately. A soft dry brush of pale gray across the patio made the fake concrete feel more believable. A strip of faux gravel beside the pavers created contrast that made everything else look more finished. None of those details were dramatic on their own, but together they completely changed the scene.
I also learned that miniature projects reward restraint. My first instinct was to add everything: floaties, flamingos, extra chairs, side tables, snacks, towels, plants, and probably a tiny celebrity guest list. But once I started placing items, the build looked cluttered fast. The best version had fewer pieces, better spacing, and one focal point. In that case, it was a white lounge chair with a bright towel next to the pool. Suddenly the whole setup looked styled instead of crowded.
Another big lesson was that textures matter more than you think. Smooth glossy water beside a matte patio surface creates a realistic contrast. A little moss tucked near the back wall softens the hard edges. Even the difference between painted “stone” and a sandy gravel strip helps the eye read the scene as layered and believable. Miniatures are not just about shrinking objects. They are about shrinking atmosphere.
The most fun part, honestly, was the storytelling. Once the pool and patio existed, the scene started suggesting details on its own. The empty chair needed sunglasses. The table needed a drink. The corner needed a planter. It stopped feeling like a craft project and started feeling like a tiny place with a mood. That is when these builds become addictive. You are no longer just gluing materials together. You are directing a very small movie set.
There were, of course, a few humbling moments. I glued a clear water sheet slightly crooked once and had to pry it up like a very disappointed giant. I also learned that too much gloss medium looks less like gentle ripples and more like a pool being haunted. But those mistakes were useful. Each one made the next build cleaner, sharper, and more intentional.
That is probably the best thing about a DIY miniature doll swimming pool and patio project: it teaches you to see design differently. You start noticing proportions, color relationships, texture, balance, and how a space guides the eye. It is playful, but it is also great hands-on practice in composition. And when it is done, you have something wonderfully weird and delightful sitting on your shelfa tiny backyard escape built by hand, complete with all the charm of a real patio and none of the full-size maintenance bills.
Final Thoughts
A DIY miniature doll swimming pool and patio is one of those rare crafts that feels creative, practical, decorative, and just plain fun all at once. It lets you build a complete scene, experiment with textures, and turn everyday materials into something memorable. The trick is to keep the structure simple, the details thoughtful, and the styling balanced. Build the pool cleanly, give the patio a clear personality, and finish with a few small details that suggest life and story.
In the end, the best miniature builds are not the ones with the most supplies. They are the ones with the most intention. So grab your foam board, line up your paints, and prepare to become the wildly overqualified contractor of a tiny poolside paradise.


