Table of Contents >> Show >> Hide
- Before You Start: Is It a Wrinkle, Bubble, Finger, or Crease?
- Tools You Will Need
- Easy Ways to Get Wrinkles Out of Window Tint: 10 Steps
- Step 1: Inspect the Tint in Natural Light
- Step 2: Let New Tint Cure Before You Touch It
- Step 3: Clean the Surface Gently
- Step 4: Lightly Mist the Wrinkled Area
- Step 5: Warm the Film Slowly
- Step 6: Squeegee from the Center Toward the Edge
- Step 7: Work “Fingers” Down with Heat and Pressure
- Step 8: Release Small Air Bubbles Only When Necessary
- Step 9: Reheat and Re-Squeegee the Area
- Step 10: Know When to Replace the Tint
- Common Causes of Wrinkled Window Tint
- What Not to Do When Fixing Window Tint Wrinkles
- DIY Fix vs. Professional Repair
- How to Prevent Window Tint Wrinkles Next Time
- Extra Experience: Real-World Lessons From Fixing Wrinkled Window Tint
- Conclusion
Window tint wrinkles are the tiny villains of an otherwise gorgeous tint job. One minute your car window or home glass looks sleek, shaded, and suspiciously professional. The next minute, a wrinkle appears and ruins the vibe like a fly landing in a wedding photo.
The good news? Some wrinkles, bubbles, and “fingers” in window tint can be corrected with patience, gentle heat, a proper squeegee, and the courage not to panic. The not-so-good news? Deep creases, contaminated film, old adhesive failure, or badly installed tint may need replacement. In other words, some wrinkles are a quick fix; others are the tint’s dramatic way of saying, “I have retired.”
This guide explains how to get wrinkles out of window tint in 10 practical steps, whether you are dealing with automotive window tint, residential window film, or a small DIY film project. You will also learn when to leave new tint alone, when to use heat, how to smooth film safely, and when calling a professional is cheaper than turning your window into a modern art experiment.
Before You Start: Is It a Wrinkle, Bubble, Finger, or Crease?
Not every mark under window tint is the same. Knowing what you are looking at helps you choose the right fix.
Wrinkles
A wrinkle is a raised, folded, or wavy section of film. It often happens when tint is applied unevenly, stretched too much, or squeegeed without enough slip solution. Light wrinkles may respond to heat and pressure. Sharp wrinkles may become permanent creases.
Bubbles
Bubbles are pockets of air or moisture trapped between the glass and film. Small water bubbles are common after installation and often disappear during curing. Air bubbles or dirt bubbles may need careful repair.
Fingers
In tinting language, “fingers” are long raised channels that usually form near curved glass, especially on car windows. They look like little film tentacles. Not cute, but usually fixable if handled early.
Creases
A crease is a hard fold in the film. If the film has been sharply bent, scratched, or permanently distorted, smoothing it may reduce the look but probably will not make it disappear completely.
Tools You Will Need
You do not need a garage full of professional equipment, but you do need the right basic tools. Improvising with a kitchen spatula and hope is not the move.
- Spray bottle
- Distilled water or clean water
- A few drops of mild baby shampoo or tint-safe slip solution
- Soft rubber squeegee or tint card
- Microfiber cloth
- Hair dryer or adjustable heat gun
- Fine pin or needle for trapped air bubbles only
- Plastic razor blade or hard card wrapped in microfiber
- Low-lint towel
- Patience, preferably a generous amount
Easy Ways to Get Wrinkles Out of Window Tint: 10 Steps
Step 1: Inspect the Tint in Natural Light
Start by looking at the window from both sides in natural daylight. Do not judge the tint under harsh direct sun, because glare can make small imperfections look like a crime scene. Stand a few feet away and identify the problem areas.
Ask yourself: Is the wrinkle near the edge? Is it in the middle? Is there dirt trapped underneath? Is the tint new? Is the film peeling or turning purple? A fresh installation with light haze or small water pockets may simply need more curing time. Older film with widespread bubbling, brittle edges, or discoloration may be beyond a simple repair.
Step 2: Let New Tint Cure Before You Touch It
If the window tint was installed recently, do not rush to attack every little bubble or cloudy patch. Window film is usually applied with a water-based slip solution that helps position the film. Some moisture can remain under the tint while the adhesive cures.
For automotive tint, curing can take several days in warm, dry weather and longer in cool or humid conditions. For some residential or thicker specialty films, full drying can take much longer. During this time, avoid rolling down tinted car windows, scrubbing the film, pressing bubbles, or using harsh cleaners. New tint is a bit like fresh nail polish: it may look dry, but it is still very capable of being ruined by impatience.
Step 3: Clean the Surface Gently
Before smoothing anything, clean the tint surface with a soft microfiber cloth. Use clean water or a tint-safe cleaner. Avoid ammonia-based glass cleaners, abrasive pads, rough paper towels, and anything that feels like it belongs in a hardware-store sandpaper aisle.
Dirt on top of the film can scratch the surface when you squeegee. Dirt under the film is more serious. If the wrinkle is caused by trapped dust, hair, or grit, smoothing may not fully fix it. You might flatten the area, but the little speck will still sit there proudly, like it pays rent.
Step 4: Lightly Mist the Wrinkled Area
Mix clean water with a tiny amount of mild baby shampoo or tint slip solution in a spray bottle. Lightly mist the outside surface of the tint where you plan to squeegee. This helps the tool glide without dragging, scratching, or stretching the film.
Do not soak the edges of the tint, especially if they are already lifting. Too much liquid near the edge can sneak under the film and weaken adhesion. The goal is gentle lubrication, not recreating a car wash inside your door panel.
Step 5: Warm the Film Slowly
Use a hair dryer on medium heat or a heat gun on a low, controlled setting. Hold it several inches away from the glass and keep it moving in slow, sweeping motions. You want the film warm and flexible, not scorched, warped, or dramatically melted.
Heat softens the adhesive and makes the film more pliable, which can help wrinkles relax. Be especially careful on rear windows with defroster lines. Too much heat or aggressive scraping can damage those lines. On home windows, avoid overheating one small spot, because sudden temperature changes can stress glass.
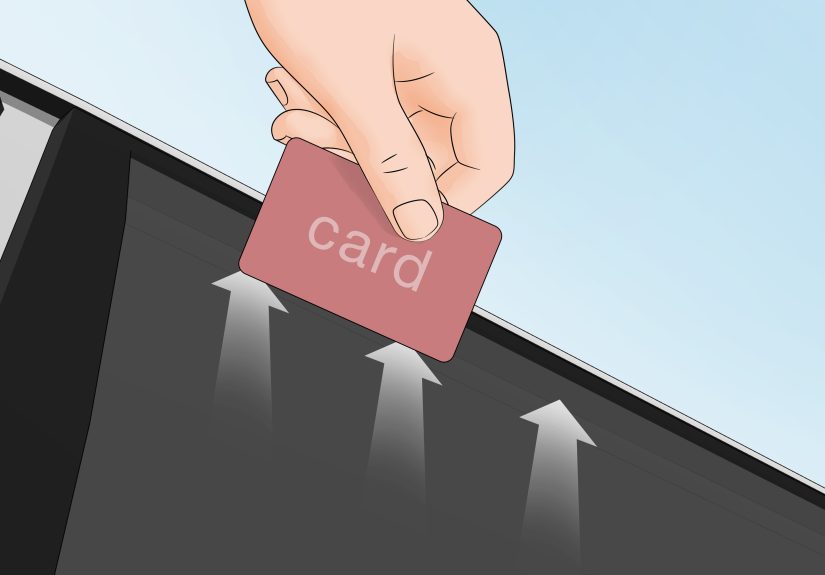
Step 6: Squeegee from the Center Toward the Edge
Place your squeegee or wrapped plastic card near the center of the wrinkle and push outward toward the closest edge. Use firm, even pressure. Overlap your strokes so you do not create new channels of trapped moisture or air.
The center-out method works because it gives air and moisture somewhere to go. Randomly pushing in circles may feel productive, but it can trap the problem in a new location. Think of it like herding tiny transparent sheep: they need a clear exit.
Step 7: Work “Fingers” Down with Heat and Pressure
If the wrinkle looks like a long raised finger near the edge of a car window, apply gentle heat along the raised channel. Then press it down with the squeegee, moving from the base of the finger toward the edge.
Do not jab at it. Do not press so hard that the film stretches or tears. Heat, smooth, pause, repeat. Curved automotive glass often needs this careful heat-and-squeegee rhythm because flat film does not naturally love curved surfaces. It has to be persuaded, not bullied.
Step 8: Release Small Air Bubbles Only When Necessary
If a stubborn air bubble remains after curing and gentle squeegeeing, use a fine pin to make a tiny puncture at one edge of the bubble. Then warm the area lightly and push the air toward the pinhole with a squeegee.
This step is for air bubbles, not long wrinkles, not dirt bumps, and definitely not every small water bubble on fresh tint. Never use a razor blade to slice the film. A pinhole can be nearly invisible; a razor cut looks like your tint lost a knife fight.
Step 9: Reheat and Re-Squeegee the Area
After the first smoothing pass, inspect the film again. If the wrinkle has improved but not fully disappeared, lightly warm the area once more and repeat the squeegee process. Use smaller, controlled strokes this time.
Finish by wrapping the edge of your squeegee or card in a clean microfiber cloth and pressing excess moisture toward the nearest edge. This helps absorb solution and reduce the chance of water creeping back under the film.
Step 10: Know When to Replace the Tint
Some window tint wrinkles cannot be fixed cleanly. If the film has a sharp crease, trapped dirt, failing adhesive, peeling edges, purple discoloration, or large widespread bubbles, replacement is usually the better answer.
This is especially true for old automotive tint on rear windows. Removing film around defroster lines can be tricky, and careless scraping can damage the lines. If the tint is expensive, covers a large window, or sits on glass with electronics, antennas, or defrosters, a professional installer may save you money, time, and several colorful words.
Common Causes of Wrinkled Window Tint
Poor Glass Preparation
Window tint needs clean glass. Dust, oils, old adhesive, pet hair, lint, and mineral residue can all interfere with adhesion. Even a tiny speck can create a bump that becomes a bubble or wrinkle.
Not Enough Slip Solution
Slip solution helps position the film and allows the squeegee to push out air and water. Too little solution can cause the film to grab too early. Too much solution can slow curing or weaken the edge if it is not properly squeegeed out.
Wrong Squeegee Technique
Uneven pressure, random strokes, dull tools, or dragging a dry squeegee across the tint can create wrinkles. Smooth, overlapping strokes from the center outward are usually safer and more effective.
Too Much Heat
Heat helps window film conform, but too much heat can warp, shrink, discolor, or damage it. Keep the tool moving and use the lowest effective heat setting.
Cheap or Aging Film
Low-quality tint may have weaker adhesive, poor UV resistance, or less flexibility. Older film may bubble or wrinkle as the adhesive breaks down from sun exposure, temperature changes, and cleaning wear.
What Not to Do When Fixing Window Tint Wrinkles
Many tint problems get worse because someone tries to fix them like they are removing a sticker from a lunchbox. Window film is thinner, more delicate, and far less forgiving.
- Do not scrape tinted windows with metal blades unless you know exactly what you are doing.
- Do not use ammonia cleaners on aftermarket window tint.
- Do not overheat one spot with a heat gun.
- Do not roll down newly tinted car windows before curing.
- Do not press fresh water bubbles aggressively.
- Do not peel large areas of film unless you are prepared to reinstall or replace it.
- Do not assume a deep crease will magically vanish.
DIY Fix vs. Professional Repair
A DIY fix makes sense when the wrinkle is small, the tint is fairly new but cured, the film is not peeling, and you have the right tools. Small edge fingers, minor air bubbles, and light surface waves can often be improved at home.
Professional repair is smarter when the tint covers a rear windshield, has defroster lines, is expensive ceramic film, or shows widespread failure. Professionals also know how to shrink film properly for curved glass, manage contamination, and replace damaged tint without turning the job into a sticky afternoon of regret.
How to Prevent Window Tint Wrinkles Next Time
Prepare the Glass Like It Matters
Because it does. Clean the glass thoroughly, including edges, seals, corners, and gaskets. A clean installation surface is the difference between a smooth finish and a tiny lint museum trapped forever under your tint.
Use Quality Film
Good window film is easier to handle, more durable, and less likely to bubble, peel, or discolor quickly. Ceramic and high-performance films cost more, but they often provide better heat rejection, UV protection, and longevity.
Install in the Right Environment
Avoid windy driveways, dusty garages, direct hot sun, and freezing weather. The best tinting environment is clean, shaded, and controlled. The worst environment is “outside while pollen is doing cardio.”
Respect the Cure Time
After installation, give the film time to bond. Avoid rolling down windows, cleaning the film, or pressing on bubbles too soon. Warm weather can speed drying, while humidity and cold can slow it down.
Extra Experience: Real-World Lessons From Fixing Wrinkled Window Tint
Here is the part most quick guides skip: fixing window tint wrinkles is less about brute force and more about reading the film. If you have ever tried to smooth tint and somehow made the wrinkle travel three inches to the left, congratulationsyou have met the personality of window film. It reacts to heat, pressure, moisture, glass shape, and your mood. Especially your mood.
One of the most common beginner mistakes is trying to fix everything immediately after installation. Fresh tint can look imperfect while it cures. You may see light haze, small moisture pockets, or a slightly uneven look. That does not always mean the installation failed. In fact, pressing too soon can disturb the adhesive and make the problem worse. A good rule is to observe first, act second. If the mark is a soft water bubble on fresh tint, let the sun and time do their job. If it is a sharp fold or a raised finger that will not lie down, then gentle heat and squeegee work may be needed.
Another experience-based tip: always start with less heat than you think you need. A heat gun can feel like a magic wand until it becomes a tiny dragon. Too much heat can distort film quickly, especially cheaper tint. A hair dryer is often safer for beginners because it warms the film more slowly. If you do use a heat gun, keep it moving and never aim it at one spot like you are interrogating the glass.
Tool choice also matters. A hard plastic card can work in a pinch, but wrapping it in microfiber is much safer. Bare plastic can scratch or drag across the tint. A soft rubber squeegee gives better control and spreads pressure more evenly. The goal is to push trapped air or moisture out, not carve your initials into the film.
On car windows, pay close attention to edges and seals. Many wrinkles start because the film was not tucked properly or because moisture crept back under the bottom edge. When smoothing roll-down windows, work carefully near the gasket. If the film lifts at the edge, forcing it down without cleaning and proper pressure may only create a temporary fix. The edge may pop back up later like it has unfinished business.
Rear windows deserve special respect. They are curved, often large, and usually have defroster lines. A small wrinkle on a side window may be a beginner-friendly repair. A wrinkled rear windshield can be a professional-level challenge. If the tint is old and bubbled across the defroster lines, replacement is usually the realistic option. Trying to scrape it off aggressively can damage the defroster, and then your “cheap tint fix” becomes a much more expensive lesson.
For home window film, the biggest issue is usually contamination and alignment. Large flat windows seem easier than car glass, but they reveal every bubble, hair, and crooked edge. When installing or repairing residential film, use plenty of clean solution during application, squeegee in organized passes, and trim carefully. If a wrinkle forms because the film overlapped the frame or was cut too tight, smoothing alone may not solve it. The film needs room to sit flat.
Finally, know when “better” is good enough. A small repaired wrinkle may not become invisible from two inches away, but it may look perfectly fine from normal viewing distance. Chasing perfection can lead to overheating, overworking, and damaging the film. Window tint rewards patience, not obsession. Smooth what can be smoothed, replace what cannot, and remember: even professional installers occasionally meet a piece of film with a bad attitude.
Conclusion
Getting wrinkles out of window tint is possible when the problem is minor and the film is still in good condition. The safest method is simple: inspect the tint, allow fresh film to cure, clean gently, mist the surface, warm the film slowly, and squeegee from the center toward the edge. Small air bubbles may need a tiny pinhole, but deep creases, dirt contamination, peeling, or old adhesive failure usually call for replacement.
Whether you are fixing car window tint or home window film, patience is your best tool. Heat helps. A squeegee helps. But rushing? Rushing is how smooth tint turns into crispy plastic lasagna. Work carefully, use gentle pressure, and when the job looks bigger than your confidence level, let a professional take over.


