Table of Contents >> Show >> Hide
- Why a Rose Gold and Marble Clothing Rack Works So Well
- Budget-Friendly Design Concept
- Materials You’ll Need
- How to Make a Rose Gold & Marble Clothing Rack on a Budget
- Budget Tips That Make the Rack Look Expensive
- Best Places to Use a Rose Gold and Marble Clothing Rack
- Common Mistakes to Avoid
- Styling Ideas for a Boutique Look
- Budget Breakdown: Where to Save and Where to Spend
- Care and Maintenance
- Experience Notes: What It’s Really Like to Build and Use One
- Conclusion
A rose gold and marble clothing rack sounds like something that should arrive in a velvet-lined delivery truck with a designer invoice and a tiny espresso. Good news: it does not have to. With smart materials, a little patience, and the confidence to spray paint without accidentally bronzing your lawn chair, you can create a boutique-style clothing rack on a budget that looks elegant, modern, and far more expensive than it really is.
This project blends two decor favorites: warm rose gold metal and clean faux marble. Together, they create a polished look that works beautifully in bedrooms, walk-in closets, studio apartments, guest rooms, dorms, entryways, and even small retail displays. The best part? You do not need a luxury furniture budget. You need a plan, basic tools, and a willingness to measure twice so your rack does not lean like it is telling secrets.
Why a Rose Gold and Marble Clothing Rack Works So Well
A clothing rack is more than a place to hang shirts. In small spaces, it becomes open storage. In stylish spaces, it becomes decor. In chaotic spaces, it becomes the polite adult in the room saying, “Maybe don’t throw that blazer on the chair again.” A rose gold and marble clothing rack adds visual interest while keeping your clothes accessible and organized.
Rose gold brings warmth without feeling heavy. It is softer than brass, more playful than black metal, and more decorative than plain chrome. Marble, or a convincing faux marble finish, adds a crisp, expensive-looking base. When combined, the rack feels airy, feminine, modern, and practical. It has enough shine to look intentional but not so much that your bedroom starts auditioning for a jewelry commercial.
Budget-Friendly Design Concept
The easiest way to build this look affordably is to start with a simple rolling garment rack, a DIY pipe rack, or a basic metal clothing rack from a home store or secondhand marketplace. Then, transform it with rose gold spray paint and a marble-look base. Instead of real stone, use marble contact paper, peel-and-stick vinyl, or a laminate shelf board with a faux marble finish.
This approach gives you the style of a boutique clothing rack without the boutique price. A sturdy frame provides function, while the finishes provide the “Did you buy that from a fancy home store?” moment. Naturally, you may answer with dignity, “Oh, this? I made it.” Then casually avoid mentioning the three fingerprints you painted over on the first try.
Materials You’ll Need
For the Frame
You can build the rack from copper pipe, black steel pipe, or an existing metal rack. Copper pipe already has a warm tone, so it may need only polishing or sealing. Black steel pipe is strong and industrial, but it will need primer and paint if you want a rose gold finish. A budget metal clothing rack is the fastest option because the structure is already done for you.
- One basic clothing rack, pipe frame, or DIY pipe kit
- Rose gold metallic spray paint or paint-and-primer spray
- Metal primer, if your paint does not include primer
- Fine-grit sandpaper or sanding sponge
- Painter’s tape
- Drop cloth or cardboard
- Protective gloves and mask or respirator
For the Marble Base
A marble base gives the rack visual weight and makes the project look custom. You can use plywood, MDF, an old shelf board, or a small tabletop. Cover it with marble contact paper for a renter-friendly, low-cost finish. Choose a white marble pattern with soft gray veining for a classic look, or a white-and-gold pattern if you want extra glam.
- Plywood, MDF, laminate board, or salvaged shelf
- Marble contact paper or peel-and-stick vinyl
- Utility knife or craft knife
- Plastic smoothing tool or old gift card
- Measuring tape
- Optional casters for a rolling clothing rack
- Optional baskets, S-hooks, or lower shelf storage
How to Make a Rose Gold & Marble Clothing Rack on a Budget
Step 1: Choose the Right Rack Style
Before buying anything, decide how the rack will be used. A display rack for five pretty dresses can be light and decorative. A daily wardrobe rack holding coats, jeans, boots, and “just in case” sweaters needs more muscle. For heavier clothing, choose a sturdy pipe rack, a metal garment rack with a wide base, or a wall-mounted option anchored properly into studs.
Freestanding racks are flexible and renter-friendly. Rolling racks are ideal if you like rearranging your room at 11:47 p.m. because inspiration struck. Wall-mounted racks save floor space, but they require proper installation. If you are working with a narrow bedroom or studio apartment, a slim rack with a lower shelf is often the sweet spot.
Step 2: Prep the Metal for Paint
Paint prep is the difference between “custom furniture” and “why is my sleeve rose gold now?” Clean the metal frame first to remove dust, oil, stickers, or mystery garage residue. Lightly sand glossy surfaces so the paint has something to grip. Wipe everything dry before painting.
Use painter’s tape to cover wheels, screw threads, or areas you do not want painted. Work outside or in a well-ventilated area, and protect the floor with cardboard or a drop cloth. Spray paint has exactly one life goal: to travel farther than you think it will.
Step 3: Spray Paint in Thin Coats
Shake the can well, then apply light coats in a steady back-and-forth motion. Do not try to achieve full coverage in one pass. That is how drips happen, and drips are basically paint’s way of saying, “You got impatient.” Thin coats dry more evenly and create a smoother metallic finish.
Hold the can at the distance recommended on the product label, usually around 10 to 16 inches from the surface. Allow each coat to dry before adding the next. Depending on the original color of the rack, you may need two to four light coats. A clear protective topcoat can help reduce scratches, especially where hangers slide along the bar.
Step 4: Create the Faux Marble Base
Cut your base board to size. A good starting point is a base that is wider than the rack frame and deep enough to prevent tipping. Sand rough edges if needed. Clean the board thoroughly before applying contact paper because dust bumps under faux marble are not charming; they are tiny mountains of regret.
Measure the contact paper with a few extra inches on each side. Peel back a small section of the backing, align the vinyl carefully, and smooth as you go. Use a plastic smoother or old gift card to push out air bubbles. Work slowly. If you rush, the marble pattern may wrinkle, and suddenly your “luxury stone” looks like it survived a backpack.
Wrap the edges neatly and trim excess with a sharp utility knife. For corners, cut small diagonal relief slits so the vinyl folds cleanly. If the base will receive shoes, baskets, or daily use, consider adding a clear protective film or using a thicker peel-and-stick vinyl made for furniture and countertops.
Step 5: Attach the Rack to the Base
If you are building from pipe, use flanges to secure the vertical supports to the base. Mark the screw holes carefully, pre-drill if needed, and fasten everything firmly. If you are upgrading an existing rack, you may be able to attach the feet to the base with screws, pipe straps, or brackets depending on the design.
Add casters if you want a rolling clothing rack. Locking casters are especially useful because clothes are dramatic; they sway, pull, and occasionally attempt escape. Make sure the wheels are rated for the weight you expect to place on the rack.
Budget Tips That Make the Rack Look Expensive
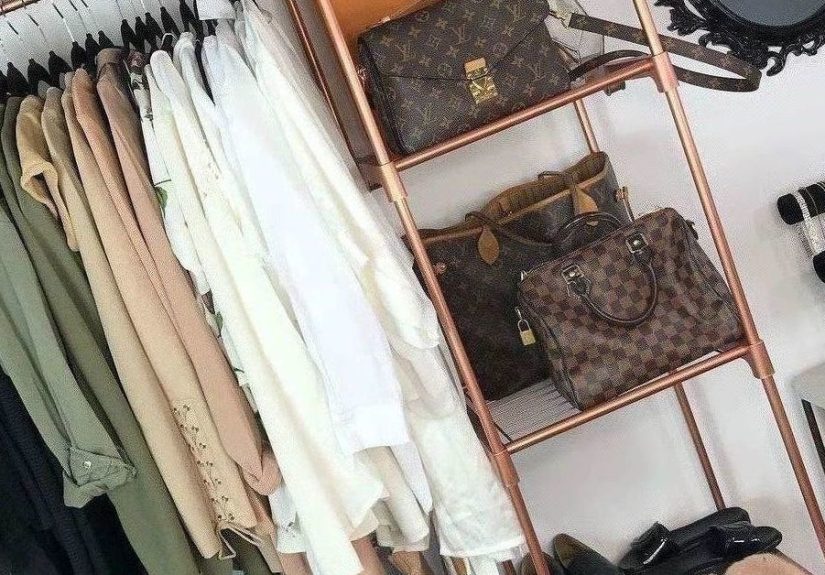
Use Faux Marble Strategically
You do not need marble everywhere. In fact, please do not marble everything unless your design goal is “Roman bathhouse meets craft aisle.” A marble base, lower shelf, or small side platform is enough to create the look. Keep the rest simple so the rose gold frame can shine.
Upgrade the Hangers
Matching hangers instantly make a budget clothing rack look more intentional. White velvet hangers, wood hangers, clear acrylic hangers, or slim blush hangers all pair nicely with rose gold. Mismatched plastic hangers can work in a real-life closet, but on an open rack, they tend to announce, “Laundry day happened and nobody recovered.”
Add Baskets Underneath
Use the lower marble base for woven baskets, shoe storage, folded jeans, handbags, or seasonal accessories. Baskets soften the metal and help hide small items. They also prevent the rack from becoming a public exhibit titled “The Many Socks of One Household.”
Keep the Color Palette Tight
Rose gold and marble already bring personality, so keep nearby colors simple. White, cream, blush, beige, soft gray, black, and warm wood tones work beautifully. Too many bright colors can make the rack feel busy, especially if your clothes are already colorful.
Best Places to Use a Rose Gold and Marble Clothing Rack
Bedroom
In a bedroom, this rack can hold weekly outfits, favorite pieces, or clothes you actually wear instead of the archaeological layers hiding in your closet. Place it near a mirror for a boutique dressing area. Add a small rug underneath to define the zone and make it feel finished.
Guest Room
A clothing rack is a thoughtful guest room upgrade, especially if the room does not have a closet. Add a few empty hangers, a basket for towels, and a small tray for jewelry or keys. Guests will feel like you planned ahead, which is always impressive even if you cleaned the room twelve minutes before they arrived.
Entryway
For an entryway, use the rack for coats, bags, hats, and scarves. Choose a sturdier frame if it will hold heavy jackets. A marble base can double as a shoe landing zone, while S-hooks can hold totes and umbrellas.
Small Apartment or Studio
In small apartments, visible storage must earn its place. A rose gold and marble rack looks decorative enough to live in the open. Use it as a mini closet, room divider, or capsule wardrobe station. Keep only your best and most-used items on display for a clean look.
Common Mistakes to Avoid
Choosing a Rack That Is Too Weak
Style matters, but structure wins. A flimsy rack overloaded with coats will wobble, sag, or give up emotionally. Choose strong materials and a balanced base. If you plan to hang heavy items, avoid thin decorative racks that are designed mainly for light garments.
Skipping Paint Prep
Metallic paint shows flaws. Clean, sand, and prime when needed. This extra effort helps the rose gold finish last longer and look smoother. It also reduces peeling where hangers rub against the rail.
Applying Contact Paper Too Quickly
Peel-and-stick marble is forgiving, but only to a point. Apply slowly, smooth continuously, and trim carefully. If bubbles appear, lift the vinyl gently and re-smooth. For stubborn tiny bubbles, a pinprick can release trapped air.
Ignoring Weight Distribution
Place heavier items near the sides or lower shelf when possible. Avoid hanging all heavy coats on one end. Balanced weight keeps the rack stable and prevents tipping, especially if you add wheels.
Styling Ideas for a Boutique Look
Once the rack is built, style it like a mini shop display. Hang clothing by color, type, or occasion. Keep the spacing breathable so each item looks selected, not squeezed into survival mode. Add a small plant, a framed print, a candle, or a jewelry tray nearby to make the area feel designed.
For a capsule wardrobe effect, display neutral tops, a blazer, jeans, one dress, and a few accessories. For a glam look, add satin pieces, cream knits, pearl accessories, and blush shoes. For a practical everyday rack, reserve one section for outfits you plan to wear during the week. Your mornings may not become magically peaceful, but at least your clothes will stop hiding from you.
Budget Breakdown: Where to Save and Where to Spend
Save money on the marble effect by using peel-and-stick vinyl instead of real stone. Save on the frame by repurposing a thrifted rack, secondhand garment rack, or leftover pipe. Save on accessories by using baskets you already own.
Spend a little more on the paint, screws, brackets, and wheels. Cheap paint may look dull or scratch easily. Weak hardware can compromise stability. If the rack will be used every day, invest in the parts that affect durability. The goal is not just a pretty rack; it is a pretty rack that does not collapse during sweater season.
Care and Maintenance
To keep the rose gold finish fresh, avoid dragging metal hangers across the bar. Use smooth hangers and lift them when moving clothing. Dust the rack regularly with a soft cloth. If the painted finish gets scratched, lightly sand the spot and touch it up with leftover paint.
Clean the faux marble base with a damp cloth and mild soap. Avoid harsh cleaners, abrasive pads, or excessive water around seams. If an edge of the contact paper lifts, smooth it back down with gentle heat from a hair dryer and press firmly.
Experience Notes: What It’s Really Like to Build and Use One
Making a rose gold and marble clothing rack on a budget is one of those projects that looks simple online and then teaches you several tiny life lessons. The first lesson is that metallic spray paint has a personality. It wants patience, light coats, and good weather. Try to force it, and it will reward you with drips, fingerprints, and one suspiciously dull patch that appears only after you proudly call someone over to admire your work.
The second lesson is that faux marble contact paper can look shockingly good when applied slowly. The trick is to treat it less like wrapping a gift and more like installing a tiny countertop. Start from one edge, peel the backing gradually, and smooth every few inches. If the pattern has gray veining, align the most attractive section where it will be seen most. Nobody needs to know the underside looks like a raccoon wrapped it during a power outage.
One of the best practical experiences with this project is discovering how much a rack changes your routine. When clothes are visible, you make faster choices. You remember the jacket you forgot you owned. You stop burying your favorite dress behind winter coats. A clothing rack can become a weekly outfit station, which is especially helpful if mornings usually involve staring into the closet like it owes you money.
The rack also encourages editing. Because open storage is visible, it naturally asks, “Do you really need six almost-identical black tops here?” This is annoying but useful. A budget clothing rack works best when it holds a curated selection: current-season favorites, work outfits, guest coats, or special pieces that deserve breathing room. Overload it, and the boutique effect disappears faster than a missing sock.
Another real-world tip: use the base. The marble shelf is not just decorative. It can hold shoes, folded sweaters, storage baskets, handbags, or a small box for lint rollers and fabric spray. If the rack is in a guest room, the base can hold towels and slippers. If it is in an entryway, it can hold shoes and a basket for scarves. That bottom zone is prime real estate, so do not let it become a random pile unless “chaotic boutique clearance bin” is your theme.
Durability depends on how honestly you build for your lifestyle. If you own mostly lightweight blouses, a simple rack is fine. If you own wool coats, denim jackets, and enough sweaters to outfit a cozy village, build stronger. Choose a wide base, secure fasteners, and consider pipe construction. A beautiful rack that wobbles every time you touch it will make you nervous, and furniture should not feel like a trust exercise.
The biggest design win is that rose gold and marble can make a low-cost project look intentional. Even a plain metal rack becomes special when the finish is consistent, the hangers match, and the base looks polished. The result feels custom, not crafty. And that is the sweet spot of budget DIY: spending less without looking like you spent less.
In the end, this project is perfect for anyone who wants more storage, better organization, and a little glam without committing to expensive furniture. It is renter-friendly, customizable, and forgiving enough for beginners. Plus, every time someone compliments it, you get the rare joy of saying, “Thanks, I made it,” while pretending you were calm and graceful the entire time.
Conclusion
A rose gold and marble clothing rack on a budget is proof that practical storage does not have to look boring. With a sturdy frame, rose gold metallic paint, and a faux marble base, you can create a stylish clothing rack that works for bedrooms, guest rooms, apartments, entryways, and small closets. The key is to focus on stability first, finish second, and styling third. Choose materials that can handle your wardrobe, prep surfaces properly, apply paint and contact paper patiently, and keep the final display clean and curated.
This project is affordable, customizable, and surprisingly satisfying. It gives you extra hanging space, improves organization, and adds a polished decor element to your home. Whether you use it for a capsule wardrobe, guest storage, outfit planning, or a tiny boutique corner, the rose gold and marble combination delivers a high-end look without requiring a high-end budget. Your closet may still contain mysteries, but at least the rack will look fabulous.


