Table of Contents >> Show >> Hide
- Why Cake Pops Fail (and How We’ll Make Yours Behave)
- Ingredients and Tools
- Step-by-Step: DIY Shrunken Head Cake Pops
- Step 1: Bake, Cool, and Crumble the Cake
- Step 2: Add FrostingBut Don’t Overdo It
- Step 3: Shape the Heads (Not Just Balls)
- Step 4: Insert the Sticks the Smart Way
- Step 5: Dip and Coat (Smooth, Not Gloppy)
- Step 6: Create the Shrunken Face (Wrinkles = Character)
- Step 7: Eyes, Mouth, and “This Guy Has Stories” Expression
- Step 8: Hair That Looks Wild (But Doesn’t Taste Like Craft Store)
- Make It Feel Like Beetlejuice Without Getting Gross
- Troubleshooting: Save the Pops Before They Save Themselves
- Make-Ahead, Storage, and Party Logistics
- Variations for Different Diets (and Different Levels of Chaos)
- Serving Ideas: Movie Night, Halloween Parties, and “Say It Three Times” Dessert Bars
- Real-Kitchen Notes: What Making These Usually Feels Like (500+ Words of Experience)
- Conclusion
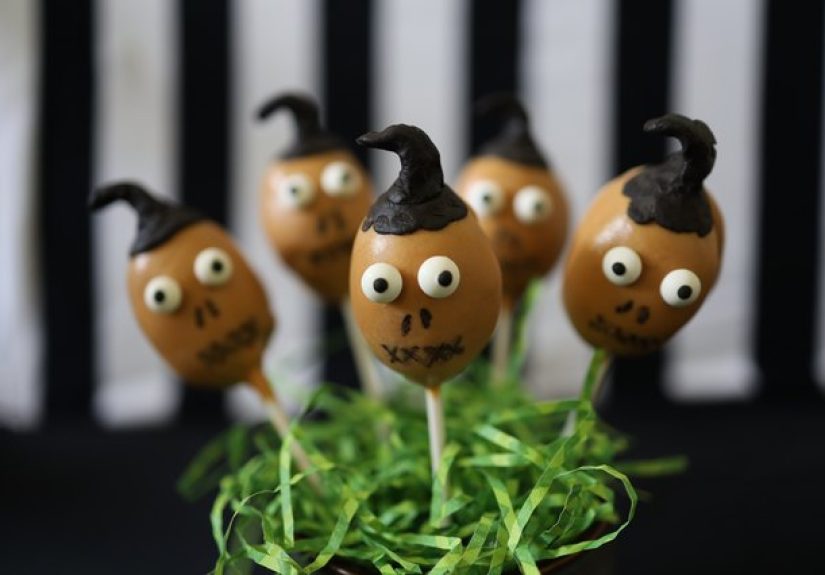
If your Halloween dessert table is looking a little… alive, it’s time to send it to the Netherworld. Inspired by the iconic
shrunken-head vibe from Beetlejuice, these DIY shrunken head cake pops are creepy-cute, party-friendly, and surprisingly
doableeven if your usual baking style is “panic, then add sprinkles.”
This guide walks you through the cake pop science (so they don’t fall off the stick like a tragic popsicle),
the decorating strategy (wrinkles without rage), and the storage/game plan (because Halloween
schedules are chaos in a cardigan). You’ll end up with treats that look like they just shuffled out of the waiting roomonly
sweeter, smaller, and significantly less likely to steal your number.
Why Cake Pops Fail (and How We’ll Make Yours Behave)
Cake pops look simple: cake + frosting + stick + dip. In reality, they’re a tiny engineering project with frosting as the
building permit. Here’s what usually goes wrongand the fixes baked into this tutorial:
-
Too much frosting: The mixture turns greasy and heavy, and the pop slides off the stick. We’ll use just enough
binder to hold together when pressed. - Too big: Oversized pops wobble, crack, and fall. We’ll keep heads small-to-medium so gravity doesn’t win.
- Coating too thick: Thick candy coating creates lumps and drips. We’ll melt properly and thin only if needed.
- Temperature drama: Warm hands + cold pops + humid air = condensation and cracking. We’ll use a chill-and-rest rhythm.
Think of it like special effects: the best results come from controlled conditions, a little patience, and pretending you meant
it to look spooky if anything turns weird.
Ingredients and Tools
Base Ingredients (Choose Your Level of Effort)
- Option A (Classic): 1 baked cake (homemade or boxed mix), cooled completely
- Option B (Shortcut): Doughnut holes (for a quick, uniform “head” base)
- Binder: Buttercream frosting (homemade or store-bought). Cream cheese frosting works, but requires stricter chilling.
- Coating: Candy melts (recommended) or melted chocolate/almond bark
- Coloring: Gel food coloring (brown, black, a little green), plus optional edible dusts
Decorating Ingredients (For the “Shrunken Head” Look)
- Fondant or modeling chocolate (for facial features and wrinkles)
- Edible marker (for fine lines, stubble, and “I’ve seen things” eye details)
- Hair options: chocolate sprinkles, toasted coconut, spun sugar, or very thin strands of pulled taffy (advanced)
- Texture options: cocoa powder, crushed cookie crumbs, or cinnamon for grime/shading
Tools That Make Life Easier
- Lollipop sticks
- Foam block or a box with holes (to hold pops upright)
- Deep microwave-safe cup or narrow bowl for dipping
- Small cookie scoop (for consistent sizing)
- Toothpicks and a small paring knife (wrinkles, nostrils, and general mischief)
- Parchment paper
Step-by-Step: DIY Shrunken Head Cake Pops
Step 1: Bake, Cool, and Crumble the Cake
Bake your cake and let it cool completely. Fully cooled cake crumbles cleanly and won’t melt your frosting into a sad paste.
Crumble into fine crumbs using clean hands or a stand mixer on low.
Step 2: Add FrostingBut Don’t Overdo It
Add frosting gradually (start small), mixing until the crumbs hold together when you squeeze a handful. You want a texture
like damp sand: packable, not greasy. If it feels slick or oily, you added too muchfix by mixing in more plain cake crumbs.
Pro tip: If you’re going for “shrunken,” slightly drier cake pop dough is your friend. It holds sculpted wrinkles
better and won’t slump after dipping.
Step 3: Shape the Heads (Not Just Balls)
Scoop portions and roll lightly into balls first. Then shape each into a slightly oval head: narrower at the chin, fuller at
the foreheadlike a tiny spooky potato with ambition.
- Classic head: oval with a defined chin
- Extra “shrunken”: slightly flattened sides and a more prominent brow ridge
Place shaped heads on a parchment-lined tray. Chill for 20–30 minutes until firm (or freeze 10 minutes). You want “stable,” not “ice rock.”
Step 4: Insert the Sticks the Smart Way
Melt a small amount of coating. Dip the tip of each stick into melted coating, then insert it about halfway into the base of each head.
This “glue” step matters. Chill again for 10–15 minutes so the stick sets securely.
Step 5: Dip and Coat (Smooth, Not Gloppy)
Melt candy melts in short bursts, stirring between rounds. Use a deep cup so you can submerge the head cleanly.
Dip straight down, lift straight up, and gently tap off excesstoo much coating hides your face details and makes the pop heavy.
If your coating is thick, you can thin it with a small amount of vegetable oil or shortening (tiny additions). Your goal is a silky coat that flows, not a mud mask.
Stand the pops upright in a foam block and let the coating set. If your kitchen is warm, give them a short chill, then let them set at cool room temperature
to reduce condensation.
Step 6: Create the Shrunken Face (Wrinkles = Character)
Once the base coat is set, it’s time to go full creature workshoponly with sugar. Choose one of these methods:
Method A: Fondant Face Layer (Most Controlled)
- Roll a thin sheet of fondant (skin-toned or light brown).
- Wrap it over the front of the head like a “face mask,” smoothing lightly.
- Use a toothpick to press in eye sockets, a small nose ridge, and a mouth line.
- Add wrinkles by gently pinching and pressing shallow folds into the fondant (forehead, cheeks, around the mouth).
Method B: Carved Wrinkles in the Coating (Fast, More Rustic)
- Use an edible marker for wrinkle lines and shading.
- Use a toothpick to scratch tiny creases into the coating (go lightdeep gouges can crack).
- Dust cocoa powder lightly into the creases for depth.
Face detail cheat code: Put most of your effort into the brow ridge and mouth area. Those two zones
instantly read as “face,” even if the nose is basically a suggestion.
Step 7: Eyes, Mouth, and “This Guy Has Stories” Expression
-
Eyes: Press two small indentations. Add tiny fondant dots (off-white) or paint with edible marker highlights.
A slightly uneven gaze makes it creepier (and also forgives symmetry issues). - Nose: A small fondant triangle smoothed into the face works. Add nostrils with a toothpick.
- Mouth: A thin curved line plus a few vertical “crack” lines reads as chapped lips. Add shading under the lower lip.
Step 8: Hair That Looks Wild (But Doesn’t Taste Like Craft Store)
Keep everything edible and party-safe. Pick one:
- Chocolate sprinkles: easiest, classic “stringy” effect
- Toasted coconut strands: tint with cocoa/cinnamon for messy, wiry hair
- Thin piped chocolate lines: pipe messy strands and let set
Add hair while any small “glue” dots of melted coating are still tacky, or brush a tiny amount of melted coating where you want hair to stick.
Make It Feel Like Beetlejuice Without Getting Gross
The movie’s aesthetic is equal parts spooky and ridiculouslean into that. Your cake pops should feel like they belong at a
Halloween movie night, not a medical textbook.
- Color palette: warm brown + a touch of green-gray shading (think “dusty attic,” not “radioactive swamp”).
- Texture: emphasize wrinkles and dryness with cocoa powder or cookie dust.
- Finish: a matte look is more convincing than glossy; let coatings set fully before adding dusts.
If you’re serving kids (or squeamish adults), keep it playful: goofy eyes, exaggerated eyebrows, and cartoon wrinkles. Horror-lite, not horror-nightmare.
Troubleshooting: Save the Pops Before They Save Themselves
Problem: The Head Falls Off the Stick
- Heads are too large or too heavy. Make smaller portions next time.
- You skipped the “dip stick tip in coating” step, so there’s no edible glue.
- The mixture is too greasy from excess frostingadd more cake crumbs and re-roll.
Problem: Cracks in the Coating
- Big temperature swings can cause cracks (very cold center + warm coating).
- Let pops sit a few minutes after chilling before dipping.
- Don’t freeze rock-hard right before dipping unless your room is cool and dry.
Problem: Lumpy, Thick Coating
- Stir more while melting; melt slowly.
- Use a deeper cup for cleaner dips and less swirling chaos.
- If needed, thin candy melts slightly (tiny additions of oil/shortening).
Problem: Sweating/Condensation
- Happens when cold pops meet humid air. Chill briefly, then let them rest in a cool spot.
- Avoid sealing freshly chilled pops in an airtight container until fully dry.
Make-Ahead, Storage, and Party Logistics
Cake pops are basically made for planning ahead. Here’s a low-stress timeline:
- Day 1: Bake cake, cool, crumble, mix, shape heads. Chill or freeze heads (not dipped yet).
- Day 2: Insert sticks, dip, decorate, and let set. Store appropriately.
Storage notes: If your frosting is a standard buttercream and your room is cool, short room-temperature holding is often fine.
If you used cream cheese frosting or your environment is warm, refrigerate. For serving, follow common food-safety practice:
don’t leave perishable treats sitting out for long stretches.
Transport tip: Poke holes in a clean cardboard box, place sticks through the holes so heads float above the base, and close the lid.
It’s like a tiny hearse for desserts. Respectfully.
Variations for Different Diets (and Different Levels of Chaos)
Gluten-Free
Use a gluten-free cake mix and a simple buttercream. Keep the mixture slightly on the firm side; GF cakes can sometimes crumble differently,
so add frosting gradually and test the “squeeze holds shape” rule.
Vegan
Choose a vegan cake and vegan frosting, then coat with dairy-free melting wafers or vegan chocolate. For details, use vegan-friendly fondant or modeling chocolate.
Super-Shortcut (Still Cute)
Use doughnut holes as the head base, dip, then add a thin “face” layer of fondant and decorate. It’s fast, consistent, and great for batch-making.
Serving Ideas: Movie Night, Halloween Parties, and “Say It Three Times” Dessert Bars
- Beetlejuice movie night: Pair with striped napkins, black-and-white candies, and a “Netherworld Snacks” sign.
- Halloween party platter: Arrange pops on crushed cookie “dirt” with candy bones (playful spooky, not graphic).
- Dessert bar: Offer different hair toppings so guests can “style” their own shrunken head.
Final move: label them something cheeky like “Shrunken Head Pops (Do Not Summon).” People love a dessert with a warning label.
Real-Kitchen Notes: What Making These Usually Feels Like (500+ Words of Experience)
Let’s talk about the part no one puts in the pretty photos: the real-life experience of making shrunken head cake pops.
Not the highlight reelthe honest, funny, “why is my kitchen sticky?” version that most home bakers recognize immediately.
First, expect the process to feel like two different hobbies taped together. The beginning is pure baking comfort: cake smell, crumbs everywhere,
and that oddly satisfying moment when the mixture finally holds together. Then you cross a line and suddenly you’re doing edible sculpture,
squinting at a tiny face like you’re auditioning for a miniature makeup department.
A common surprise is how much hand temperature matters. Warm hands can soften the cake mixture fast, especially if your kitchen is warm
or you’re making a big batch. Many people find they naturally develop a rhythm: roll a few heads, chill them, roll a few more, chill again.
If you try to shape all heads at once without chilling breaks, the last ones can turn into mushy ovals that refuse to keep their “chin.”
The good news is that “shrunken” is forgivingslight weirdness reads as intentional. That’s practically the whole aesthetic.
Decorating is where the fun-and-frustration ratio spikes. When you start adding wrinkles, you’ll probably discover that
less is more. A few strong creases (brow, cheeks, mouth corners) look better than a thousand tiny scratches that make the head look
dirty rather than detailed. Many bakers find that using an edible marker for fine lines feels easier than carving everything with a toothpick,
because you can build shadows gradually. It’s like drawing with snacksvery empowering.
Hair is another “experience.” People often assume hair will be simple, then realize it’s the one detail that can instantly go from “wild” to “mess.”
Chocolate sprinkles are the easiest win: they look like wiry strands and taste good. Toasted coconut gives a more realistic stringy texture, but you’ll want
to tint it so it doesn’t scream “tropical vacation” on a haunted head. A light dusting of cocoa powder or cinnamon usually gets it into the right spooky zone.
If you pipe chocolate strands, you may notice your lines start confident and end… emotionally exhausted. That’s normal. Start with a few bold strands and stop
before your hand cramps into a permanent claw.
The dipping stage is the moment most people describe as “a little dramatic.” If your coating is too thick, you’ll see it immediately: the head looks like it’s
wearing a winter coat, and your face details disappear. If your coating is too hot, it can slide, pool, or melt the surface. Many home bakers get the best result
by melting slowly, stirring a lot, and using a deep cup so the dip is quick and clean. Tapping off excess feels risky at firstlike you’re about to launch the head
across the roombut once you get the hang of a gentle tap, the finish looks smoother and more professional.
Finally, expect a strange emotional arc: you’ll start out confident, then hit a point where you wonder if you’ve created a batch of tiny haunted walnuts,
and thensomewhere around the moment you add shading and haireverything suddenly clicks. The faces become expressive. The wrinkles look intentional.
The whole tray starts to feel like a themed dessert set piece instead of random cake on sticks. That “it finally looks right” moment is exactly why people
keep making character cake pops: it’s messy, goofy, and oddly satisfying in a way that regular cupcakes can’t compete with.
If one or two pops look especially chaotic, don’t toss them. Put them front and center. Every batch deserves a “main character,” and in the Beetlejuice universe,
being a little unhinged is basically a requirement.
Conclusion
DIY shrunken head cake pops are the perfect Beetlejuice-inspired treat: spooky, funny, and totally customizable for your party vibe.
Keep the heads small, the coating smooth, the wrinkles intentional, and the hair edible. With a little planning (and a lot of giggling),
you’ll have a tray of cake pops that look like they wandered in from the Netherworldjust in time for dessert.


