Table of Contents >> Show >> Hide
- Why a Wall-Mounted Knife Rack Works in a Small Kitchen
- Pick Your Style: Slotted Rack vs. Hidden-Magnet Wood Bar
- Quick Planning: Size, Capacity, and Placement
- Materials & Tools (With Smart Substitutions)
- Build Option A: The Simple Slotted (Kerf) Knife Rack
- Build Option B: The Hidden-Magnet Wood Knife Bar (Sleek + Space-Saving)
- Finishing Without the Fuss
- Mounting It Like You Actually Want It to Stay Up
- Knife Safety & Daily Use Tips (Tiny Habits, Big Difference)
- Troubleshooting: Common “Oops” Moments and Fixes
- FAQ
- Conclusion: Small Kitchen, Big Upgrade
- DIYer Experiences & Lessons Learned (An Extra of Real-World Wisdom)
If your countertop is the size of a paperback and your knife block is out here acting like it pays rent,
it’s time to go vertical. A wall-mounted wooden knife rack gives you back precious prep space, keeps blades
easy to grab, and makes your kitchen feel oddly… competent. Like you alphabetize your spices for fun.
(No judgment. We’ve all been there. Once.)
This guide walks you through two space-saving builds: a simple slotted (kerf) rack and a
hidden-magnet wooden knife bar. Both are beginner-friendly woodworking projects with big
“why didn’t I do this sooner?” energyespecially in a small kitchen where every inch matters.
Why a Wall-Mounted Knife Rack Works in a Small Kitchen
A wall-mounted knife holder solves three common small-kitchen problems at once: clutter, accessibility,
and that mysterious “why are my drawers always jammed?” situation.
- It frees counter space for prep (and for the emotional support toaster oven).
- It reduces drawer chaos by keeping knives out of the “everything drawer” ecosystem.
- It encourages safer storage than loose blades rattling around in a drawer.
Bonus: when knives are stored clean and dry, you’re less likely to trap moisture in tight spaces. That’s
good for the steel and good for your sanity.
Pick Your Style: Slotted Rack vs. Hidden-Magnet Wood Bar
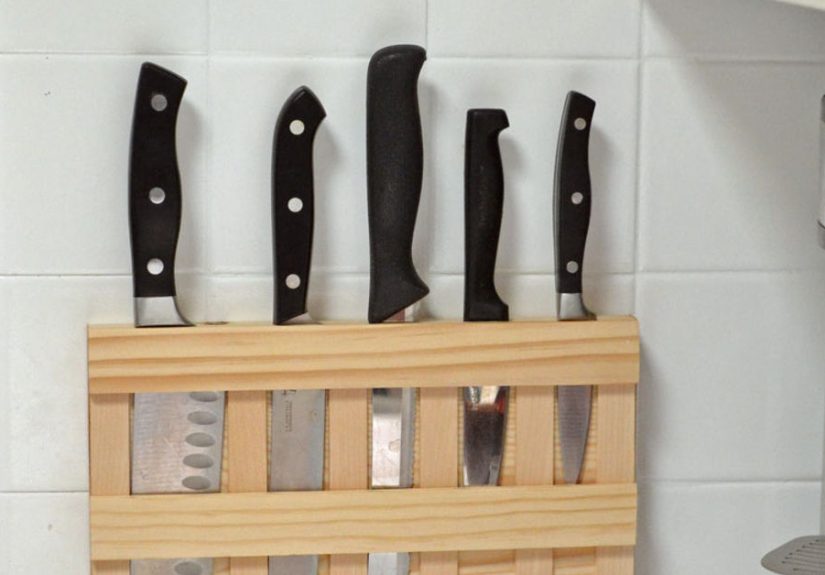
Option A: Slotted (Kerf) Wooden Knife Rack
Think “knife block, but wall-mounted.” You cut narrow slots (kerfs) into a hardwood board and slide the
blades in. It’s straightforward, quiet, and doesn’t care whether your knives are magnetic.
- Best for: mixed knife sets, non-magnetic blades, extra security.
- Trade-off: you’ll need to size slots to your knife thickness and keep them clean.
Option B: Hidden-Magnet Wooden Knife Strip
This is the fan favorite: a sleek wood bar that holds knives with magnets hidden inside the wood. The result
looks like modern kitchen décor, but it’s secretly a very strong opinion about organization.
- Best for: small kitchens, fast access, minimalist looks.
- Trade-off: not all “stainless” knives are equally magnetic (alloy matters), so test first.
Quick Planning: Size, Capacity, and Placement
Before you cut wood (or confidence), decide these three things:
-
Length: An 18–24 inch rack is a sweet spot for most small kitchens. It typically holds
6–10 knives comfortably if you space handles so they don’t overlap like awkward party guests. -
Location: Place it where you prep, but not where steam and splatter live full-time.
Avoid directly next to the stove if possible. -
Safety: Consider kids, pets who believe counters are a suggestion, and guests who like to
“help” by grabbing sharp objects.
Materials & Tools (With Smart Substitutions)
Wood
Choose a stable hardwood like maple, walnut, cherry, or oak. You can also use high-quality plywood for a
painted rack, but hardwood gives the nicest feel and durability.
Hardware for Mounting
- Best: screws into wall studs (reliable and drama-free).
- If studs aren’t an option: heavy-duty wall anchors rated for the load (but read the fine print).
- Optional upgrade: a French cleat for easy removal and rock-solid support.
For the Hidden-Magnet Build
- Rare-earth magnets (disc magnets are common for embedding).
- Epoxy (or another strong adhesive suited for magnets/wood).
- Forstner bit (clean recesses) or a router setup for flat-bottom pockets.
Tools
- Measuring tape, pencil, square, clamps
- Drill/driver and bits
- Sandpaper (120/180/220 grit)
- Option A: table saw or circular saw + guide (for kerfs)
- Option B: Forstner bit set (for magnet recesses)
Safety note: If you’re using a table saw, use a push stick and keep hands out of the line of cut.
Also: wood dust is not “seasoning” for your lungsuse ventilation and a mask when sanding/cutting.
Build Option A: The Simple Slotted (Kerf) Knife Rack
Recommended specs
- Board size: ~18″–24″ long, 3.5″–5″ tall, 3/4″ thick
- Kerf depth: ~1/2″ (enough to capture the blade safely)
- Slot spacing: ~3/4″–1.25″ depending on your knives
Step-by-step
-
Cut and square your board.
Cut to length, then check the ends are square. Small kitchens deserve straight lines too. -
Layout the slots.
Mark slot lines across the face. Put your widest chef’s knife and bread knife at the ends so they don’t bully the smaller knives. -
Cut kerfs.
Using a table saw: set blade height to ~1/2″ and use a stop block for consistent slot placement.
Without a table saw: use a circular saw + guide, or a handsaw + miter box if you’re feeling old-school. -
Add a bottom “catch” (optional but smart).
Glue and pin a thin strip along the bottom edge as a lip so the blade can’t slide downward if someone bumps the rack. -
Sand and soften edges.
Break sharp corners with 180–220 grit. Nobody wants a knife rack that also shaves knuckles. -
Finish.
Use a light oil/wax finish (details below) and let it cure as recommended.
Build Option B: The Hidden-Magnet Wood Knife Bar (Sleek + Space-Saving)
Recommended specs
- Board size: ~18″–24″ long, 2.5″–4″ tall, 3/4″–1″ thick
- Magnet coverage: multiple magnets across the length for even holding power
- Wood over magnets: keep a thin “skin” so knives hold well but magnets don’t contact blades
Step-by-step
-
Test your knives first.
Some stainless alloys are less magnetic than others. If a blade barely sticks to a fridge magnet, don’t bet your fingers on it. -
Mark magnet layout.
On the back of the board, draw a centerline and mark magnet positions. Use more magnets where heavier knives will live. -
Drill recesses.
Use a Forstner bit to drill flat-bottom pockets. Aim to leave a consistent thickness of wood on the front face.
(Tip: sneak up on depthgo shallow, test, then deepen if needed.) -
Dry fit everything.
Drop magnets in the holes to confirm they sit flat. A magnet that’s tilted will create weird “hot spots” in holding power. -
Glue magnets in place.
Use epoxy (common choice for magnets). Keep all magnets oriented the same way so they don’t fight each other like rival siblings. -
Seal the back.
Cover the magnet pockets with a thin wood strip, veneer, or a backer board. This protects magnets and looks cleaner. -
Sand and finish.
Smooth the face and edges; apply your finish and let it cure.
Pro handling tip: When placing a knife on a magnetic rack, touch the spine first and then roll the blade gently toward the magnet.
It’s quieter, steadier, and less likely to smack the edge against the rack.
Finishing Without the Fuss
Your rack doesn’t touch food, but it does touch bladesand it lives in a kitchen, where water and grease are basically roommates.
Choose a finish that’s easy to renew and doesn’t get gummy.
Easy, kitchen-friendly finish options
-
Mineral oil + wax blend: wipe on, buff off; easy to refresh.
Great if you want a natural feel and minimal smell. -
Tung oil (or similar curing oil): more durable than straight mineral oil, but needs cure time.
Apply thin coats and be patient. - Hardwax oil or wipe-on blends: durable and pleasant to maintain, but follow manufacturer cure times closely.
Important: Oily rags can be a fire risk if wadded up. Lay them flat to dry or follow your local disposal guidance.
(Yes, even for a “small project.” Fire does not care about your project size.)
Mounting It Like You Actually Want It to Stay Up
A wall-mounted knife rack is not the place to “see if adhesive strips can handle it.” Use studs when you can.
If you can’t, use anchors rated for the loadthen give yourself a safety margin because knives are sharp and gravity is relentless.
Stud-mounted install (recommended)
- Find studs with a stud finder (electronic or magnetic) or by tapping for sound changes.
- Mark height so handles are easy to reach but blades aren’t in the splash zone.
- Pre-drill to avoid splitting the wood.
- Level it (your eyes lie; levels don’t).
- Screw into studs with appropriate-length screws for your rack thickness.
No-stud install (only if necessary)
If studs aren’t available where the rack must go, choose heavy-duty anchors designed for drywall and follow the instructions precisely.
Also: consider a shorter rack (lighter load) or relocate the rack to a stud-friendly spot like between cabinets.
Knife Safety & Daily Use Tips (Tiny Habits, Big Difference)
- Store knives clean and dry. Moisture is the enemy of steel and the friend of mystery spots.
- Magnetic rack technique: spine first, then roll the blade onto the magnet; reverse that motion to remove.
- Give each knife personal space. Crowded blades can knock together and dull faster.
- Keep it out of reach of kids. If you wouldn’t hang a cactus at toddler eye level, don’t hang a chef’s knife there either.
Troubleshooting: Common “Oops” Moments and Fixes
“My knives don’t stick well to the magnet rack.”
Two common causes: your knives aren’t very magnetic (some stainless alloys aren’t), or the magnets are too far from the face.
Fix by increasing magnet coverage, moving magnets closer to the face (carefully), or switching to the slotted rack.
“The rack feels wobbly.”
Wobble usually means the mounting isn’t solidmissed studs, under-rated anchors, or screws not biting well.
Re-mount into studs, add a French cleat, or upgrade anchors.
“My rack looks… dry.”
If you used an oil/wax finish, refresh with a light wipe and buff. Wood in kitchens tends to appreciate occasional reconditioning.
FAQ
Is a wooden magnetic knife strip safe for expensive knives?
Yeswhen used correctly. Place the spine first and avoid “slapping” the edge onto the rack. A wood face can also be gentler than exposed metal strips.
Can I mount a knife rack inside a cabinet door?
Often, yesespecially in very small kitchens. Make sure the door hardware can handle the added weight and that knives won’t hit shelves when closing.
For safety, still mount securely with appropriate hardware.
How many knives can I store?
A typical 18–24 inch rack holds about 6–10 knives, depending on handle size and spacing. If your set is larger,
consider two shorter racks (one for daily knives, one for “special occasion” blades).
Conclusion: Small Kitchen, Big Upgrade
A DIY wall-mounted wooden knife rack is one of those rare projects that’s genuinely practical, looks great, and costs way less than a “designer storage solution”
that’s basically a plank with a marketing budget. Pick the slotted rack if you want universal compatibility, or go hidden-magnet if you want sleek, modern,
and satisfying “click” placement (minus the edge damage).
Either way, you’ll save space, reduce clutter, and stop playing countertop Tetris every time you cook. That alone deserves a slow clap.
DIYer Experiences & Lessons Learned (An Extra of Real-World Wisdom)
The first time most people build a wall-mounted knife rack, the surprise isn’t the woodworkingit’s the “life logistics.”
You can cut perfect joinery and still end up staring at a finished rack thinking, “Wait… where do I actually put this so it doesn’t become a hazard?”
That’s normal. Small kitchens are full of competing priorities: prep space, splash zones, outlet locations, cabinet doors that swing like they’re auditioning
for a WWE entrance. The rack has to live peacefully in that ecosystem.
One common “aha” moment: height matters more than you think. Mount it too low and you’ll bump handles with bowls, cutting boards,
and your own elbows. Mount it too high and you’ll do that awkward tiptoe reach that turns dinner prep into a balance exercise. Many DIYers land on a
sweet spot where the handles are easy to grab with a relaxed arm, but the blades sit above the busiest counter chaos. If kids are around,
the sweet spot shifts higherbecause curiosity plus sharp metal is not a fun math problem.
Another real-world lesson: magnet racks feel different than you expect. People assume the magnet does all the work instantly.
In practice, the best racks feel “predictable,” not aggressive. That’s why the spine-first technique is such a game changer: it makes placement feel controlled,
avoids edge contact, and reduces that loud clack that makes everyone in the house ask, “Everything okay in there?” DIYers who embed multiple magnets
(instead of relying on a few super-strong ones) often report a better experience because the holding power is distributed across the blade instead of concentrated
in one tiny spot.
Then there’s the topic nobody brags about on social media: cleaning. Slotted racks can collect dust and kitchen residue over time,
especially if you store knives that weren’t fully dry. The fix is simplewipe knives before storage and occasionally run a thin cloth (or a folded paper towel)
through the slots. Magnetic racks are easier to wipe down, but they still benefit from a quick clean now and then because kitchens are basically grease
laboratories disguised as cozy spaces.
A surprisingly satisfying “experience upgrade” is building in intentional spacing. DIYers who rush the layout sometimes cram knives together,
and then handles overlap, blades bump, and the rack becomes annoying to use. Leaving a little breathing room makes the rack feel premiumeven if you made it
from a leftover piece of maple and pure stubbornness. A good rule: give your most-used knife and your biggest knife the best parking spots. You’ll reach for them
constantly, so they shouldn’t require a puzzle-solving session.
Finally, the most universal lesson: mounting is the main event. People will spend an hour debating walnut versus cherry and then use mystery screws
they found in a junk drawer. Don’t. A knife rack is a “load + leverage + sharp objects” situation. Mount into studs when possible, use quality hardware,
and check for wobble before you trust it. Once it’s up, though? The daily payoff is real: more counter space, faster cooking flow, and the quiet satisfaction of
seeing your knives lined up like a tiny stainless-steel choir, ready to sing the song of dinner.


